rll
-
Posts
91 -
Joined
-
Last visited
Content Type
Forums
Events
Gallery
Everything posted by rll
-
If memory serves me correctly, 1600 is the crossover frequency.
-
They do look interesting, curious to know if you have seen or used them yet and what you think? As you can see, I've done almost the same thing as what you are doing. Shoot, we even have the same counter. http://community.klipsch.com/forums/storage/6/1307534/DSCN1288.JPG
-
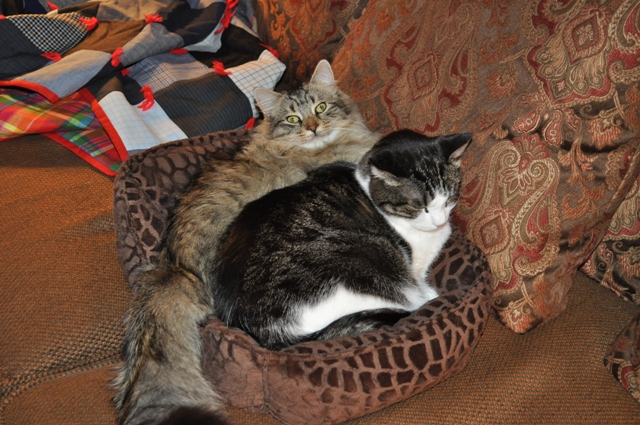
Beenie and Sam, my Christmas present from my wife a year ago. He's a real character.

-
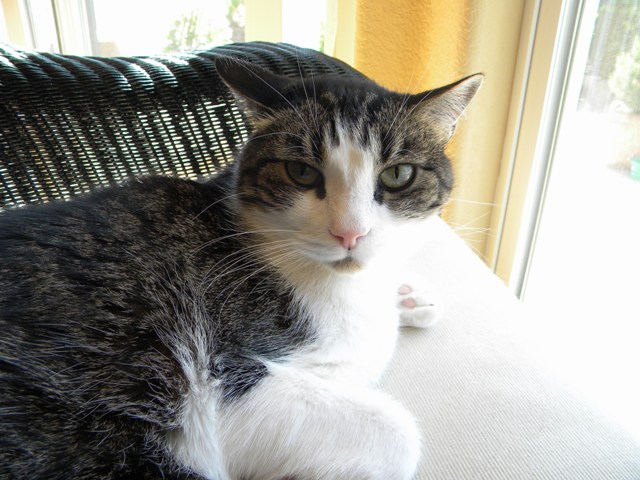
Beenie, who we've had for almost eight years.
-
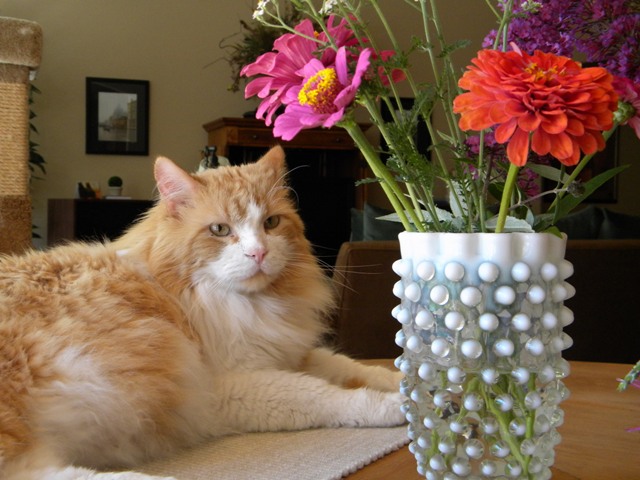
My best buddy Andy, who we suddenly lost almost a year ago. He was a great cat, very gentle soul. Believe he had a lot of Norwegian Forest Cat in him. He loved people.
-
Bob and Michael Crites have many friends here. This morning I was poking around their web site when I saw they lost Casey, their friend and company dog, this past Wednesday. Having lost my good buddy Andy, a Marmalade Norwegian Forest Cat in November, I know how much it hurts, and I'm sure many of you do too. I still get teary thinking about him. But it also helped hearing from friends, so I'd like to pass on to Bob and Michael my sincerest sympathies. I'm sure Casey had a wonderful life. Randy
-
Ahhh, nicely done.
-
I experimented some with that trimmer and was afraid of doing just what you did, so I took the plunge and bought a router (rather than continuing to borrow my neighbor's). It's come in handy for some other things, and is fun to learn how to use and the things it can do. Early in his Cornwall thread, Marshall walks through his process for the patch. Granted, his patch was to the substrate, but it may provide some ideas. Other than that, I do not have enough experience. I'm afraid I don't have enough experience finishing to provide any more than general advice. There are so many variables, so continue to take your time and practice to find what you are looking for. Regarding your concern that stain might make the finish too dark - you can control the darkness or depth to a great extent with the amout of time you leave each wipe on the surface before wiping off. Many short intervals will allow you to slowly build it to what you desire. Remember this, once you've finished staining, it does little good to go back later and add more, once it dries, the pores of the wood won't accept more stain. So if you decide to stain, set aside plenty of time for howver many coats/cycles of the wipe-on/wipe-off process may be needed. Randy
-
Very good job matching the grain on the panels. It's in the details. Too late for you now, but if you have a router and a flush trim bit with a bottom bearing, you can make quick work of trimming veneer, much better than what you used. As for finish, I built some walnut Cornscalas a year and a half ago following this tutorial when it came to finish: http://forums.klipsch.com/forums/t/117315.aspx Stained first with Minwax Gunstock, a wipe on and wipe off, followed right away with a wipe on and wipe off of a 70-30 mix of Minwax Gunstock and Special Walnut,. Followed that with Watco Walnut oil. I'm sure if you ping him, Marshall (Groomlakearea51) will guide you through it, he has a wealth of knowledge which he is willing to share. Practice on scraps to find what you want, and take note so you can reproduce it. Randy
-
I knew as I hovered the cursor over the link that this could be special, just from the title. I can't come up with the proper superlative. That is nothing short of astounding! Geez, I'd never come out of that room. My hat is off to you, sir, well done!
-
Truly outstanding!
-
I misunderstood your question altogether. I assumed you were asking about the Cornscala. Never mind....
-
If I were to build those, and I really would like to (I have built a couple pairs of CS-2s), I'd start by studying this by forum member JW Cullison. He's still active, I believe, so can perhaps give you some guidance. http://forums.klipsch.com/forums/storage/4/1071530/cs4.pdf Have fun, and good luck! Be sure to post your progress. Randy
-
Not the CT-125, but his titanium dome replacement diaphragms. See the bottom of this page: http://www.critesspeakers.com/klipsch_tweeters.html Randy
-
If memory serves me, the crossover is 1600hz. I put a pair of Crites' titanium tweeters in mine, which should allay your fears about drivers on that end. As for the woofers and the passives, from time-to-time they show up on Ebay. Randy
-
$200 CORNWALL SAGA - RESCUING ORPHANS
rll replied to Groomlakearea51's topic in 2-Channel Home Audio
Cory, I assume your question is directed to Marshall, but it appears he has gone (hopefully that's temporary as he's a very valuable resource), so I'll try to answer your question. Yes, the mixed stain is 70% Gunstock and 30% Special Walnut. Following Marshall's advice, I applied the second stain (the mix) right away. If you let it dry, the pores will close up, making it futile to continue. So make sure you've set aside plenty of time to complete the process in one sitting. I let it sit only as long as it took to wipe on the second cabinet, then returned to the first and wiped off, etc. Short and quick allows you to gradually build the depth of color to suit your taste. In the end, I probably applied 4 "coats" (I'd have to check my notes) of the second stain to get what I was looking for. After letting them rest, I then applied the Watco, which really made them pop. I'd encourage you to get your hands on some walnut veneer pieces and practice your technique first. Good luck! Let us see the results. Randy -
Looks as though you did not get them yesterday. I'll try again this evening when I get home.
-
I asked tech support a couple years ago, they sent me two. PM me, they are PDFs, and I'll send them along. Randy
-
Oy vey, very nice! 3-4 weeks ago one of my nieces got married, wedding and reception were at her dad's house, my sister's ex, who I hadn't seen in probably 20 years. As we were leaving he took us through his shop. I knew he was a contractor, but I was stunned by his shop. Had to be nearly 2,000 sf. Right in the middle of the floor was a Felder cabinet saw, a massive blue beast. My jaw hit the deck. Several other items, plenty of dust control capacity, and space to maneuver around. Visions of speaker building projects immediately leaped into my head. Off in the corner, my wife saw them first and pointed them out to me, were a pair of Choruses, looking to be pristine, aside from gathering dust. He had no idea what he had, other than they were Klipsch. I made it clear to him that I'd be plenty happy to take them off his hands for a fair price. The crime of it is, he's got a home theater set-up in the basement, but for mains is using in-wall speakers. I thought, you've got these beauties, which you apparently like, gathering dust in the shop when they could be used in your theater? Oh, the humanity!
-
(Last post vanished into the ether.) Thanks for the suggestions. Some I was aware of, some not. On a related topic, does anyone have experience with testaudio.com, specifically the spectrum analyzer download? Randy
-
Hey all, I'm looking for suggestions/recommendations for a test tone cd or download. Anyone care to offer their suggestions? Randy
-
Geez, nobody out west. I'll go first.
-
flush mounted tweets & mid horns sonic difference?
rll replied to ZombieWoof's topic in Technical/Restorations
I elected to flush mount mine.
-
flush mounted tweets & mid horns sonic difference?
rll replied to ZombieWoof's topic in Technical/Restorations
Mr. Harris (gothover) sent me this offline when I asked him that question, he may know the source: Effects of surface mounting versus flush mounting driversWhen it comes to DIY speaker design it is often asked if it is really necessary to go through the extra work required to flush mount a driver when it comes to overall performance. I'll try to address this issue with some theoretical concepts as well as actual measured data. The problem with surface mounting a driver is that the thickness of the frame of the driver causes a transition between the plane of the driver frame and the front baffle of the speaker. Diffraction will occur at this boundary and the severity of diffraction will be based upon the thickness of the driver frame meaning a thicker frame will produce worse diffraction effects. The effect of diffraction on the frequency response is a constructive and destructive combination of waveforms that produce dips and peaks in the response. The frequency at which these dips and peaks occur is based upon the distance between the edge of the driver diaphragm and the edge of the driver frame. This distance corresponds to a wavelength at which diffraction effects occur and shorter distances cause higher frequency diffraction effects. Drivers with circular faceplates will produce the most extreme diffraction effects because the distance to the edge of the frame is the same in all directions which reinforces the diffraction effects at the same frequency (wavelength) causing a more severe dip/peak at that frequency. Now when it comes to flush mounting drivers it doesn't really matter much if you flush mount lower frequency drivers like woofers because the distance to the frame of the woofer corresponds to a diffraction frequency that occurs higher than the passband of the driver and doesn't really affect the response. So it is not essential to flush mount woofers although there is one benefit to doing so. Flush mounting a woofer will eliminate diffraction effects between the tweeter and the edge of the woofer frame but these diffraction effects are very minor for several reasons. The main reason why tweeter diffraction with the woofer frame is not an issue is because the distance between the tweeter diaphragm and the woofer's frame edge is not constant which spreads the frequencies that diffraction occurs at apart and minimizes diffraction effects. Flush mounting a tweeter is another story. Since tweeters operate at higher frequencies and the distance between the tweeter diaphragm to the edge of the tweeter faceplate corresponds to a wavelength/frequency that is in the passband of the tweeter diffraction effects will come into play if a tweeter is not flush mounted. This effect will be most pronounced for tweeters that have round faceplates for reasons previously mentioned. Most tweeters have a diaphragm to edge distance between 1 and 2 inches which corresponds to frequencies around 13000Hz and 6500Hz respectively. So the wider the tweeter frame, the lower the frequency that tweeter diffraction effects will occur. Below is a comparison of the frequency response of the Hiquphon OW1 tweeter mounted in my Hyperion speaker cabinet with and without flush mounting. As you can see the flush mounted tweeter has a much flatter response especially above 5kHz. The peak/dip at 2kHz/3kHz is due to cabinet diffraction effects cause by the edge of the front of the cabinet. Above that point there is a peak around 5kHz, a dip around 9kHz and another peak around 13kHz in the surface mounted tweeter's response. The dip around 9kHz corresponds to a distance of about 1.5 inches which is exactly the distance between the edge of the Hiquphon tweeter dome diaphragm and the edge of the tweeter faceplate. As you can see there is a +1/-4dB swing in the response caused by not flush mounting the tweeter, however, off-axis these dips and peaks shouldn't be as prominent. So the main point of this demonstration is to convince you that it is necessary to flush mount tweeters to obtain a flatter frequency response but woofers do not necessarily have to be flush mounted. The problem with flush mounting drivers is it usually requires skill with a router and the proper bits and circle cutting jigs. There is a way to flush mount drivers without using a router that I've used several times including in the example above. I cut out a frame from 1/8" masonite or some other type of thin plywood that matches the thickness of the driver frame and then glue it to the front baffle of the cabinet. This method was used for every speaker design shown in my projects section and is very effective. Furthermore it makes it easier to flush mount odd shaped drivers. The only other thing that I'd like to add is that you can apply some of the lessons learned in this tutorial to driver positioning on the baffle. Just like diffraction effects between the tweeter and its faceplate, there are diffraction effects between the driver and the edge of the cabinet. Rounding over the edges of the baffle is one way of reducing these effects but it is very hard to completely eliminate them. The best way of reducing diffraction effects is to locate the tweeter at different distances to each side of the baffle so that the frequencies that diffraction effects occur are spread out across the frequency response. This is why you often see tweeters offset to one side of the cabinet in many designs. Ideally the best way to minimize diffraction effects between the tweeter and the cabinet edges is to locate the tweeter according to distances based on the golden ratio of 0.6/1/1.6. If you can't do this, at least try not to use distances which are multiples of each other. Now if you don't feel like moving your tweeter around to reduce the effects of diffraction then the other alternative is to strategically place acoustically absorbant felt around the tweeter near the edges of the faceplate. This should help reduce diffraction effects but is a whole other topic of discussion. -
Thankyou Bruce. Oddly enough, it was the other way around at first. She was initially skeptical, said the others were just fine. When I got to a point where I had to remove the components from the others, she got quite anxious for me to finish them. She's grown fond of the improved sound quality over the KG4s. When I put them side by side and did an A/B comparison, she was hooked. With the veneer, I thought long and hard before I cut the pieces. I laid the sheet out several times, in the end I let the sheet tell me where the cuts should be made. Even then, before I cut it, I had Harry come over for a consultation and he liked it. I'm very happy with how it was laid out. As Greg Roberts would say - details. Randy