No.4
-
Posts
575 -
Joined
-
Last visited
Content Type
Forums
Events
Gallery
Everything posted by No.4
-
I opened this at work before it disappeared..... fastest back button in the Midwest here! my caption is based off old school ad copy. “Sounds better than it looks” (doubtful!)
-
Nice work! Planning out the veneer process was one the more difficult parts of my La Scala build. I veneered the doghouse and the inside panels of the top, bottom and sides before I assembled them all together. All I had to do was the outside and front edges. I had some waste inside the doghouse, but not much. Hats off to you for cutting and fitting the pieces. So far it looks perfect. for those considering rehabbing la scales or belles you might share some tips on how you are getting that perfect fit.
-
That’s a good find! My local thrift stores....not so much.
-
Small footprint, super cool. what is your winter project? 🙂
-
I am not an expert on this either. I have been using digital lately just because I have been so curious. I have been a holdout up until recently. I am using an iphone and iPad for a source through a Schiit modi Into my system. The modi will support the file sizes that amazon hd and ultra hd broadcasts. MQA is supposed to compete with ultra hd I believe, but don’t quote me on that. I started looking into MQA because I am back and forth about upgrading my DAC and during that research, many reviewers would bring up whether or not the particular DAC I was looking at would support MQA. I do not need MQA necessarily, but you definitely do. As to your above settings when you do get an MQA supported DAC you will probably want to have all three of those options selected. That is assuming you are using your AVR to control volume. The third setting will bypass all processing internal to your computer and let the DAC do the work which is what you want.
-
As I understand it MQA is unique to tidal and not all DACs support MQA files. Does yours?
-
Looking really good!
-
Too bad about the HK A300. They seem like pretty cool amps.
-
Very cool, you should post more.
-
I have been lucky with Amazon. I usually buy newer music on CD though. Older music I generally go for vinyl. If there is something obscure or out of print I have had excellent luck with Discogs. Prices are generally very reasonable if not cheap as well.
-
The Dayton’s are great for a three way setup, the ESS AMTs will work in two a two way. ESS are my favorite. However, the leftover three way parts I have do sound great, so they will be utilized in a cornscala type setup. I just need to decide on the bass bin design.
-
Jantzen.
-

Double Stack ESS AMT-1 with Wings--Possible Kit for Heritage
No.4 replied to Chris A's topic in Technical/Restorations
@Rudy81 yes I have gotten that far. I was going through trying to decipher what adjustments i need to make to my delay time. I did re run sweeps and adjust PEQs though now that I have the drivers at an angle. The phase and spectrogram look better to my eyes now with adjust PEQs. The sound is great to my ears as it is, I’m just curious how much better it could be. The ability to fine tune any speakers using these tools is really impressive. I am just pushing through the learning curve. -
Double Stack ESS AMT-1 with Wings--Possible Kit for Heritage
No.4 replied to Chris A's topic in Technical/Restorations
Working on it now though! -
Double Stack ESS AMT-1 with Wings--Possible Kit for Heritage
No.4 replied to Chris A's topic in Technical/Restorations
No. That is a component of REW I have not played with very much. -
Double Stack ESS AMT-1 with Wings--Possible Kit for Heritage
No.4 replied to Chris A's topic in Technical/Restorations
Well, I have some homework to do. My frequency response is pretty flat throughout the audible range, but my phase looks like a tightly wound spring! -
Double Stack ESS AMT-1 with Wings--Possible Kit for Heritage
No.4 replied to Chris A's topic in Technical/Restorations
I was seated right around the middle point of the two heils. Maybe a little lower. The difference now is night and day. My Bass bins are pushed into the corner though, so the back wave of the heils is firing pretty close to wall. I think yours are set up further from the wall so you may be getting more of the dipole effect, not sure. I even tried removing my wall treatments behind the heils, but it did not improve the sound. Quite the opposite. -
Double Stack ESS AMT-1 with Wings--Possible Kit for Heritage
No.4 replied to Chris A's topic in Technical/Restorations
I have been crossing at 400hz since I have started this project. So far so good. I don’t listen at very high SPL usually though, and my room is small. I have been experimenting with toe and the angle of the stacks. I raised the back feet of the stack/wings one inch so the stacks are angled towards the listing position. This made a huge difference in the vocal range and really focused the imaging. I reported a few pages back that the sound was more “live” while standing at the listening position. This angle has brought that “live” feel to the seated position. There is now no difference between the standing and seated position and the soundstage begins at a lower point in front of me. I am going to try a few more stack angles and toe adjustments to see if there are any further gains to be had, but I think I am close I did run a few sweeps and adjusted a few PEQs before I did all of the new changes. The output of the heils has changed a little as they continue break in. The sound quality I am getting From this setup at this point is nothing short of incredible. I have been considering building a pair of cornscalas for our living room to put my previous horns, compression drivers and ALK networks to good use. Now I don’t know.... -
Dressing up my 1979 LaScalas with grills
No.4 replied to Ray_pierrewit's topic in Technical/Restorations
Yes, like this exactly. I always really liked those grilles. -
Dressing up my 1979 LaScalas with grills
No.4 replied to Ray_pierrewit's topic in Technical/Restorations
@Ray_pierrewit The contrast of the silver/grey fabric and the black scalas looks great! Have you though about making some belle style grills for the bass horn to match? -
Double Stack ESS AMT-1 with Wings--Possible Kit for Heritage
No.4 replied to Chris A's topic in Technical/Restorations
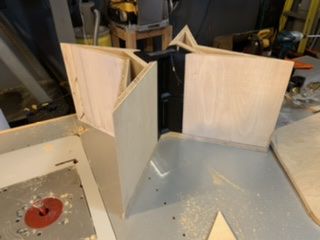
@hallcon83 When both of the sides of the horns are glued together the top and bottom can be built. Basically the heil and both sides are put together on top of a piece of plywood and the shape of the top is traced out. The shape was then cut out with a jigsaw leaving some material towards the edges. Then the top and bottom was screwed to the sides ensuring everything was square. The screws will allow the tops and bottom to be removed from the sides until final glueing. Once all put together I ran the tops and bottom through the router using a flush cut bit. I used the the vertical sides as the guide to run the bearing along. This produced a good edge, but still required some sanding and filling. The point where the sides come together did still have some round over due to the router bit. I just used a file to get points sharp. There is some bonds and filler underneath to get a good surface for the veneer. Hopefully that helps. I found the photo below as I was routing the tops. You can see a little better how rough the edges were before final sanding and filling.
-
Double Stack ESS AMT-1 with Wings--Possible Kit for Heritage
No.4 replied to Chris A's topic in Technical/Restorations
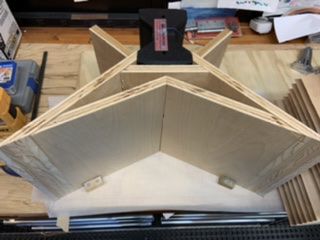
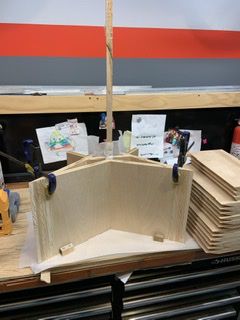
@hallcon83 Thank you, and welcome. All of the vertical parts were cut with a table saw. There was some trial and error with the angles. I used small scrap pieces to help get the angles right. The jig is used to test fit the pieces and aid in glueing. You can see how the jig is used for alignment below. then the parts could be glued and clamped.
-
Weller WES51. Worth every penny.
-
Reminds me of Drunken fireworks by Stephen king. That audiobook is hilarious.