ToolShedAmps
-
Posts
207 -
Joined
Content Type
Forums
Events
Gallery
Everything posted by ToolShedAmps
-

Henry Scott Yocum Memorial Amplifier Build
ToolShedAmps replied to ToolShedAmps's topic in Talkin' Tubes

- 80 replies
-
- 1
-

-
- 2a3
- single-ended
- (and 1 more)
-
Henry Scott Yocum Memorial Amplifier Build
ToolShedAmps replied to ToolShedAmps's topic in Talkin' Tubes
I've been asked many times how I create the etched info/artwork on the plates of my amplifiers. I'll try to explain the process as best I can, those of you who wish to try to replicate the process can PM me for additional info. I'll try to keep this build-thread going without bogging it down with too much "white-paper" type drudgery. There's enough of that elsewhere. In a nutshell, I create all of my images in Adobe Illustrator and Adobe Photoshop. I generate the same "layout" in digital format within Illustrator to match the physical plates and the graph paper layout. This then allows me to create the text/artwork EXACTLY as it will appear on the plates when etched. I size the circles slightly smaller than the actual holes (tube sockets) to use them as registration indicators when ironing the photo paper onto the milled plates. Yep, you read that right, I print the Illustrator file (inverted of course) onto photo paper using a laser printer. This is then IRONED onto the plate using a very hot iron. This creates a "ghost image" (ie., not good enough to act as a resist itself), you need to then put on your "artist" hat (if you have one) and dig out the little bottles of Testors gloss black enamel paint and some pretty fine brushes so that you can paint over the ghost image. I normally heat-set the plates in a household convection oven @ 180 degrees for 2 hrs. Here is a pic of Scott's plates after they've come out of the oven. In the next installment I'll go over the actual etching process/chemicals/precautions, etc. Cheers! Matt.- 80 replies
-
- 1
-
-
- 2a3
- single-ended
- (and 1 more)
-
Henry Scott Yocum Memorial Amplifier Build
ToolShedAmps replied to ToolShedAmps's topic in Talkin' Tubes
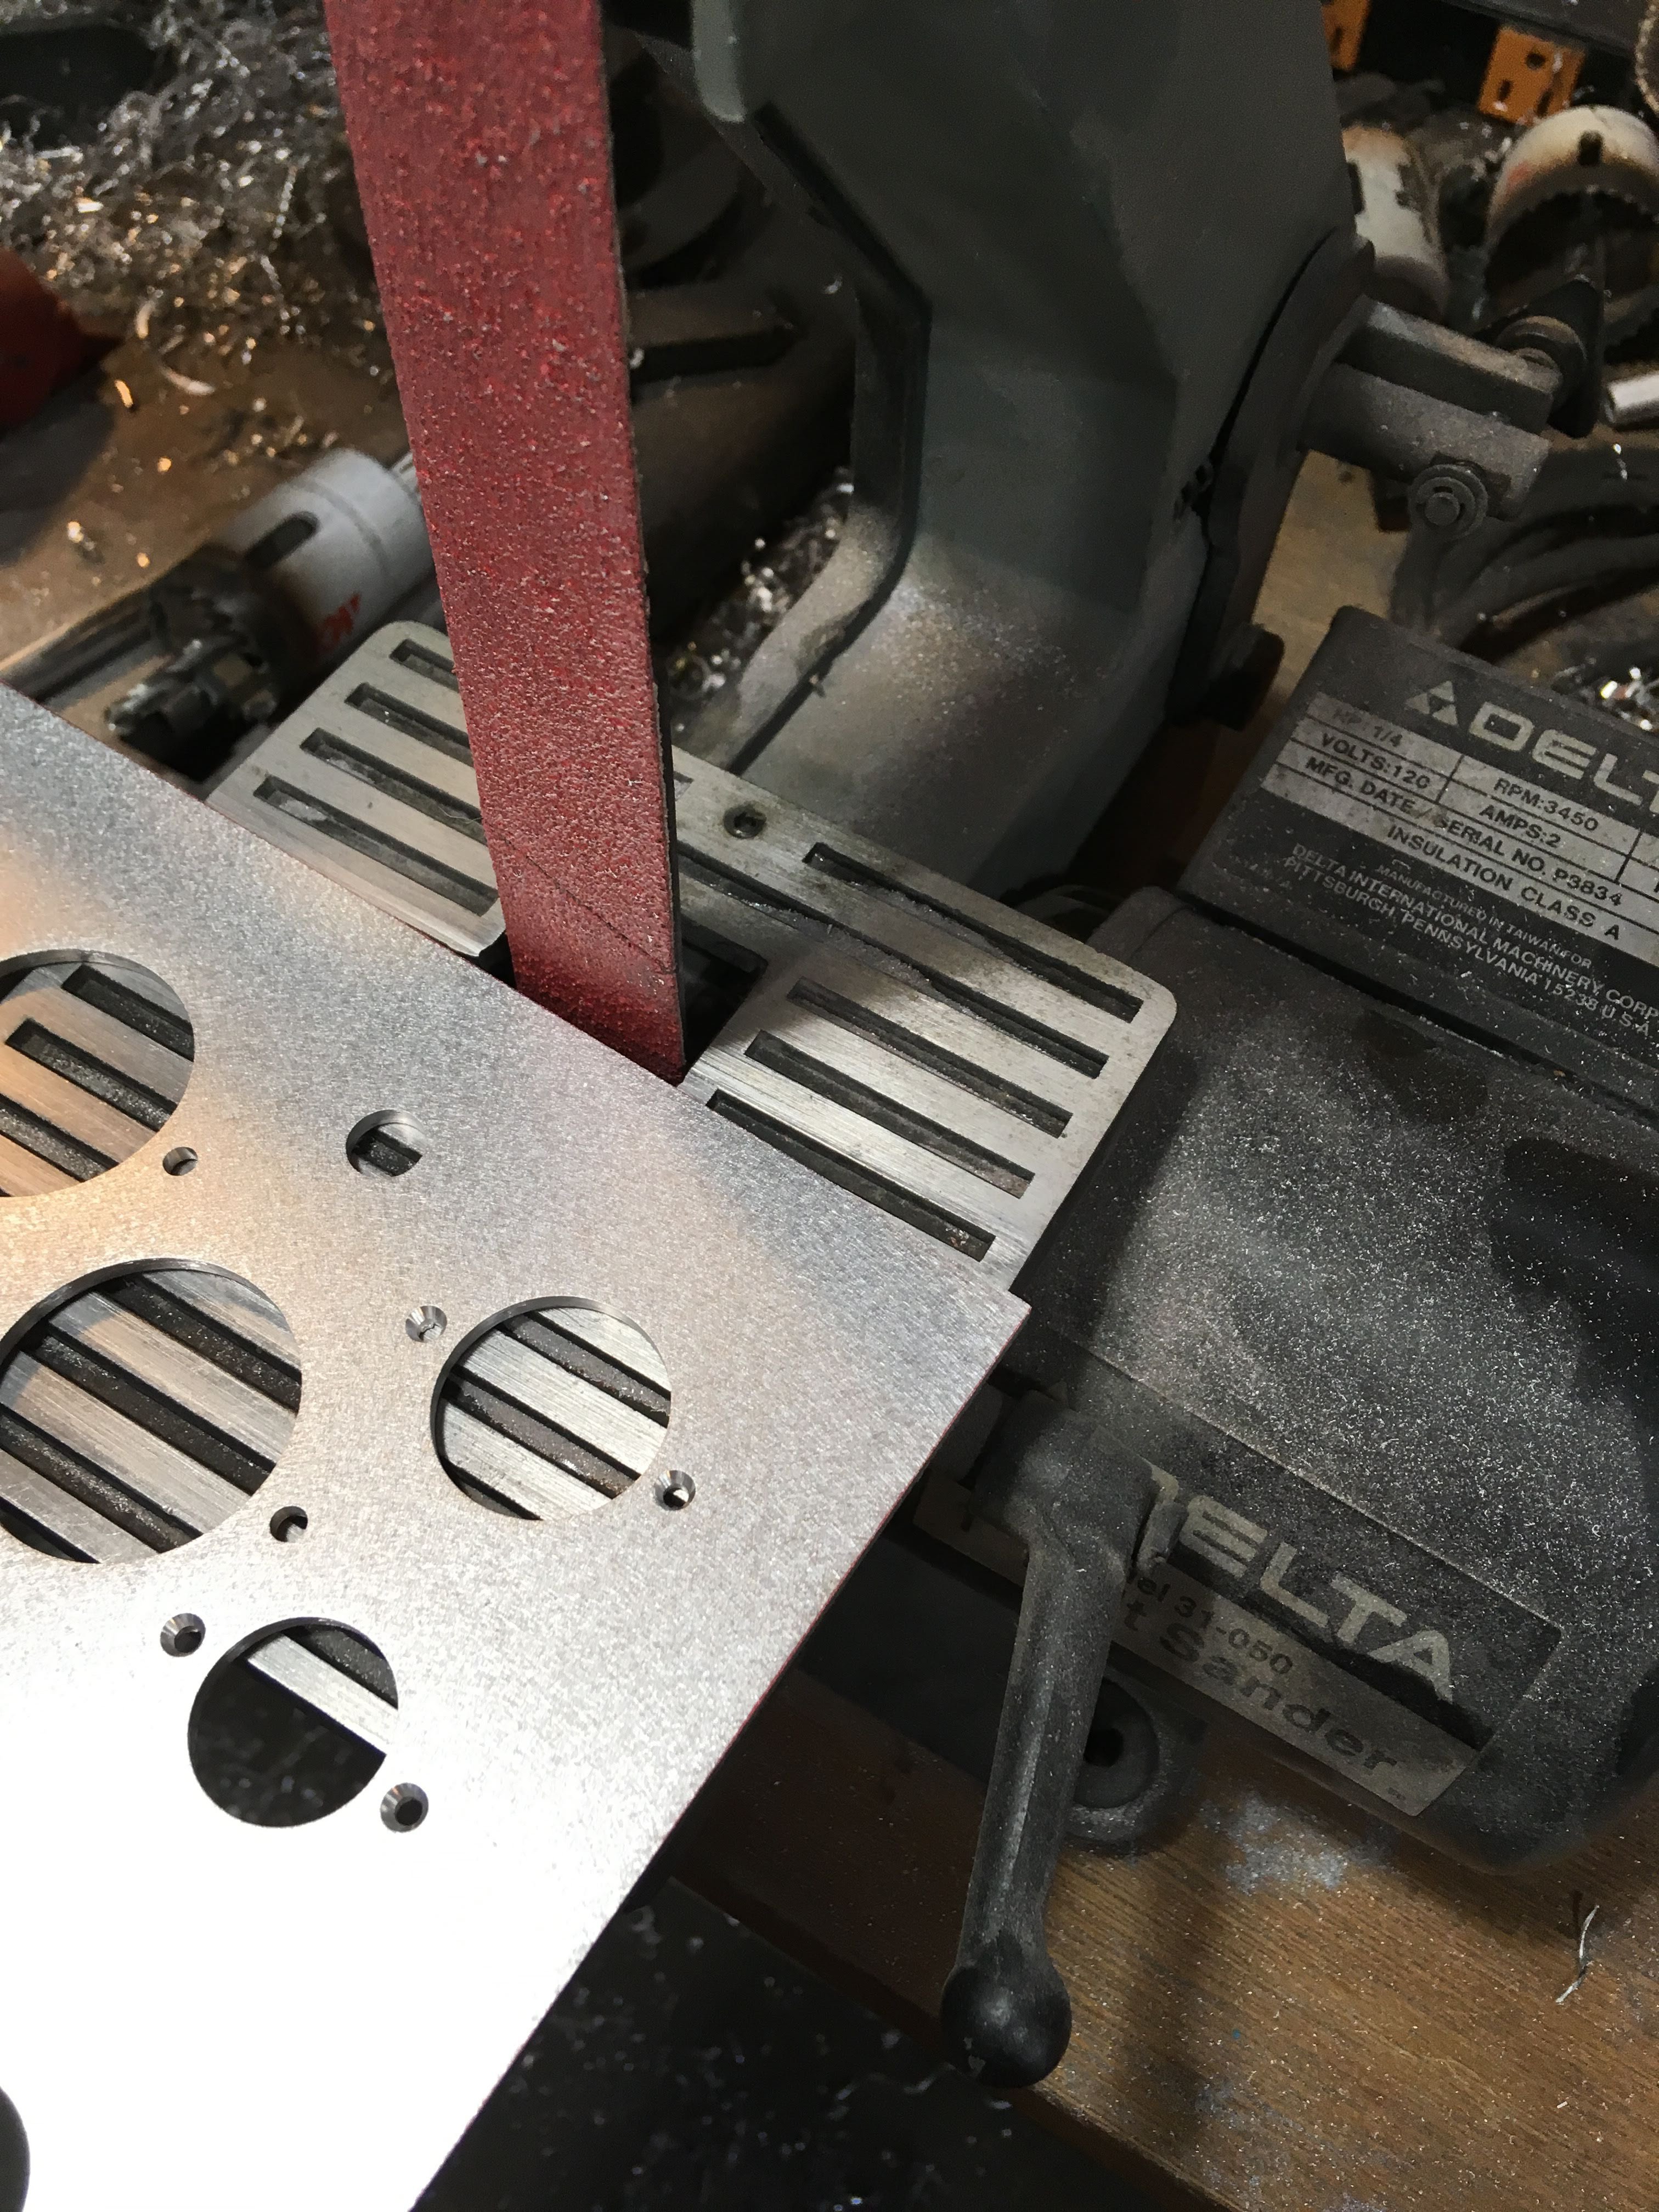
OK, so a bit back in this thread I stated that I cut the top-plate and bottom-plate 1/8" oversize and would explain why and how I size it to fit the wood base. The why: as accurate as I like to think I (and my tools) are...... the bases are actually more of a rhombus than an exact rectangle. My goal is to have the tightest finger joints possible, sometimes during glue-up the base gets slightly "out-of-square". No worries. This is the reason for the 1/8" additional material on the plates. The how: AFTER all of the milling (aside from the countersinks around the periphery) I match the plate up to the base and use a sharpie and straightedge to mark where the plate needs to be shaved. My tool of choice for doing this "shaving" is my trusty 1" belt sander. It allows me to draw the edge of the plate across the platen varying speed and pressure to trim just the marked area. This makes for a very nice fit.
- 80 replies
-
- 2
-
-
- 2a3
- single-ended
- (and 1 more)
-
Henry Scott Yocum Memorial Amplifier Build
ToolShedAmps replied to ToolShedAmps's topic in Talkin' Tubes
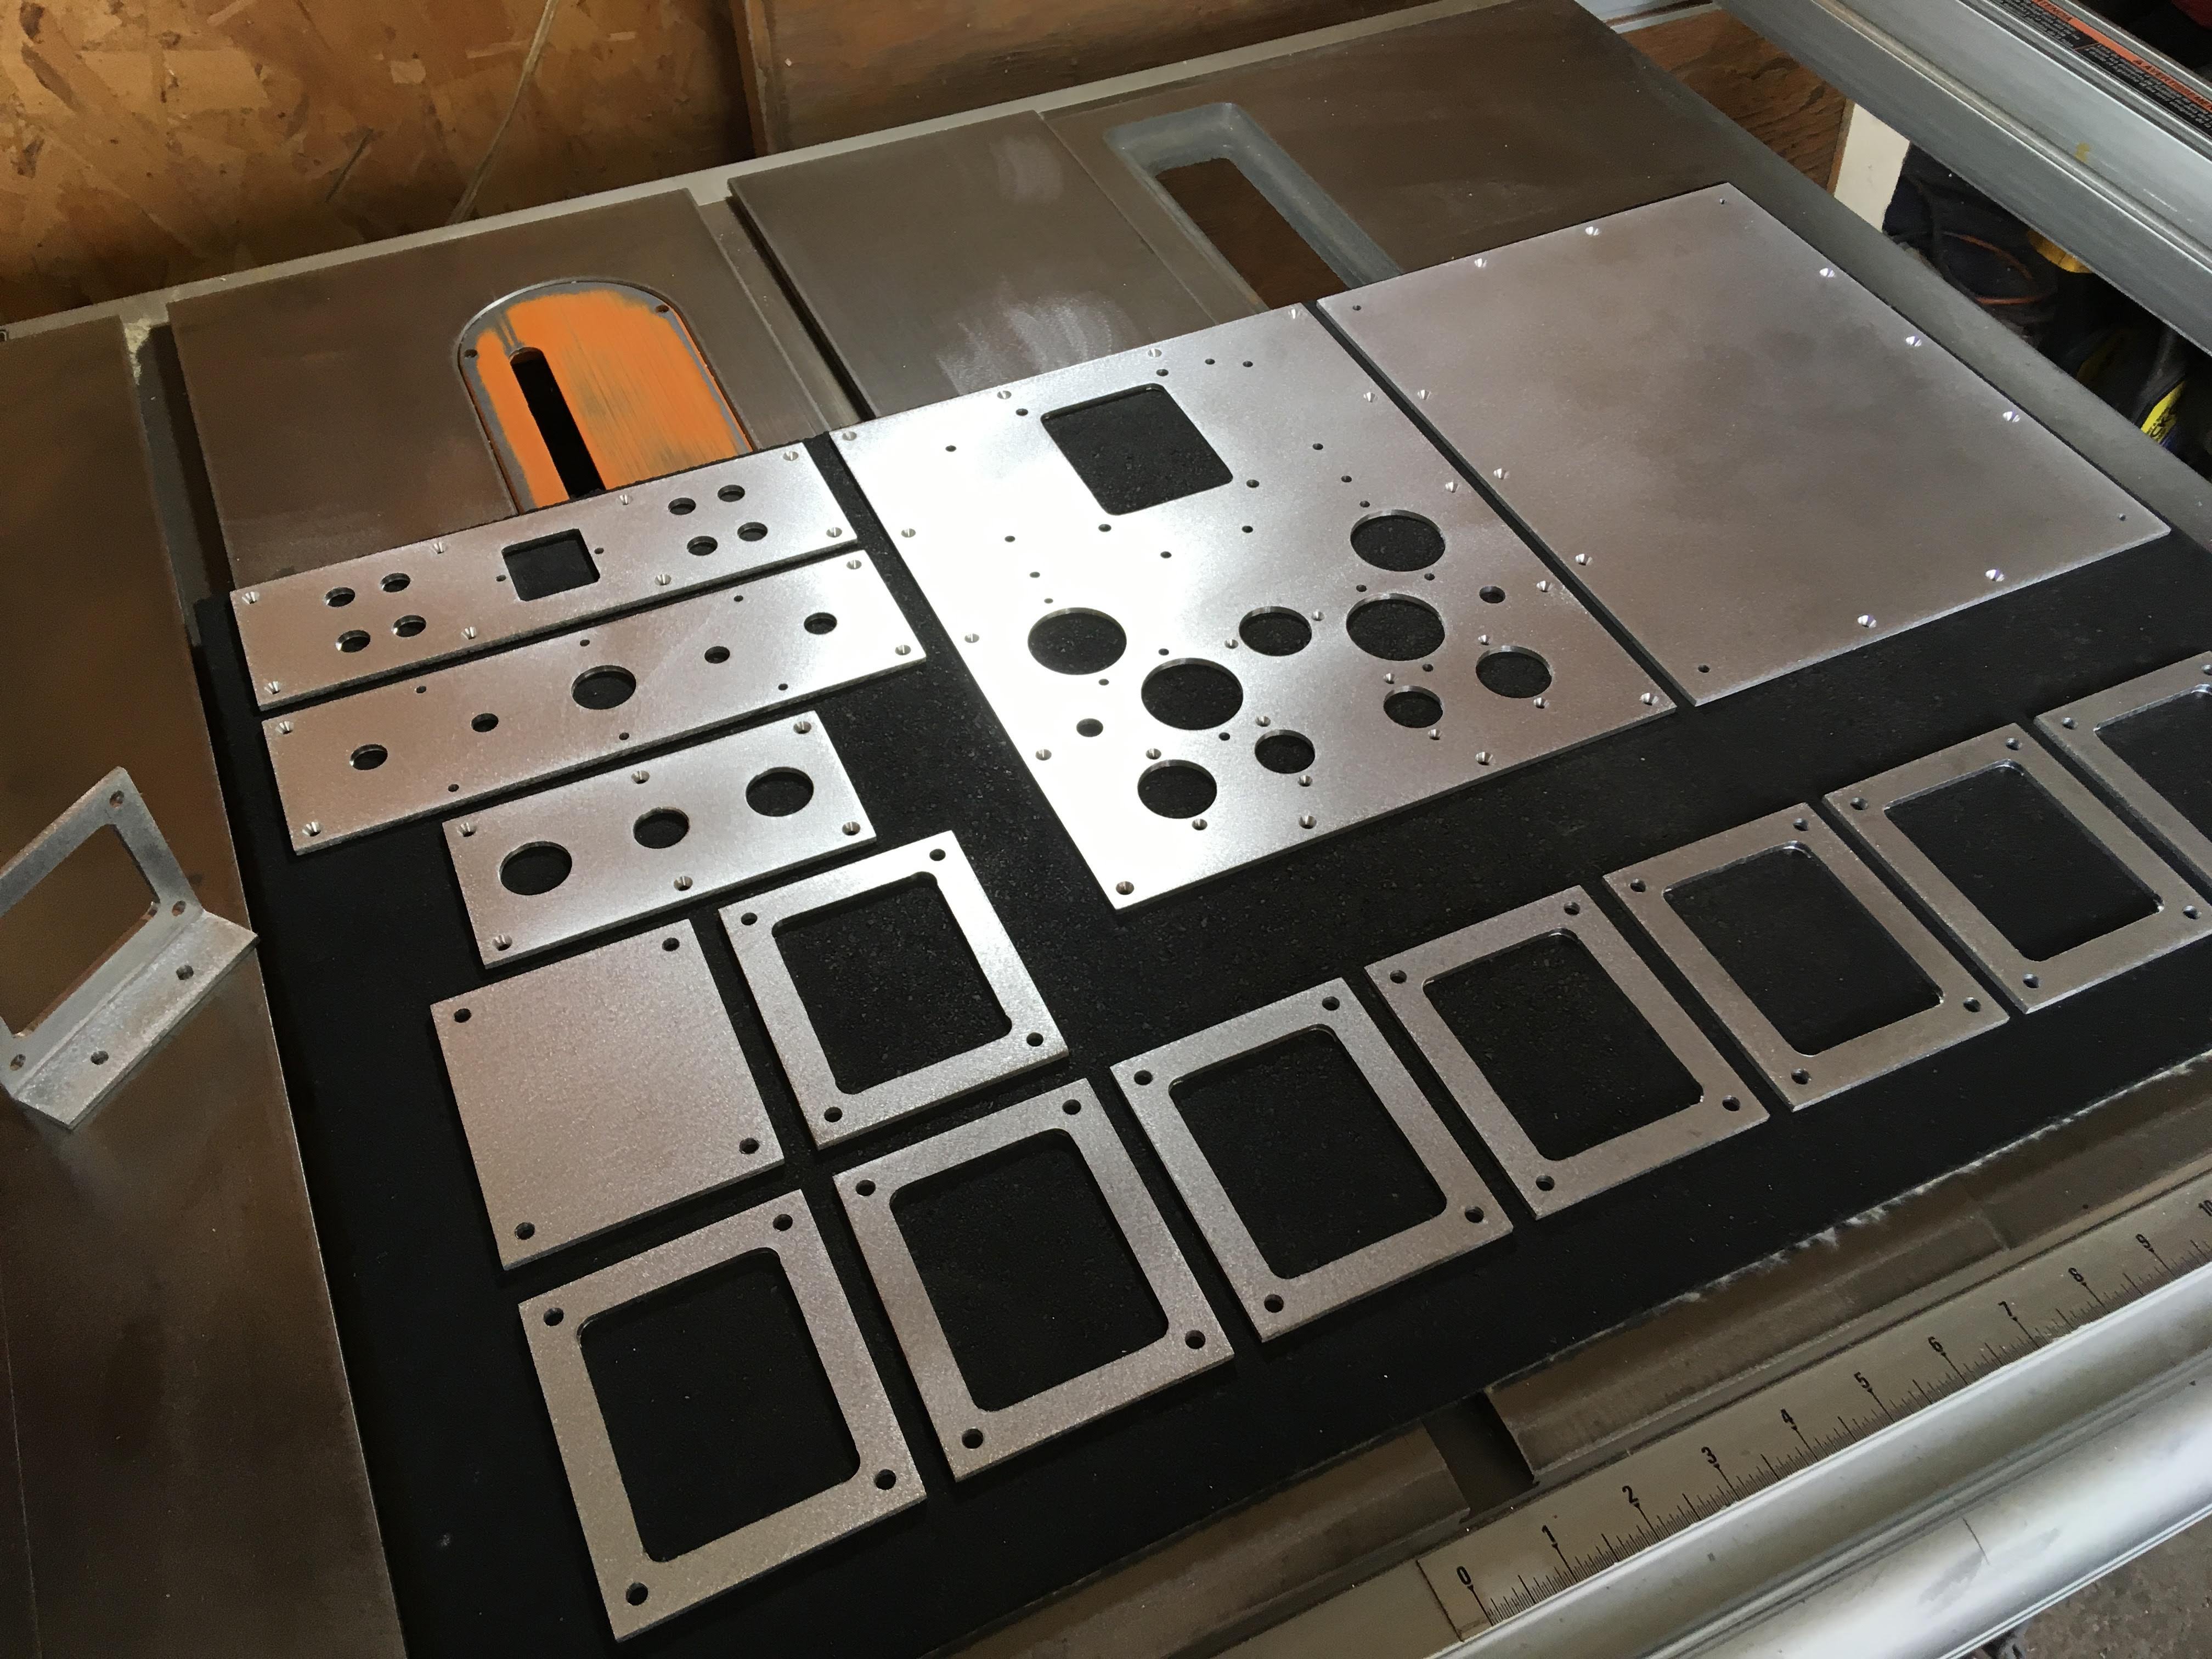
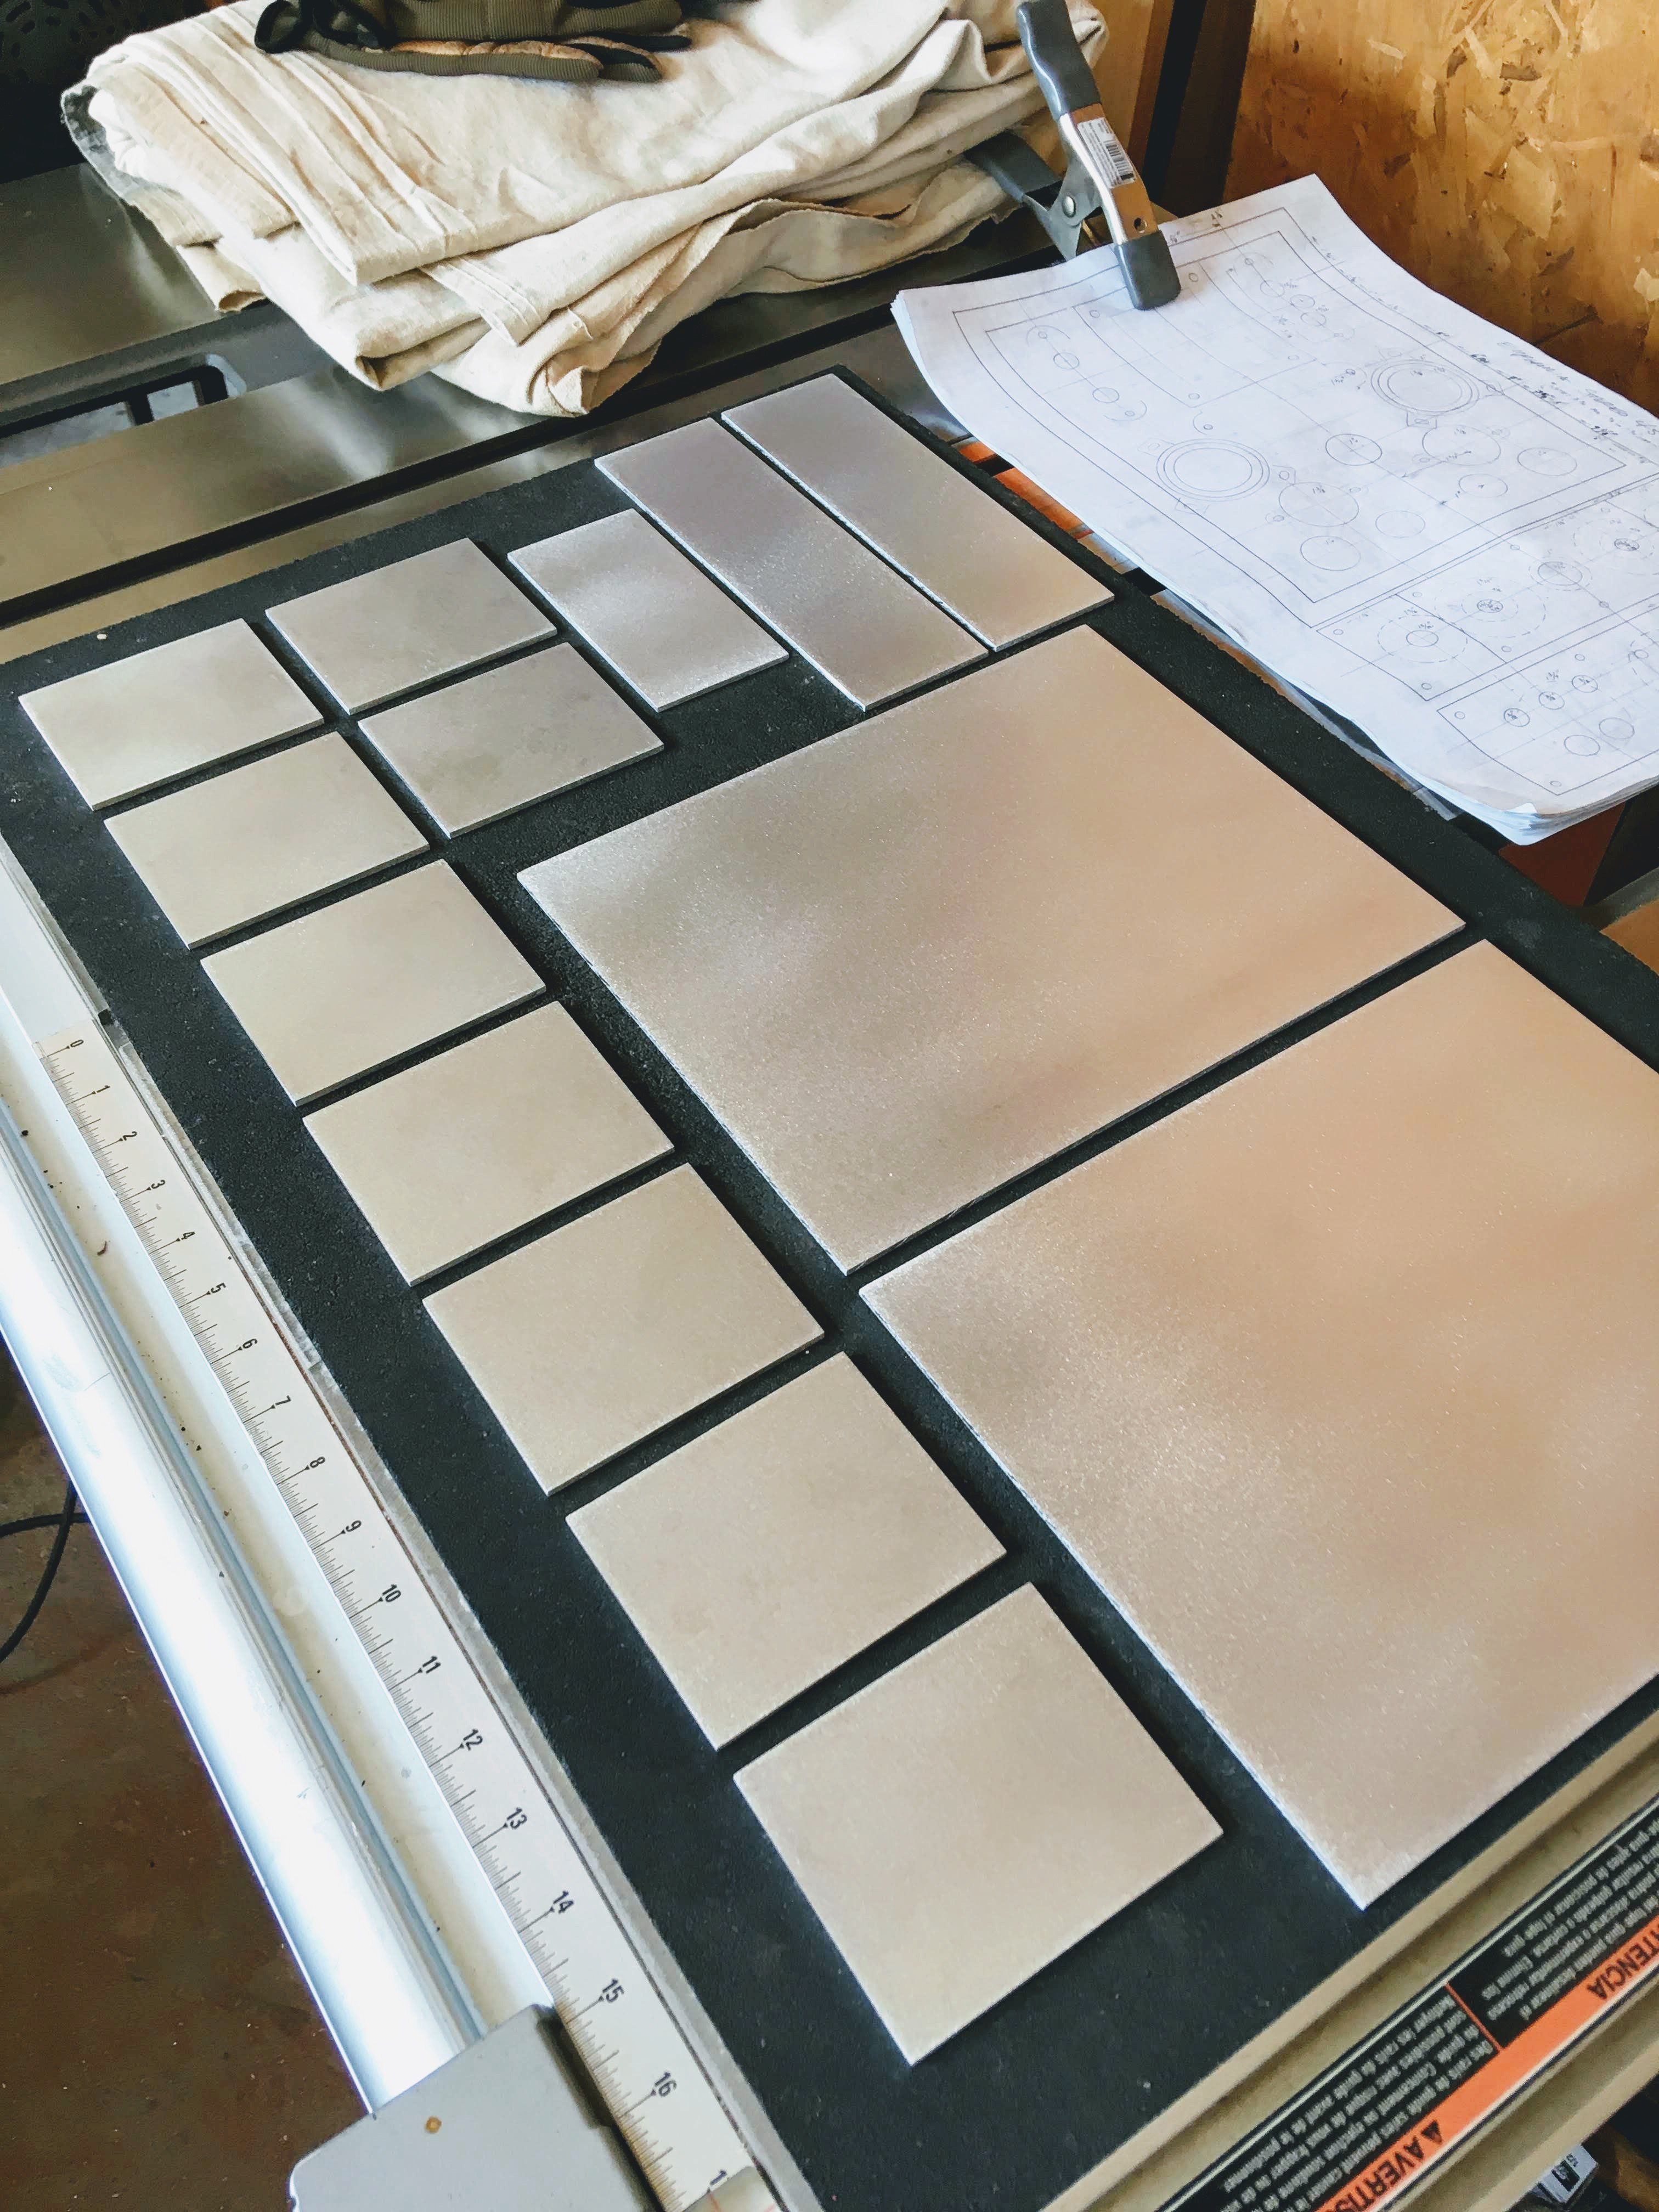
Howdy All! Whew! Lots O' plates milled and prepped for etching. Additionally, you'll notice an additional plate to the left of the original 14, this is a choke bracket I fabricated to mount the selected Transcendar choke on the inside of the chassis. The original end-bells on the choke had their little mounting feet oriented such that the choke would have to be mounted vertically, thus not fitting within the Euphoria chassis. The mounting bracket I fabricated started life as 1/8" thick 4" X 2" extruded rectangular 6063 aluminum. By making a cut @ 1 7/8" on the 2" flat, then flipping the piece and making the cut again you are left with two 90 degree "L" brackets @ 4" X 1 3/4". Size them as you wish for different sized applications.
- 80 replies
-
- 2
-
-
- 2a3
- single-ended
- (and 1 more)
-
Henry Scott Yocum Memorial Amplifier Build
ToolShedAmps replied to ToolShedAmps's topic in Talkin' Tubes
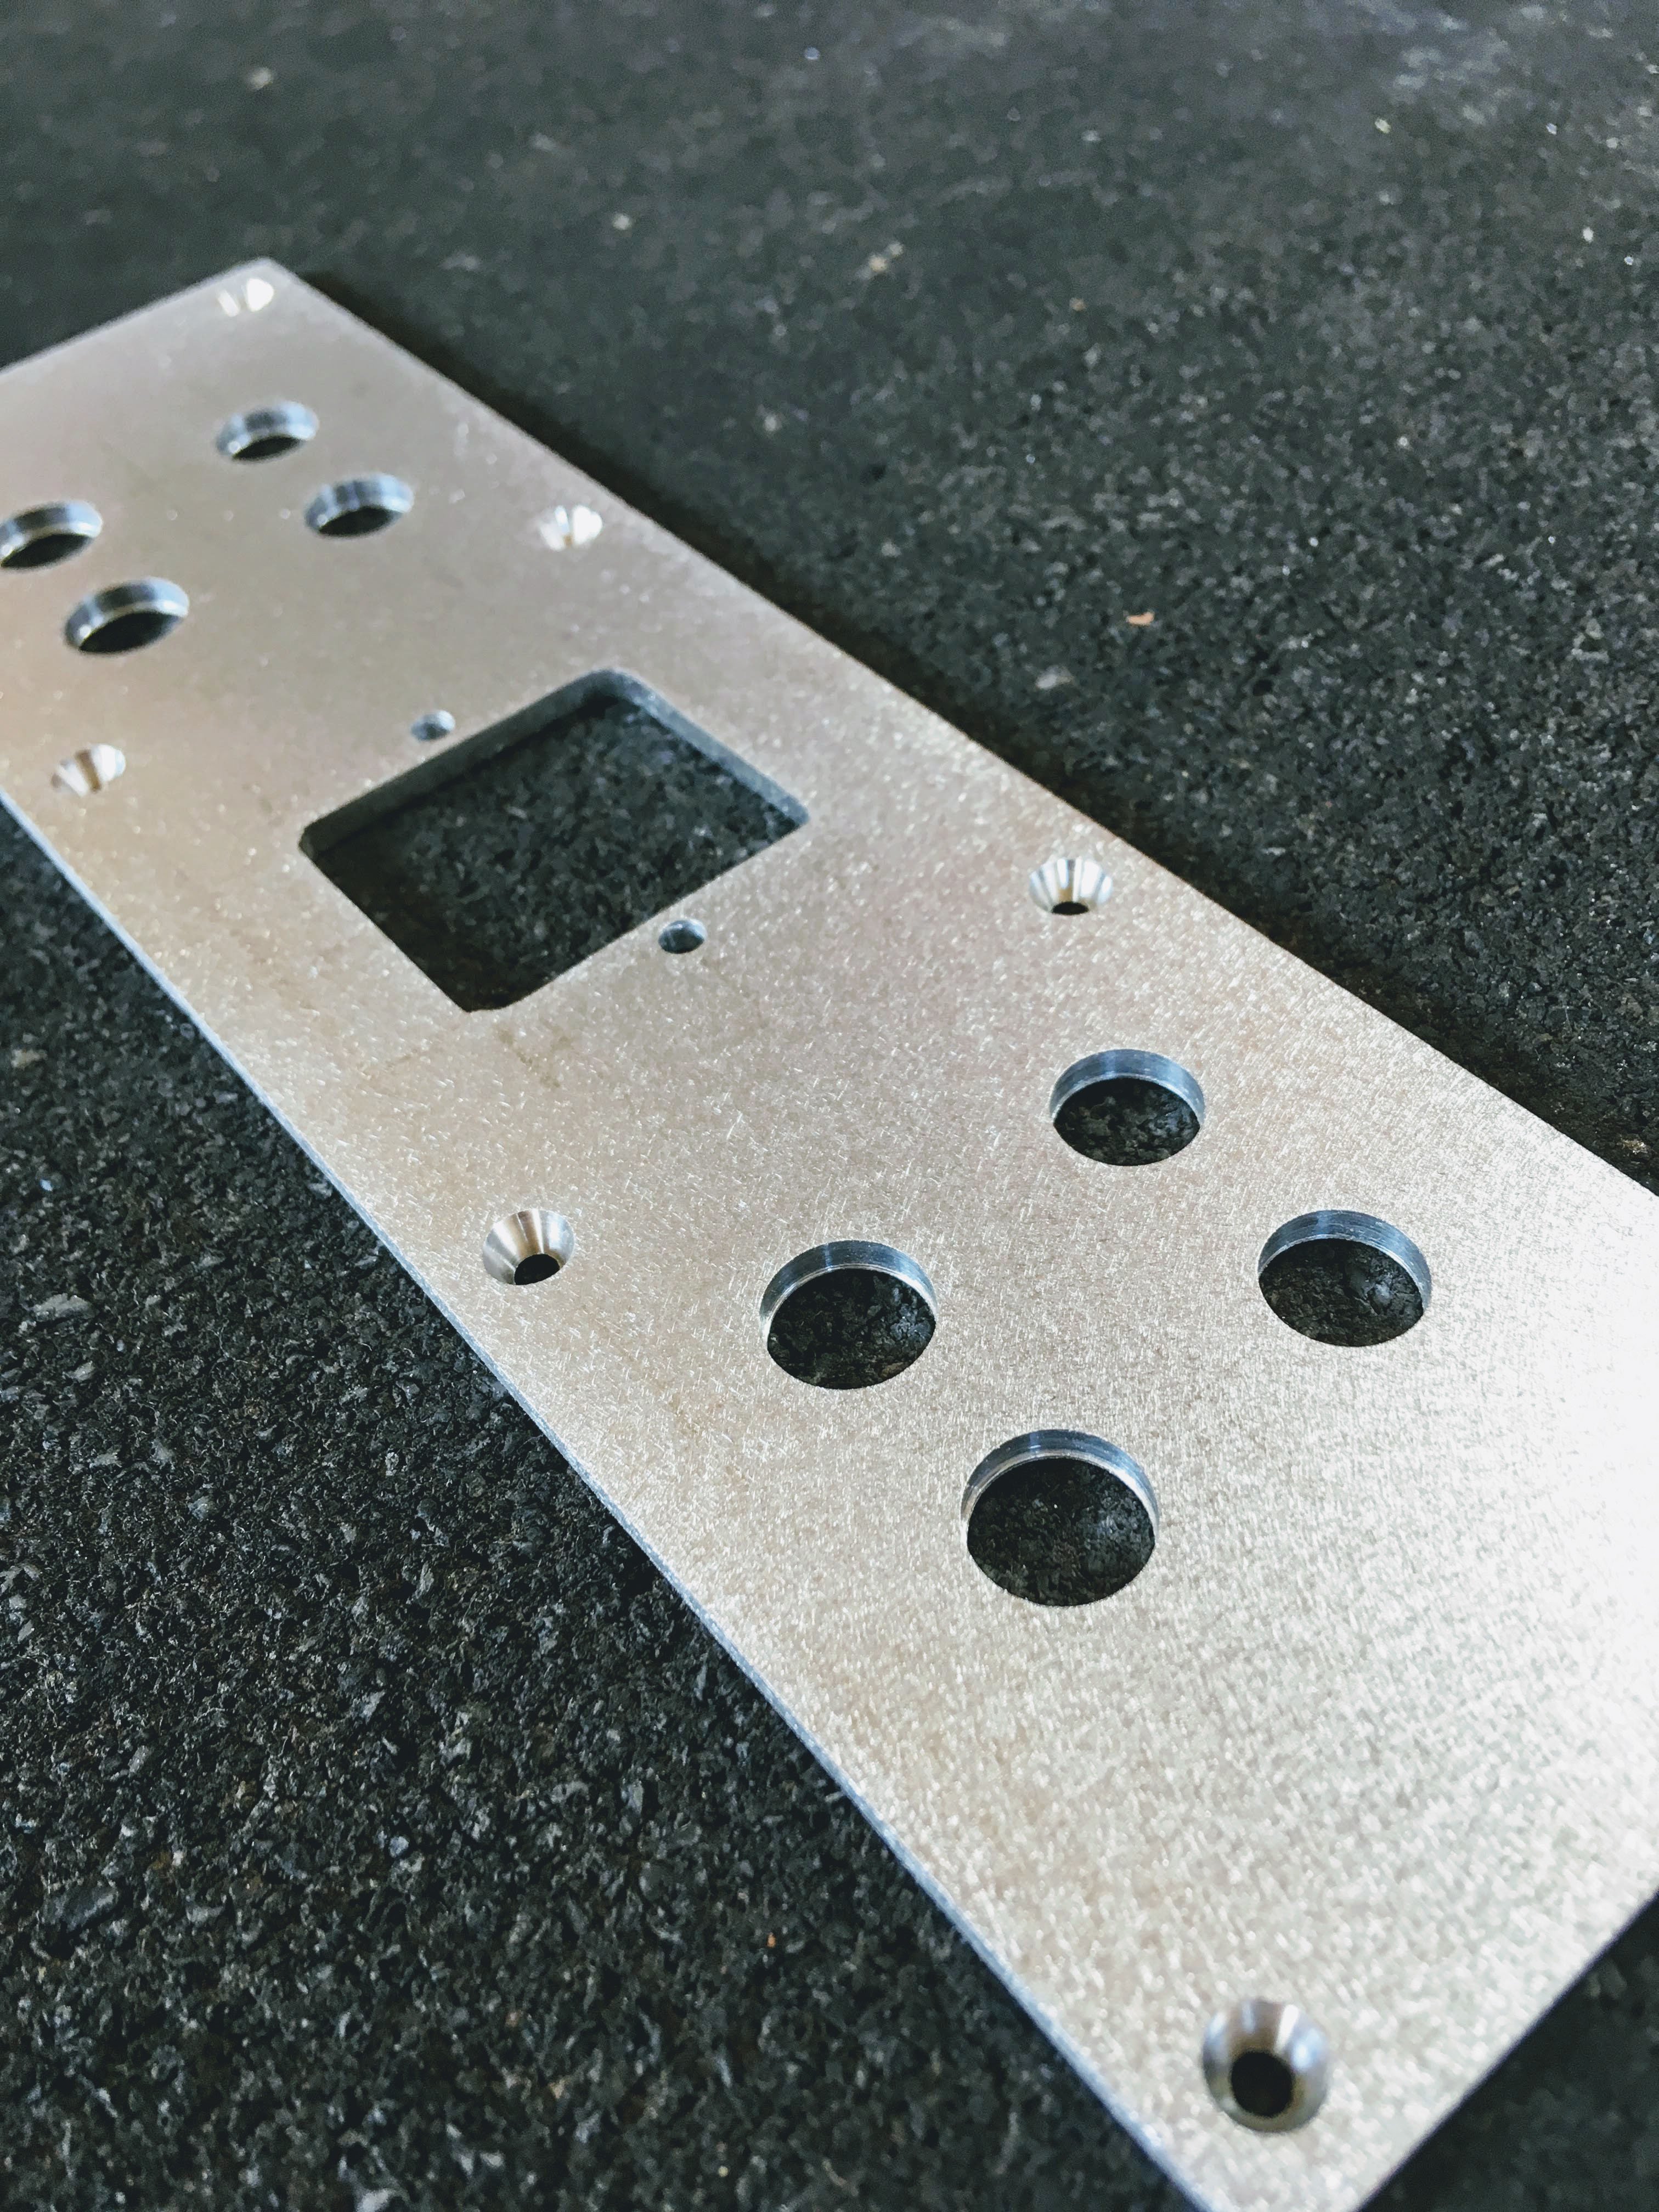
Then the back of each plate is sanded again with 100 grit to remove any burrs from the holes followed by sanding the face with 150 grit using the random orbit sander to prepare the surface for the application of the "resist" for the etching phase of the process. Here is what the plate looks like after sanding. Make sure you remove ALL of the layout marks with the sander as they will act as a resist and you'll have extra lines in the etch....
- 80 replies
-
- 4
-
-
- 2a3
- single-ended
- (and 1 more)
-
Henry Scott Yocum Memorial Amplifier Build
ToolShedAmps replied to ToolShedAmps's topic in Talkin' Tubes
Completed cut-out....
- 80 replies
-
- 2
-
-
- 2a3
- single-ended
- (and 1 more)
-
Henry Scott Yocum Memorial Amplifier Build
ToolShedAmps replied to ToolShedAmps's topic in Talkin' Tubes
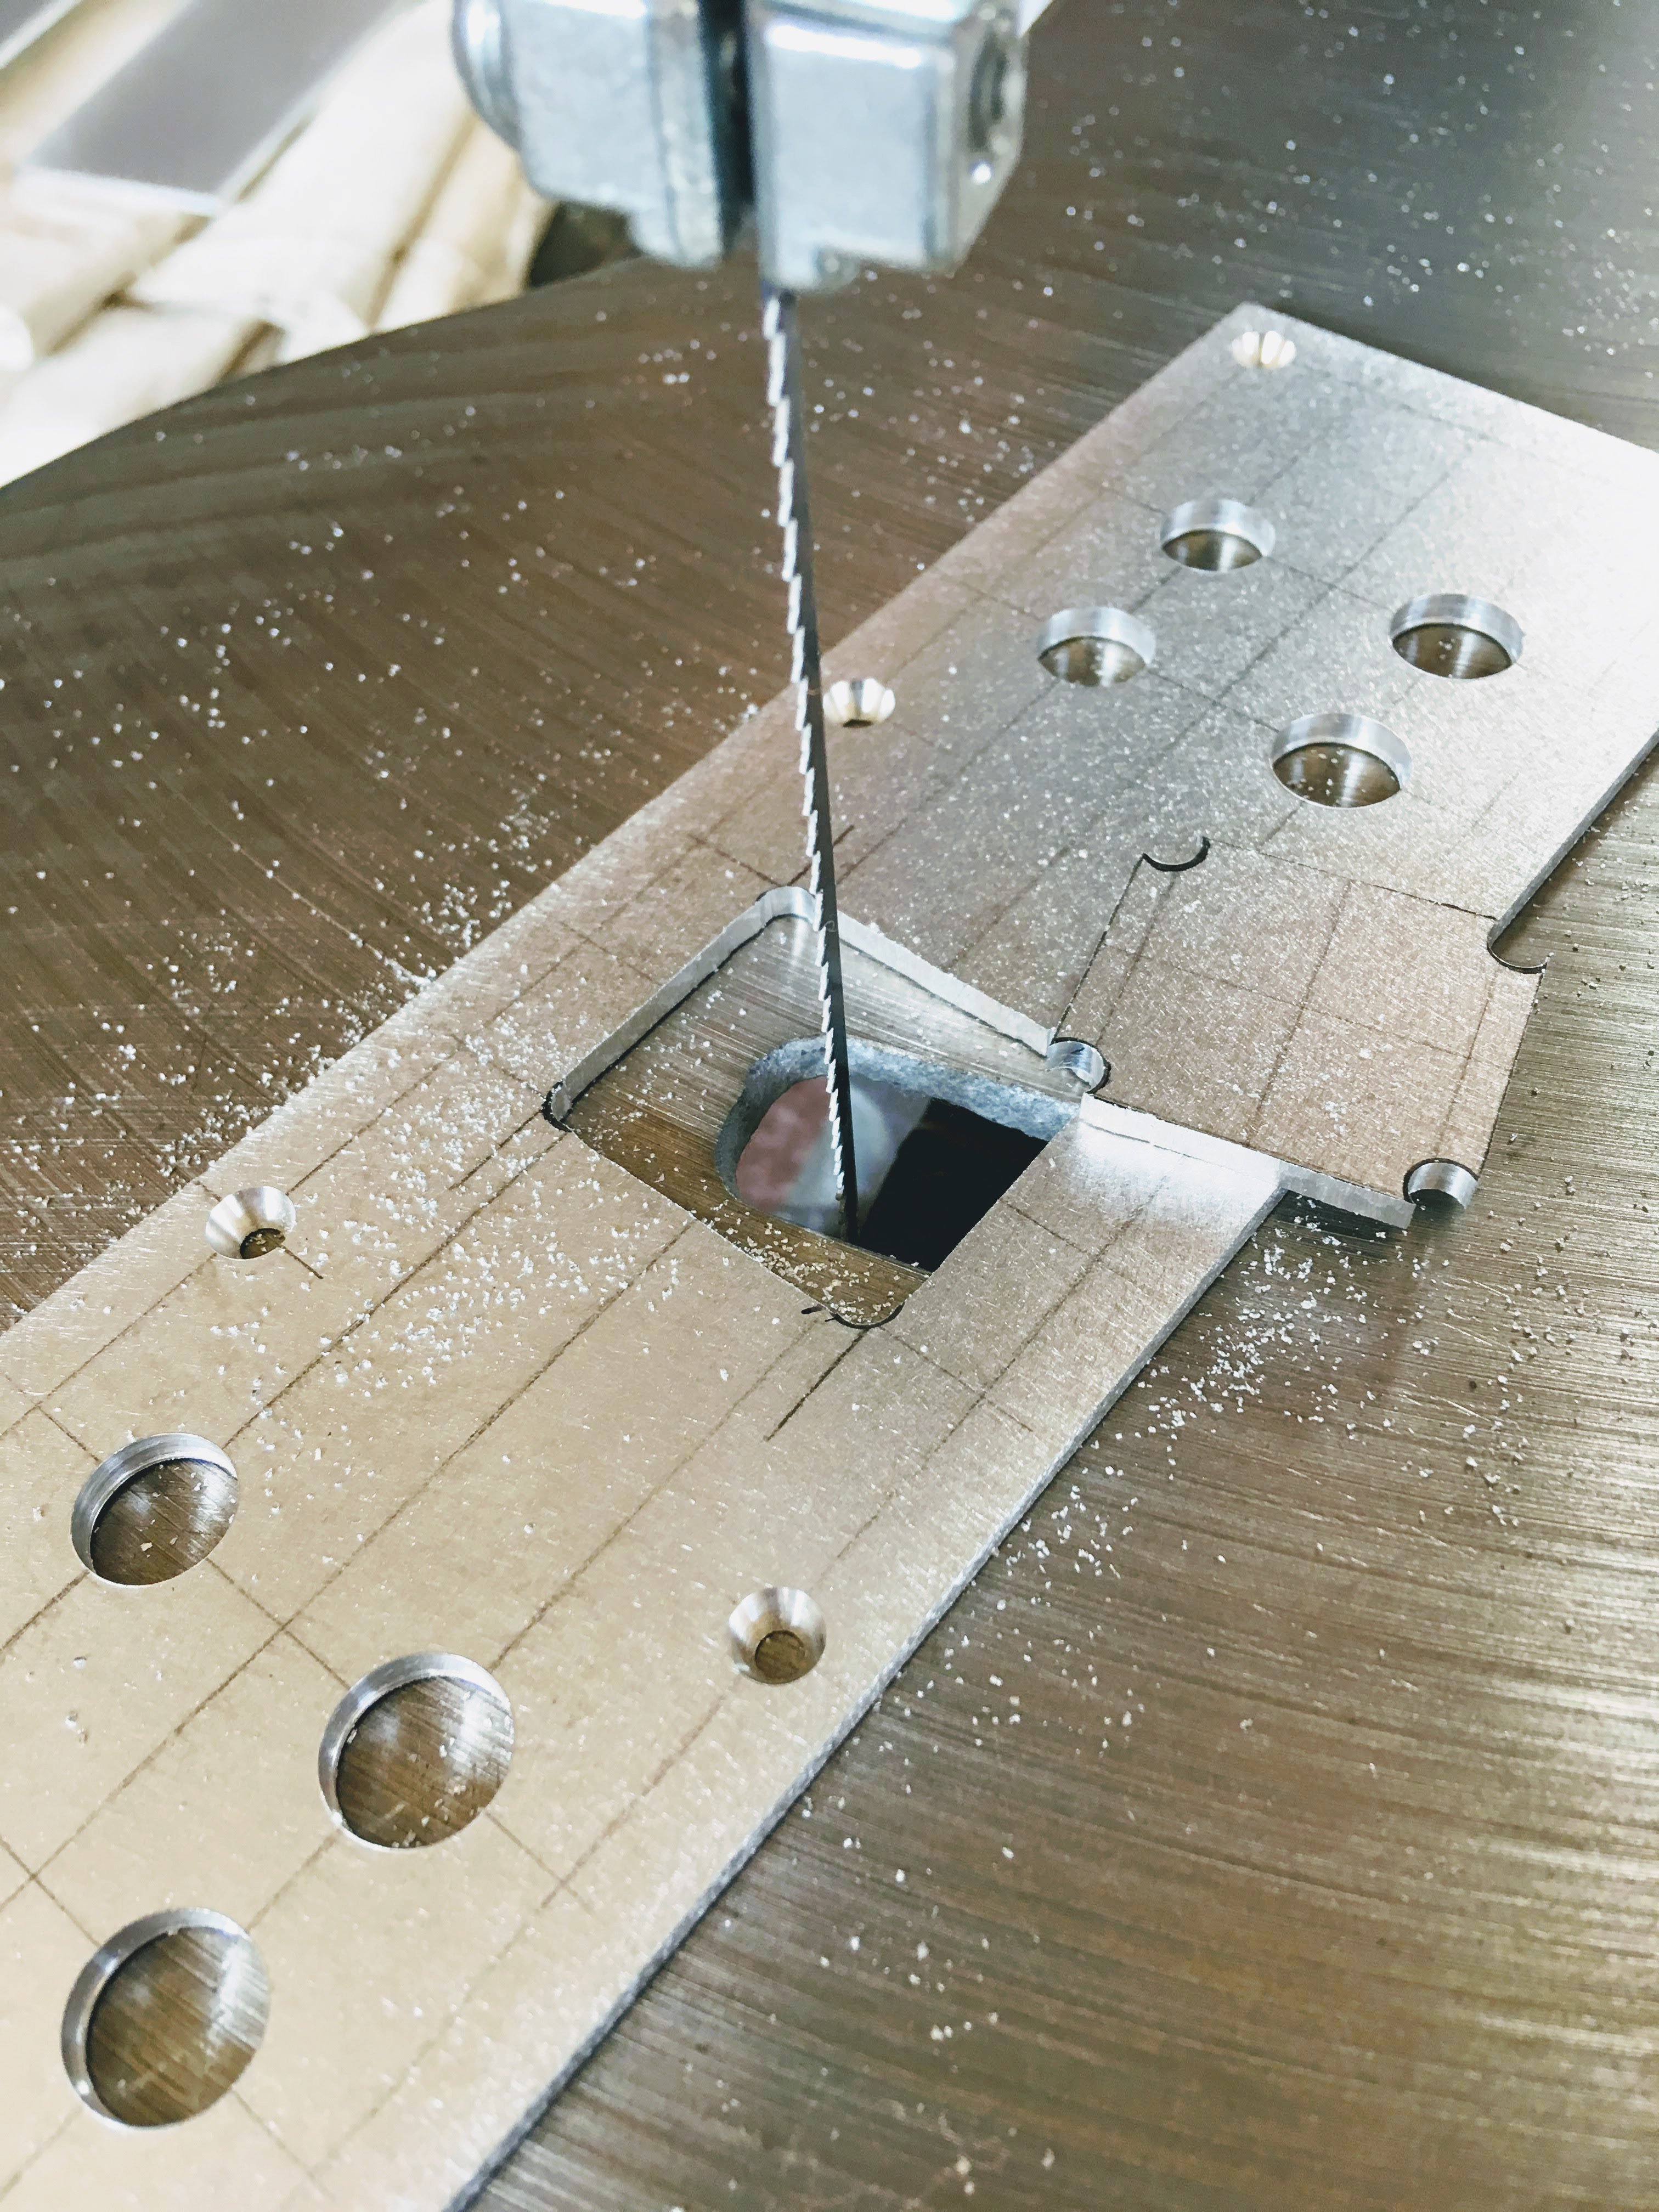
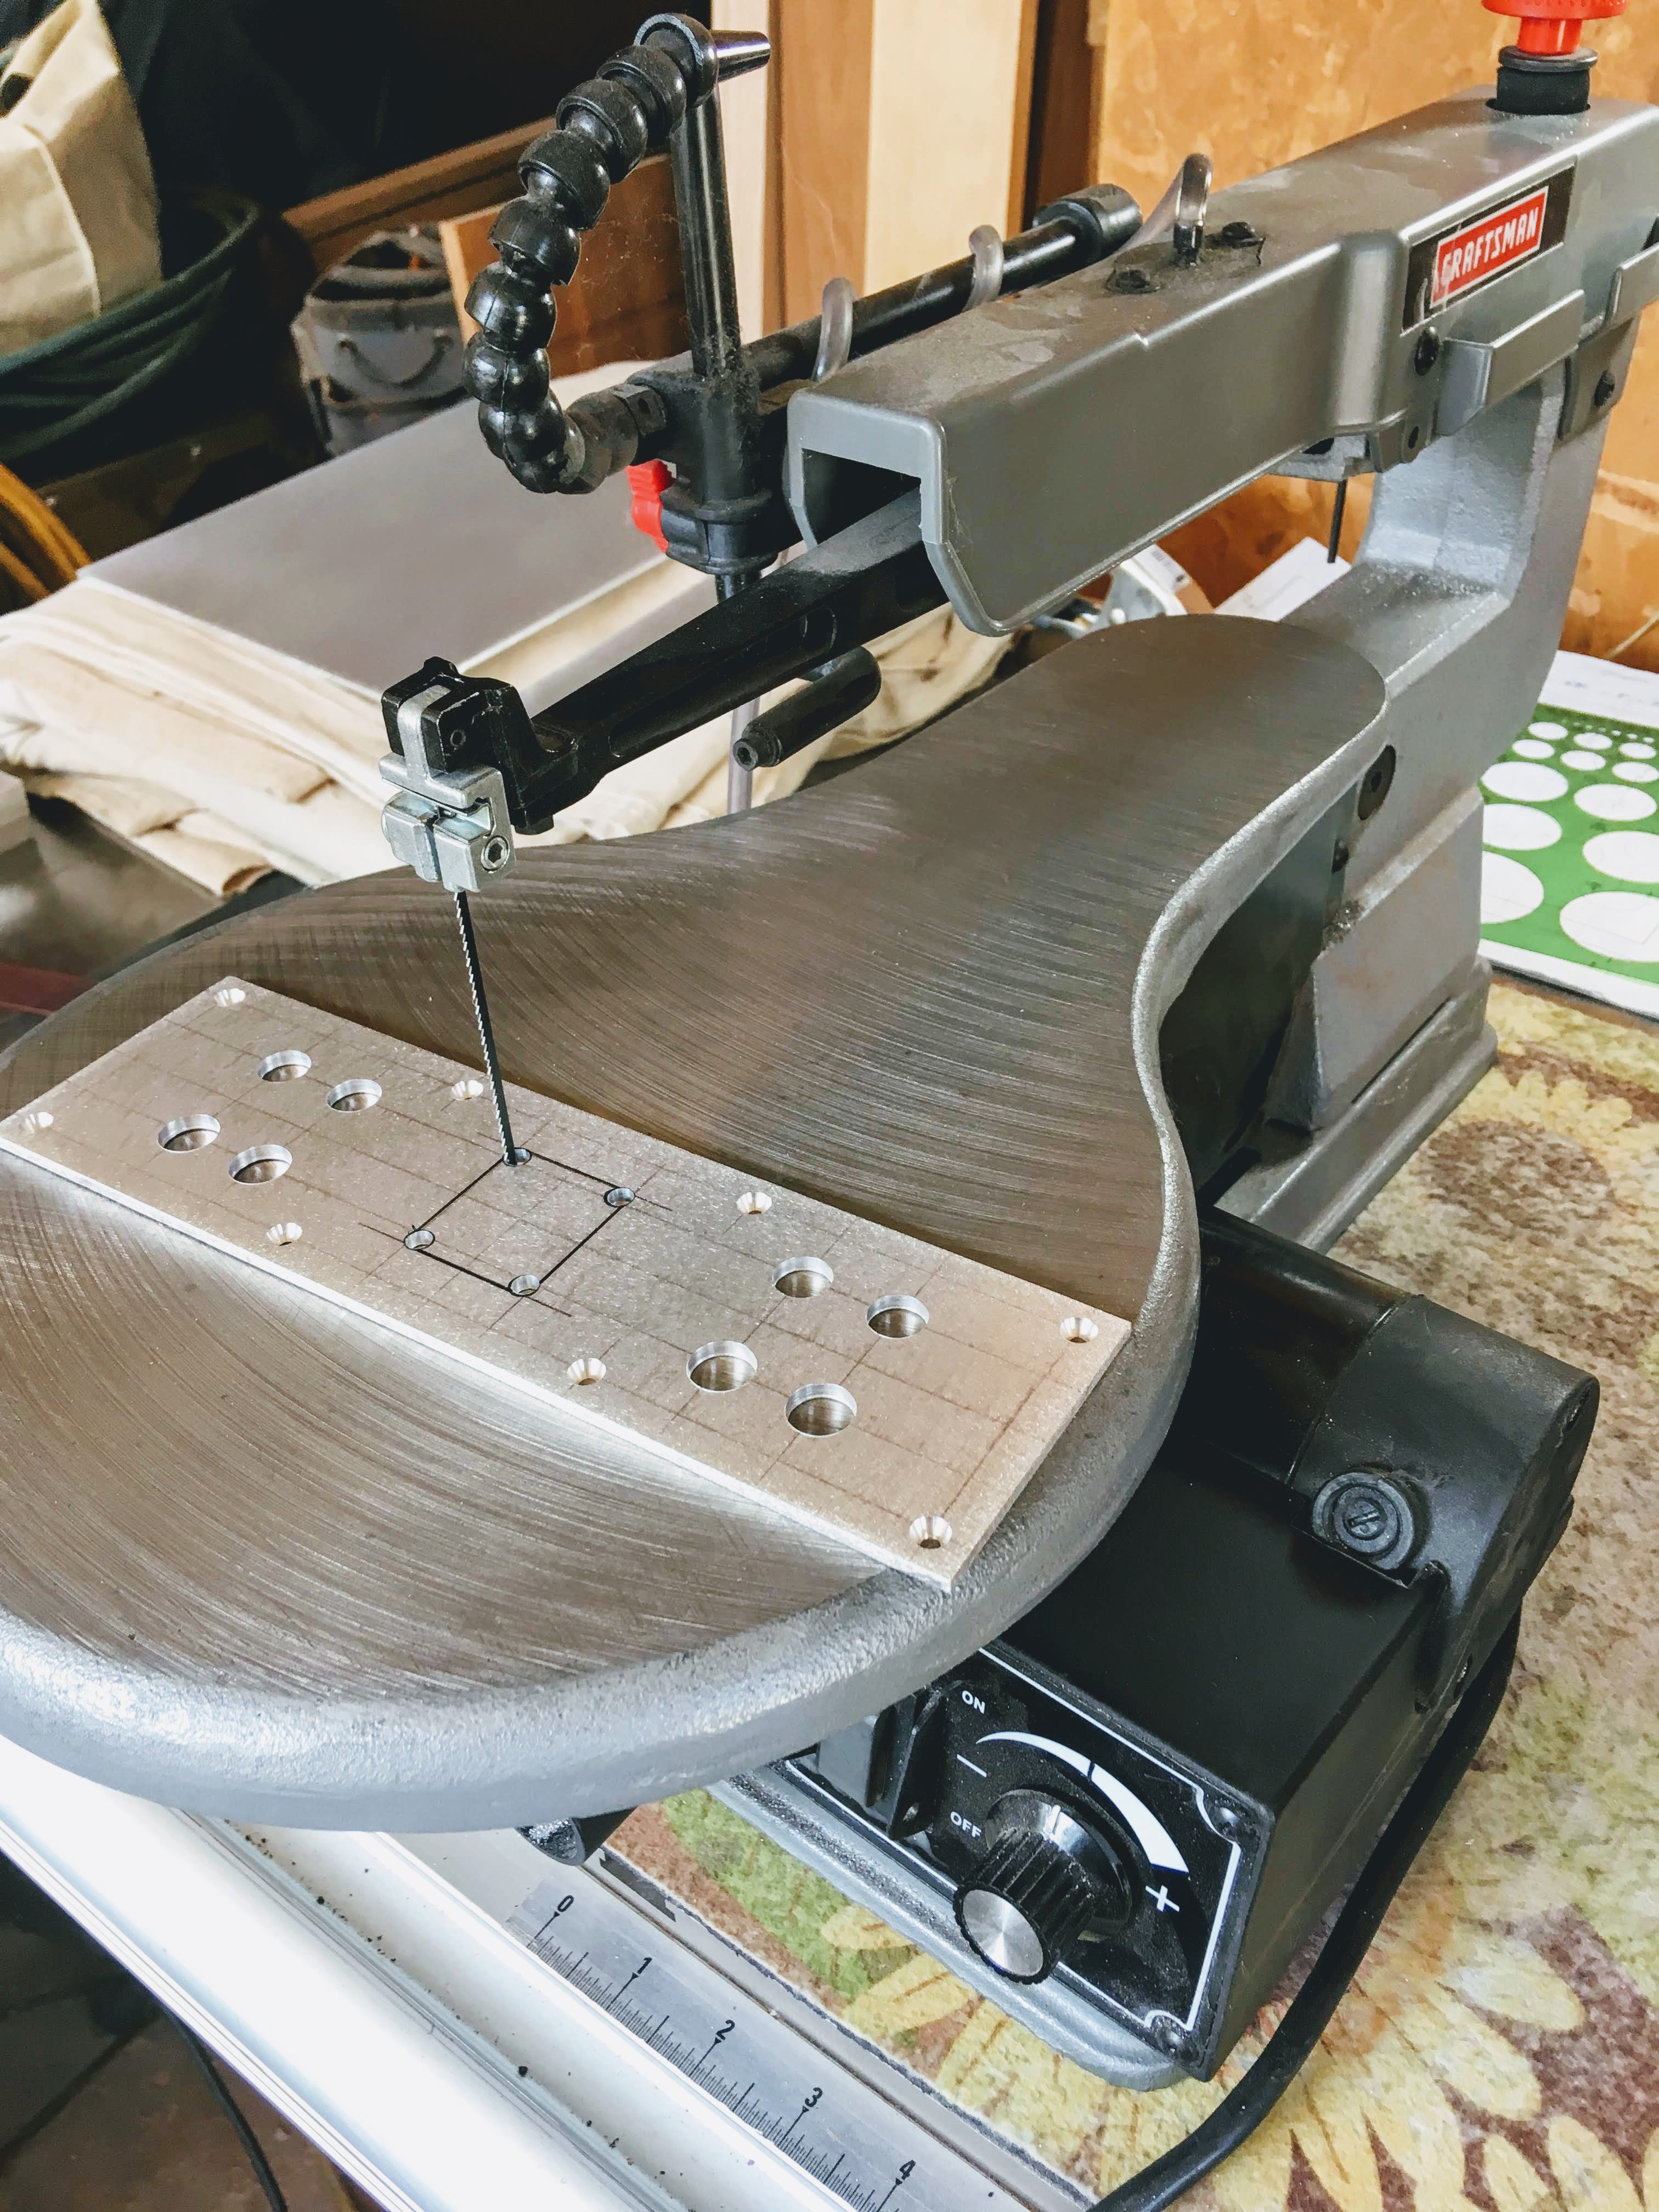
This is the tool of choice for cutting any hole that isn't round. I've found that Olson 15 TPI blades work best, and at very low speed (strokes per minute)..... this takes forever, but no other method I've tried works as well. Note: It is far easier to cut aluminum "on-the-flat" with a scroll saw than it is to cut a curve. In the photo you can see that I have drilled a 3/16" hole in each corner of the IEC connector cut-out to allow for only flat cuts. Final clean-up of the square cuts are done with files.
- 80 replies
-
- 3
-
-
- 2a3
- single-ended
- (and 1 more)
-
Henry Scott Yocum Memorial Amplifier Build
ToolShedAmps replied to ToolShedAmps's topic in Talkin' Tubes
I physically layout all of the dimensions and drilling locations from my "blueprint" to the plates with a mechanical pencil, clear 18" ruler and machinists square. After the layout is complete for each plate, I use a spring-loaded marking tool to create a dimple at each drill point for the bit to start from. This is very important as it prevents the bit from "walking" off the desired drilling location. Using one of my two drill-presses, I mill each hole accordingly (note: DO NOT USE ANY CUTTING FLUID AS IT WILL DISALLOW THE "RESIST" FROM ADHERING TO THE PLATES FOR THE ETCHING PROCESS). Go slowly, wear hearing protection. I use titanium nitride coated twist drills, step-bits, and hole-saws to mill the aluminum. Chamfered counter-sinks are done using carbide end-mills mounted in the drill press.
- 80 replies
-
- 4
-
-
- 2a3
- single-ended
- (and 1 more)
-
Henry Scott Yocum Memorial Amplifier Build
ToolShedAmps replied to ToolShedAmps's topic in Talkin' Tubes
Here are all of the plates necessary to build Scott's amp. The top and bottom plates are cut oversize by 1/8" to allow precise fitting to the wood base (you'll see how this is done later). I use 100 grit loop-back sandpaper discs mounted in my trusty DeWalt random-orbit sander for all of the initial sanding (including the deburring of the plates between cuts).
- 80 replies
-
- 3
-
-
- 2a3
- single-ended
- (and 1 more)
-
Henry Scott Yocum Memorial Amplifier Build
ToolShedAmps replied to ToolShedAmps's topic in Talkin' Tubes
Howdy all, my next step in building an amplifier is cutting all of the 1/8" (3mm) 6061 Aluminum plates and milling/drilling them. DISCLAIMER: for you DIYers out there, I do not advocate that this be done at home by those of limited skill or unfamiliarity with the tools I use. I take NO responsibility for any mishaps that may occur. This is highly dangerous, please consider risk vs. reward before attempting to replicate ANY of my processes. This works for me, YMMV. I develop all of my layouts on 11" X 17" graph paper for all of the amplifiers I build. This helps visualize the amplifier and gives me a blueprint to work from. I use a Diablo "non-ferrous" blade mounted in my table saw to perform all of the cuts. I proceed slowly and clear the aluminum chips from the top of the saw after every single cut. Additionally, there is normally a burr created on the edge of the cut that must be sanded off prior to each subsequent cut to allow the plate to sit flat for the next cut. This process takes quite a bit of time so plan accordingly. Eye protection is MANDATORY, I wear safety glasses AND a full-face shield. Wear long-sleeved shirts, hot aluminum chips can and will burn you.
- 80 replies
-
- 1
-
-
- 2a3
- single-ended
- (and 1 more)
-
Tube recommendations for Quicksilver Horn Monos
ToolShedAmps replied to ElJacobo's topic in Talkin' Tubes
I'd suggest getting a pair of N.O.S. or lightly used G.E. or RCA ST-shaped 6L6g's. Either black-glass or grey-glass are fine... -
Henry Scott Yocum Memorial Amplifier Build
ToolShedAmps replied to ToolShedAmps's topic in Talkin' Tubes
Hi Richie, No, actually it's 6061 Aluminum, not stainless steel. And that process will be highlighted following the next installment. I do use fairly benign chemicals, however, when combined and the aluminum plates are added the witches brew becomes fairly violent (I don't recommend anyone try this at home). Matt. -
Henry Scott Yocum Memorial Amplifier Build
ToolShedAmps replied to ToolShedAmps's topic in Talkin' Tubes
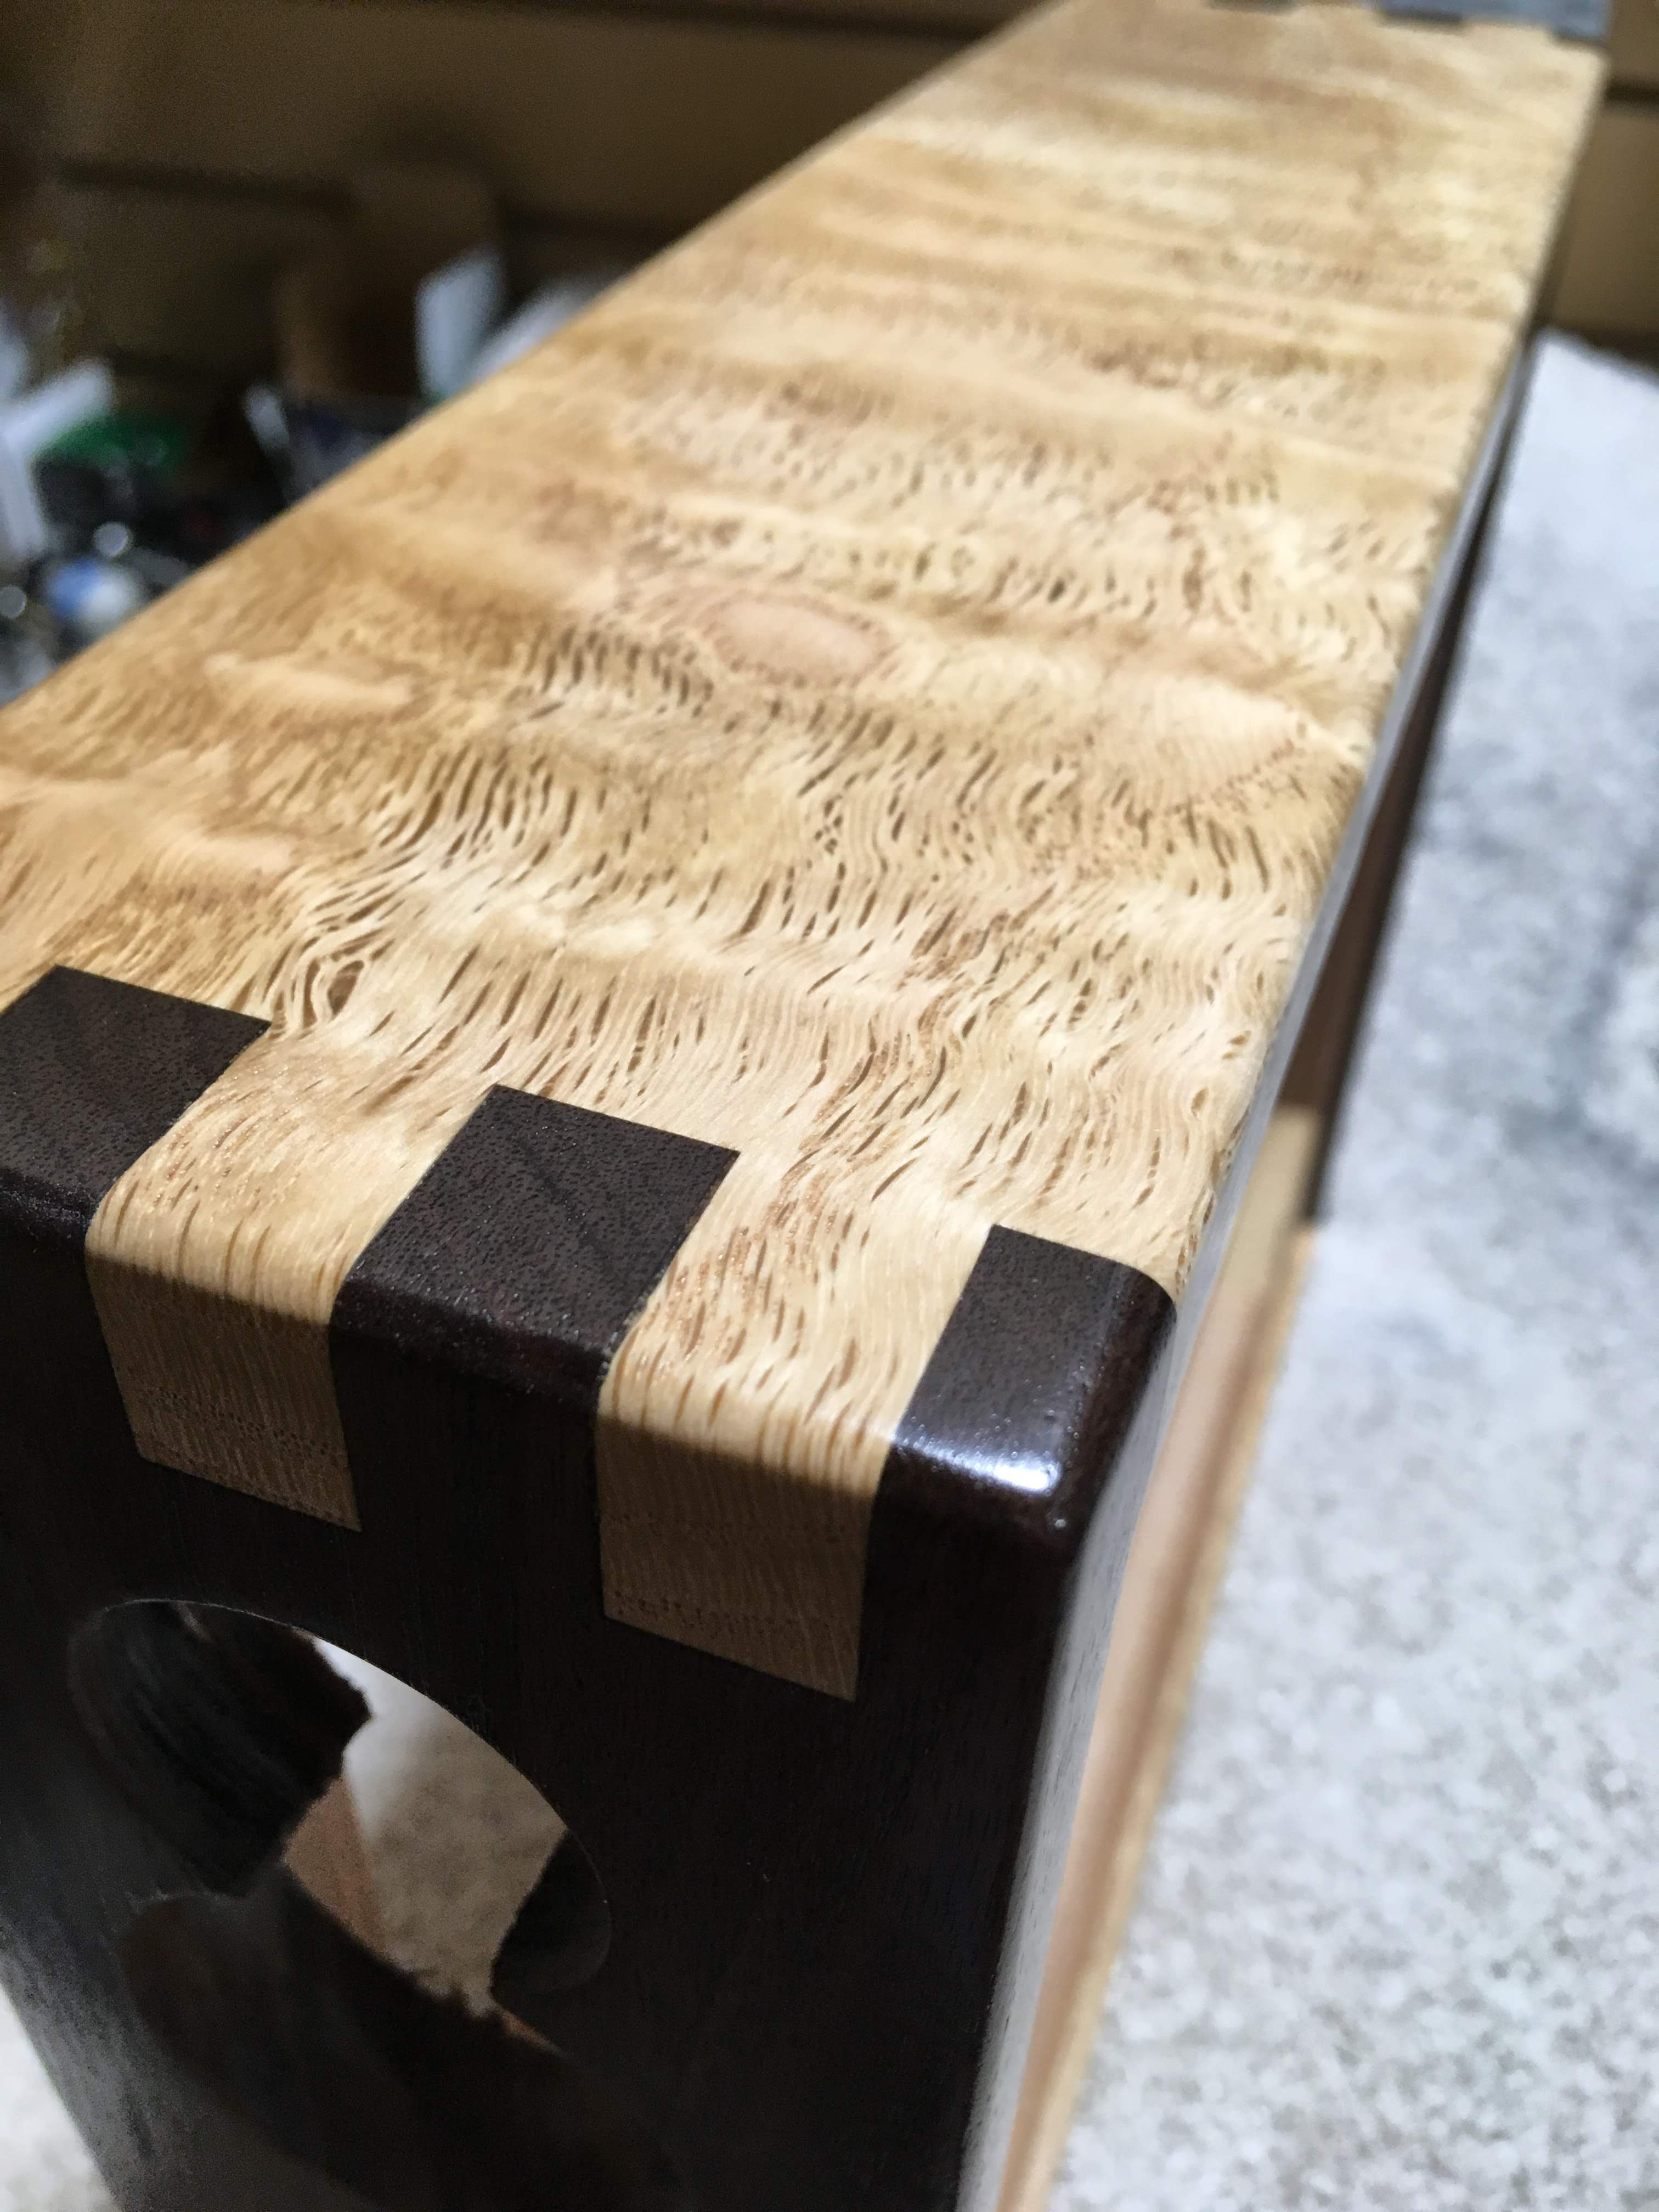
A couple more pics showing the cleats.
- 80 replies
-
- 3
-
-
- 2a3
- single-ended
- (and 1 more)
-
Henry Scott Yocum Memorial Amplifier Build
ToolShedAmps replied to ToolShedAmps's topic in Talkin' Tubes
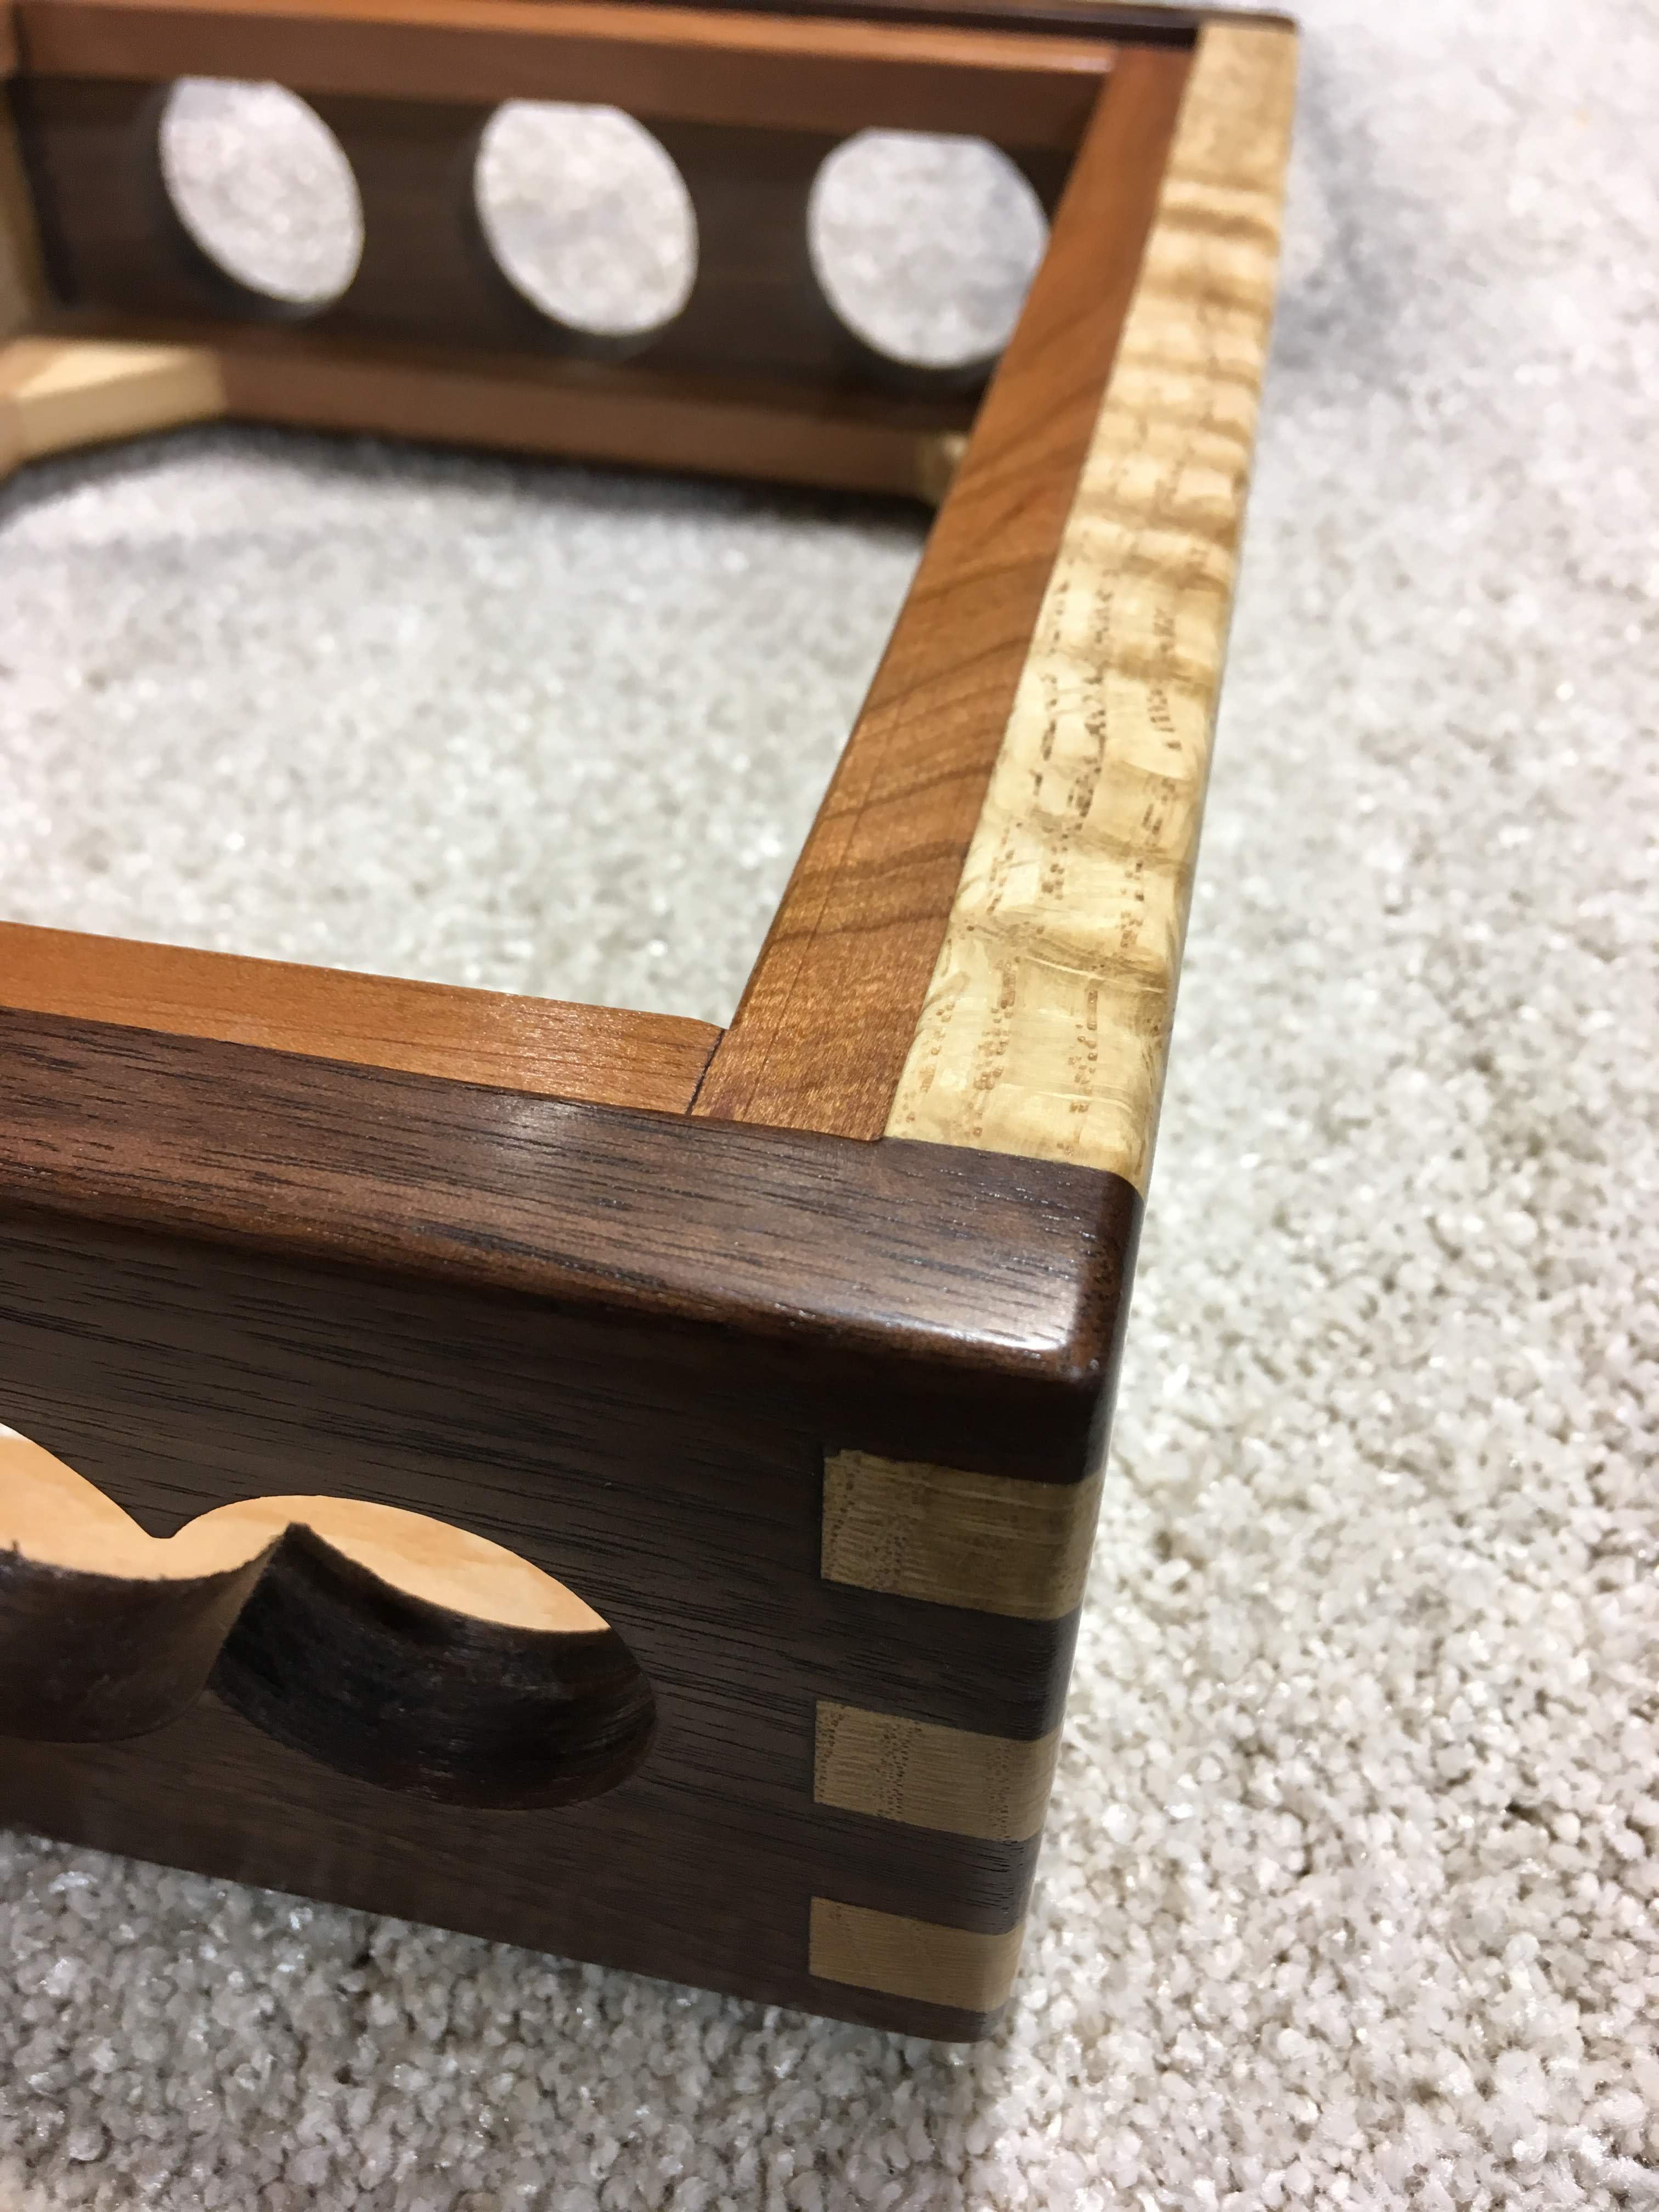
Hey all, as promised, here are a few detailed photos of how my amp bases are built in house. The base dimensions are 12" X 9 1/2" X 3 1/4". Comprised of 16 separate pieces, the 5/8" sides and front/back are "finger" joined and glued. The 8, 1/2" X 1/2" cleats are glued 1/8" from the top and bottom of the frame allowing for a reveal for the top and bottom plates to sit flush. When dry, finally the 4 glue blocks for the feet are glued in. When all is dry, everything is sanded from 100 grit all the way to 380 grit. NOW the fun starts! Every amp base has 8 coats of pre-catalyzed lacquer applied with 400 grit block sanding between each and every coat. After the last coat is applied and allowed to cure completely (2 days) the base is rubbed out with grey then white Scotchbrite pads. The last step is waxing the bases with Black Bison "dark" paste wax (this is the step represented by the photos), allowed to dry for a few days prior to buffing on my wheel with carnuba wax. The next installment will address the 1/8" (3mm) 6061 Aluminum plates, how I cut them to dimension and mill them. Cheers! Matt.
- 80 replies
-
- 4
-
-
- 2a3
- single-ended
- (and 1 more)
-
Henry Scott Yocum Memorial Amplifier Build
ToolShedAmps replied to ToolShedAmps's topic in Talkin' Tubes
OK, a brief description of Scott's amplifier is in order before we begin. His amplifier will be a variation of my PWK Special Edition Euphoria Stereo 45 amplifier. His will be a Two-stage, Triode-Strapped Pentode (E180F/E280F/D3a) driving a 2A3 Triode. It will be tube rectified via GZ37 or 5U4g. DC filament heaters for the driver stage and AC heating for the 2A3's. I am including top-plate mounted "hum" pots for the 2A3 filaments for the very 1st time so that Scott's family can even elect to swap in some of the very inexpensive Chinese tubes and have a means of balancing the heater rails. Additionally, as gobs of power is unnecessary to drive K-Horns, we had elected to use a pair of my very favorite output transformers with a 5K primary winding which will yield approx. 4 watts RMS into the typical Klipsch 8 Ohm load. For the DIY'ers among you, I will publish the schematic for the circuit and power supply "as built" at the end of the thread. As per usual, every amplifier begins with the wood base. Scott had decided on the "standard" Klipsch 2Tone flavor of Curly White Oak and Black Walnut. I'll post pics this evening. Cheers! Matt.- 80 replies
-
- 4
-
-
- 2a3
- single-ended
- (and 1 more)
-
It's been awhile since I've posted to the forum for various reasons. However, I thought this would be an appropriate vehicle to allow those interested to see the construction of an amplifier from start to finish..... the ToolShed way. As many of you may know, shortly after the pilgrimage we unexpectedly lost a great addition to our extended Klipsch family, Henry "Scott" Yocum. He was a jovial, kind-hearted, Klipsch lover that I came to know during the several months he was in my queue. We had half a dozen hour-long conversations about everything from music, speakers/amplifiers to food. He will be greatly missed. The amplifier that will be constructed on this build thread is his. Built exactly as he wanted it, with the exception that it will have his name etched into the top plate where the name of the amplifier normally goes. Hopefully, once completed, his family will listen to it through his beloved K-Horns and the music will touch them as it did him. So, if you have interest, tune-in as I'll be posting pics as well as text to walk y'all through this build over the next few weeks. Godspeed Scott..... Matt.
- 80 replies
-
- 10
-
-
- 2a3
- single-ended
- (and 1 more)
-
When the high end gets a bit ludicrous
ToolShedAmps replied to tube fanatic's topic in Talkin' Tubes
Microphonic tubes go directly to a landfill......sorry, couldn't help myself. -
The input sensitivity running the EF86 is 1.32v to full output in the Genesis6. Sensitivity is slightly lower (1.55v to full output) running the E80F in the same Genesis6. As long as any directly connected source capable of the industry standard CD Player output voltage (2.0v) will easily be able to drive the Genesis6 to full output. Optionally, the Genesis6 can be ordered with the 6AU6 Input/Driver instead of the EF86. This Pentode allows for an input sensitivity of 1.10v to full output in the Genesis6 for those customers who would like to connect a typical MM Phono-Stage directly to the Genesis6 without the need for an active Line-Stage. Although the stocks of N.O.S. 6AU6's do not seem to be dwindling, this is NOT the standard configuration of the Genesis6 as there is no current-production 6AU6 being manufactured. Sonically, it's a coin-flip, both versions running great examples of either tube type yield outstanding results.. TS Matt.
-
Yes, the E80F has slightly less gain, however, I believe it's a much superior tube in sound quality to most EF86's (aside from perhaps the "chrome plate Telefunken) and it is a 10,000 hr. heater-life tube...additionally, the gain difference in most cases is negligible as it doesn't need to swing 60v in any of my circuits. TS Matt.
-
Air Tight
-
Perhaps I can answer some of this question and Matt can add his own $0.02 The Genesis6 is a stereo amplifier, not Mono-Blocs. Matt is currently running them with 6L6 type output tubes which in this design yield nearly 6 watts per channel (plenty to drive the bass-bins of his La Scala's). However, as good as any 6L6 is (wired single-ended AND as a Pentode, driven by a Pentode) it CANNOT hold a candle to the absolutely mind-bending sound quality of the RCA "box-plate" 6W6gt. Unfortunately, this tube (like a DHT 45) is capable of less than 3 watts operating near cut-off. This is not enough power to drive Matt's La Scala's to the type of peak SPL's he enjoys. The addition of the Mono-Bloc's will allow Matt to run the mid-range and tweeters with the Genesis6 using the 6W6gt outputs and run the bass-bins with 12 watts of single-ended KT-88 power. As the Mono-Bloc's as well as the stereo Genesis6 have discrete input level controls per channel, matching them to his passive split-crossover network will be a piece of cake. Additionally, since his Exodus Line-Stage has two pair of outputs, y-cables or other such compromises will be unnecessary. I expect the results will be fantastic. TS Matt.
-
Ya know all I have is SS..... couple Adcoms and alot of the Bob Carver amps.... But I can see down the road getting some tubes for sure... I think they look soooo cool. The speaker I would power with tubes would be my LaScala's TS Matt your work is Awesome for sure I'm tuned in for updates..... MKP :-) Thanks MKP! I'm looking forward to getting Matt's Mono-Blocs finished and delivered (as I consider Matt within driving distance, I'm going to personally deliver them. This will give me an opportunity to hear his beautifully restored La Scala's myself. TS Matt.
-
Thanks Russ! Matt is getting the Hashimoto Power Transformers and Jensen Copper Foil coupling caps in his Mono-Blocs. However, because of the circuits' output current requirements (the vintage Tamura's are only good for about 60mA), he is getting a pair of specially wound dual-secondary (8 Ohm @ 100mA and 600 Ohm @ 20mA) output transformers. The dual-secondaries are necessary to allow Matt to use the transformer-coupled Line-Output (600 Ohm) to drive very long cable runs (if necessary) to his dual subwoofers. TS Matt.
-
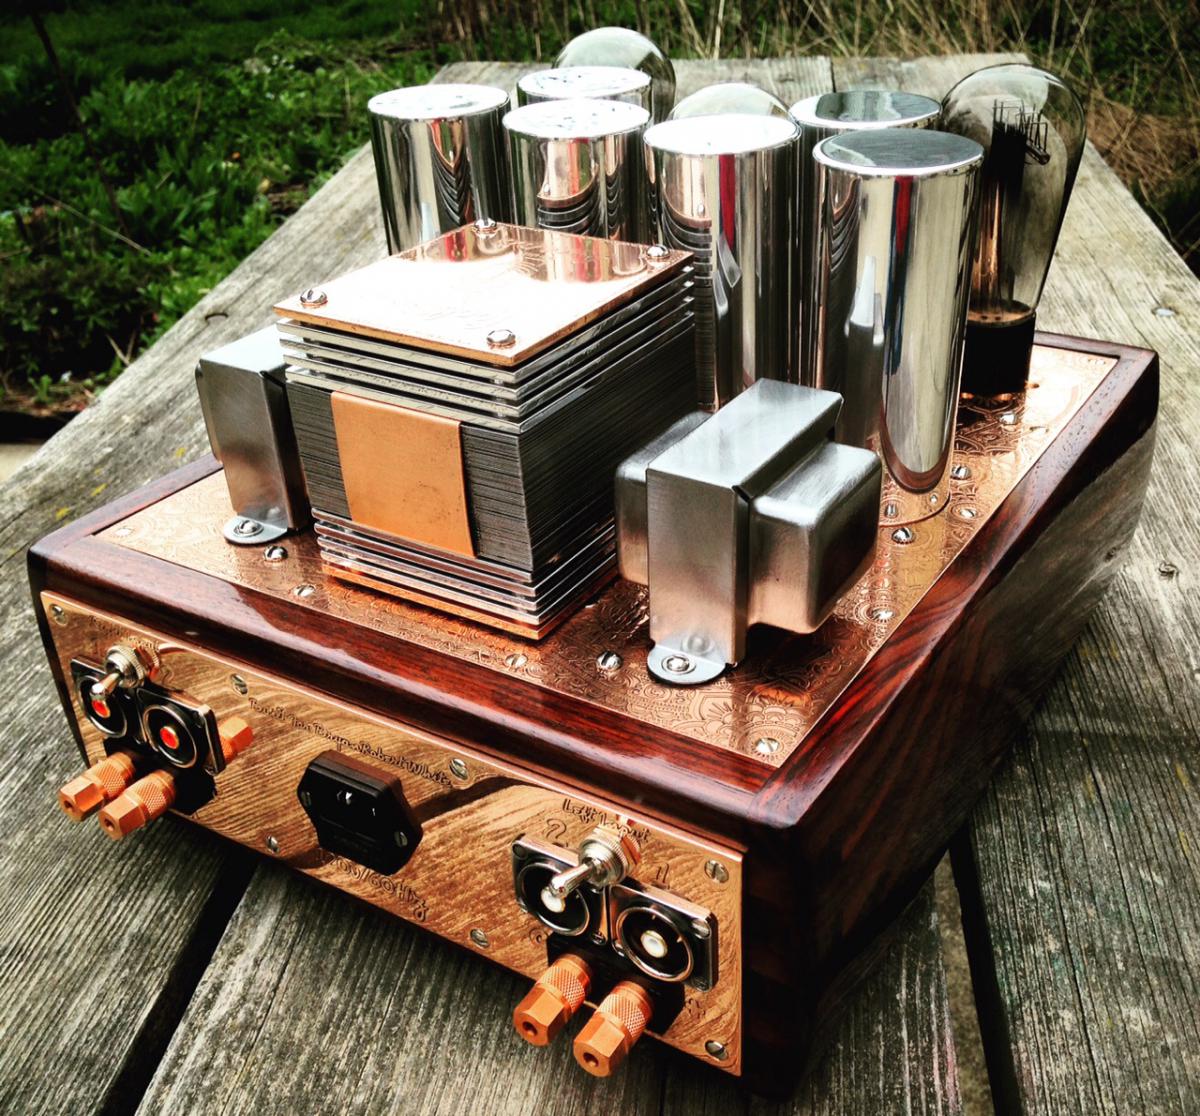
This DHT 45 SET is Polished Copper and East Indian Rosewood.
-
Kevin is a great guy and an absolute tube fanatic. His recommendations have always been spot-on. His pricing is simply a reflection of his expertise, well worth the extra few dollars to insure you are getting what you paid for. TS Matt.