John N. Lumley
-
Posts
12 -
Joined
-
Last visited
John N. Lumley's Achievements
Member (2/9)
16
Reputation
-
Hi Henry, thanks for posting. If you look at current tube prices (NOT NOS), you might find that the old tubes are a bargain! and in most cases, better sounding. YMMV https://www.tubedepot.com/products/sovtek-6sj7 ($49.95) https://www.tubedepot.com/products/genalex-gold-lion-6v6gt-cv-511-power-vacuum-tube ($59.95) https://www.tubedepot.com/products/sovtek-5y3gt-rectifier-vacuum-tube ($35.95)
-
Hi again, here's current NOS tube prices at https://vacuumtubesinc.com/ A reliable seller in Orlando, Florida, USA, that I've used for many years. 6SJ7 $7.50 ea. 6Y6GT $3.50 ea. 6W4GT $3.00 ea. Rgds, <JNL>
-
OK, Mouser has 36 of these in stock; with the cheapest UPS-ground shipping, the cost is $41.75 for a pair. https://www.mouser.com/ProductDetail/546-1444-972 Hawk is cheaper, but why buy there, when you can combine shipping of the electronic parts at Mouser, and save on shipping? (one vs. two shipping costs) I can ship a pair of CNC machined enclosures for $17.10, via a USPS flat-rate medium box, in the USA 48 states. So, we are at a total of $58.85. BTW, I have not marked up any the costs! Now, I just need to estimate the CNC machining costs. Perhaps a group-buy of 10 pairs might be a good idea to lower costs? Rgds, <JNL>
-
Ok, front view here. Couldn't post both due to MB limits; <JNL>

-
Well, thanks guys for the kind words! There is nothing at all wrong with Maynard's "LITTLE SWEETIE" A really splendid design, I might add. Without his inspiration, I would have had nothing to build on. I like to build my way, and he likes to build his way. I'm sure both work and sound very similar. If there's enough interest, I could supply CNC machined Hammond 6X9X2" aluminum mono-block chassis (as used by Maynard) They would be ready to use, without any metal-working, just bolt on the parts. I might at a later date, offer a partial parts kit that has tube sockets, IEC socket, on-off switch, fuse holder, mounting screws, etc. Builders could then choose their favorite resistors, caps, and tubes. I like to drill & tap all the mounting holes #6-32, which makes it very easy to mount all the parts from the outside of the chassis. It's so much easier than holding a heavy transformer in one hand, and then trying to insert a screw and nut with the other hand from underneath. Yeah, I'm a retired tool & diemaker that has my own wood-working, and CNC machine shop on the property. I started building Knight Kits in high school, ca. 1962, and DIY around 2000. A nice forum; fun to read and learn from! Rgds, <JNL>
-
The long awaited "Little Sweetie" mono SETs
John N. Lumley replied to tube fanatic's topic in Talkin' Tubes
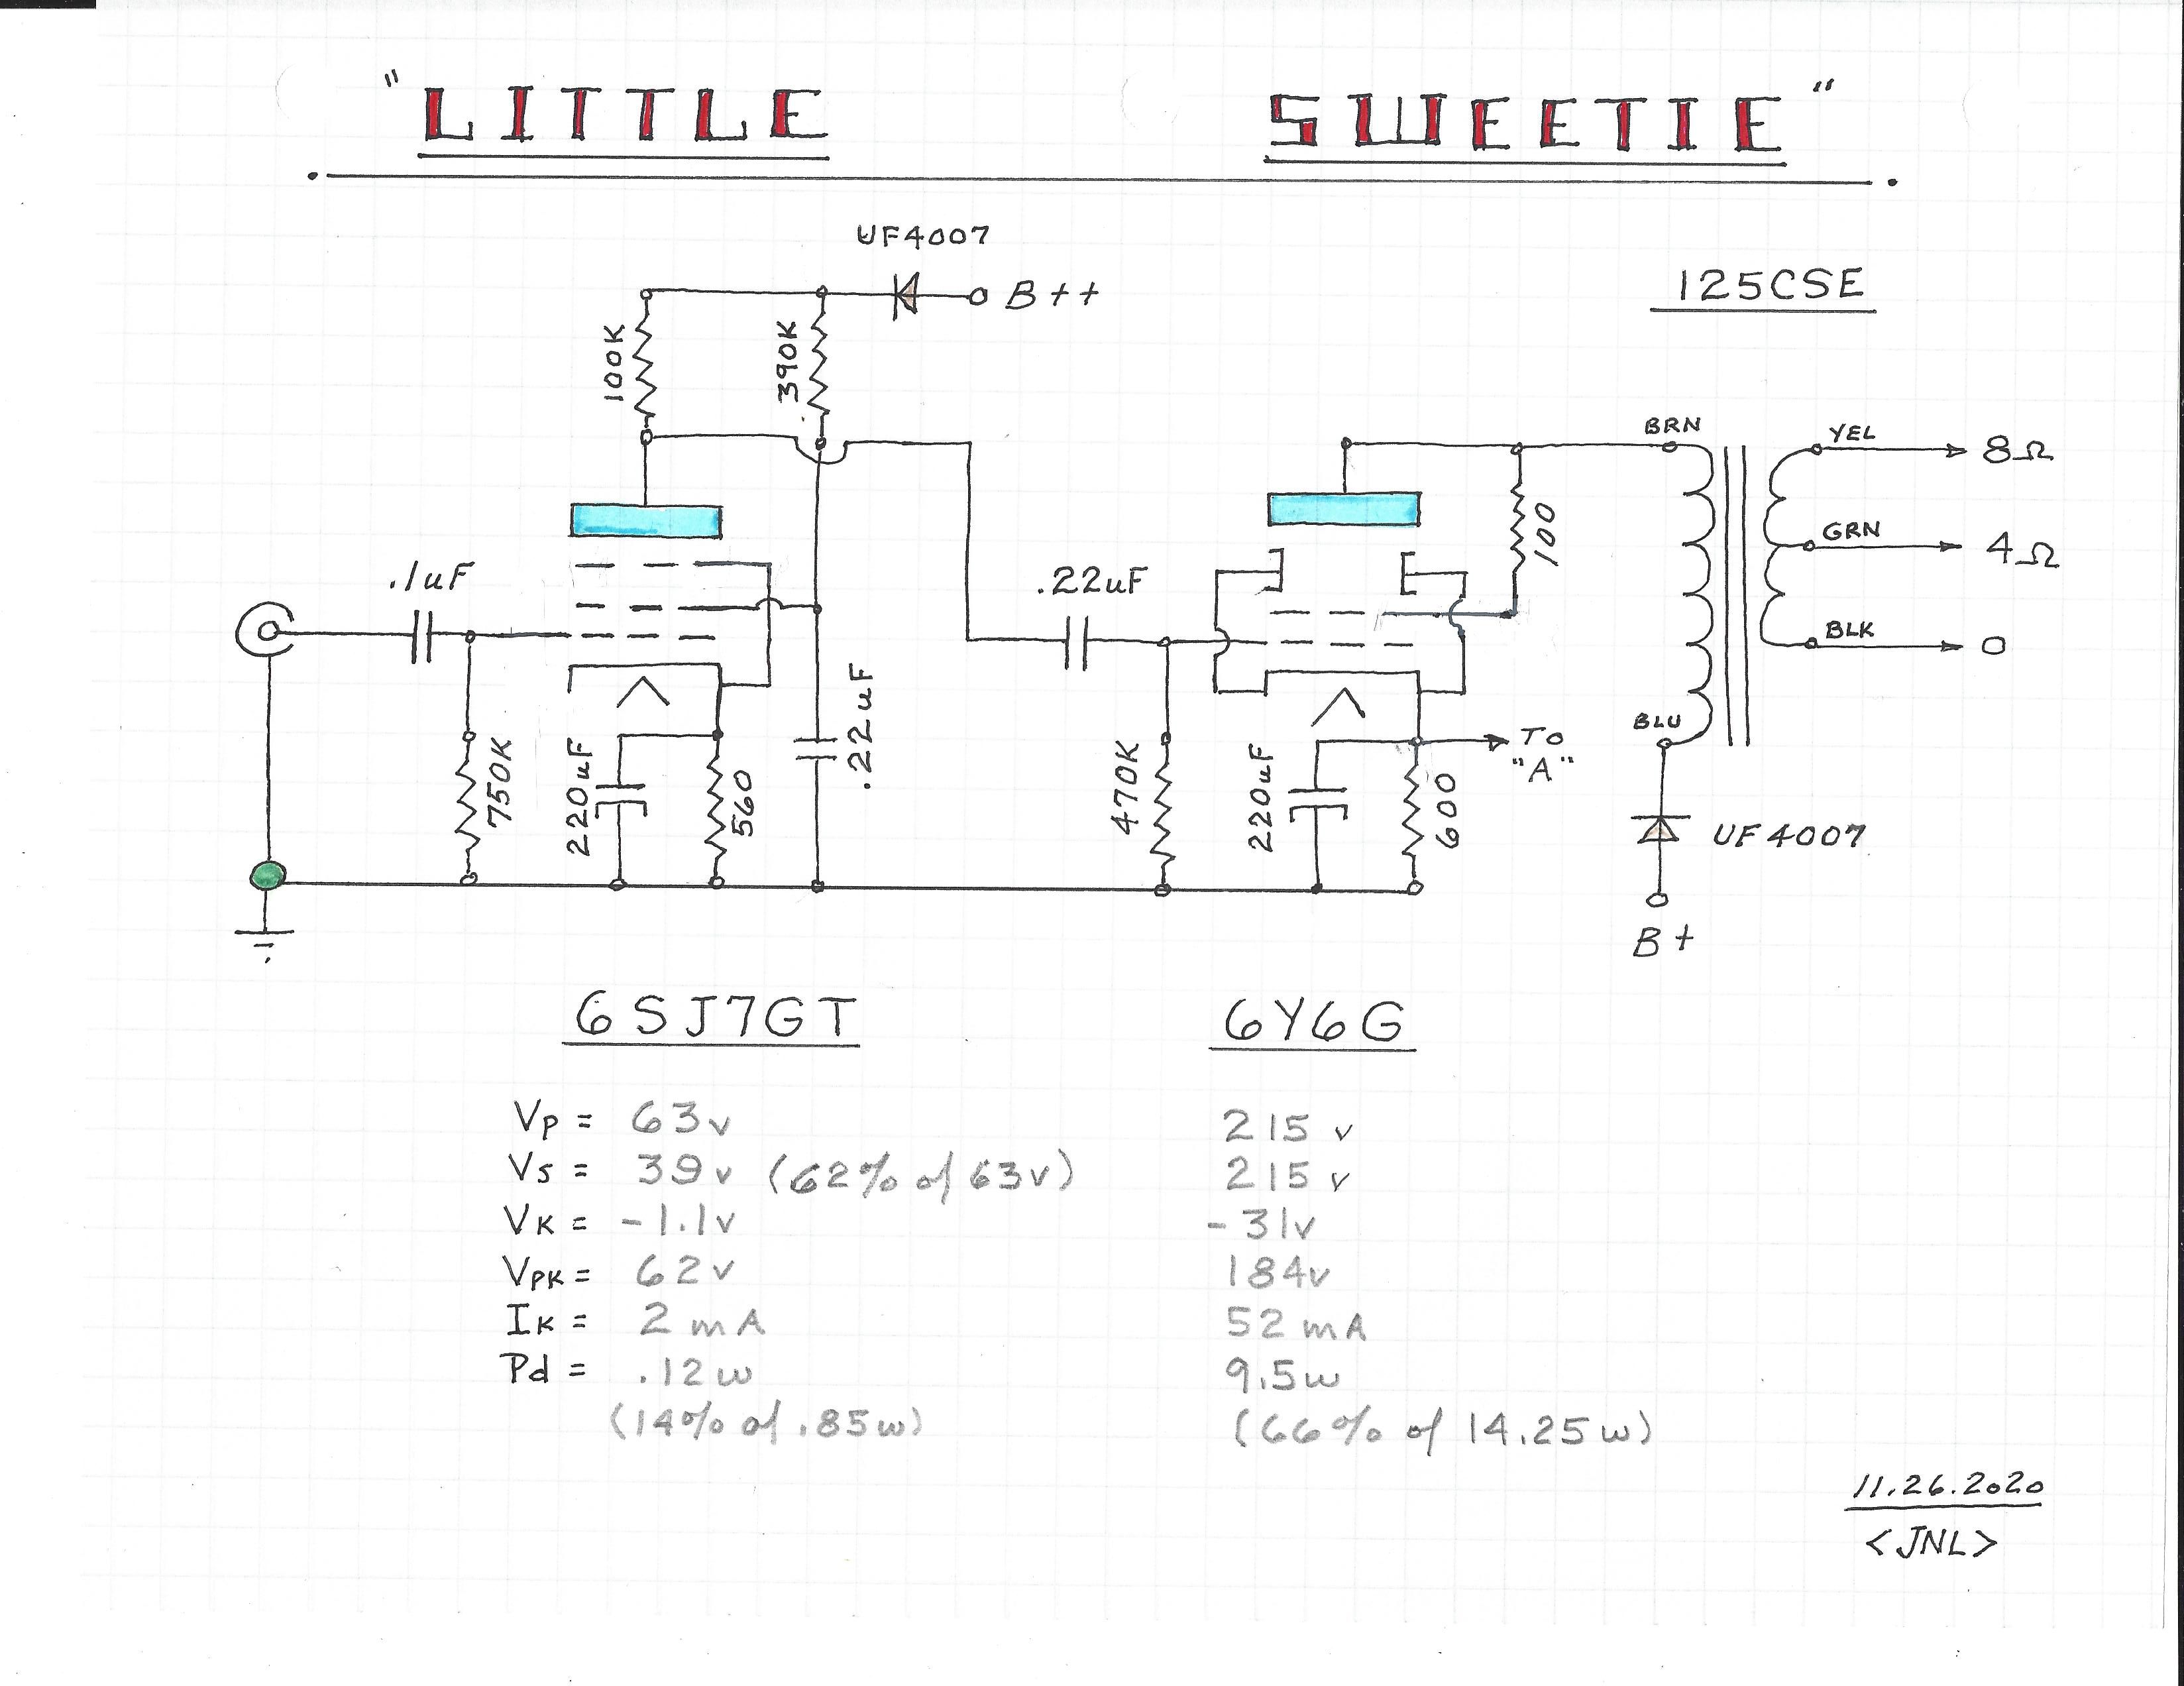
Well, in a nutshell, the diodes prevent the driver tube voltage sagging, when the power tube draws heavy current. If you Google "stopper diode", you find better explanations. rgds, JNL. -
The long awaited "Little Sweetie" mono SETs
John N. Lumley replied to tube fanatic's topic in Talkin' Tubes
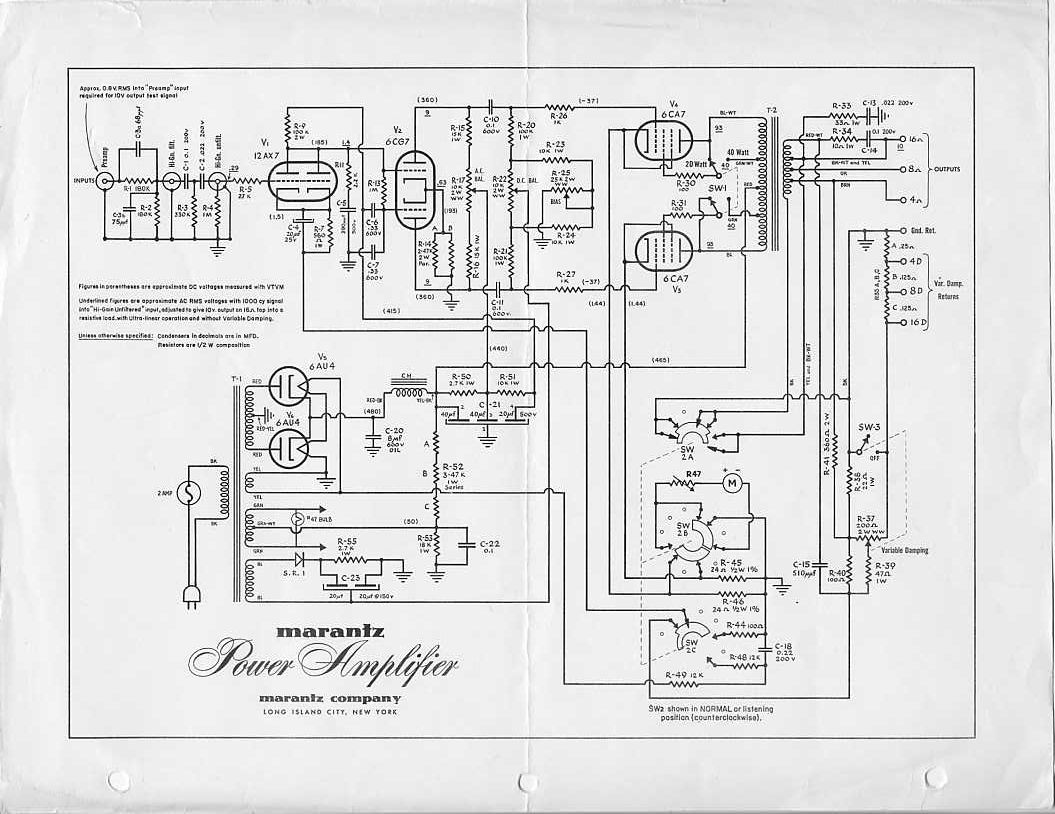
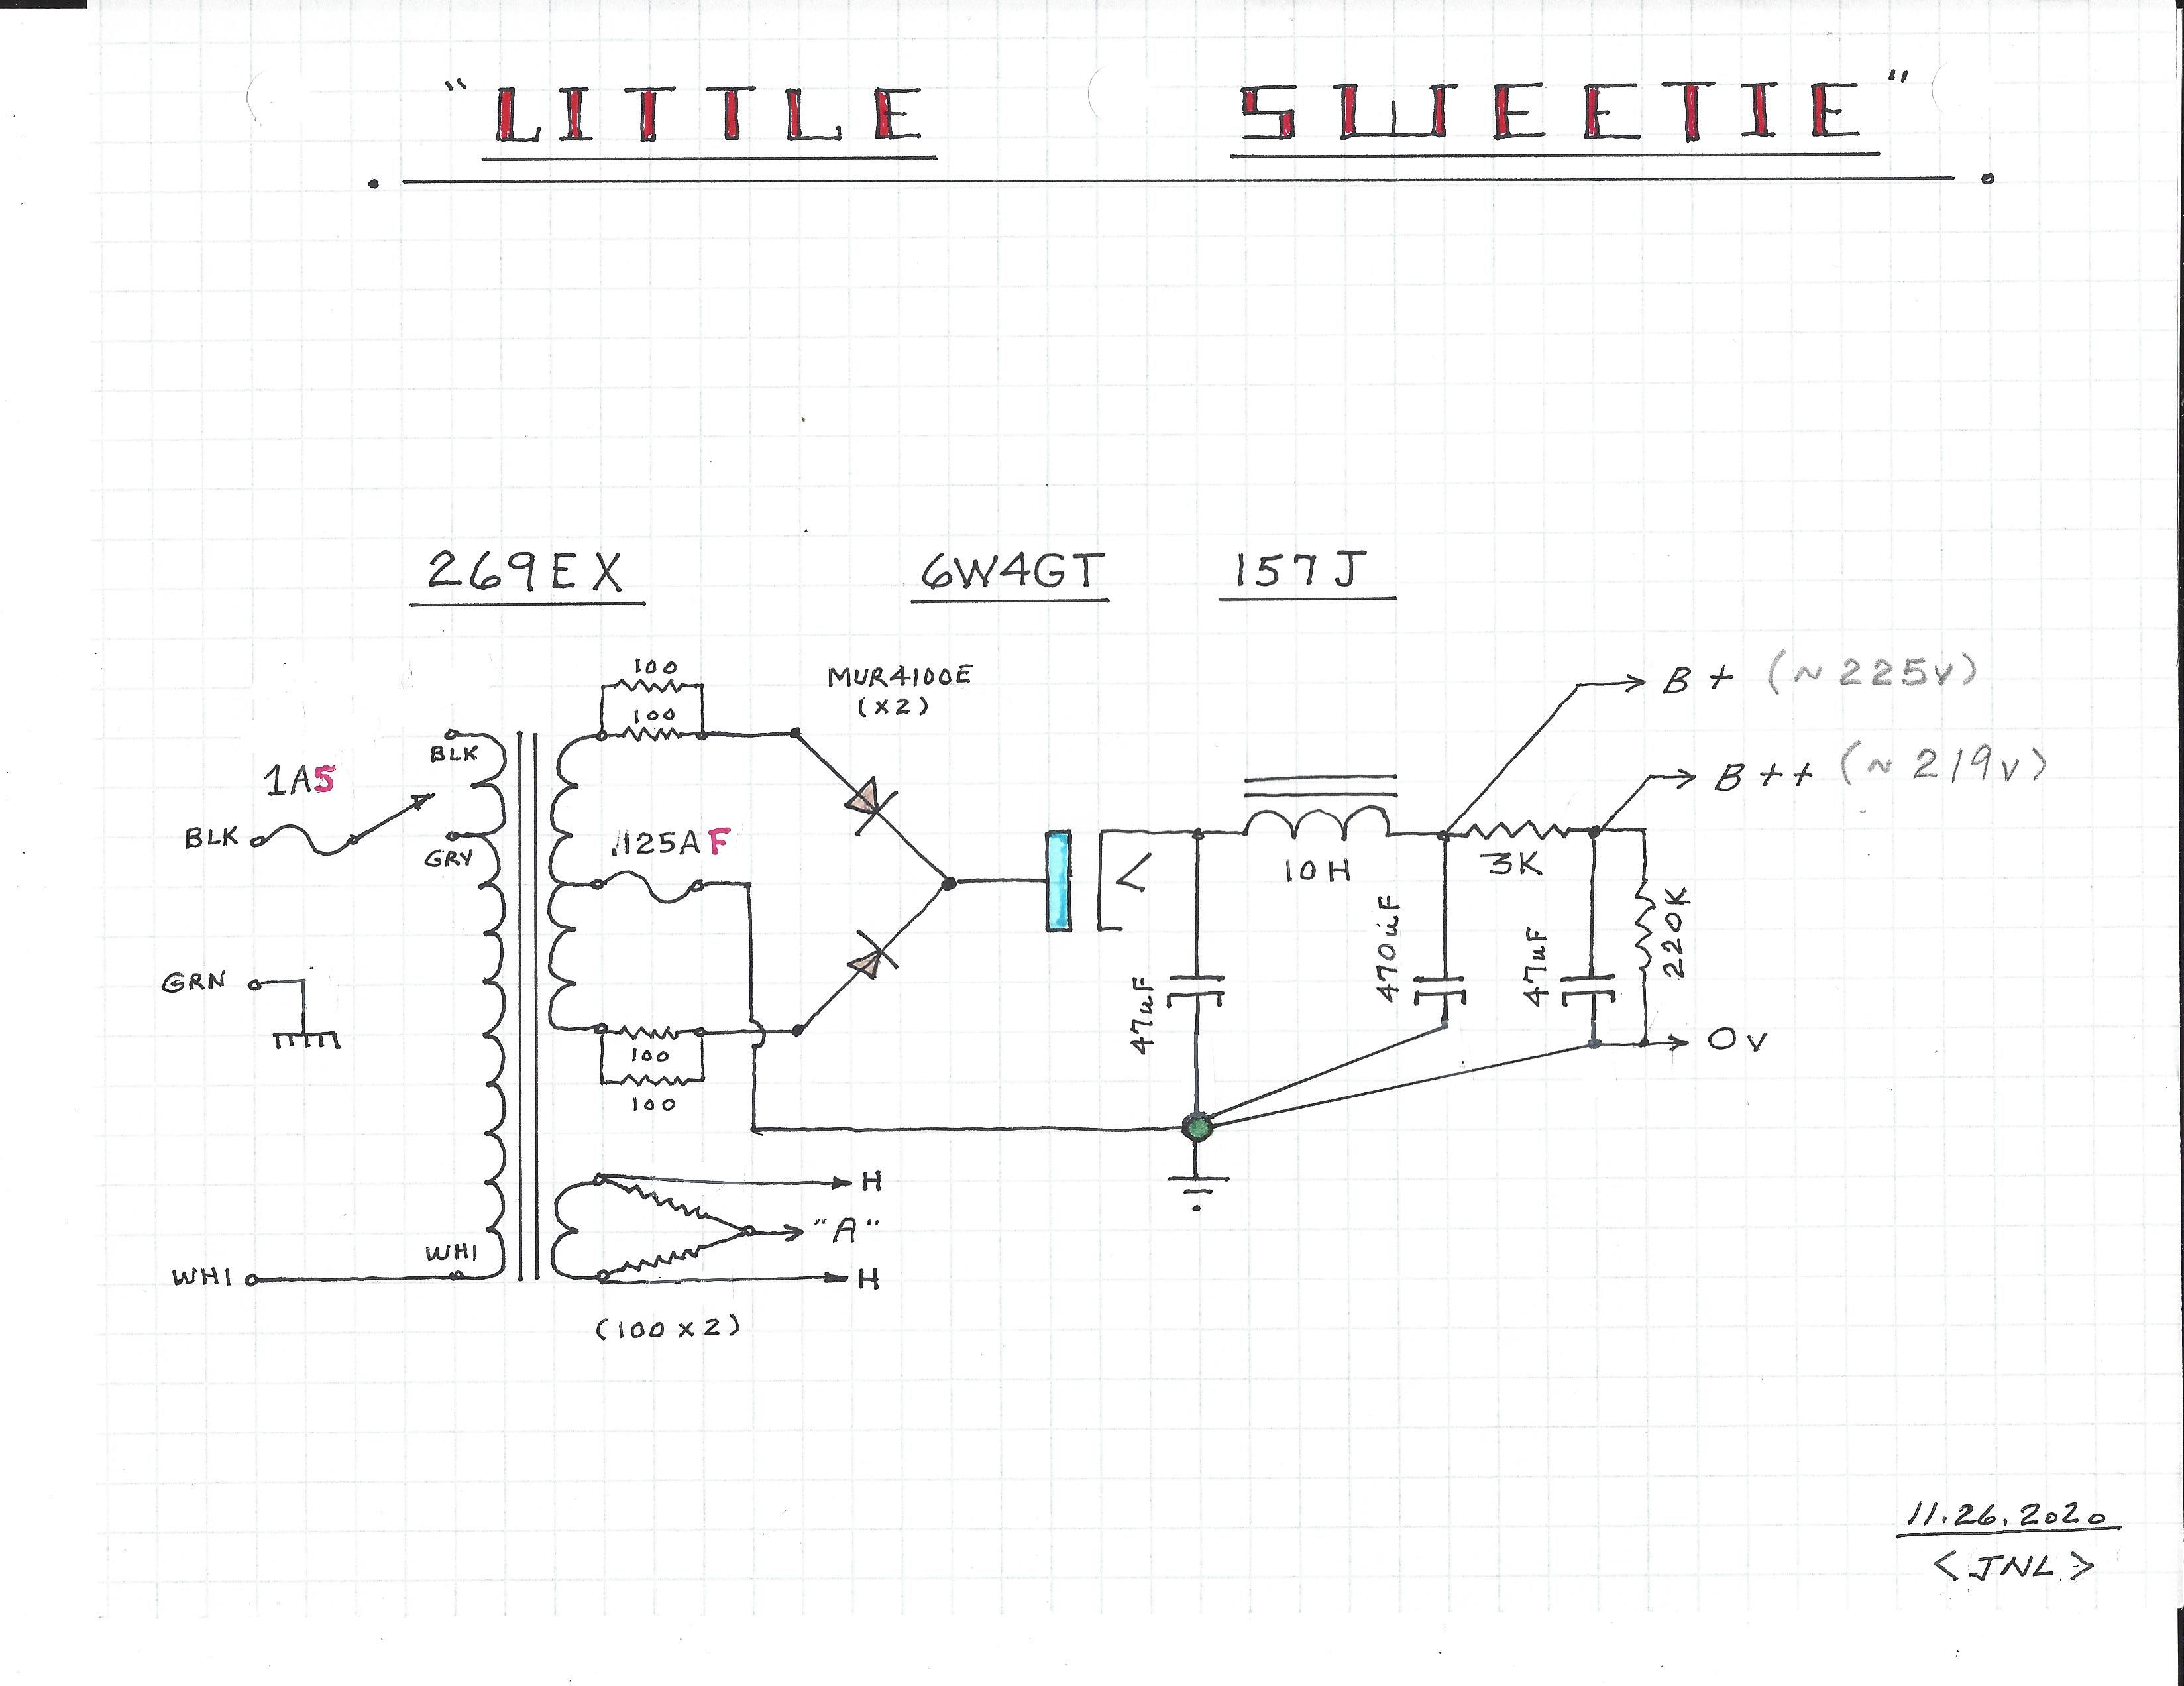
Hi Mike, great idea! The TV damper-diodes give you a slow turn-on, and a low voltage drop. The oil cap gives you low DCR, and a very long lifetime. (if not forever) As you know, that first cap right after the rectifier is the most stressed cap in the whole amplifier! The Marantz model 2 amps used 2) 6AU4 then a 8uF motor-run oil cap. rgds, JNL.
-
The long awaited "Little Sweetie" mono SETs
John N. Lumley replied to tube fanatic's topic in Talkin' Tubes
Ok, here's the 2) schematics in jpeg format. I'm still very impressed with the sound of these little and affordable mini-mono-blocks! It's all I really need to power my Tang-Band W8-1808 full-range drivers (93dB), that are in a 2-way system, with a Tang-Band 25-1166SJ tweeter (93dB). Hat's off to Maynard, again. rgds, JNL.
-
The long awaited "Little Sweetie" mono SETs
John N. Lumley replied to tube fanatic's topic in Talkin' Tubes
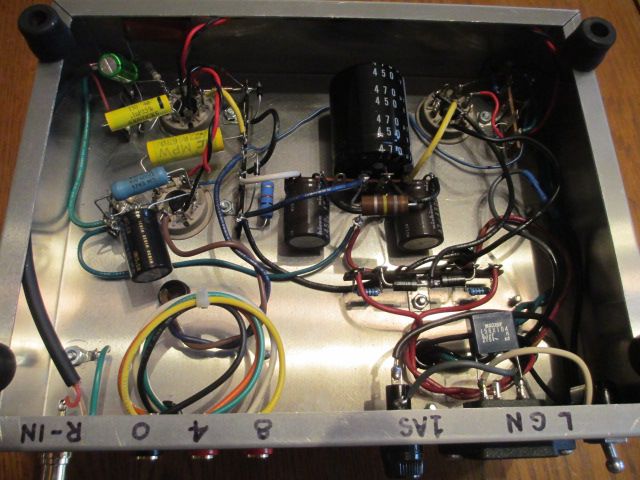
Hello, I did not isolate the transformers from the chassis. I use star washers to bite thru the varnish used in manufacturing, thereby grounding them. I employed a 6W6GT 1/2 wave damper diode, right after the MUR4100E diodes. This provides a nice and slow ramp-up of the B+, and helps filter out diode hash. I also use UF4007 "stopper" diodes in series with both the B+ and the B++ rails. These prevent interaction between the two stages, and improve the bass. I used 47uF-470uF-47uF caps in the power supply, based on PSUD2 simulations. I measure under 1mV-AC at the speaker terminals. Overall, a very worthwhile project, proving again that the circuit design is paramount! Expensive "audiophile" parts can't fix a bad design sound. A schematic will follow; still having to reset my password every time I try to log-on again... rgds, JNL.
-
The long awaited "Little Sweetie" mono SETs
John N. Lumley replied to tube fanatic's topic in Talkin' Tubes
-
The long awaited "Little Sweetie" mono SETs
John N. Lumley replied to tube fanatic's topic in Talkin' Tubes
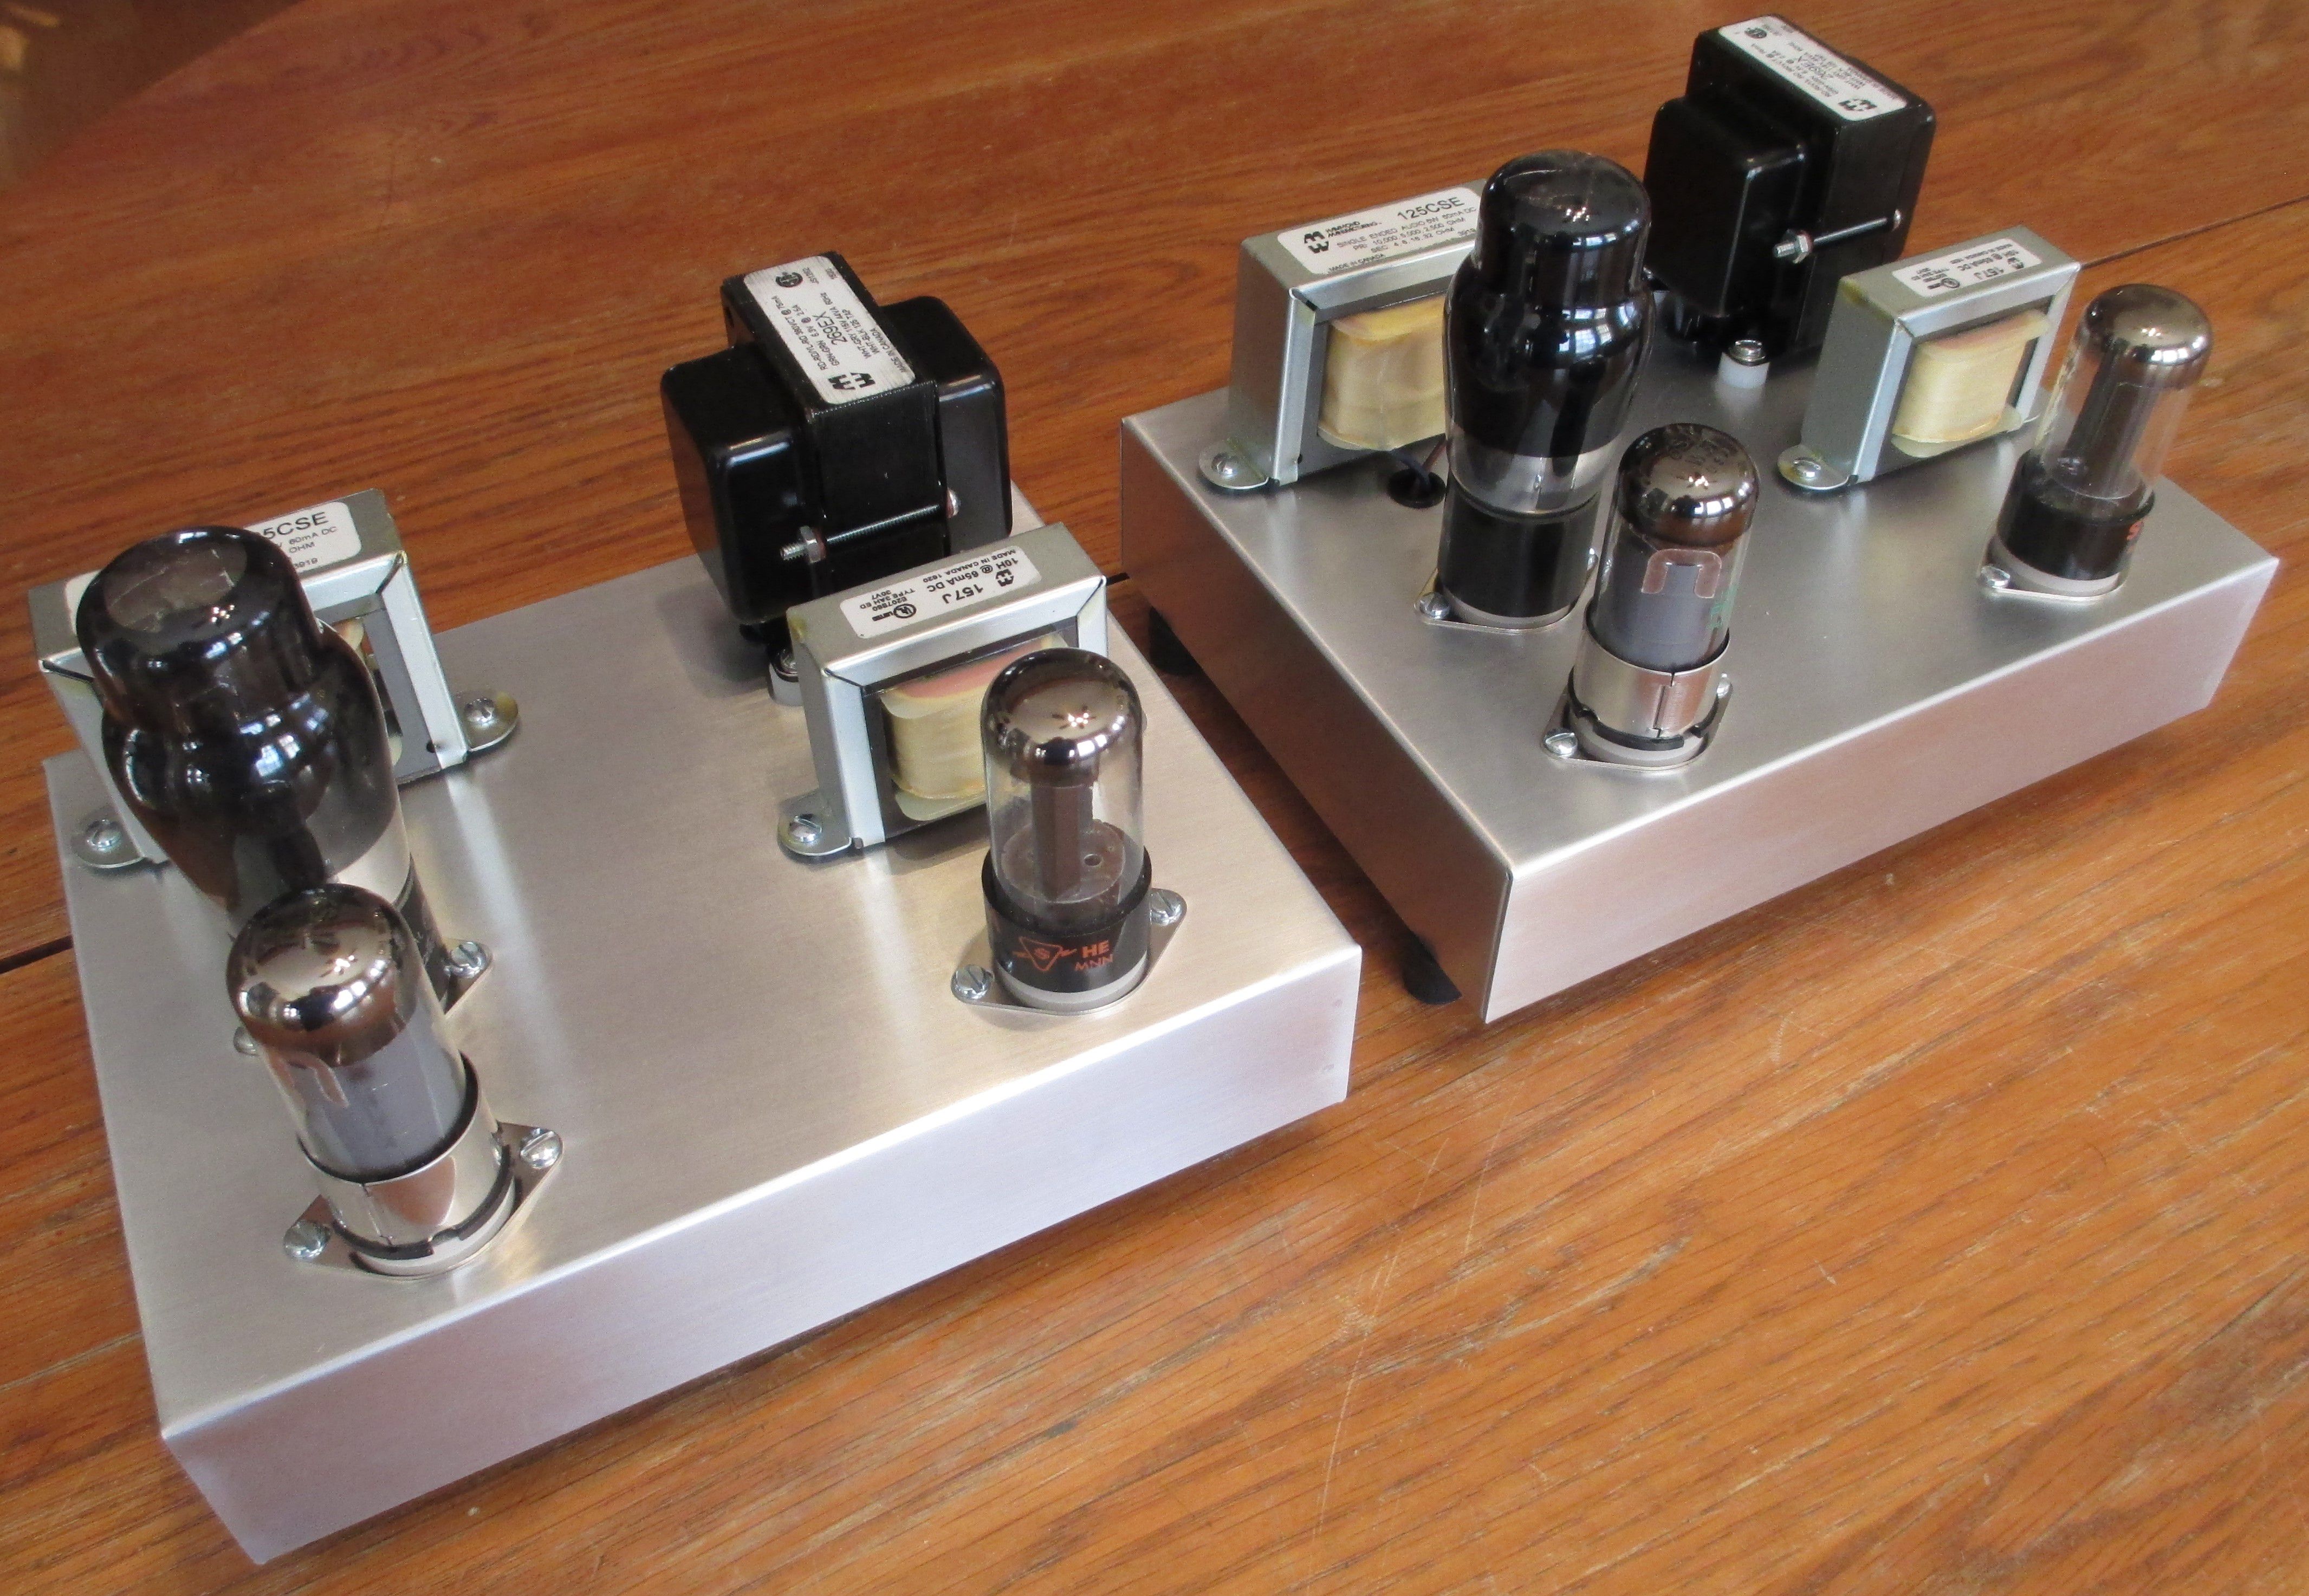
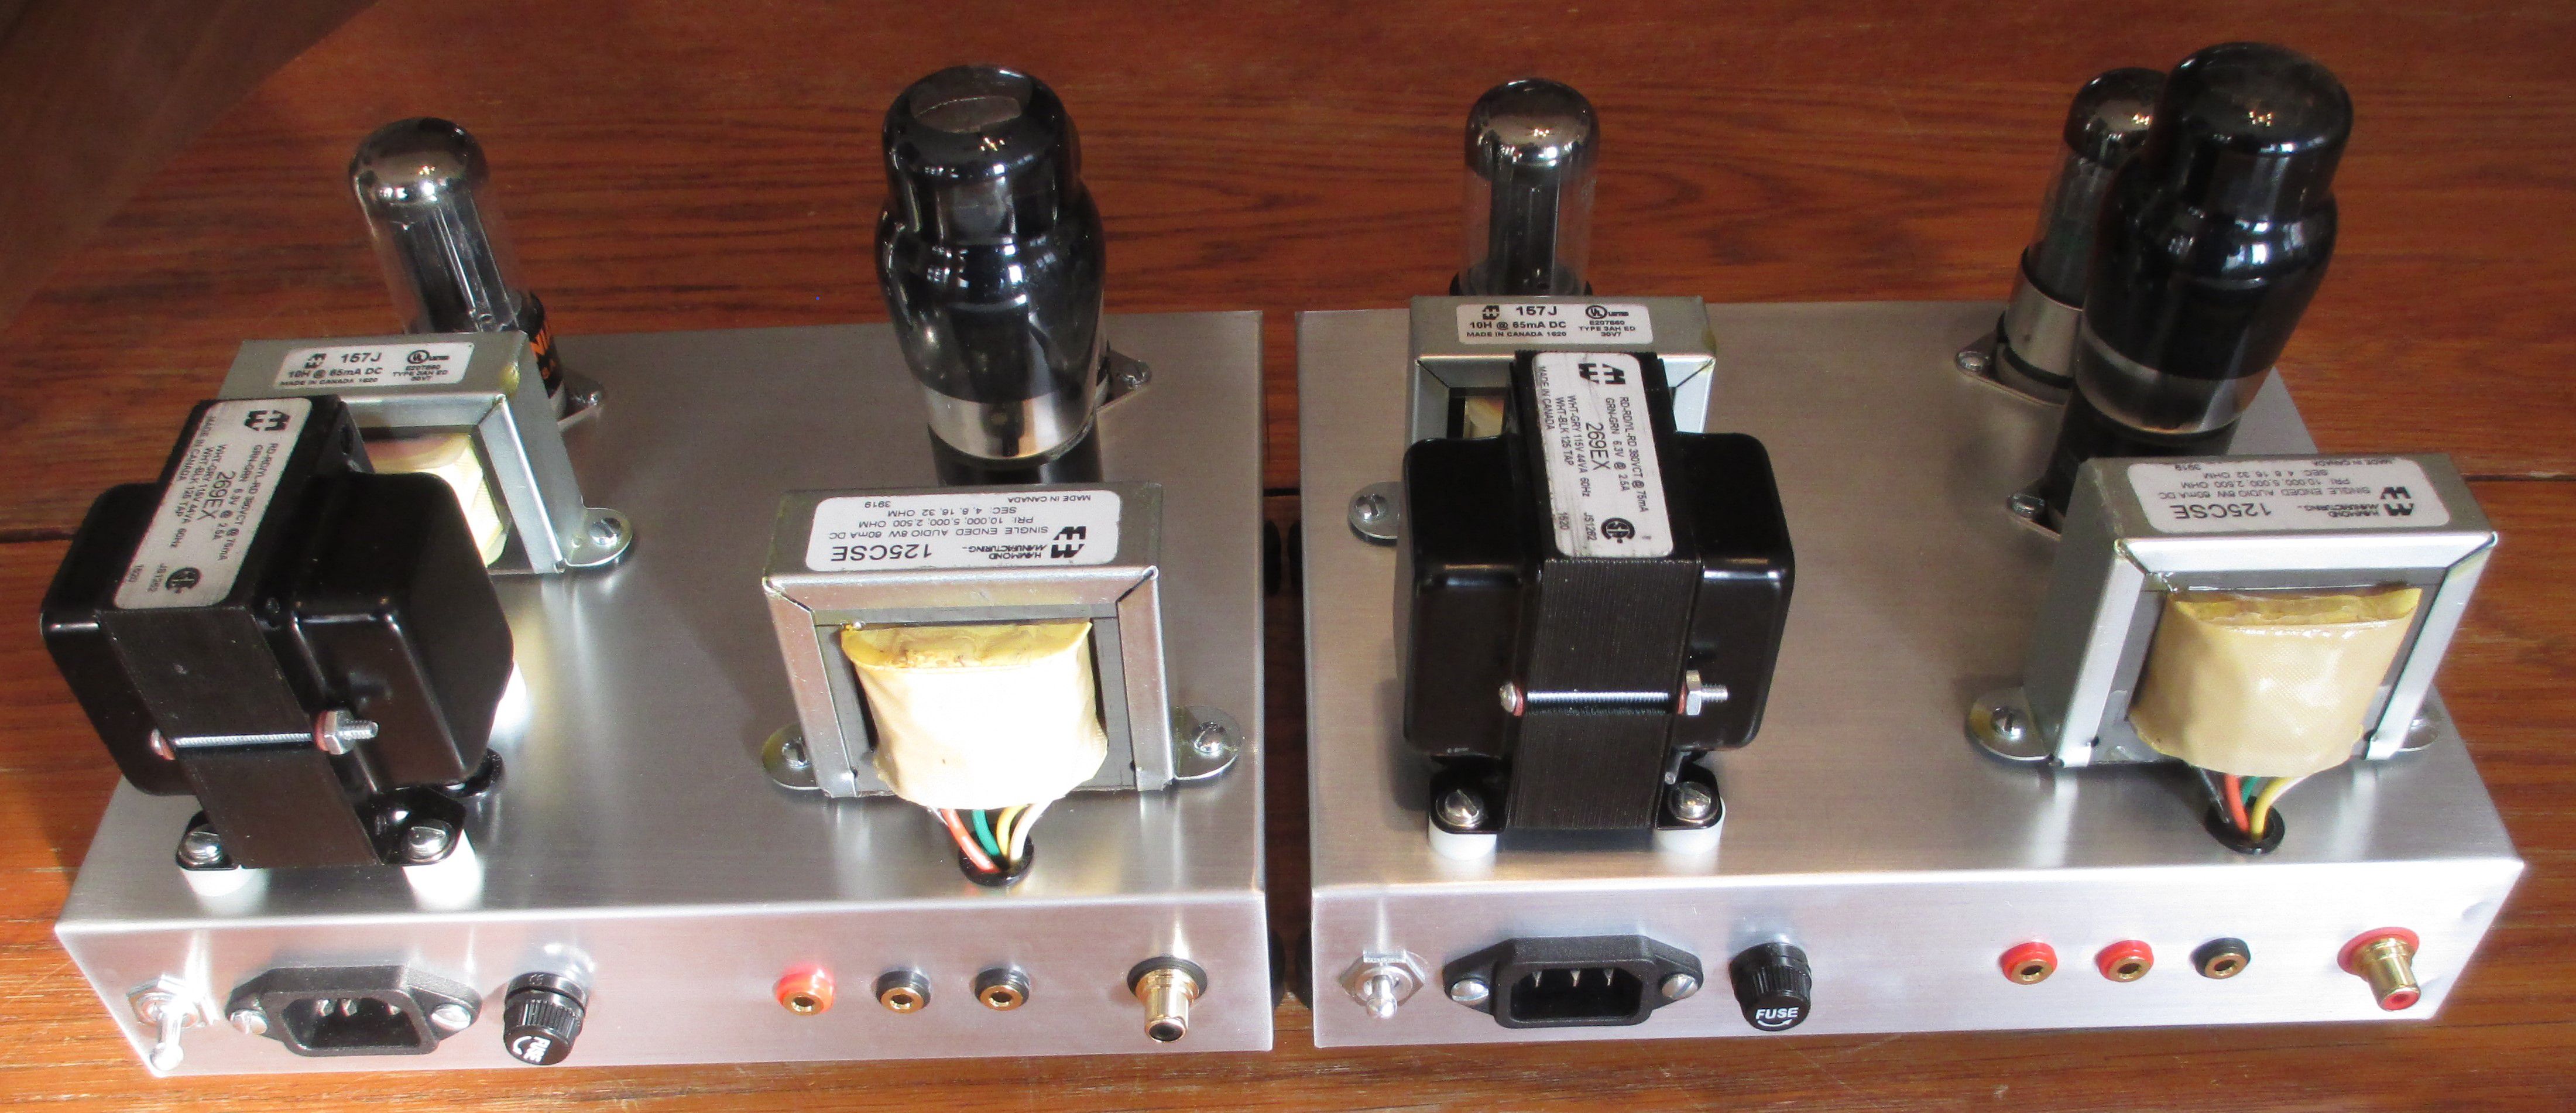
Hello again, here's a few external pix to start with. Front view first. rgds, JNL.
-
The long awaited "Little Sweetie" mono SETs
John N. Lumley replied to tube fanatic's topic in Talkin' Tubes
Hello, I just completed a pair of "Little Sweetie" mini-mono-blocks, based on Maynard's great design. I basically used the same Hammond iron, but added a choke to replace R10; the 180-2W resistor. I also added a damper-diode tube in series with the red/yellow C/T wire, in the ground rail to provide a slow-turn-on. I put a stopper-diode in the B+ rail to the blue wire of the output transformer. It took me a very long 3 days to machine the chassis and wire the amps! And upon first start-up, they sounded really nice, and are improving every day. Thanks again to Maynard for sharing his wonderful designs and providing help to builders. (I will try to upload photos when I figure out how to resize them below the 2MB limit.) rgds, John N. Lumley