arfz28
-
Posts
568 -
Joined
-
Last visited
Content Type
Forums
Events
Gallery
Everything posted by arfz28
-
Tigers vs sooners, who will win this one?
-
Now that is one sweet turntable, amazing the talent some people have to be able to make a turntable like that.
-
MIZZOU 41 NEBRASKA 6, been a long time since we ever gave them a good butt kickin.
-
Missouri tigers vs Nebraska two hours till kick off, cant wait go TIGERS.
-
Greg It only took the contact cement 15 minutes to dry for me but again it was hot as heck when I was using it, I bet if it was cooler outside it might have taken a good half an hour for the contact cement to dry.
-
Ya there is some good prices on ebay, I think I had a whopping 18 dollars maby less than that in the sapele veneer that I used on my heresys and that included shipping. But for some reason it seems like most raw veneer on ebay is not that wide, length is no problem thow you can get some very long pieces if you want to.
-
Baddad I got the veneer off of ebay cant remember the guys name thow. Go to ebay and type in veneer, all kinds off it on there especally raw veneer. There is also plenty of websight out there that sell paperbacked veneer in real big sheets.Make sure you ask the seller if the raw veneer is nice and flat some raw venner is real wavy and needs to be flattend out.
-
Groomlakearea51. I understand everything you are telling me to do but do I need to remove the woofers to put the silicone on or just go around and over the top of the screws with the silicone without removing the woofers. I really need to take the backs off and take a look at the woofers but heck I figured its just as easy to ask you. I probably wont work on this project tell the weekend anyway but I really think it wont hurt a thing sealing everything up like you are talking about.
-
Tin -ear. yes I did do a lot of work straighting out the cabinets you must have very nice square corners for your veneer to lay on nice and straight. ALL dings and dints were filled and sanded smoth. Its kind of like getting a car painted what would it look like if the bodyman didnt fill in the dints and dings. I bet I spent a good 6 hours getting the cabinets ready for the veneer, my problem was lack at practice and knowlede of putty work. I just took my time and kept at it, the corners were the worst part getting them nice and square but I did it. I bet a guy that paints cars for a living could have done it in about 1/4 of the time I spent on it.
-
I took the backs off my set of heresys to see what drivers were in them and to go ahead and check all conections on the crossovers just really doing a check over. Speakers have no problems but what I notice right away after taking off the back panel was that there is no seal around it. The heresy is in a sealed box so I was wondering if anybody has put some wheatherstriping on the back panel before and if so has it improved the sound? It seems to me that there is no way without a seal that there aint some small air leaks. So has anybody sealed the rear panel on their heresys and found and improvement, seems like this might be a cheep tweek. Oh these are 84 models
-
The amp pictured is a scott 299a tube intergrated amplifier, made from 1959 to 1961, its been rebuilt by Craig Ostby. The cabinet on top of it was made by me.
-
Good for you looks like you fixed it.
-
Tom here is the trimming trick I used, After you have the first piece of veneer attached to the speaker flip the speaker over so the veneer is face down on your work bench, be very carefull, you will need a piece of wood on top of your work bench so you wont cut it up with the utility knife. I used a big piece of mdf that I had laying around,its like a piece of plywood but nice and flat . Now the tuff part making sure you keep enough veneer for sanding and not to much so you dont have to sand for a solid hour.Here is a trick I used, I took a piece of my scrap veneer that is 1/42 of an inch thick and layed it against the speaker on top of the veneer were I was going to make my cut with the utility knife, this will keep you away a good 1/42 of an inch away with little sanding left to do.Trick is new blade in utility knife, go very slow with very little pressure should take 3 or 4 passes to cut the veneer mabe more when doing it against the grain of the veneer. Be very carfull near the end of the veneer you dont want to rip it and mess it up. Once you got the venner timmed turn speaker over and take 100 grit or 150 grit sand paper on a block sander and sand it flush to the speaker, be very carfull neer the ends of the veneer if that sandpapper catches it wrong you will rip a chunk off not good. Use the sanding block like the utility knife very little pressure and take your time. I spent hours sanding down the edges of these speakrs so I wouldnt have any tear outs. Also take your finger and press down on the veneer at the ends of the veneer when you are sanding them with the block sander this will give the veneer more support while sanding that area and help avoid tear outs. Hope this helps.
-
Wow if its almost seased up, I bet its seen its day. My hk430 volume controll is real easy to turn after I gave it a cleaning with caig deoxit. Take the cover off of the amplifier and see if you can see whats binding up on the volume controll. Maybe a few drops of oil on the shaft of the volume controll if you can get to it might loosten it up but I doubt it. Try some 3 in 1 oil and see if you can do any good . keep the oil off of the wiper part of the volume controll only use deoxit on this part. Good luck maby it will come unseased.
-
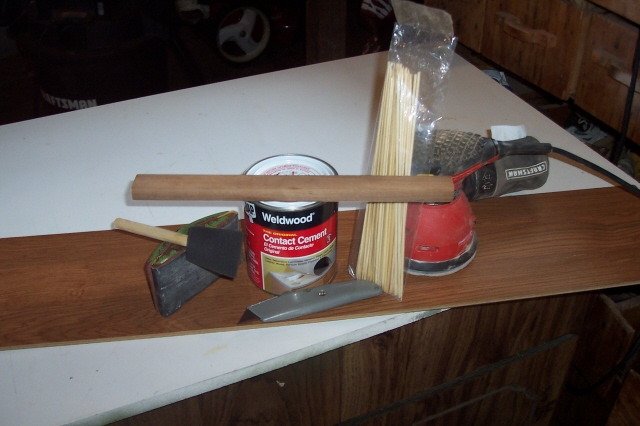
Pictures of tools I used.

-
Here is the way I reveneered the speakers, mostly the same way Greg and everybody else has done it in the past. I used raw sapele veneer 1/42 inch thick and weldwood contact cement the flamible type.Each piece of veneer was only about 10 inches wide so every piece had to be made wider to cover the heresys, I overlaped two pices of veneer and cut them with a utility knife to get a good tite fit.I used a pice of fake hardwood flooring I had laying around for a straight edge, after cutting I used veneer tape to hold the two pieces of veneer together, now the pieces were wide enough and ready for contact cement and instulation on the speaker, needed 8 pieces total to do the speakers. The seams turned out nice you have to get very close to the speakers to tell were the seems are most people cant even see them untill I point the seems out were they are at. This took a lot of time and I wish I could have found some raw sapele veneer that was wide enough to cover the speakers and I could have skipped this step, but it seems most raw venner isnt that wide and must be seemed. My vener also wasnt that long about 26 inches, so I only could cover one side of the speaker, I couldnt match the veneer grain around the sides and top and bottom, this really was no big deal you dont really notice that the grain is not one perfect continuois match all the way around the speakers. actually some of the stripes match each other from the sides and top and some dont really no big deal to me and nobody notices it anyway.If my veneer came in real long pieces I probably would have tried to match the grain all the way around if I could have done it I would have but in my case it was imposible and was really no big deal to me. Here is a good tip on putting the veneer on the speakers and how I did it. First you need a piece of wood for putting pressure on the veneer while installing it, I used a piece of walnut wood about a foot long an inch wide and 3/4 inch thick, this piece of wood will take the place of a j roller, you dont need a j roller save your money this piece of wood will put way more pressure on the veneer than any j roller.I used a sponge brush and put a heavy coat of contact cement on one piece of veneer and on one side of the speaker cabinet, you need to let both pieces dry for about 15 minutes, dont put the veneer on right away, I think if you put the venner on to soon your odds of bubbles increase. I used shiskabob sticks undernith the veneer and layed the veneer on the side of the speaker, make sure you have plenty of overhang all around the side you are doing once the veneer makes contact with the speaker there is no moving it. I started at the very bottom middle of the speaker and worked my way up the speaker with the piece of walnut wood, as I moved up the speaker I kept removing some of the shiskabob pieces.Now after I got the veneer attached to the speaker I trimmed it with my utility knife about 1/16 of an inch away from the speaker, than carfully sanded the edges smooth with a block sander with 100 grit sandpaper.now that my edges are done now lets go over that veneer real good with that piece of walnut wood again and again. PRESURE, PRESSURE AND MORE PRESSURE, with that homade tool you can put lots of pressure on the veneer, I went over and over the piece of veneer applying as much pressure as I could with that piece of wood it works great.It takes contact cement 72 hours to fully dry, so if a bubble would apear in the next few days heat area up with a hair dryer and press back down with the wooden homade tool.I went over each piece of veneer I know at least 10 times appying as much pressure as I could with the veneers grain of wood, I checked the speaker every day for a week for bubbles, never had one. I think letting the veneer dry a good 15 minutes or longer after putting on the contact cement helps and also all the pressure you can get on it with the piece of wood you are using as a tool. The speakers I let set for at least ten days before I but a stain on them, I wanted to make sure no bubbles showed up and that the contact cement was dry. I used minwax natural stain no color at all in it, I wanted the natural beauty of the saplel wood to show. After applying the stain, I let it dry completly for two days, now it was time for the polyurathane, I used zar satin polyurathane put one coat on and let dry for 24 hours than sanded with 600 grit sandpapper on a sanding block. I than put on another coat of poly and let set for 24 hours next day I applied the last coat for 3 coats total, looked good to me so I quit. I used a spounge brush to put on the poly, you need to be carefull so you dont get a sag or a run in it, I put on very light coats and had no problem at all.Getting nice edges around the speakers took a lot of time at least 20 minutes on each edge with that sanding block and 100 grit sandpaper, I then used 220 grit sand papper on the edges to make them nice and smoth. I though about using a flush trim router bit to trim the edges but thought I would mess them up amd would have had one big problem, so I did it the old fashion way and it worked great it just took a lot of time. What I learned and what might help as tips for other people is this. Let contact cement dry for a good 15 minutes or so before applying, put a lot of presure on the veneer when you apply it with the wooden tool and go over it a bunch of times it wont even hurt to go over it every day for up to 4 or 5 days to make sure the veneer is on there good.I put all my vener on in the garage it was not in the best conditions 100 degee temperatures and humid, after I got the veneer on the speaker I moved it into my basement for the final sanding and staining and poly. I wish I had a nice shop with air conditioning but I didnt, I had no choice but work in the heat with the contact cement, it is flamible and dont use it in the house it could cause a fire.A good controlled envirement would have been nice but I had none while putting on the veneer. I let the speakers set for a good 10 days in the basemnt before applying any stain or poly, I wanted to make sure the contact cement was dry and the speakers were in the same tempereature for a long time. I also went over the speakers with my random orbital sander with 220 grit sandpaper before staining and adding the top coats of poly. Why did I use ployurathane and not boiled lindseed oil or some other type of finish was this. I figured I would put a good seal on the wood I didnt want to have to keep putting coat after coat of something that will keep soaking into the veneer and making contact with the contact cement and take a chace of loosining it up. Did this make any difference I really dont know, time will tell, so far so good. Anymore questions please ask.
-
Is the volume control stuck in one spot or is it just hard to turn? More info please.
-
PrestonTom: I hope at some point you tell us more about the process. Specifically, what kind of veneer (paper backed etc) and what kind of adhesive, and how you solved the various headaches of bubbles etc. You seem to have found the secret. -Tom I agree with Tom. I'm planning on using ribbon strip sapelle on my DIY speaker project, and I would love to hear some of the lesson you learned in your process. Yours look great BTW. Jeremy Thanks for all the complements folks, I will give some details on how I did this veneering job in the next day or two, I have to go to my sons high school football game tonight so tonight is taken up. So far no bubbles in veneer and its been 2 weeks since the last coat of satin polyurethane was put on the speakers.
-
I wish I had time to listen to my system with 3 kids playing every kind of sport known to mankind I have no time, I bet its been 2 months since my scott 299a tube amp has been fired up, Craig will kill me perty soon I will neeed a varic to reform the caps. LOL
-
Ya I miss the old fart, where has he been lately?
-
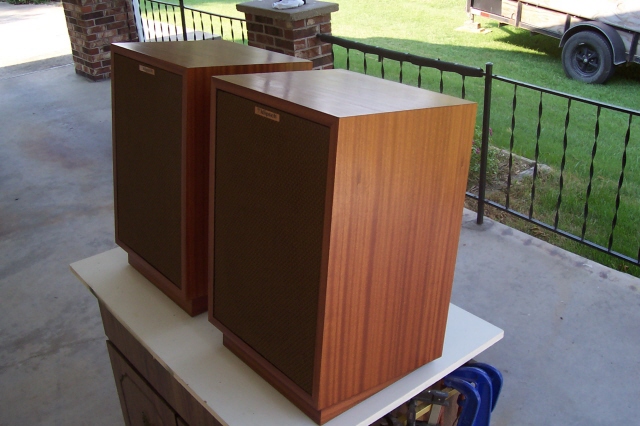
The pictures turned out perty good but you wont believe how much better they look in person. I would like to thank Greg for his help on answering some of the questions I had about veneering he was a big help. Gregs veneering work inspired me to give veneering a shot and I am glad I did I learned a lot from this project.
-
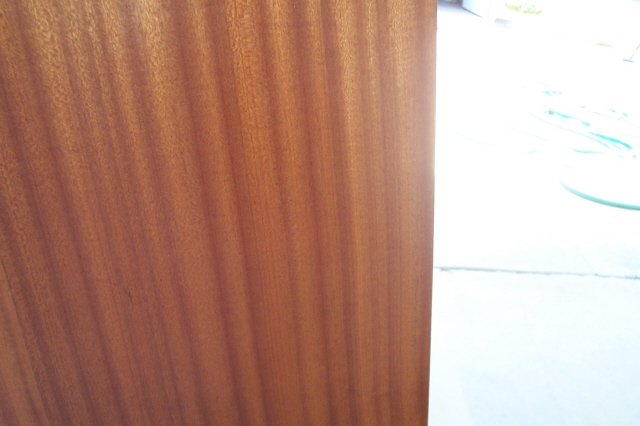
Last shot of veneer close up.
-
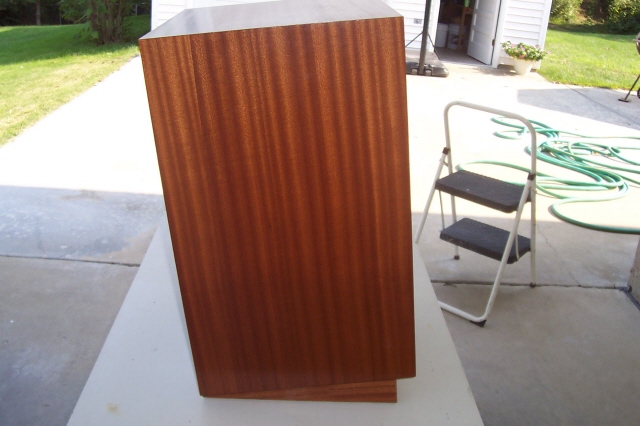
Another one.
-
again
-
Another shot.