Chorus1 Fan
-
Posts
142 -
Joined
-
Last visited
-
Days Won
1
Content Type
Forums
Events
Gallery
Everything posted by Chorus1 Fan
-
Thanks for the encouragement 👍 I did the mods based on somewhat "selfish' reasons. I wanted the biggest best sounding speakers I thought would fit my personal listening space, not so much worried about what would fit into public opinion. I also wanted them to look more like speakers (vs a PA system look) than what I had before (nice grills/etc.) After a lot of research, and reading multiple threads on here, I was simply doing what I thought would be best for my long term listening enjoyment ! (& I am DEFINITELY happy with how they sound now 😀
-
Thanks for the "thumbs up"👍 on the bracing Bigger is years away for me (after the kids leave & vacate space for a new bigger listening area) so I'm set for the immediate future with my Chorus 1's Since I've already had La Scala's,I would hope for K-Horns (possible), or Jubes (dream on) someday... Dave
-
Thanks for the link, you beat me to it (response) I read that thread NUMEROUS times as I was doing research & getting ready! You're also being humble about your part 😀 The best part of his project might be those cabinets you cut on that fancy equipment !!! VERY COOL 😎 I'm really glad you added that link, it consolidates alot of good info into one place for future reference for everyone !!! I did even try/test fit some PVC like Matt did, but I wasn't happy with how it fit (loose) Maybe your version was better because you cut new motorboard openings? Dave
-
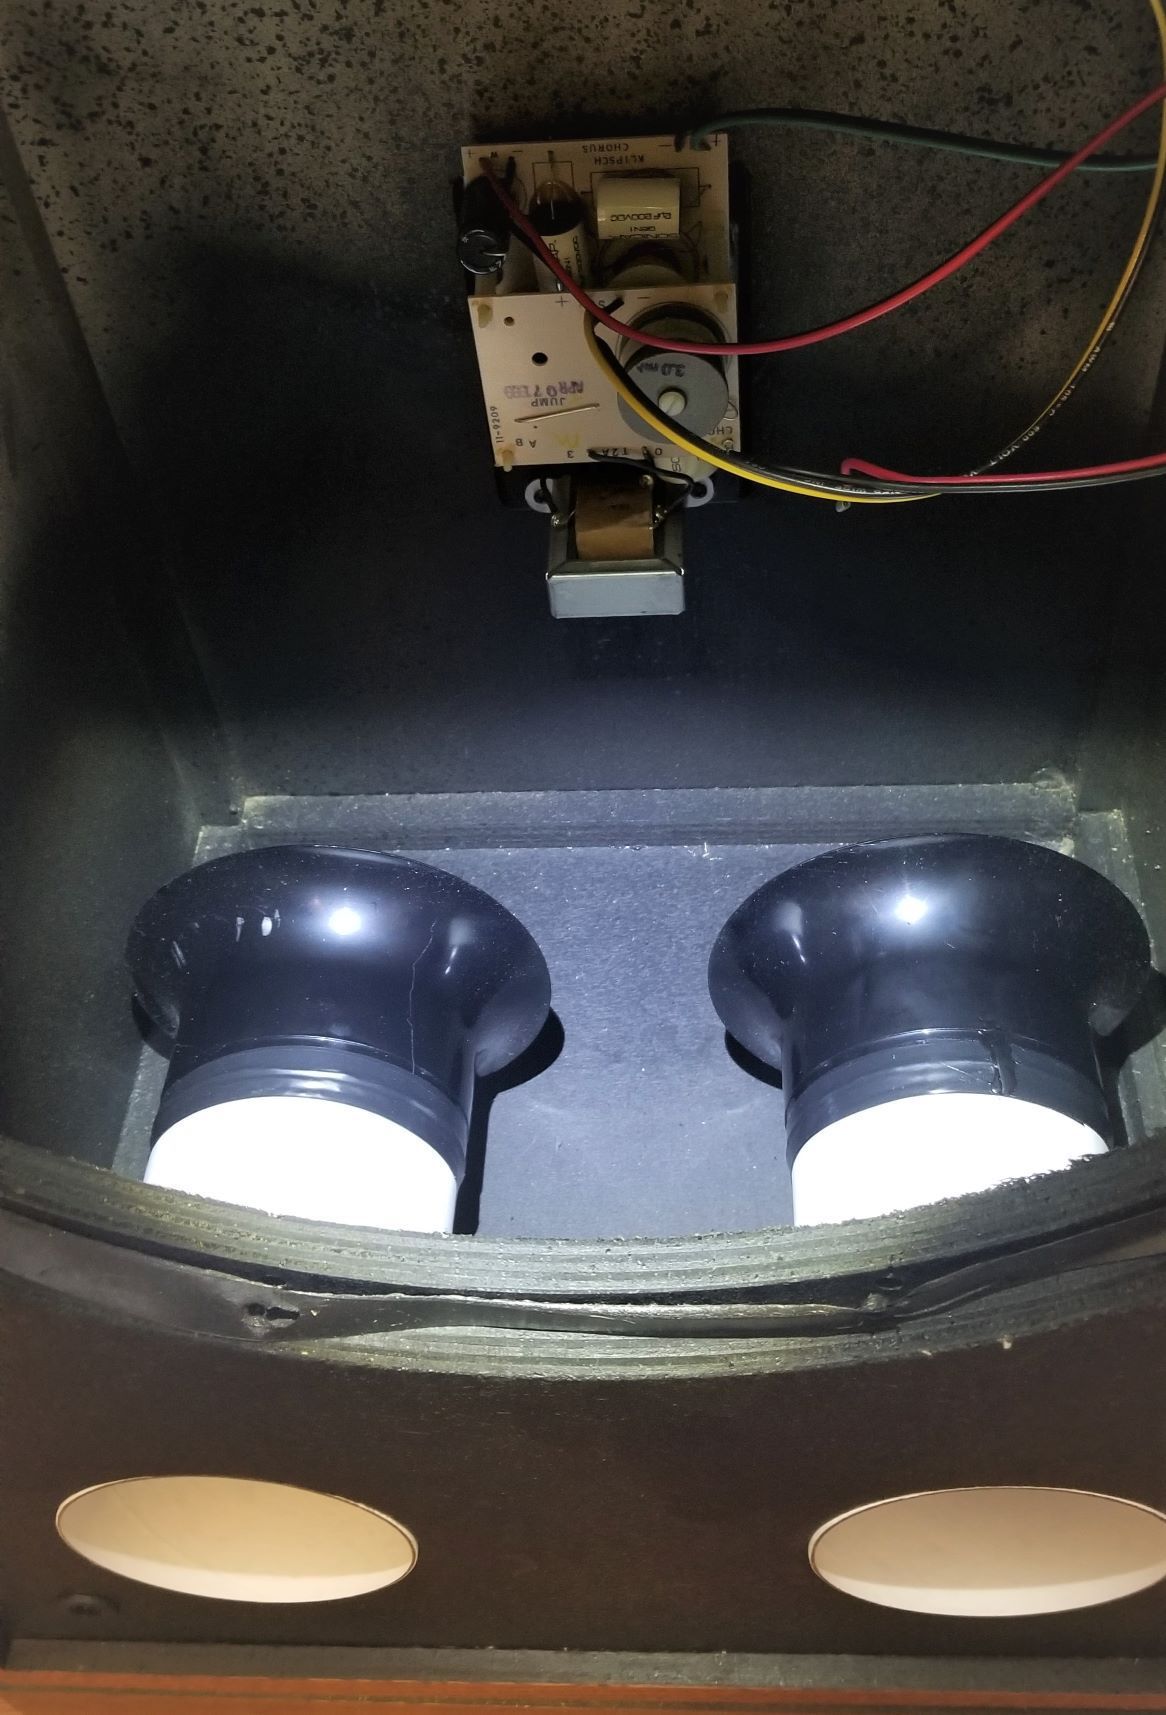
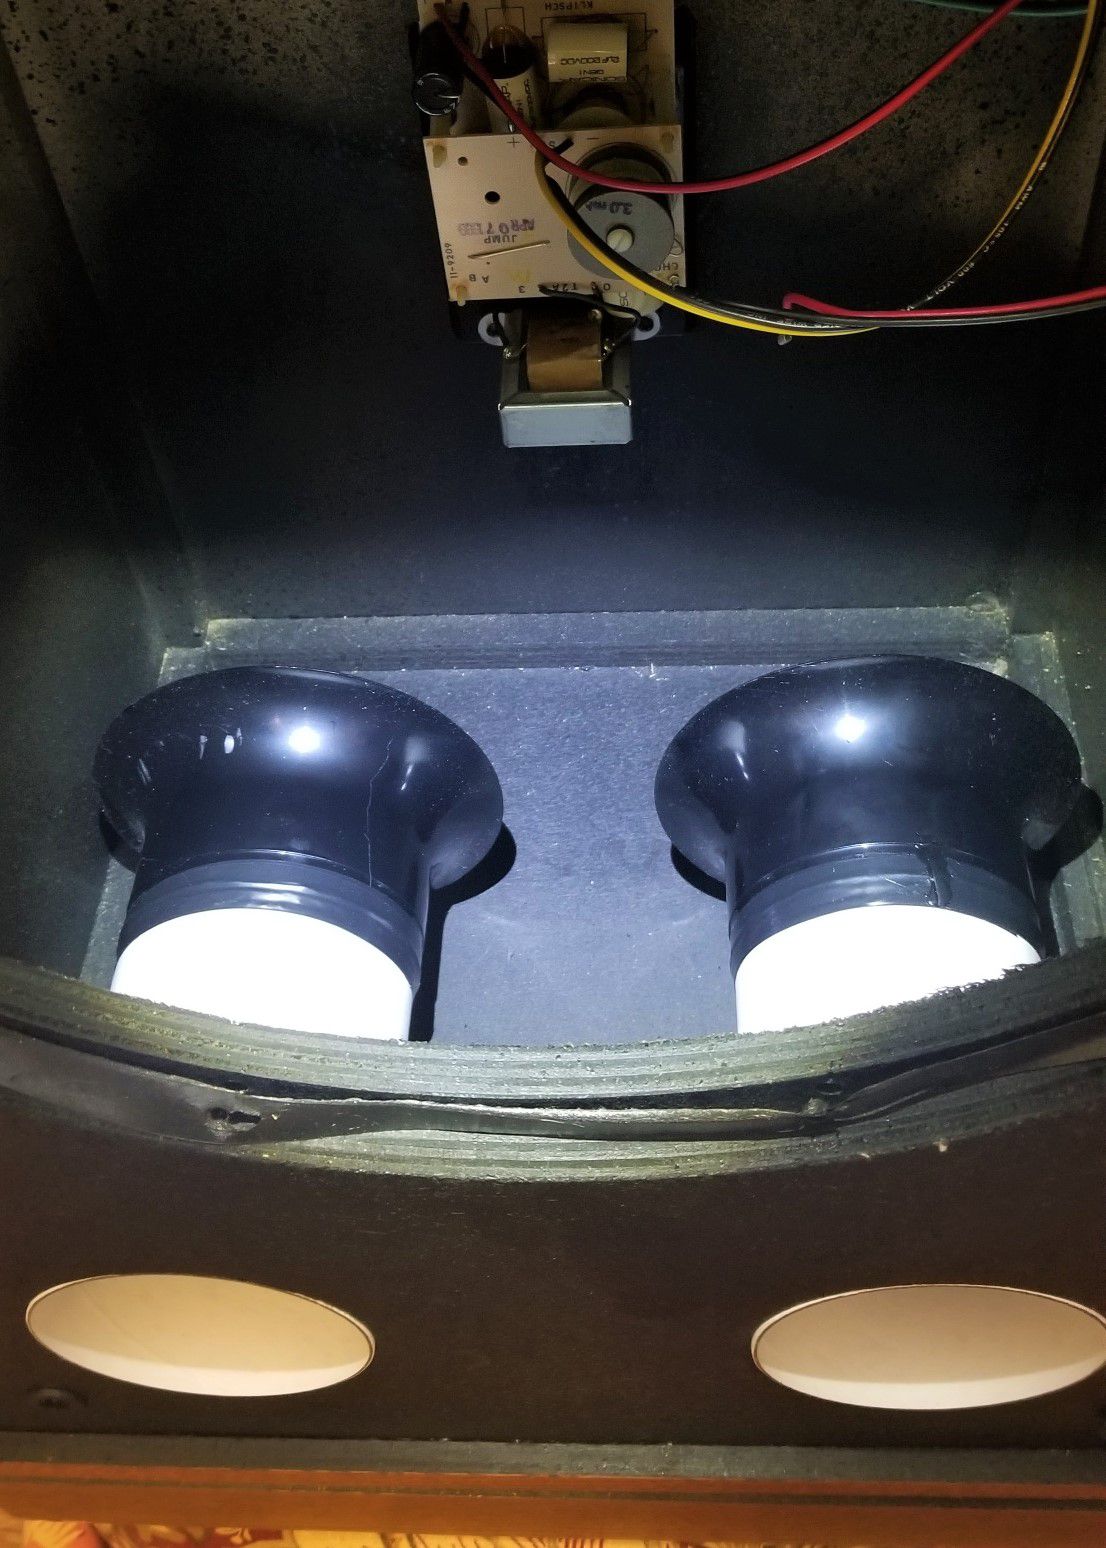
Thanks! 1. The mod was adding the whole tube & flare. The factory Chorus 1 just has two holes in the front motorboard (no tube at all, just two holes thru the plywood) 2. Yes, (mimic) It is acoustical egg-crate marketed specifically for sound absorption, there is also a roll of polyfill under the two ports 3. absolutely (adjusting room placement) still tweaking placement to augment best sound. Currently they are up against a rear wall & one is in a corner, both slightly toed in Dave
-
I'll second that opinion ! I know many here say the Chorus does best with high power, My big Yamaha amp is getting recapped so I'm currently pushing mine with @ "measly" 85 watt Luxman R-115. I can't get it up much past 1/4 volume & things start falling off shelves 😁 I can literally feel my chest cavity start to vibrate with the K-48 woofer movement too. (If needed, I think I could do "self-CPR" if I turned the Luxman 1/2 way !
-
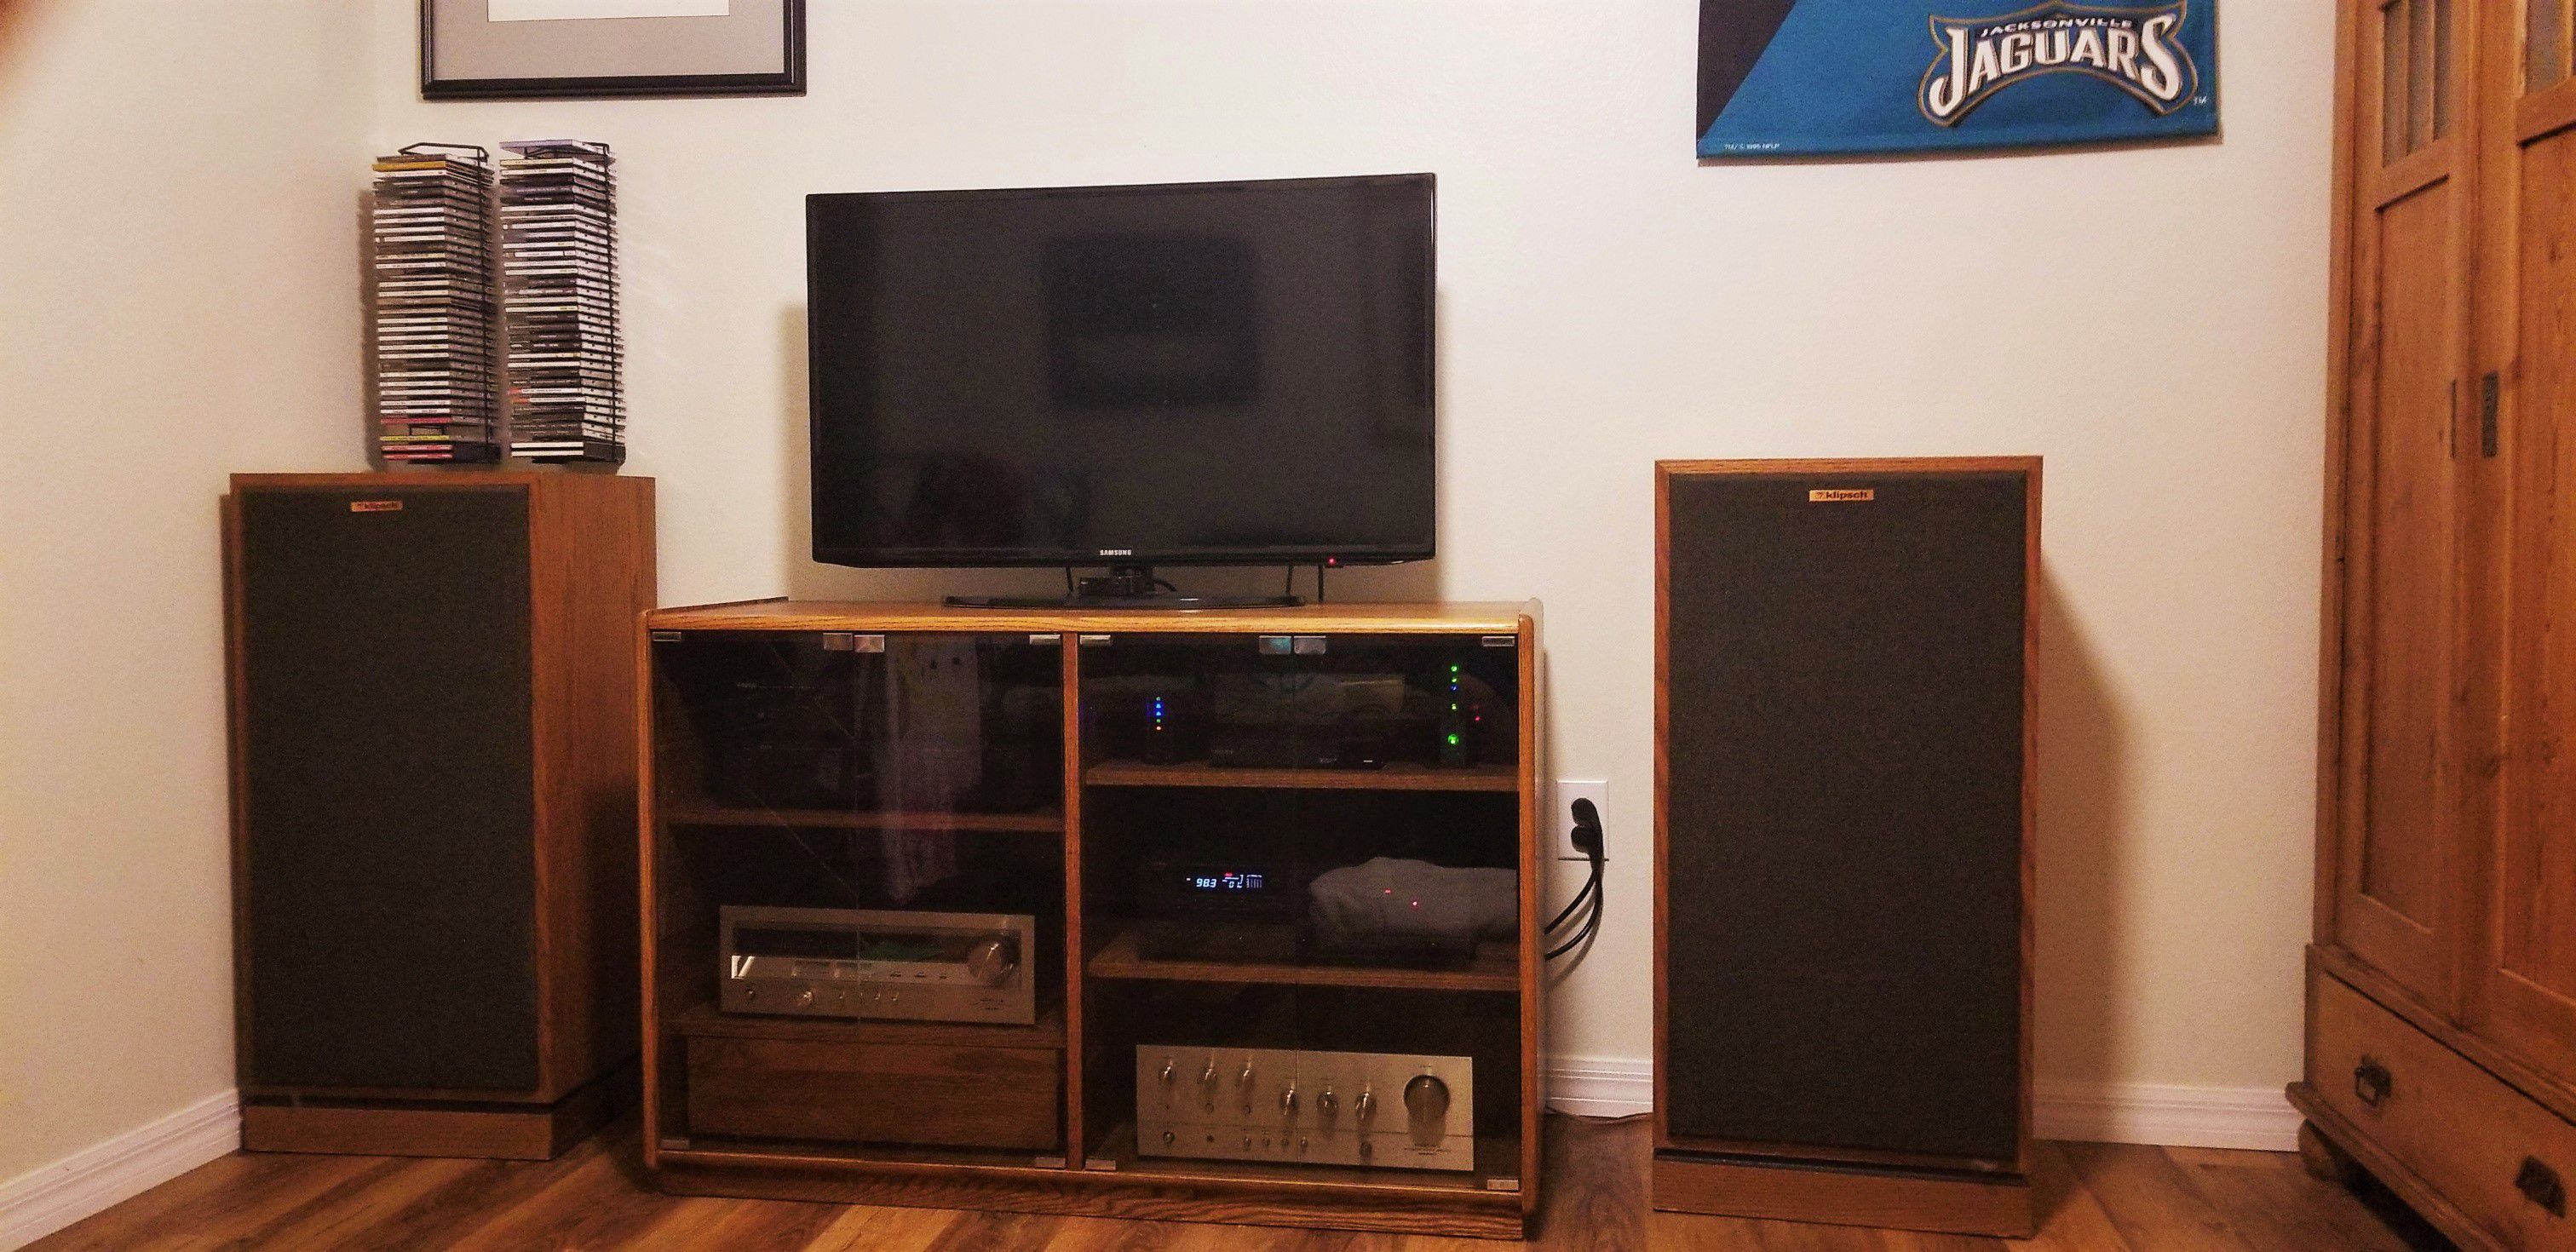
My dedicated music listening room (& a TV for my kids that doesn't run through the speakers) I vibrated about 1/2 of the CD's out of those wall racks above the left speaker by playing Dire Straits "six blade knife" at who knows how many decibels 😎 These Chorus 1's will THUMP & I don't miss my La Scala's AT ALL (*hard to believe....I know...but It's true....😁) https://f072605def1c9a5ef179-a0bc3fbf1884fc0965506ae2b946e1cd.ssl.cf2.rackcdn.com/product-specsheets/Chorus-brochure.pdf (this LINK is to the factory Chorus 1 specsheet / brochure) Enjoy

-
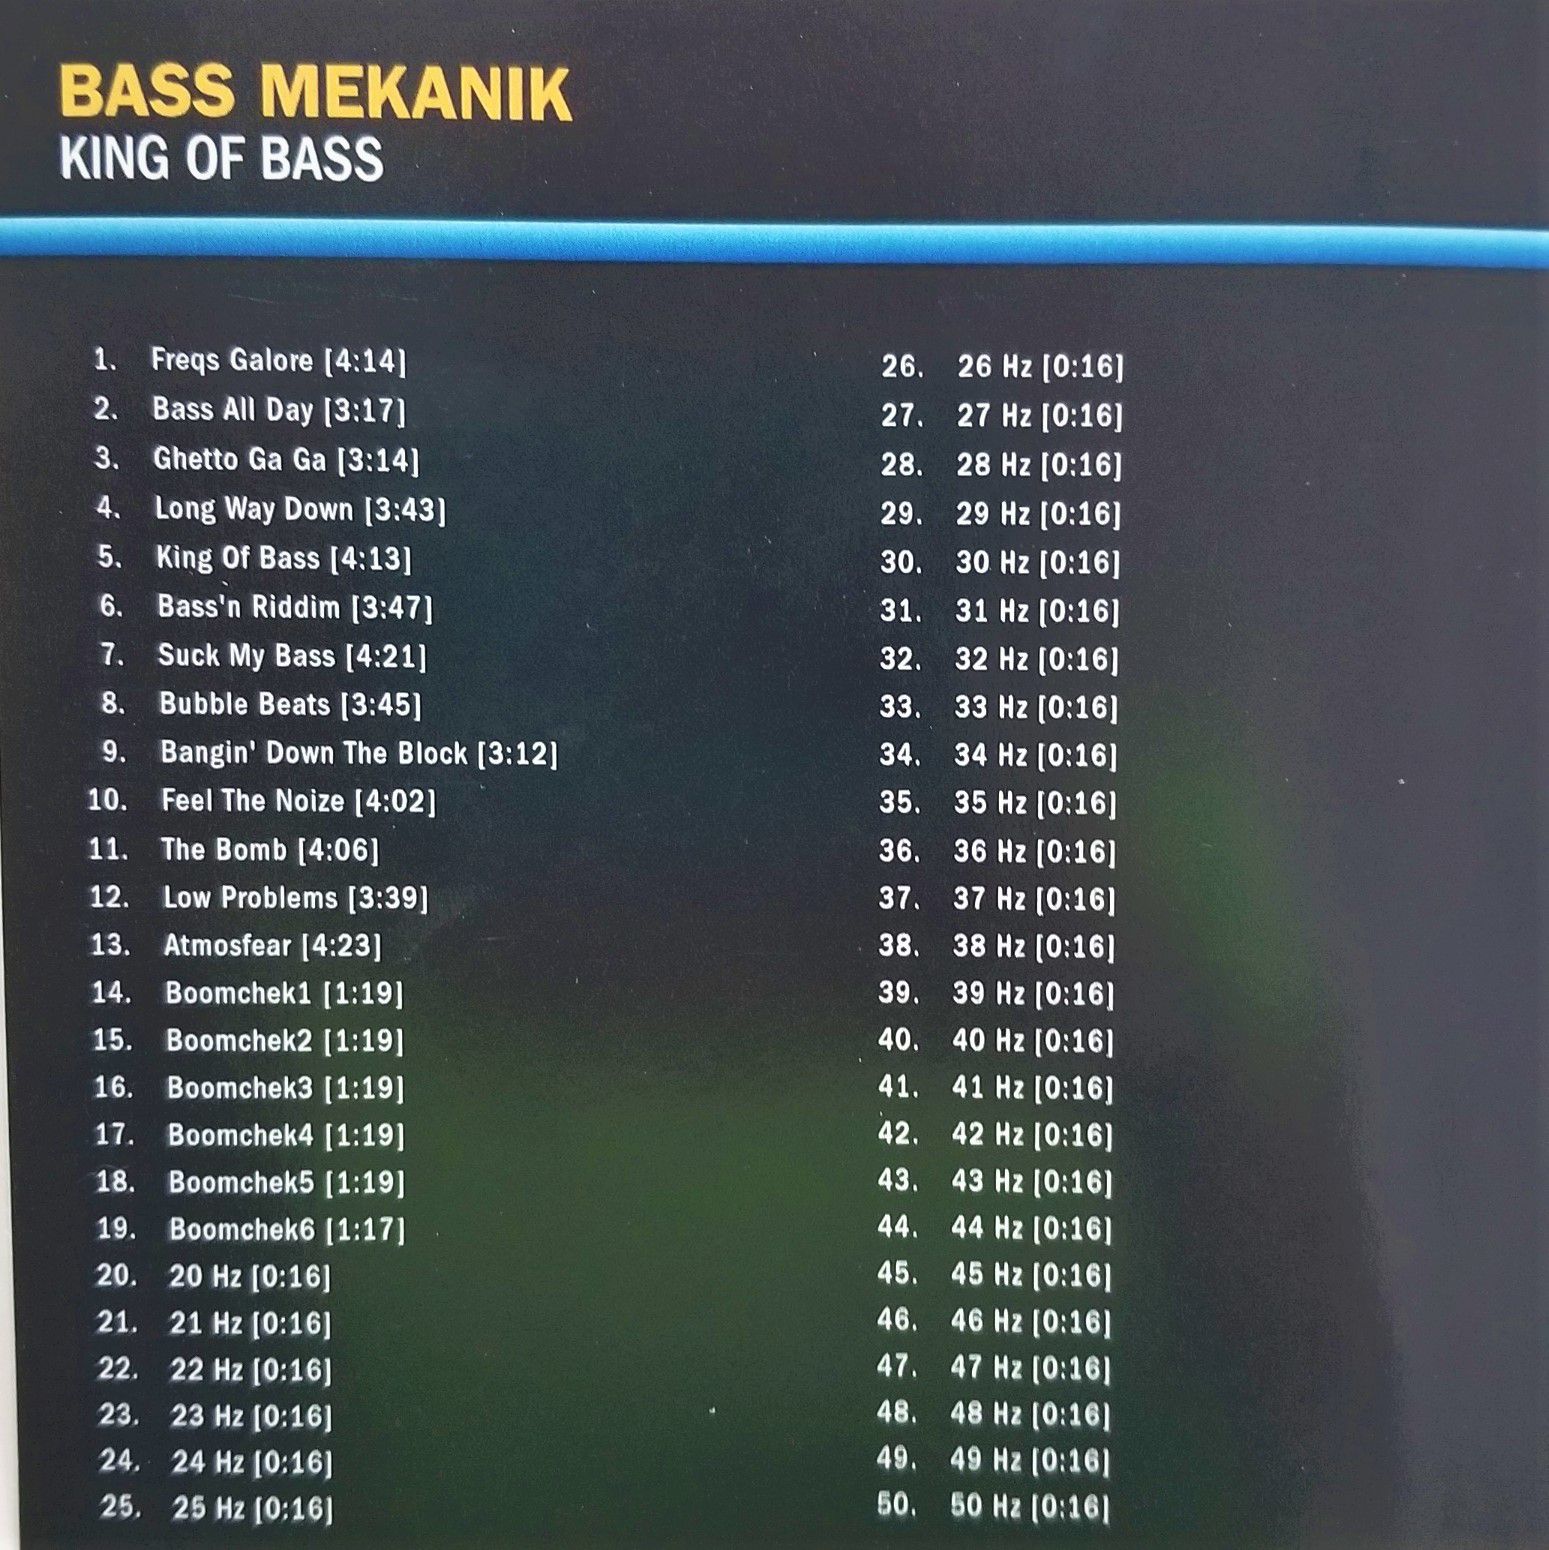
OK, I know I promised "testing" & I would try to keep it as "Objective" as possible. Here's how I tried to do the best I could w/o measuring it like an engineer would 😁 I ordered this CD (picture below) online that has Digital test tones of all the mid & low bass frequencies. I played it a few different times both before I started any mods, and again a few different times after all the mods were completed. PRE- RESULTS: I could hear a noticeable dropoff in volume & sound "fullness" around the 45 Hz test tone prior to my modifications POST-RESULTS: After the ports/bracing/insulation was installed, I can now play a 40 to maybe 39 Hz test tone without any dropoff. They will play lower tones as well, but I can hear a progressive decrease in volume as it gets lower (volume is at a consistant level 39-40 Hz and above) In addition (this is subjective/my opinion...) I think the bass is tighter & generally just sounds better than before. I am glad I did all the work, & EXTREMELY happy with the 5-6 Hz I gained on the lower end !!! NO REGRETS 😎 (But if you just want to keep it simple, & don't have a chop saw, just put the ports in...) Dave
-
Here's one cool thing that was inside each speaker. A paper "buildsheet" from Hope 😍 showing the P.R.I.D.E. in their work ! Anyone know any of the names/initials listed on here? (HDR Builder ?) When I reinstalled the woofer, I rotated it 180 degrees then used this gasket tape from parts express to reinstall it. (the factory gasket was THIN plastic & crushed down to about the thickness of two post-it notes... https://www.parts-express.com/parts-express-speaker-gasketing-tape-1-8-x-1-2-x-50-ft-roll--260-542 <-- LINK to speaker gasket tape
-
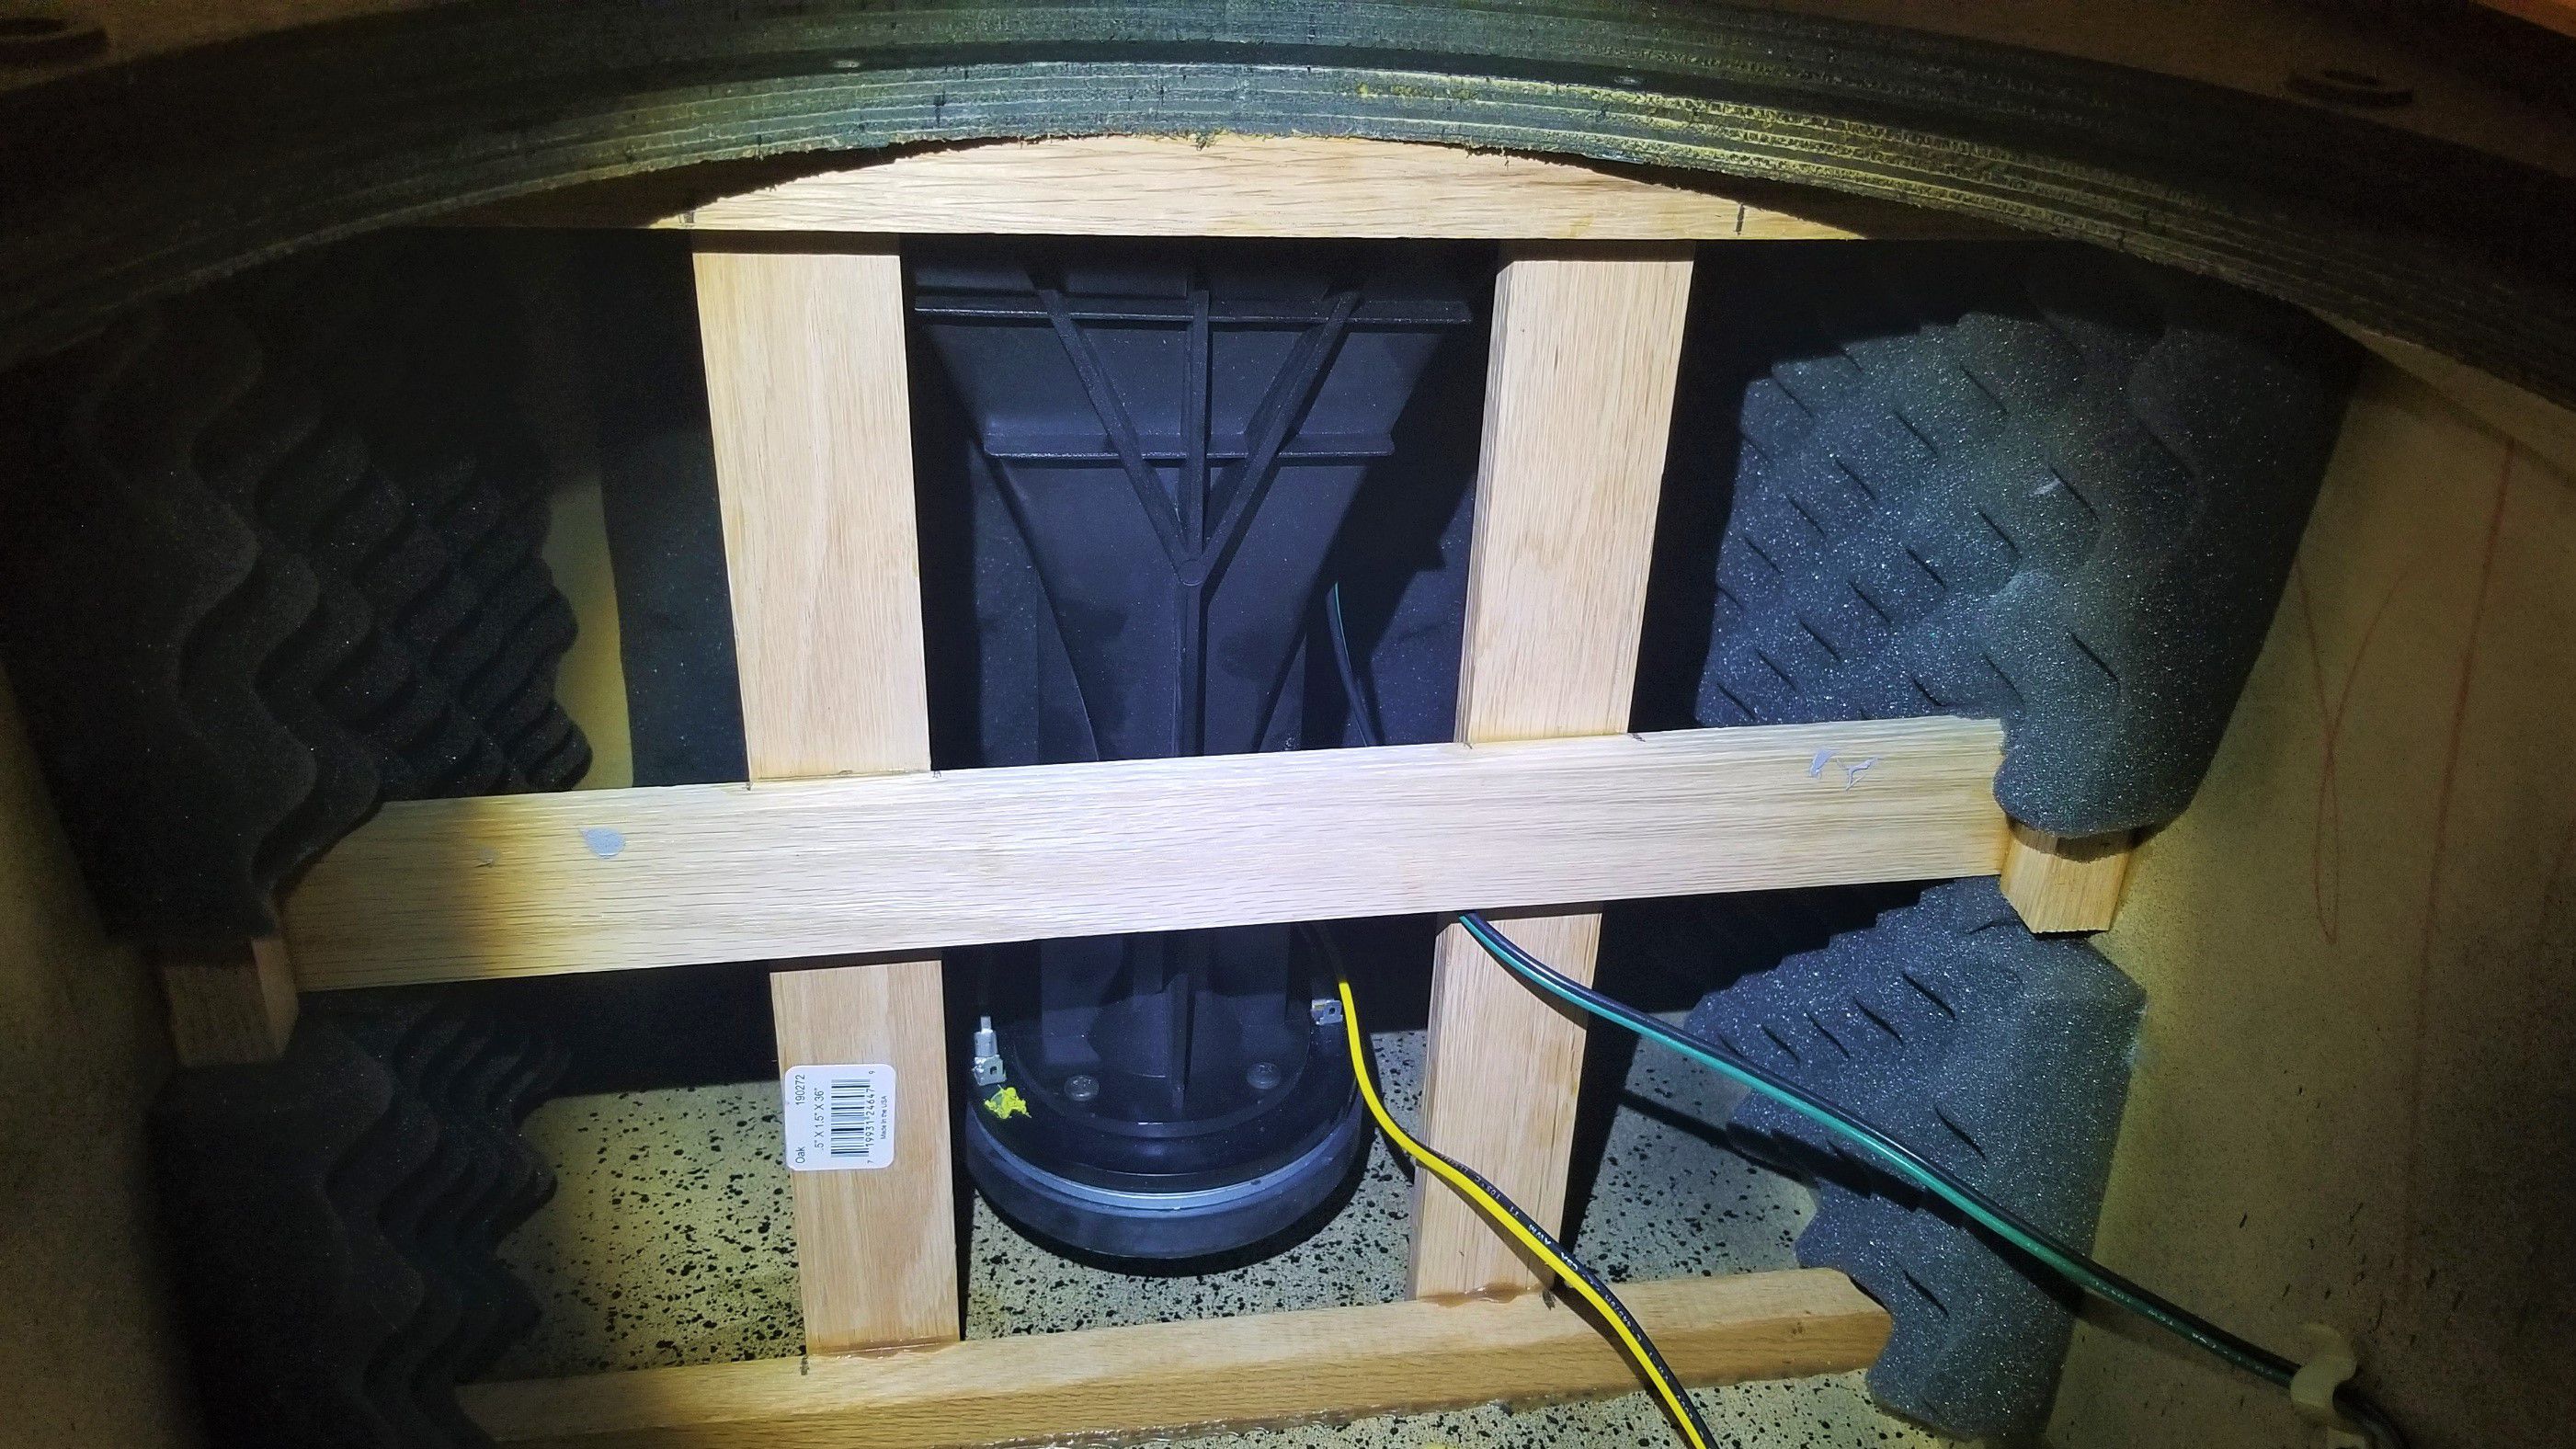
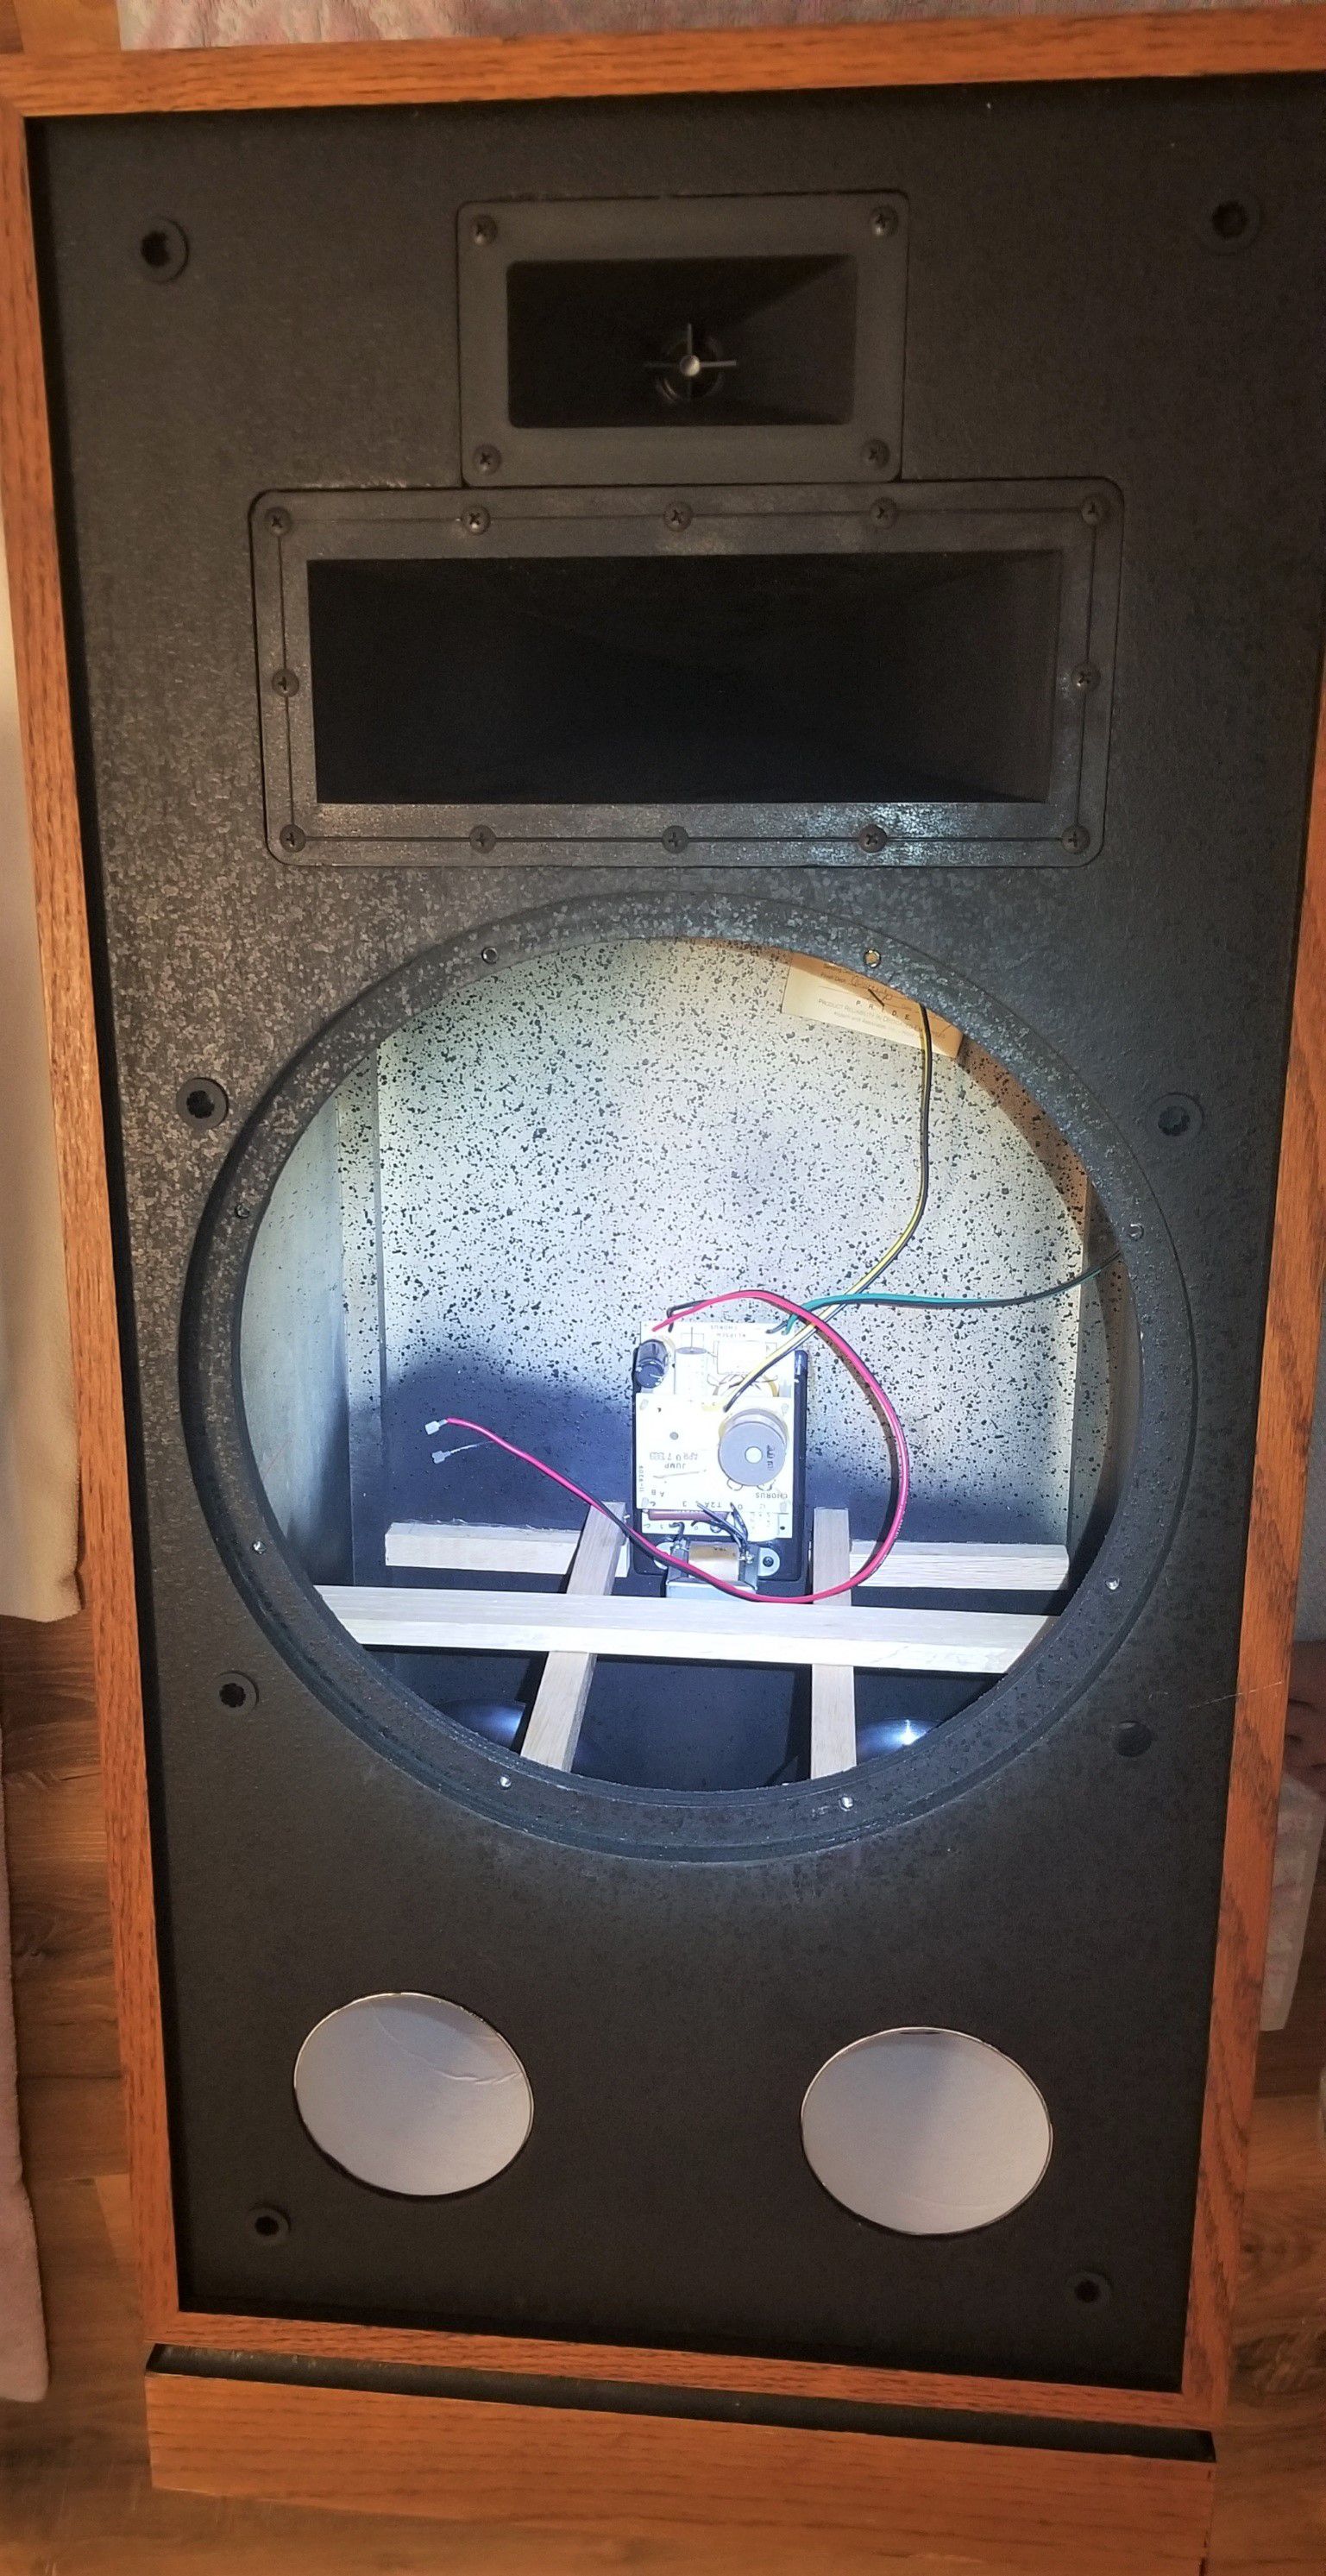
The upper bracing starts right above the opening of the woofer. (side to side oak 1"x1"). This is probably the weakest section of the entire speaker, because it's where the motorboard is thinnest, between the woofer opening & the mid-horn opening. Most of the bracing is 1"x1", with one piece of 2" x 3/4" & 2 cleats used in the middle as a side to side brace (same as I used on the bottom section) I also used construction adhesive to glue on 3 sheets of sound deadening egg crate foam. One sheet is on the inner "roof" of the speaker and one one each upper side wall. These were 2" thick 1 foot squares I bought on Amazon. (In case you're wondering, no insulation was inside the cabinet originally)
-
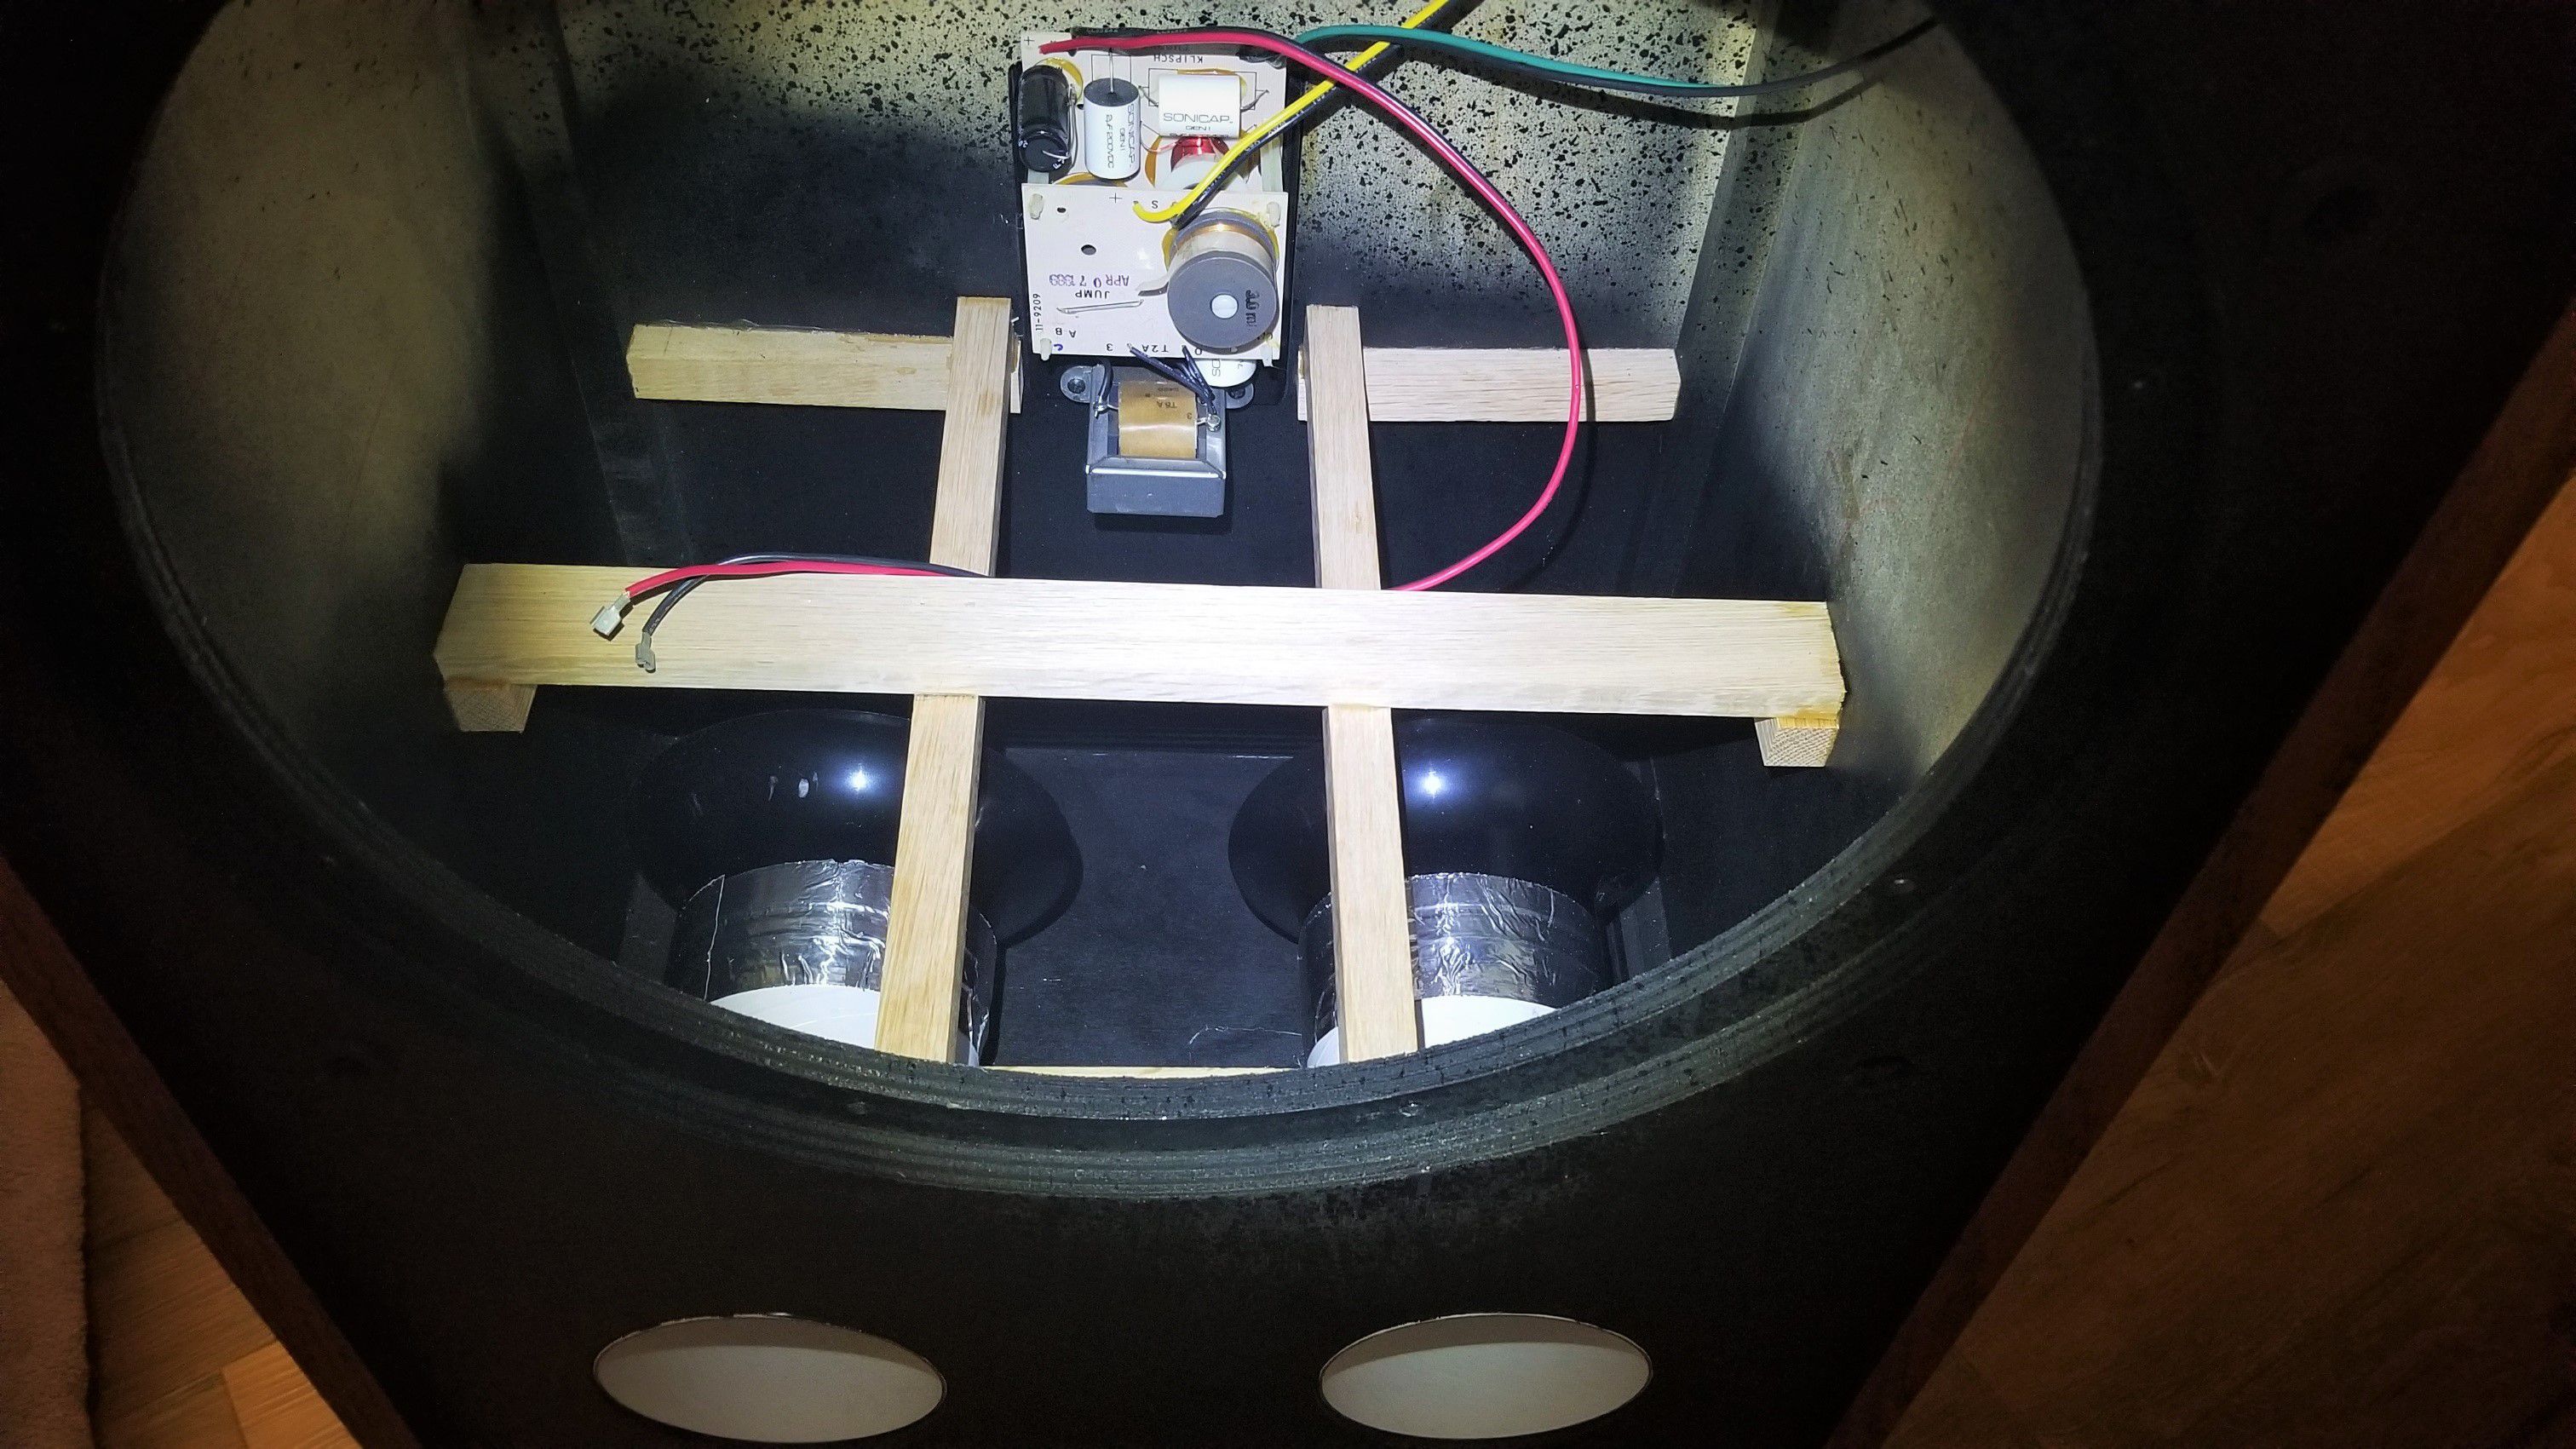
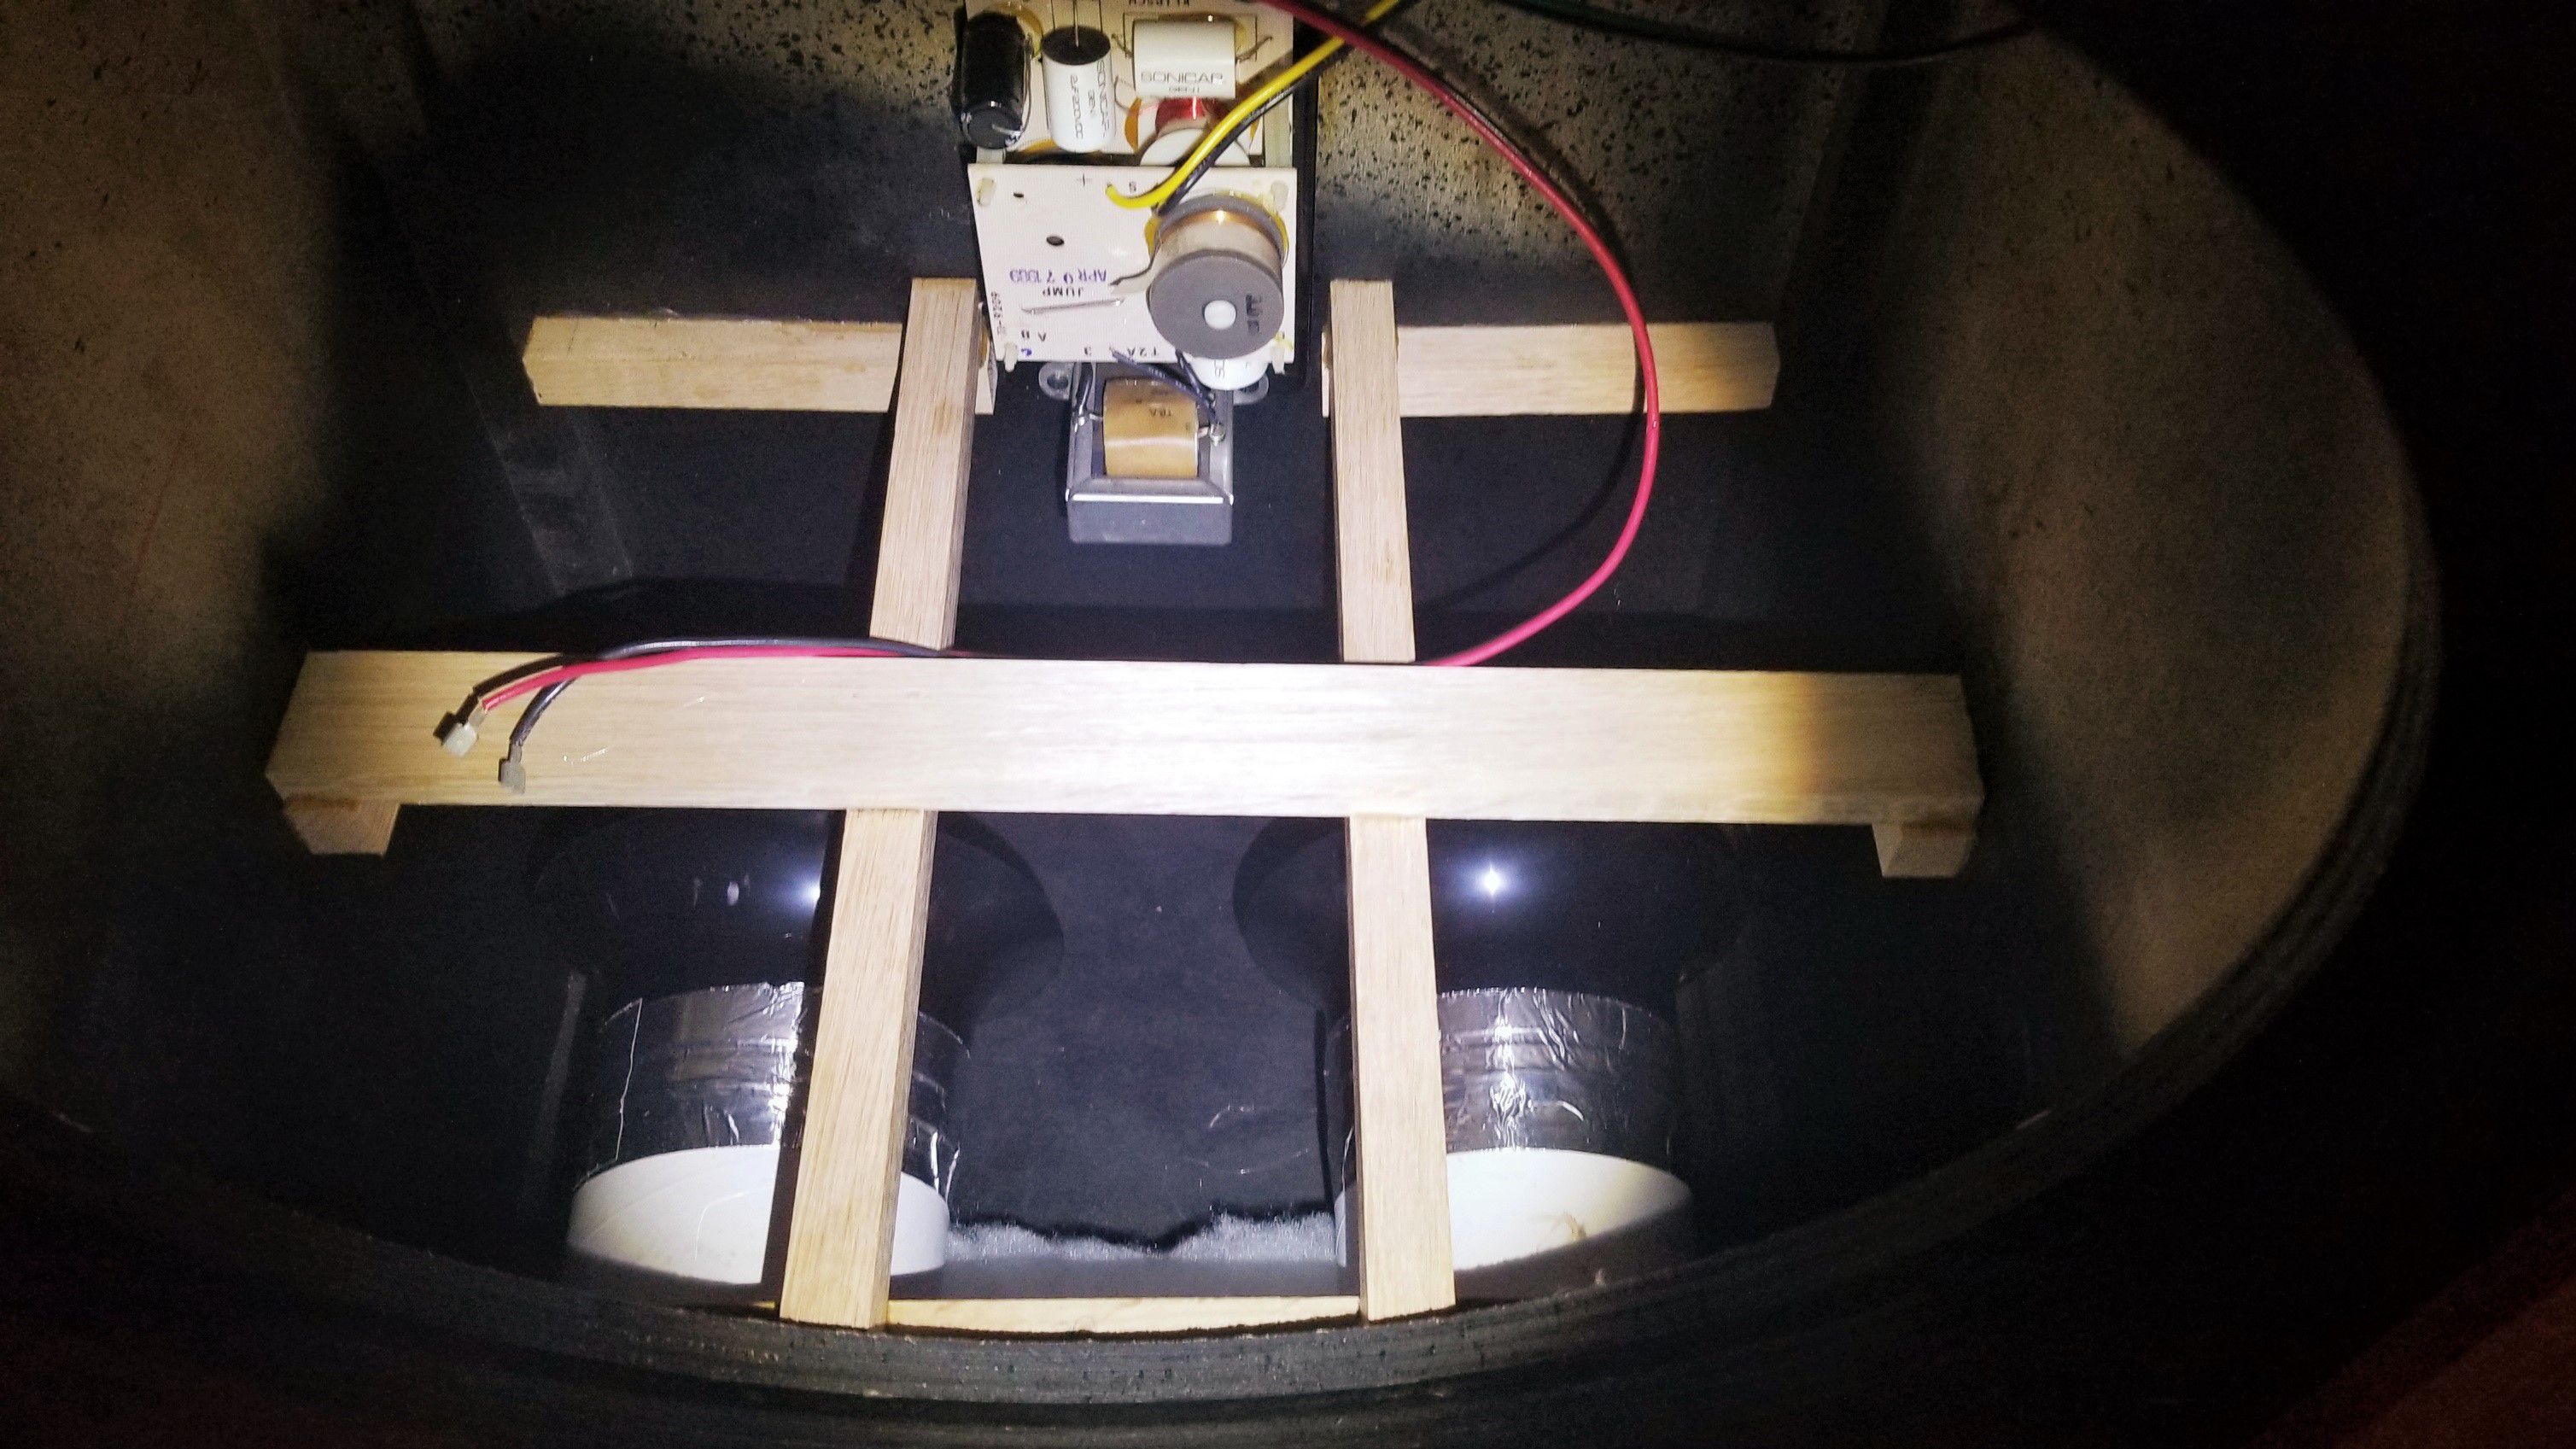
One more view of the lower bracing & ports... Time to work on the upper part next
-
Better view of the lower bracing (Thanks Morey for the Quartet bracing pics I used for ideas !) I was able to use small wood clamps (& titebond lll wood glue) on most places, but I did have to use two small 5lb dumbells on the cleats beneath the side to side brace in this pic. Flipping a Chorus speaker top to bottom numerous times for brace work is like going to the gym... 😁 You can also barely see a small roll of "polyfill" I put up front, right beneath the the two paper tubes side to side. You can also see the silver "metal foil" A/C duct tape I used as the final layer to strengthen the seam between the plastic flare & the cardboard port
-
Ports are now fully installed, in their final positions. The bracing work is in progress. I glued oak 1x1's (purchased at home depot) on the front & rear walls & also 1x1's as front to rear braces. I test fit the ports prior to gluing the braces to make sure I could remove the ports if I ever need to/want to (hopefully not, but ya never know what cranking up the volume may do some day...) There is also a 2' x 3/4" oak strip connecting the walls side to side as seen in this pic. The lower bracing is installed just barely below the woofer opening on the front wall.
-
You can see the electrical taped seam in this pic, but I was just test fitting them to each opening. They still need a layer of foil A/C duct tape (read below) To get them TIGHT (pressed in fit) do this: 1. Place tube in one at a time from the inside 2. leave an extra 3-4 inches of port sticking out through the hole 3. wrap as much electrical tape as needed on each one individually (some took 1 wrap, others took up to three complete wraps) 4. wiggle & gently press it back in from the OUTSIDE to get a final "flush" fit & have it as tight fitting as possible In This pic the ports were almost done but I did do two more things: a. I hot-glued the joint 3/4's the way around where the port meets the wood of the front motorboard. This makes em rock solid! b. before installing, wrapped the flare/tube seam with silver foil tape that is designed for use on A/C ducts. (you can see the silver tape in a pic of the braces coming up next)
-
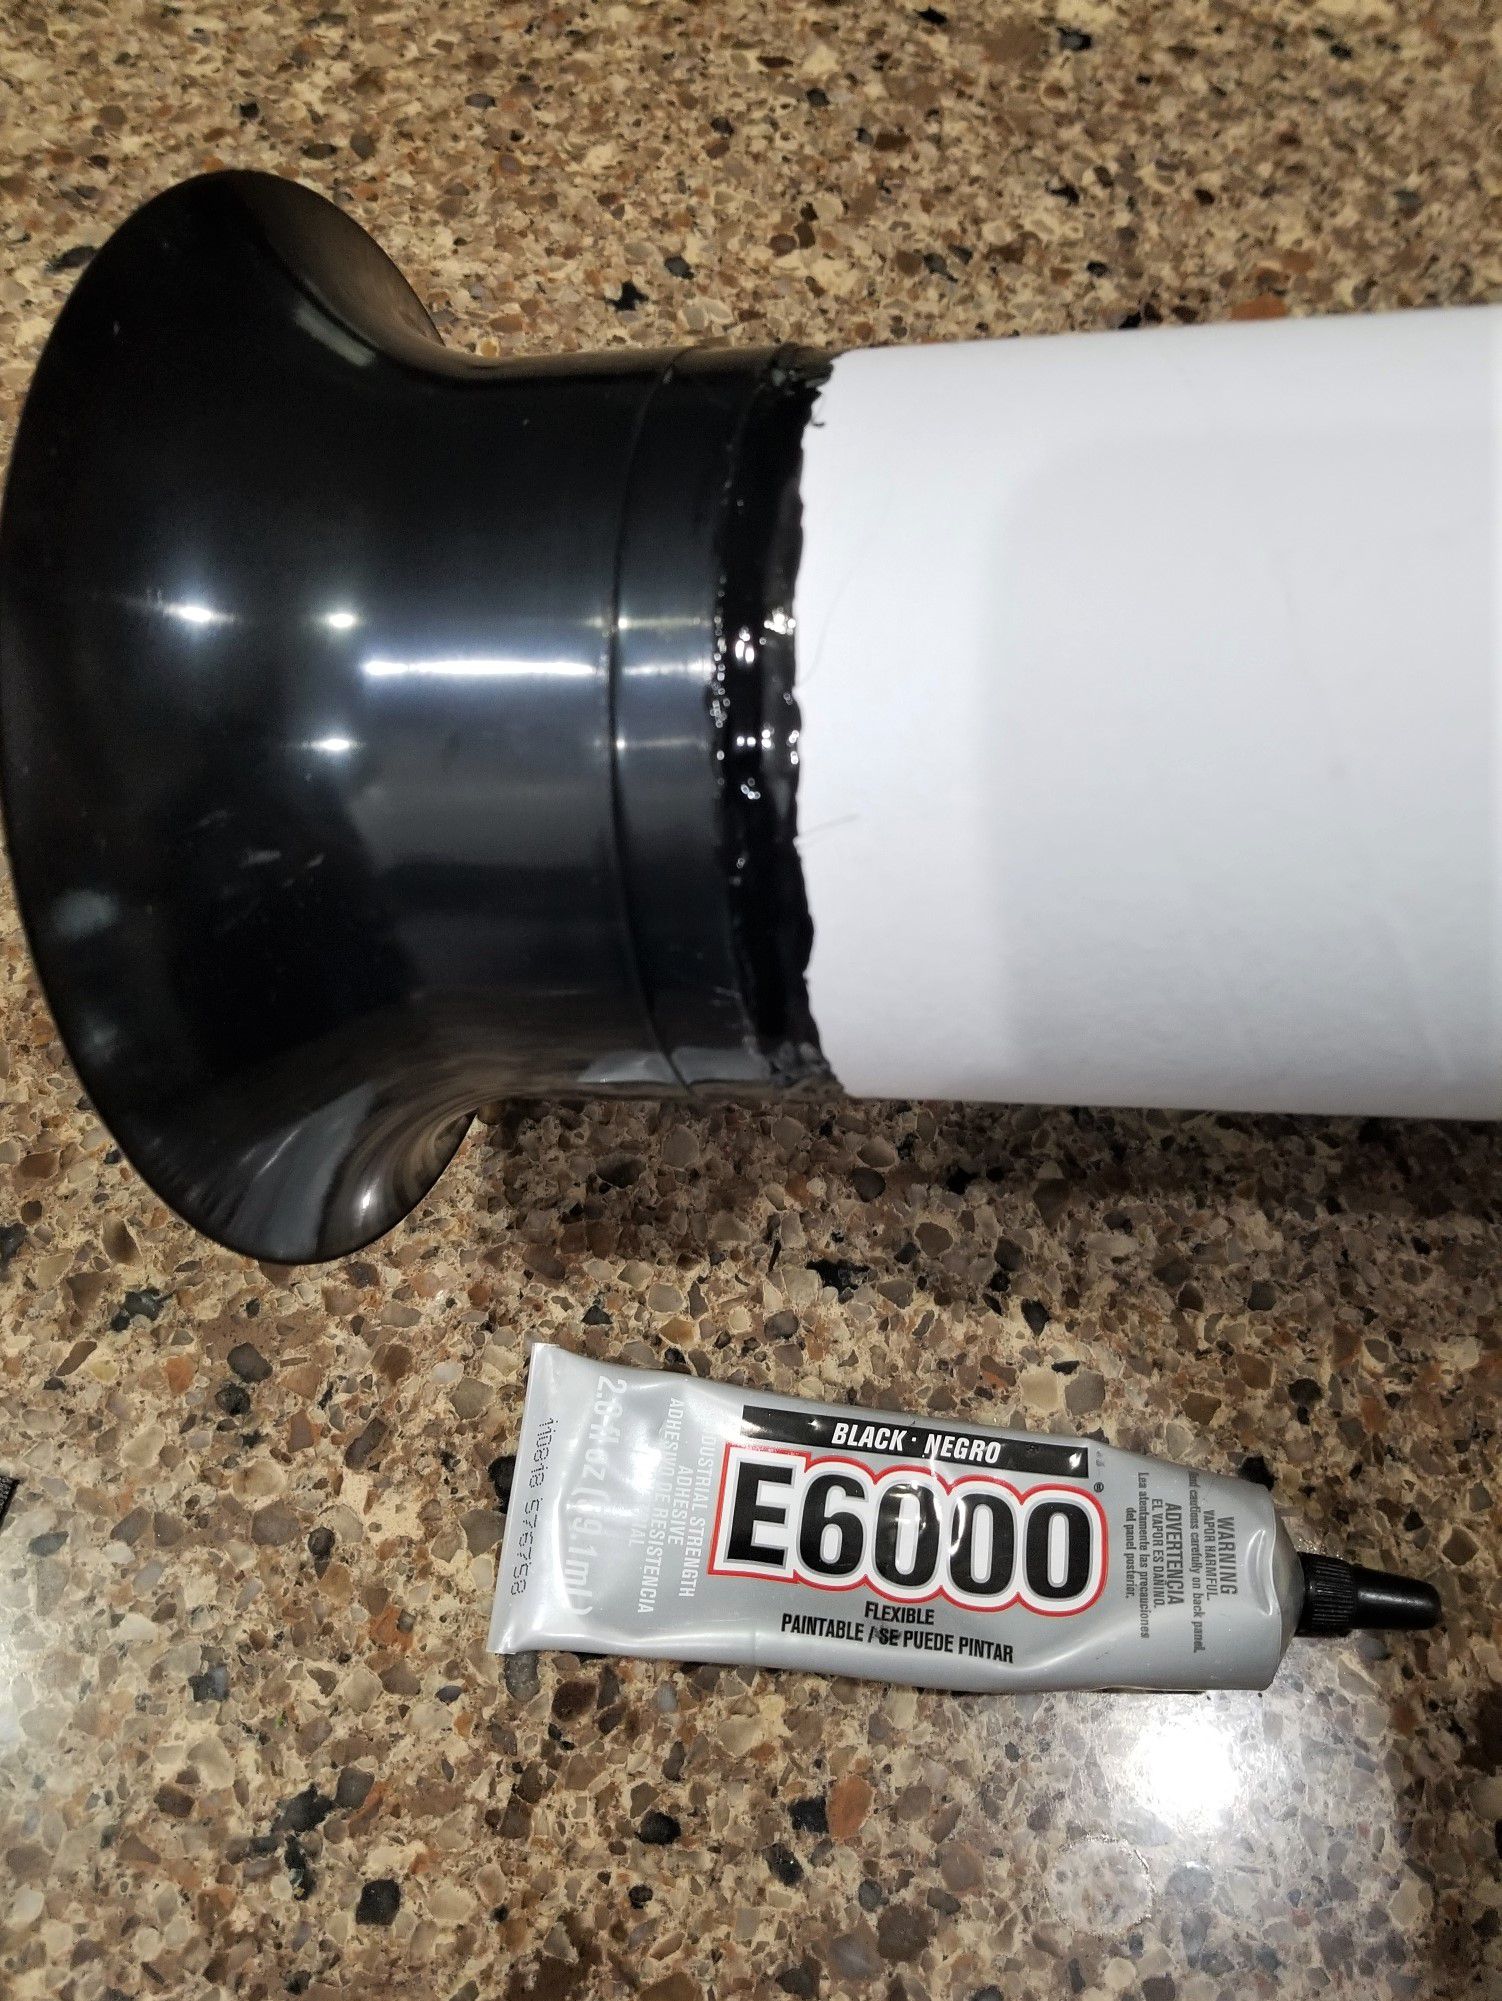
After I cut the cardboard, I had to figure out a way to join the flare to the tube (btw, they are EXACTLY the same size diameter) I used blue painters tape on the inside (temporary measure, removed later) and then TWO coats around the outside seam of this flexible black adhesive called "E-6000" that I bought at Ace Hardware. After both of the 2 adhesive coats dried, I wrapped the seam with two layers of electrical tape to give it more strength.
-
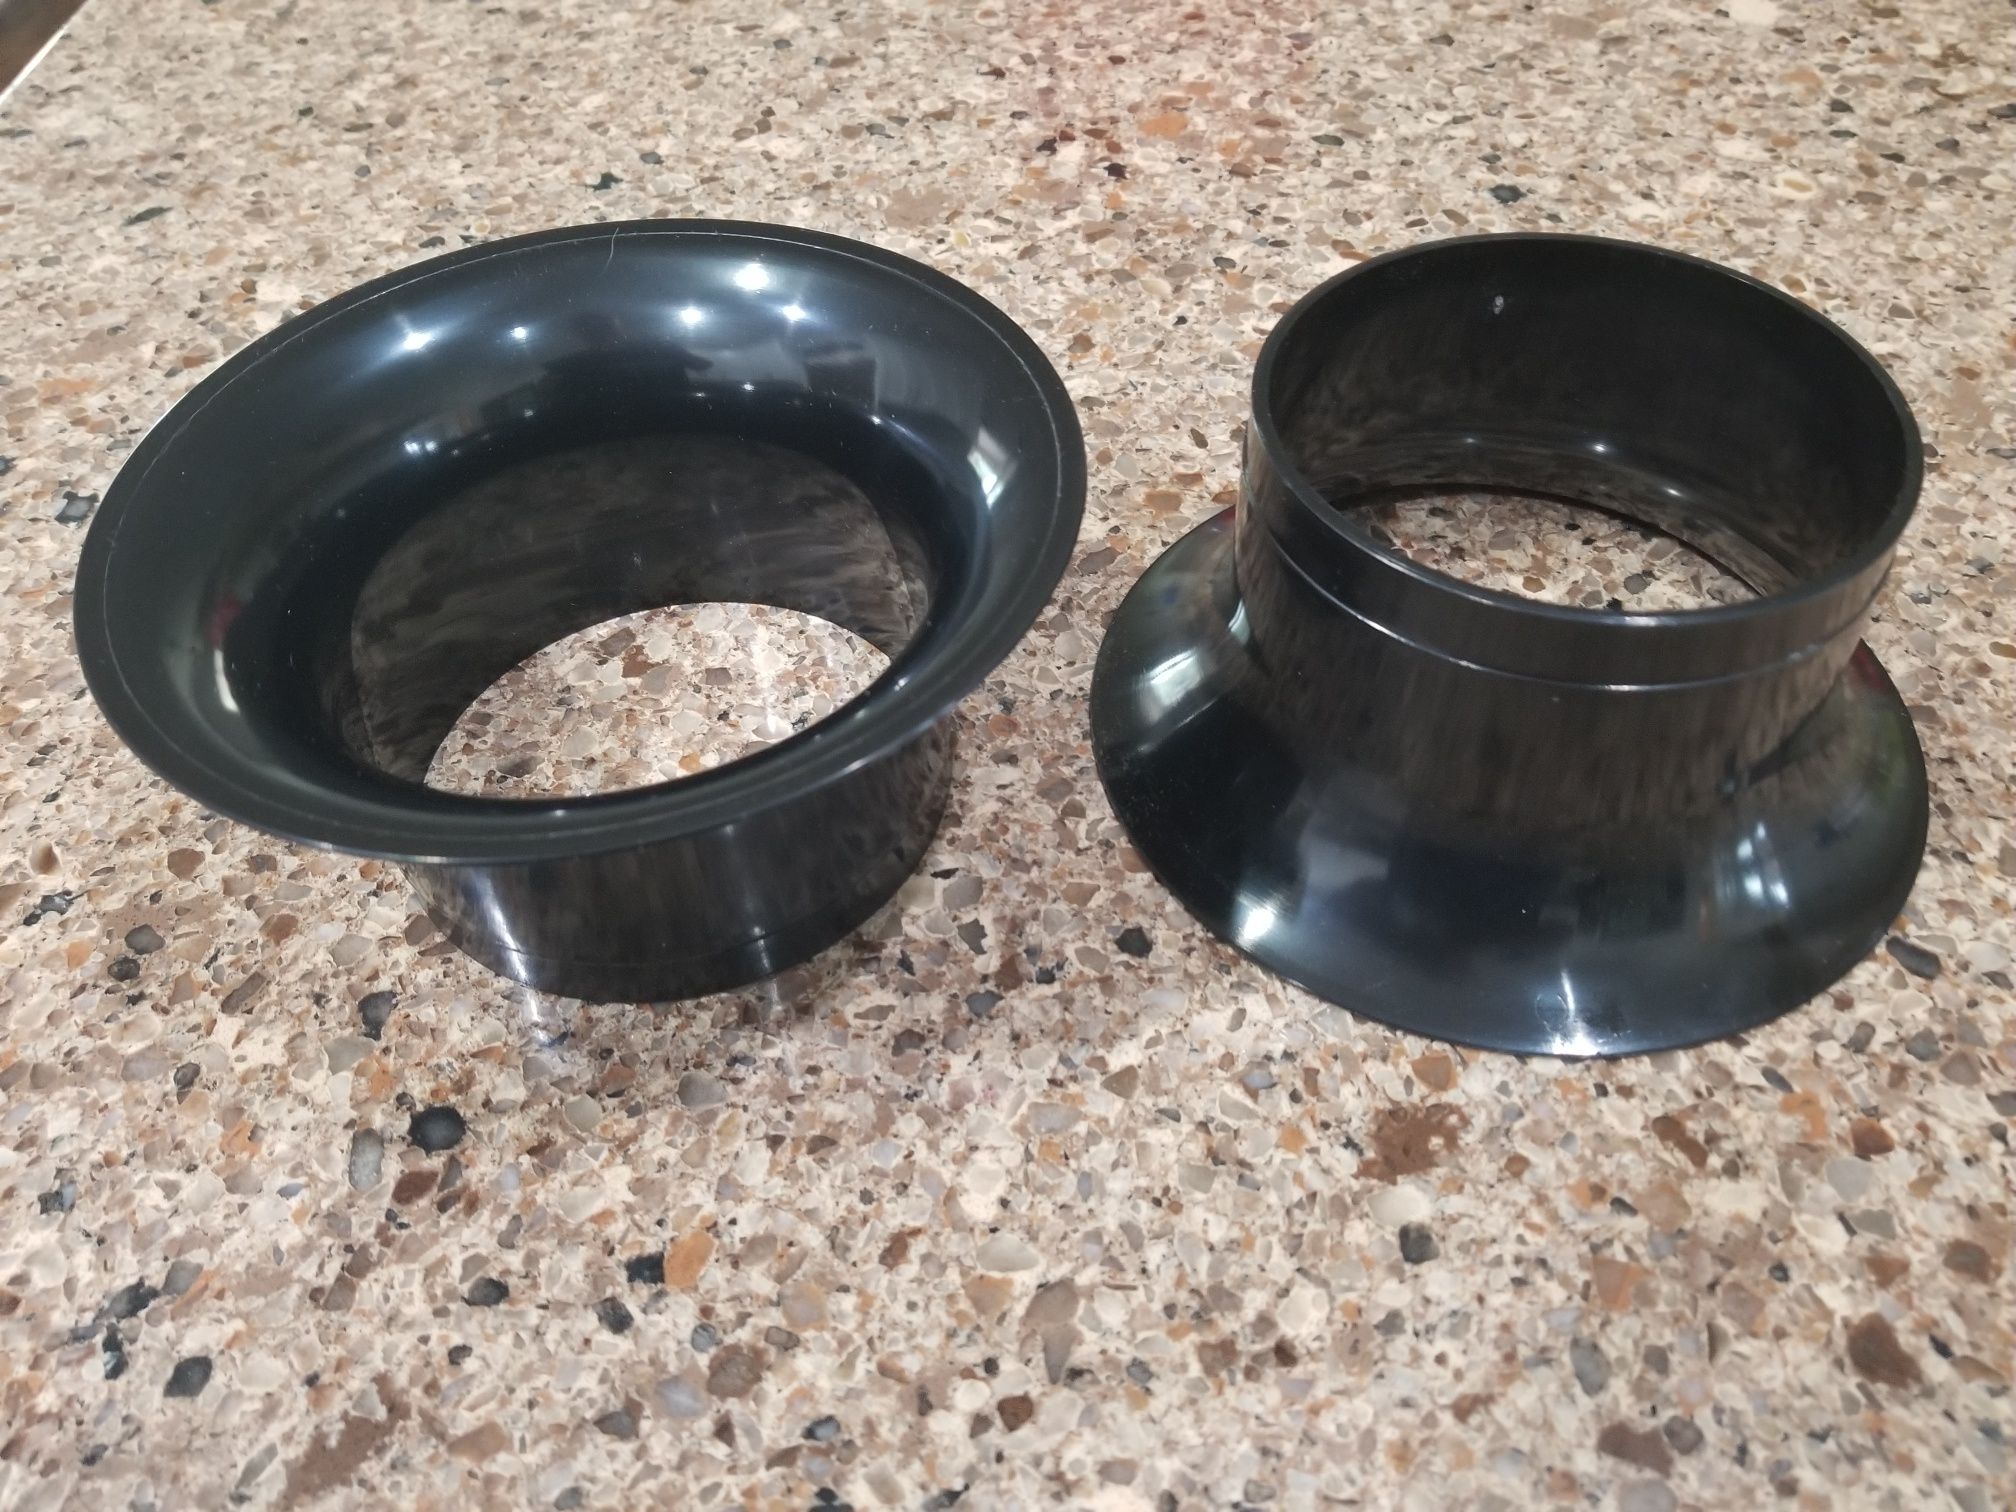
This is the flare I used. It might be a little overkill (? unnecessary) but I wanted to make sure I didn't get any port noise/chuffing sounds afterwards https://www.parts-express.com/Precision-Port-PSP-4IF-4-Inside-Flare-for-Port-Tube-268-377 <-- LINK to parts express 4" flare
-
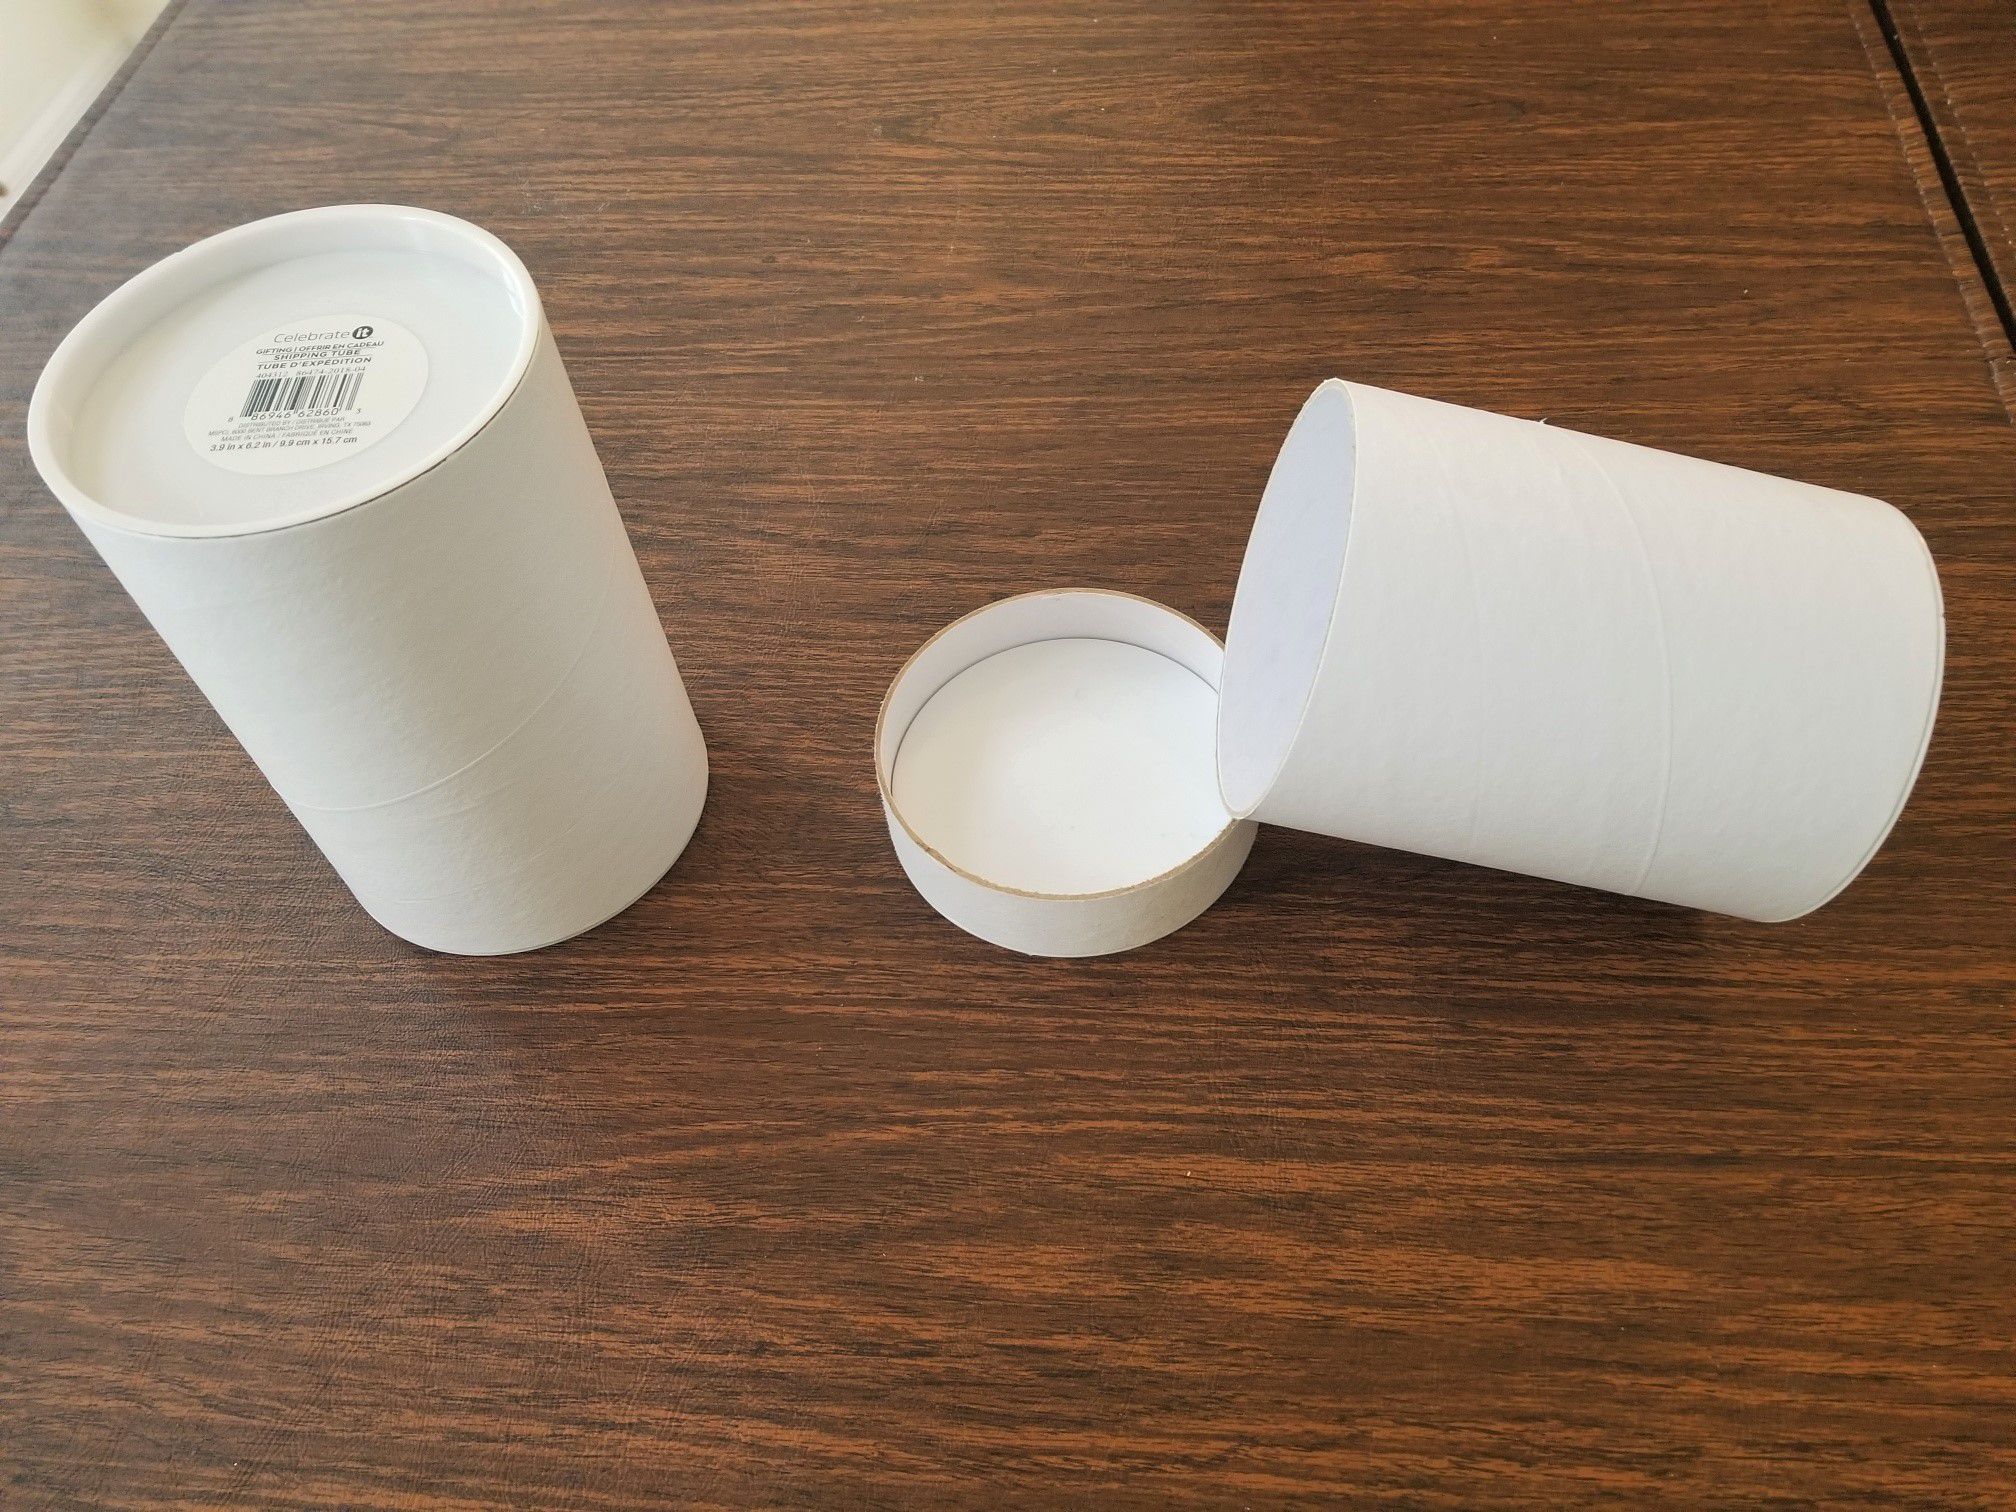
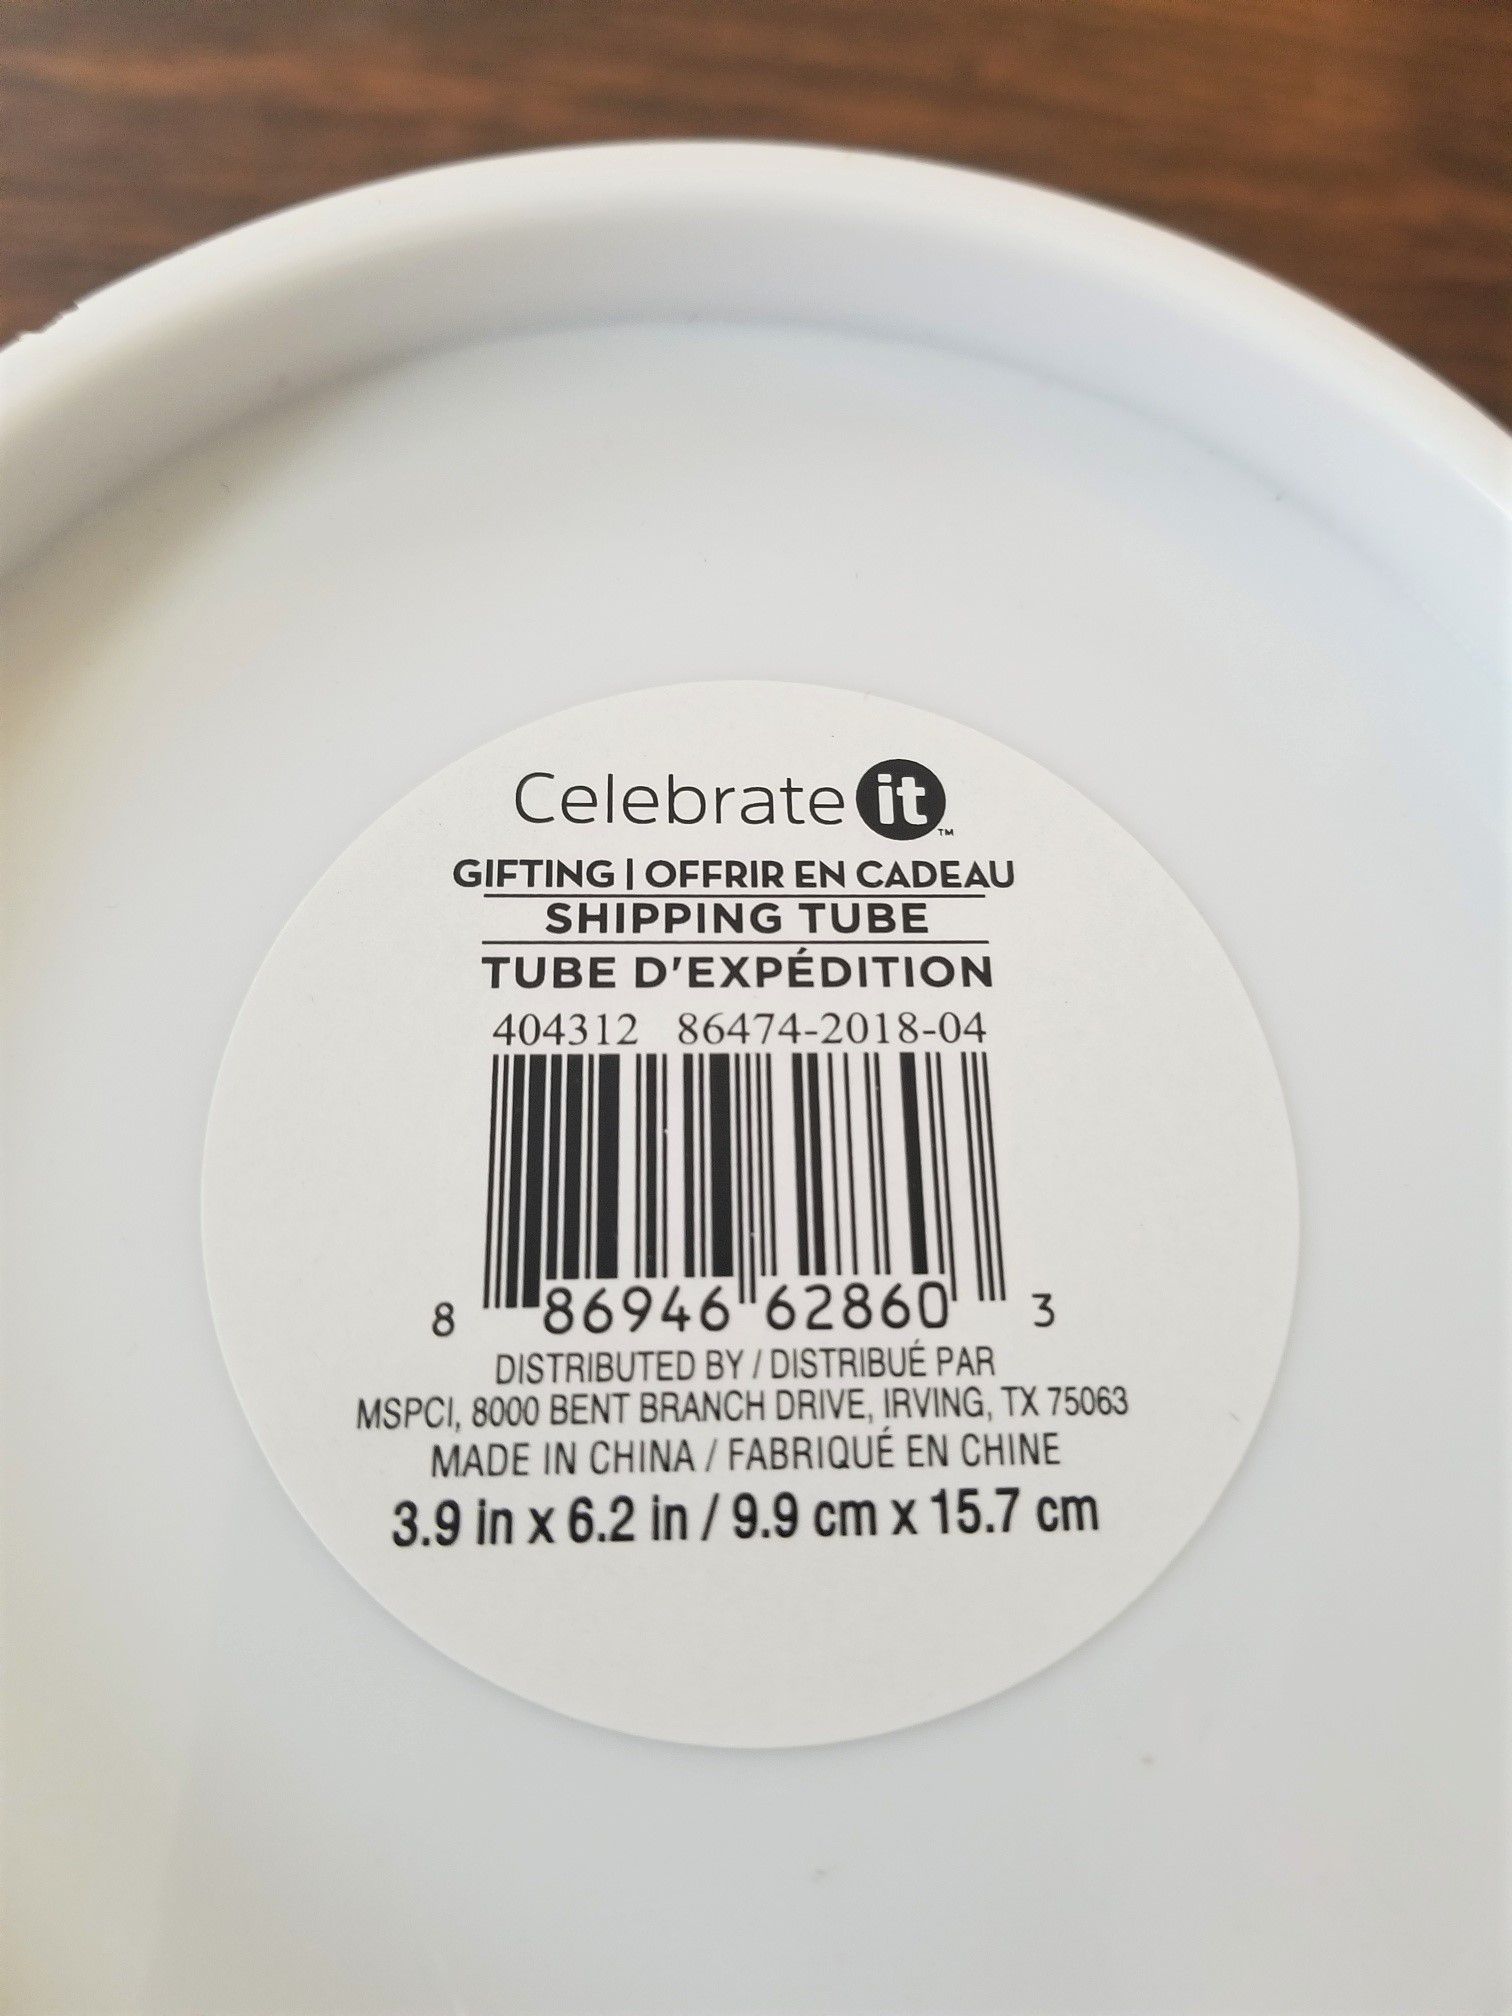
This is a closeup of the part I used. I bought it at "Michaels" a big chain craft store we have here in Florida. You may find it elsewhere, but I tried other mailing tubes, carpet roll inserts, etc. for weeks on end and NONE fit like I wanted except this one. https://www.michaels.com/white-shipping-tube-by-celebrate-it/M10323409.html?dwvar_M10323409_size=4&utm_source=CJ&utm_medium=2470763&utm_campaign=14079089&cm_mmc=Affiliate-_-CJ-_-2470763-_-14079089&affSource=2470763_14079089&cjevent=2c79bd6994ee11eb827d02db0a82b82c I did have to wind between 1-3 layers of electrical tape on the end of each tube to make it fit tight (& each one was different/unique in the amount it took)
-
This is the cardboard shipping "tube" I used. I searched forever to find one that was a precise (semi-precise😁) fit. I also had to trim it to fit with my chop saw (fine toothed blade) because of the flare I used on the end. I tried to keep the overall length including the "usable portion" of the flare to about 7" overall.
-
I purchased my Chorus 1's & figured that if I tweaked the low bass response a little, these would be a pair of speakers I would keep forever. I got finished this past weekend & figured it was my turn to "pay it forward" & share the results in a build thread so others can easily duplicate the project (including pix/part #'s/relevant info) I also decided since I was "going in" the cabinets, I might as well try bracing them too. To make the post modification info more objective (hopefully) & less of my "opinion" I purchased digital test tone CD for low bass frequencies. I tested them pre & post mods & was quite happy with the results (testing info coming up at the end 😎) Dave
-

Speaker test music? Dynamic Highs/Lows ...
Chorus1 Fan replied to Emile's topic in 2-Channel Home Audio
ZZ top "One Foot In The Blues" CD:. Song: "Fool For Your Stockings" If it's loud enough, the opening note has scared (made em jump) many of my friends... 🙂 "Sure got cold after the rain fell" is another awesome song... Not a very well known CD, Saw it recommended elsewhere... LOVE It ! -
I copied/pasted the add from the "dollars & sense" section over at Audiokarma... I've seen him post good info in other areas. I think it's legit. (No affiliation 🙂
-
https://washingtondc.craigslist.org/mld/ele/d/silver-spring-klipsch-speakers/6916978011.html Wish I was closer... What a DEAL !!!
-
I have modded Chorus 1's in my main 2 channel listening room , & KG 4.2's, in a bedroom, but neither are in use as my HT setup My HT setup is an Emotiva sub, Heresy ll's with crites diaphragms & crossovers, KSF-S5's as rear surround & a KSP-C6 as my current center. I do have a KSF-C5 in storage (it came with the S5's, but I've never used it) I'm not as obsessed as some others here about "Timbre matching" so I'm pretty happy with the KSP-C6, I'm just curious how it matches up to the other two you've owned, the KSF-C5 & KLF-C7. (I bet not many have owned/listened to all three of them, especially the KSP-C6)


![20190426_134914[146].jpg](https://community.klipsch.com/uploads/monthly_2019_07/small.1473220658_20190426_134914146.jpg.3c999f161666d3ce866c6d8011b1e3b7.jpg)
![20190426_135553[145].jpg](https://community.klipsch.com/uploads/monthly_2019_07/1209029806_small.20190426_135553145.jpg.81eaf49ff3018c3a00ebba2ba2bbb81c.jpg)
![20190426_134851[147].jpg](https://community.klipsch.com/uploads/monthly_2019_07/742030840_small.20190426_134851147.jpg.e8aa2b7b09e63ab0353a343e9748b8a5.jpg)