


ZINDA89
-
Posts
53 -
Joined
-
Last visited
Content Type
Forums
Events
Gallery
Everything posted by ZINDA89
-
I first covered mine in a textured vinyl for $8 a roll and they ended up looking like a pro audio version of the heresy. I tore it off and started my oddessy and what I thought was a never ending refinish. My cabinets were badly neglected. All 4 sides were cupped to a point where I ended up sanding through the veneer trying to get them flat, level and maintain an even thickness. But I made sure to reinforce all corners, edges and seams, making them harder and more durable than they were new. No shortcuts, no worries of cost or time, I ended up finding out what worked as I went along. Here's some of my work. Grinding away the seams and corners. Then filling with crazy glue and baking soda, 1 drop at a time. This made them sealed (no possible way to end up with a crack in the paint) and reinforced the edges strength. It was tested by a nearby speaker rolling off a chair and bouncing on the ground while spinning it's sharp veneer edge hit the finished edge directly on the center of the seam edge. It chipped the paint but did not even ding the material. I did end up having to respray the entire cab to fix the chip. But I found out that what I did was worth the effort.
-
I can't totally agree that things are made better now than they were 30 years ago simply because anything that was built between 2000 and 2005 was doomed for failure due to the millions of improperly made capacitors that were used in just about everything. I've seen my share of good caps go bad in modern electronics even Panasonic and Elna brands almost daily I'm tearing something apart that's dated 2000 to 2013 with failed caps, but I have a stack of maybe 10 or more receivers from the 70s and 80s that I use daily and none of them have any bad caps in them. Infact I'll bet I could go to a Goodwill and buy 10 electronics devices dated after 2000 and make sure they all power up, take them apart and I'll see at least 3 with bad caps, and that's not including any monitors. If I picked out only monitors, half or more will have bad caps. I have a crt tv that I bought new in 1983, it still works, I tore apart a bunch of crt monitors that all worked back in 2010, bought a bunch of LCD and led monitors to replace them and over half of them had bad caps! I just tore open a power supply yesterday and all of the caps that were marked "low esr" were bad and no others had issues, I'm going to look for that board and post a picture of it. I had to laugh when I saw the low esr caps mentioned just hours after I saw those. Those are also the culprits that go bad in monitors, i replace them with regular caps and they have outlived the originals by 3 or 4 years now without any failures, those replacements were torn out of old vcrs and crt monitors and tvs from the early 80s to mid 90s they already were in use longer than the caps that they replaced and still work! There was mention of believing others that know more about things so they are to be believed based on that fact, let me ask 1 thing, do they have a vested interest in capacitor sales or parts? Because there is such a thing as a sales man, I'm not sure if you ever heard about these guys but they study up on the things they need to say to convince you to buy crap you don't really need and make it sound quite convincing since they are going to be making money from your purchase they have no interest in telling you anything other than their benefits even if they are marginal or even questionable. Because that's what they have to do to make money, they can be very convincing and even make you feel that you are completely wrong if you don't buy into what theyre telling you. That's what makes a great salesman, making you believe they're right and make you willing to argue their point even when it's been proven that what they are saying is simply opinions and when actual tests are conducted using different higher quality caps, in a controlled environment double blind tests show that people cannot hear the difference, it's nearly a guessing game at that point and the numbers cannot even be repeated. There's a sound engineer who heard of this craze when it started a few years back he has a web page and that tells how he wanted to test different caps that were labeled as superior sounding to others. So he built 4 identical crossover networks using different caps and mounted them outside of the cabinets. He then connected them through a ultra fast relay that can switch crossovers so quickly there is no lag in sound, meaning when they are changed there is no delay, it should just sound different when switched. The idea was to have people listen and tell when they heard the difference and which ones sounded the best. He had a stage and a remote to switch the relays all set up and was ready to test it out. He turns on the music gets into position and clicks the button and clicks the button and clicks the button? He figures the relays are not powered up because he didn't hear any differnce but when he walks closer to the speakers he can see the relays are working just fine! End of testing.
-
I would not even start stripping any paint off of old veneer, for what reason would you want to do this? What do you think the results are going to be? You'll never get clean untouched wood after it's been painted black! The veneer is too thin to even consided trying to save it. Paint soaks into the grain of the wood and will fill every single hole and sanding it off of a 1/16” thick surface is not going to leave you any veneer. On top of it all, as stated, if solvents are used they will simply loosen the glue and the veneer will peel off. Bottom line is, the cost of trying to save what is probably a bad veneer is going to take forever and cost more than simply peeling it off and redoing it right. Plus it will look 100 times better than you'll be able to get that old bad veneer to look no matter how much time and money you spend. Or you can sand it down to where the veneer is perfectly flat again, it might even need to sand right through it in spots just to get it all one height, then seal it prime it wet sand, prime again, check for flaws, then 20 or more coats of lacquer, wait a week then sand it to a mirror finish, start at 220 grit, then wetsand with 500, then 1000, then 2000, wait 2 days, then if no flaws appear, shoot 30 coats of clear gloss acrylic lacquer top coat, wait a week, wet sand with, 500, 1000, 2000 and then 3000. Wait 2 days look for flaws, find flaws, strip the entire thing and start over but this time grind all seams and edges away about 3/8" deep using a hard wheel on a grinder. Then rebuilt all seams corners and edges using crazy glue and baking soda, this seals everything and provides a durable tough as nails edge that will last forever. Grind it all flush with the wood and redo all prior steps that you just learned. After a few months of daily work (work on 1 cabinet, then leave it sit and do the other) and $300 to $500 you should end up with something that looks like this.
-
Just curious if anybody ever tests their capacitors before they replace them? So many are instantly telling others to change out their stock components with overpriced exact duplicates without ever knowing if the originals are out of value in the first place. Many times the caps are chosen by the manufacturers because they did extensive testing to find which ones perform well with those speakers. Tiny differences in internal resistance will affect the way they work. When the mention of not hearing any difference was stated, I have to say that I commend you for saying this since most others will never admit that fact and have made up their minds that since they spent a fortune on unneeded parts and spent the time doing it, their ears automatically hear a huge difference. I'm not sure if it's denial and don't want to admit they were taken or jumped on the band wagon just because it's a buzz right now. I have tested all my caps in my old speakers including series 1 & 2 Heresy's, Infinity, Polk, etc even tested a bunch of cheap speakers and have yet to find any that deviated at all from their marked values. Looks like your speakers turned out nicely, but is there even any Klipsch parts left? Seems like you could have just started from scratch and made your own cabinets and you would have saved $500 minus the cost of veneered plywood (last time I checked it was $53 a sheet for ¾"x4'x8' 10 ply oak veneer sheets available at Lowe's and home Depot). Plus you would have saved all the time and work prepping the surfaces, time spent looking for veneer, sandpaper and other stuff that went into the veneer job. You certainly have the skills to perform the task and you could have altered the cabinet size and shape to suit the speaker ideally, but most importantly you could say that it's your own design, because it would be. You'll get twice the satisfaction when you made the entire speaker, (even though you almost did just that) than simply replacing parts (albeit nearly every single part) out from some manufacturers cabinet. Just something to consider next time you want to start a project, even though it seems that you have plenty of cash to spend, that $500 could have gone into even better drivers, wires or a nice table saw, router/bits, sander etc..
-
This probably would be better if posted in the sales area, I have a set of series 2 I'm selling, they have a mirror piano black lacquer finish on them. I'm in the Phoenix az area
-
I have a pair of painted Heresey 2s, I think they look just fine, it all depends on who painted them.
-
heresy 2 Klipsch Heresy 2 pair in Piano Black Lacquer Mirror Finish
ZINDA89 replied to ZINDA89's topic in Garage Sale
Sorry about not posting where I'm at, I was having a hard time just getting the ad posted and all the info mentioned. I'm in the Phoenix, AZ area. -
heresy 2 Klipsch Heresy 2 pair in Piano Black Lacquer Mirror Finish
ZINDA89 replied to ZINDA89's topic in Garage Sale
mirror finish? Yup! -
heresy 2 Klipsch Heresy 2 pair in Piano Black Lacquer Mirror Finish
ZINDA89 posted a topic in Garage Sale
I have a set of Heresy 2"s that I picked up with some bad cabinets, typical abuse, never oiled, water damaged, used as plant stands their entire life then out to the garage for more moisture to end up deforming them further. Although the Veneer was still 100% attached (very unusual since most with minimal abuse seem to have it peeling off in sheets} and it wasn't even that dinged up, it really needed to be redone or refinished in some manner. I originally checked out doing some quick black vinyl covering after a bit of leveling to the surfaces and thought it looked too much like a piece of band equipment, so I promptly removed it from the test speaker and rethought the entire thing over. Not wanting to make new cabinets and chance possibly changing the sound or making them undesirable to anyone who might eventually be interested in owning them in the future. I decided that there was no other option than to refinish them. After looking at veneers and getting a better idea of whats available and whats desirable, I realized that no matter what wood I choose they will never be universally acceptable to every environment or decor. So I was left with the one option of what I believe to be the only real universal finish that holds any amount of class and at the same time will fit any decor wether its classical, modern, contemporary etc.. I guess its not going to look right in a country rustic decor setting but then most with that type of decor are not as likely to be into fine audio gear (from my own experience). With my mind made up I ventured forward, this was not my first go round with the black lacquer paint finish. I had started some series 1's years ago and didn't have the time to execute the task properly and just needed to get my car back in my garage. I cut it short and ended up with what 90% of others have after they tried. So with left over supplies I did some smaller sized cabinets and they turned out quite nice with just about a weekends work on each project. Years later and no longer working 50-60 hours per week at a very hot physically and mentally demanding job, I found I finally had time to spend on a project, I ran across the previously mentioned pair of Heresy series 2's and cleared out a spot to get started. I immediately noticed the sides were not as flat as I thought they were from my vinyl covering. I took the time to get each side as flat as possible then then I encased one speaker entirely with an old box of tile grout I had left over from another project. this really worked out great, everything was looking extremely nice and nearly mirror smooth I have pictures of the grout surface shining and flat as a mirror. Then the second speaker was prepped and i had only enough grout to cover 1 side, I went to get more and found that grout 10 years ago is not the same grout made today! New grout is simply what used to be called spackel, spackel now is what used to be called chalk dust! So my plans changed and its a good thing they did, I needed to address some possible problems that might come about from corners, edges and most of all seams that could easily be chipped if not reinforced with something that is much stronger than wood or even grout plus be able to bond directly into the fibers of the wood making a complete sealed and strengthened edge. I tried a few bad ideas that others were doing including bondo and found it could be broken right off the corners with 2 fingers and minimal force. It just didn't stick to the wood and was impossible to work with. I saw molds others were using and felt that without some nails driven into the wood and having the heads sticking out there was no way it could ever work but still offered no real edge protection and absolutely no chance of a 100% seal across the 4 seams. I then came up with layering Crazy glue across the seams then adding baking soda to freeze the glue in place. This worked but I figured out after a while that I needed to have a better base that offered a harder surface for the glue to penetrate and grab onto. So I reluctantly ground away all my previous work and removed about 3/8" material across each seam (3/8" deep). I made sure to leave a v shaped groove so there was an area for the glue to settle into and build upon its self with each layer adding on about 1/16" more until it was built up and over the edges of the wood so I had something to grind away and end up level with the wood. This process was tedious, time consuming, costly (figure about 80 tubes of glue) but absolutely necessary to make this project look like I wanted it be. I ended up doing this to the rear side edges and back bottom edges as well after I noticed issues with water getting under the paint and swelling on the edges while I was wet sanding. Of course this meant stripping the entire speaker for the 3rd time to rebuild the edges and get things back in shape. Leveling, checking for dips and high spots along the edges and middle. After 250+ hours I had 1 speaker done! The next speaker was the one that was in better shape so I figured I had less to be concerned about and thought I could skip some of the more time consuming steps and found out that there was no other way to do this and after the 3rd stripping and starting over I knew that I was going to end up with something very different and much more than just a speaker, they have a look and feel of pieces of functional art, a smooth feeling when your hand slides across the surface and onto the edge and then down the side, as if its one solid piece of glass, no seams, nothing that resembles wood or the cabinet it was once. The sublime beauty is so simplistic, so timeless, so elegant, that viewing them you would never think of the difficulties and long hours of work that went into their creation. Seeing and feeling them is the only way to truly understand what I'm saying, even with all the luster, depth and shine, it's not until your hand feels the surface and glides across the finish, you will then fully appreciate them and understand that there are nice speakers and there are others that transcend what we know as speakers and have become works of art in their own right. It's truly amazing what can be accomplished when you have a dream and combine a pile of money and add a huge amount of time and effort towards that dream. I was tempted to stop and just make my own cabinets each and every day I was working on them, 2 months of 10 hour days, but I know that if it was easy everyone would have a set like this, that's what sets this pair apart from all others. All caps were tested using my fluke 85 and not 1 deviated from the marked value even .001uF! All horns were disassembled and washed, the diaphragms were inspected under a ten power magnifying lens to ensure no defects to the surface or wires, screws were tightened properly and the inside of the cabinets were given a coat of silicone sealant along all seams. the woofers were freshened up with a very light coat of water based flat black paint to give the appearance of new looking cones. Feet of different heights were added to the bottoms and can be interchanged with your own set if you dont care for the incline I have provided. I was going to use adjustable levelers but the insert piece needed would have required a hole about 3/8" to 1/2" to fit the threaded part required for those type of legs. I felt that was far too intrusive and opted for a 1/8" (basically invisible) screw hole with screws about 2.5" long to ensure they would never have a chance of coming loose and tearing up the wood. I have to say that at $1,000 for the pair I'm going to be ending up losing money on this set and my time will be basically free, I have kept all receipts as I went along and the grand total is shocking, but that's my own fault for working with this speaker, I feel that they could be worth much more but I need to sell them so I can get on to the next project, I think that anyone who is looking for a rare and unique speaker that has potential to be the center of attention and the talking point of every gathering even when their are much more costly better sounding pieces in the same area should definitely be interested in this set. Just last week I went ahead and shot 10 more layers of clear on them and polished them both when I thought I had a local buyer, he wanted to prepay using pay pal but I am not accepting any pay pal payments, he wanted me to deliver last weekend and was ready to pay cash, when I tried to set a time for delivery, he never replied back! -
Sealing and Strengthening edges and seams
ZINDA89 commented on ZINDA89's gallery image in Members Albums Category
there were some spots where water got under the glue and needed to have an area ground away again and more glue was applied to seal the wood better this is where I decided that all seams would need to be ground away at least 1/2 inch to reduce the chances of having to redo any prior sealing, this is simply not deep enough nor wide enough to ensure proper sealing. -
Sealing and Strengthening edges and seams
ZINDA89 commented on ZINDA89's gallery image in Members Albums Category
heres what should have been pictured if the uploader worked properly -
Sealing and Strengthening edges and seams
ZINDA89 commented on ZINDA89's gallery image in Members Albums Category
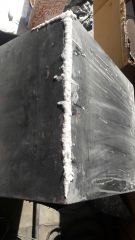
this is how the edges corners and seams will look if you fill the ground away areas properly. notice how much higher its been built up over the surface? thats so when its ground back down theres a completely filled non-porous edge left thats level with the sides and will not show any of the glue edges where it stops and the paint starts will be seamless and look like 1 molded piece of black glass once painted and polished. -
Sealing and Strengthening edges and seams
ZINDA89 commented on ZINDA89's gallery image in Members Albums Category
heres what was supposed to be pictured this shows the reconstruction and sealing of seams and corners to be able to get that beautiful uniform look and shine on all corner seams and edges. this process is time consuming and has a high price but its the only way I know to get the results needed to be able to to end up with a top notch Piano Black Lacquer finish. grinding awy the edges witha peanut grinder about 1/2 inch straight in so the seam is revealed allows the glue to get deep into the seam and it will soak into the wood another 1/8 inch as well making it a part of the wood it will not chip, or peal off the wood without taking 1/8 inch of wood along with it! it will resist cracks or any changes in the surface even when struck with a sharp heay object such as another speaker falling directly onto that edge with its edge. I had this happen to me and found that the outer surface of the paint had chipped very slightly but since I was in the process of polishing I went ahead and sanded it down and built up paint in that area agin and polished it smooth. It sounds easy but still took 4 hours or more to fix a tiny spot. Its better than reconstructing an entire edge and filling a seam which would probably end up in stripping 2 sides to get it done properly. maybe 2 days work minimum if all goes well. -
Heresy 2 in piano black lacquer
ZINDA89 commented on ZINDA89's gallery image in Members Albums Category
 because the wood is so old and has been subjected to water or damp conditions on top and bottom of cabinets the leveling off of the sides took about 24 hours each speaker, once the sides were flat then I had to seal the wood to be able to even get started. I tried various materials to do this and locally there wasnt anything available specifically for that purpose due to the layers going over it were going to be lacquer based paints. I found some old (10 years) grout compound and coated the sides with a thin layer till I had a surface that thich enough to sand to a mirror finish. What I thought was a flat surface was still very far from mirror finish as I found out. see the attached picture showing the grouted surfaces. I only had enough grout for 1 and half speakers and when I went to get more I found out that once again progress has shifted the quality of the products available to us. As we all have been hearing for some time that everything being made now is way better than before. Processes being used to manufacture stuff has ushered in a new wave of better than ever products, thats BS everytime I go to buy anything its subpar. once again Grout now is nothing more than what spackel used to be, unusable garbage that cannot get wet or it dissolves and washes off. I tried everything, outdoor patching compounds (not water proof?) to bondo (20 second work time) and struggled with all of them. Nothing seemed to be the answer. I had differences in the overall surface that were still near 1/8" from high to low plus the need to seal the wood and went with bondo to seal the surface. Bondo is not water tight, meaning its not a 100% water blocking substance it will absorb some moisture. and I found that out on the areas that it was thin or actually ended and the edges became apparent. It was simply a long expensive trial and error process that I still cannot guarantee any perfect way to do it. I found crazy glue was my best friend. filling holes, sealing seams and rebuilding all corners and edges became a standard that could not be avoided. If I didnt grind away the edge and rebuild it it was sure to become a problem a week or 2 later in the form of a crack or a blemish on the surface wether it was done and polished or still in the process of painting. Many times I had to strip them back down to bare wood and start over . Each time you do this after its done costs about $100 per speaker. You wont know if theres a problem until 2 to 4 weeks after they are complete. I called this set done 3 times and found myself striping it back to wood trying to figure out what went wrong. this set took me 400 hours to get them to look like this, this picture is actually taken (200 hours of work) after I called them done the first time before I had to strip one and redo it 2 more times. about 3 months of long days, mostly 10 hours per day. Theres very little down time with lacquer (dries enough to wet sand in 10 to 20 minutes) and the summer was coming quickly in Phoenix, it was already in the 90s when I was finishing up. Lacquer will dry before it hits the surface and cannot be sprayed outside, the surface temps will be over 200F easily, the paint will not dry but rather turn into a tar like substance that cannot be sanded. Wet sanding with seams not sealed will allow water to enter the wood and it will swell, edges as well, back edges water gets under the veneer and it will spread out everywhere and it comes up under the paint and cracks it weeks later. I just did a 20 year old bookshelf speaker (12"x8"x8") that had high quality veneer on 5 sides with some huge dents but was not water damaged, I was done completely in 3 hours. Ill explain more of what I found that made this such a difficult task with the series 2 and their construction in another post.
 -
-
 I filed off about 1/4" of material on all edges and seams, rebuilt all corners using the best, strongest most time consuming and costly methods I knew that would stand up to any punishment. After trying several other suggested ways to do this, like bondo and other plastic types of fillers, I found that they were easily broken off by just grabbing it and tearing it off. There was minimal bondage and no strength at all. the material sagged and drooped and never seemed to really harden, especially for the purpose it was needed to be used for. I came up with the idea of using super glue and baking soda built up in layers as a much better solution to the problem. I was able to rebuild all seams and corners back to better than new, making it a sinch to paint over and made all edges super tough. I even had an incident where another small speaker fell and struck the edge and all that it did was crack the paint. the paint stayed in place and the edge had no damage at all. the other speaker hit it hard right on its corner. This may not be the quickest or cheapest way to do this but when you're spending as much time and money to do this it pays off to do it right. I estimated my time to be about 400 hours and cost to be outrageous due to so many set backs when using the original cabinets. could have remade new cabinets and been done in a week but wouldn't be real Heresy 2 speakers then.
 -
-
-
-
completely redone in mirror finish piano black lacquer, reused all original parts including cabinets which turned out to be much more work than anticipated due to all the warpage and cupping of 35 year old wood.
- 2 comments
-
- 1
-

-
- heresy 2
- piano black
- (and 2 more)
-
im new to the site and just finished up restoring a set of heresy 2's in piano black lacquer, all original parts were used, I did not make new cabinets and reused every original part in the restoration. Of course I got rid of the ugly walnut veneer look and went with a timeless and less traveled path of the true furniture grade piano black lacquer finish to set this pair a step up from all others. When i went to upload images I got tons of errors and the first set I was started on simply disappeared on me and I was trying to delete 3 of the pictures since they were not even part of the group, It would not allow me to delete them and also had errors on 3 others I needed to get uploaded to show the process. It failed numerous times and there was no way of deleting them either. then I started all over uploaded a bunch more added comments and had a few that failed to upload so I tried a few more times and next thing I know the page closes and my pictures and an hours work are gone but then I see my first set of unfinished pictures which I had several of the wrong ones still stuck in that group have suddenly been posted! of course only the ones I really didnt even want to post showed up but most of the good shots did not even post. so how do i get rid of the ones i tried to delete and what happened to my second set of good finished pictures i spend hours getting ready to post? I see there's a bunch of blank images posted now from the first set which should never have even been uploaded, but the second set I hit upload all images and it took me to a page that said there was an error?!? thats when i saw the first set that I never even tried to post. I never clicked to submit any of them but they all made it? how can this be?

-
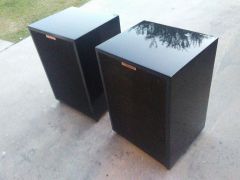
true mirror finish 100% by hand using 100% original parts
ZINDA89 posted a gallery image in Members Albums Category
 this shows what can be done when you apply a large amount of hard work, time and money. about 400 hours to get the set done. Many issues with the cabinets created some huge obstacles. I could have made new cabinets and beed done in 3 days (provided my paint did not fail or create more issues as I had encountered) but then these would not be real Klipsh Heresy 2 speakers! used rubber feet of different heights to lean them back for a much cleaner look.
 -
original old ugly walnut veneer, typical dents water damage
ZINDA89 posted a gallery image in Members Albums Category
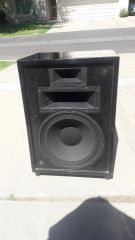
.jpg.b8cf6976b3a2950fb2b8c971480d5c00.jpg) these were the original condition when I got them. measured nearly 1/2" wider on the bottom than the middle and 1/8" wider on top than middle. all 4 sides were cupped corner to corner with up to 3/16" gap in the middle and front edge. leveling was a challenge, keeping consistent wood thickness on front edge was my main concern.
these were the original condition when I got them. measured nearly 1/2" wider on the bottom than the middle and 1/8" wider on top than middle. all 4 sides were cupped corner to corner with up to 3/16" gap in the middle and front edge. leveling was a challenge, keeping consistent wood thickness on front edge was my main concern. -
 cabinets were sealed, capacitors were tested and found not 1 to have deviated even 1% from labeled specs! all network wiring was checked to make sure they were done correctly from the factory, noticed an error on 1 and rewired it. all looked stock from factory but was incorrect on 1 lead placement going to the tweeter starting off the same post as main cap input. woofer cone was painted with cheap water based spray paint . all horns were disassembled and the horn parts were cleaned inside the throats screws were all tightened evenly, (some were a bit loose)
 -
.jpg.d96426d604cc71ff65a081bac728dbbc.jpg)

.jpg.821fee6aee7c922a1898514073d58f11.jpg)
