CECAA850 Posted October 11, 2010 Share Posted October 11, 2010 Next panel. Quote Link to comment Share on other sites More sharing options...
CECAA850 Posted October 11, 2010 Share Posted October 11, 2010 Time to dry fit the top. I ended up missing one of the panels with my pre-drilled holes on top and had to make 3 little patches. I'm sure it was due to the perpendicular "issues" I had with some of the inner panels. I plan on doing a round over on the edges and it looks like I'll need to remove several outer screws so my bit won't hit them. At that point, it'll be glued tight so it shouldn't matter if the screws are there or not. I see a LOT of finish work ahead as well as having to make driver access covers. I'm also going to do a little painting before the last panel is glued permanently in place. You can click on the pics to make them larger. Quote Link to comment Share on other sites More sharing options...
jason str Posted October 11, 2010 Share Posted October 11, 2010 Looking good, i like the fact that you did not overdue it with screws witch tends to weaken the structure due to splitting your panels in two. The finishing is the hardest part if you are picky with the outcome, propper prep is a must for a decent finish. Keep the pictures coming. Quote Link to comment Share on other sites More sharing options...
psg Posted October 14, 2010 Author Share Posted October 14, 2010 Next week, I plan to glue in the first two panel, cut the circle into the third, install T-nuts and glue that panel as well. Didn't get that far! I have to scale down my expectations! I used biscuits to align my pieces into the glue and secured the panels with screws so the PL won't push out the panels. Quote Link to comment Share on other sites More sharing options...
psg Posted October 14, 2010 Author Share Posted October 14, 2010 I assembled the first two panels at the same time to get a good square going without using squares. Quote Link to comment Share on other sites More sharing options...
psg Posted October 14, 2010 Author Share Posted October 14, 2010 View from the other side. Apart from that, I cut the two angled edges into my baffle panel and brought it home. I will cut the circle this week at home to save time at the next class. I am measuring 13 7/8" for the recommended Dayton driver. Does that sound right? (It's certainly smaller than 15"!) Quote Link to comment Share on other sites More sharing options...
jason str Posted October 14, 2010 Share Posted October 14, 2010 View from the other side. Apart from that, I cut the two angled edges into my baffle panel and brought it home. I will cut the circle this week at home to save time at the next class. I am measuring 13 7/8" for the recommended Dayton driver. Does that sound right? (It's certainly smaller than 15"!) Thats just how it is with driver sizes, has not changed as long as i can remember. Did you leave the 1/2" overlap for the driver access hole ? Maybe its just my poor eyesight. I may have a fix for you if this is the case. Quote Link to comment Share on other sites More sharing options...
CECAA850 Posted October 14, 2010 Share Posted October 14, 2010 Nice progress. I like the biscuits. It seems like you could use them with clamps and not need screws. It sure would make finishing the exterior a lot easier without all those pesky screw holes. Keep the pics coming. Quote Link to comment Share on other sites More sharing options...
psg Posted October 14, 2010 Author Share Posted October 14, 2010 Thats just how it is with driver sizes, has not changed as long as i can remember. Good. Did you leave the 1/2" overlap for the driver access hole ? Maybe its just my poor eyesight. I may have a fix for you if this is the case. Overlap? Panel 2 is mounted flush with the access hole, isn't it? Quote Link to comment Share on other sites More sharing options...
psg Posted October 14, 2010 Author Share Posted October 14, 2010 Nice progress. I like the biscuits. Thanks! It seems like you could use them with clamps and not need screws. It sure would make finishing the exterior a lot easier without all those pesky screw holes. Keep the pics coming. That was my inital plan, but various people really impressed upon me how hard PL pushed back, and there are places where clamping will be difficult. It will be a bit of a pain, but I will remove the screws at the end and will be putting in plugs of a contrasted color, sand everything down and stain it. Quote Link to comment Share on other sites More sharing options...
jason str Posted October 14, 2010 Share Posted October 14, 2010 Overlap? Panel 2 is mounted flush with the access hole, isn't it? No, you should have left a 1/2" overlap on panels 2,3, & 4 Panel 1 should be 1" overlap, there is a large detailed picture in the plans on page 6 of 23 (pdf version). Quote Link to comment Share on other sites More sharing options...
psg Posted October 14, 2010 Author Share Posted October 14, 2010 Overlap? Panel 2 is mounted flush with the access hole, isn't it? No, you should have left a 1/2" overlap on panels 2,3, & 4 Panel 1 should be 1" overlap, there is a large detailed picture in the plans on page 6 of 23 (pdf version). The access hole is cut 1 inch from the front, so there's a 1/2 inch left when panel #1 is glued in. As far as panel #2 and #3, I can't tell a thing from the the sketch on page 6, but I do see it on page 8! It look flush to me on these pictures: http://countercultured.net/pics/ht/tht/ and here: http://billfitzmaurice.info/forum/viewtopic.php?f=30&t=8589&start=60 I don't see where in the plans it is mentionned to offset panel #2 and panel #3 by 1/2 inch to the outside. Guess I should look at the #D SketchUp model. Quote Link to comment Share on other sites More sharing options...
jason str Posted October 14, 2010 Share Posted October 14, 2010 Page #11 shows a better view of the inside after panel install. I see the same was done on the other build, the overlap of the plywood will allow glue on 2 sides of your side access panel braces insted of one. What i was going to recommend is ripping down some 1/2" plywood and glue down 2 overlapping layers making 1" total. Quote Link to comment Share on other sites More sharing options...
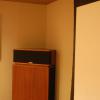
jason str Posted October 14, 2010 Share Posted October 14, 2010 Here is mine, notice i cut my access hole after most was done. [] Braces are glued on 2 sides once the side panel is installed. Quote Link to comment Share on other sites More sharing options...
psg Posted October 15, 2010 Author Share Posted October 15, 2010 Page #11 shows a better view of the inside after panel install. I see the same was done on the other build, the overlap of the plywood will allow glue on 2 sides of your side access panel braces insted of one. What i was going to recommend is ripping down some 1/2" plywood and glue down 2 overlapping layers making 1" total. Maybe we don't have the same plans... On page 11, the figure is for "Panel 8, panel 7/8 braces and panel 1/8 reflector install" and the access door is hiden from view. The only figure where I can see overhang is on page 8 "Panel 5 and panel 3/5 braces install", but it looks to me as if the access holes flanges are installed on that figure since there is a line parallel to panel #2 that reaches panel #1 and that would be a solid side panel if the 1/2 offset were correct. Quote Link to comment Share on other sites More sharing options...
psg Posted October 15, 2010 Author Share Posted October 15, 2010 The Google SketchUp plan showsthe panels flush against the access hole. I think I'm okay. BFM doesn't think such an error would make a big difference in the sound. Quote Link to comment Share on other sites More sharing options...
nyt Posted October 15, 2010 Share Posted October 15, 2010 there was only an overhang on panels 1/2 in my plans 1 Quote Link to comment Share on other sites More sharing options...
psg Posted October 15, 2010 Author Share Posted October 15, 2010 Current plans have the access hole 1 inch from from the edge with panel 1, leaving a 1/2 inch overhang there. All three other panles are flsuh with the access hole using X-ray vision on SketchUp. Looks like I'm okay (for now; pretty more timefor other mistakes!) Looked flush to me on your build too: http://countercultured.net/pics/ht/tht/build25.jpg http://countercultured.net/pics/ht/tht/build26.jpg Maybe a small offset on panel 4? But panel 2 and 3 look flush with the access hole in your pics. Quote Link to comment Share on other sites More sharing options...
psg Posted October 15, 2010 Author Share Posted October 15, 2010 A couple of questions... What sort of gear is needed for the EQ? I hear some version of Audyssey may be sufficient? If you already have a receiver with Audyssey, it may suffice. Try it before you buy something else. If you don't, look into getting a BFD. It takes a little time to get the hang of it, but it's worth it. you're basically getting a 12 band PEQ for around a hundred dollars. I am very interested in the hundred dollar Behringer DSP 1124P Feedback Destroyer Pro. There was a used one on Canuck Audio Mart and the seller said: "generation 1 with ver. 00 firmware, so it's compatible with REW (Room Equalization Wizard) software." Do current models not work the same? I am having a tough time finding it in Canada (again) Edit: I see Canada Post can do my bargain hunting from the US for me! http://www.canadapost.ca/shopper/items/1299023/Behringer-Feedback-Destroyer-DSP1124P Quote Link to comment Share on other sites More sharing options...
jason str Posted October 15, 2010 Share Posted October 15, 2010 The Google SketchUp plan showsthe panels flush against the access hole. I think I'm okay. BFM doesn't think such an error would make a big difference in the sound. There should not be any difference in sound, however that can be a weak point. Make sure you glue the snot out of the access door mounting you will be installing and be sure its square as this cannot have any air leals. Once the first few panels are done the rest is just repetition, don't forget we are here if any questions arise. Quote Link to comment Share on other sites More sharing options...

Recommended Posts
Join the conversation
You can post now and register later. If you have an account, sign in now to post with your account.
Note: Your post will require moderator approval before it will be visible.