Chrome Magnum
-
Posts
25 -
Joined
-
Last visited
Recent Profile Visitors
1584 profile views

Chrome Magnum's Achievements
Member (2/9)
13
Reputation
-
Maynard design 6AQ5/6005 SEPP amp w/James OPTs (impression/take)
Chrome Magnum replied to mike stehr's topic in Talkin' Tubes
Gorgeous interpretation of a Maynard design! You do yourself and him Proud!! -
Annnnnnnd We're off!!! Looks like a very cool build!! Thanks for the pre-view!
-
Ground up build: my "Weapons Grade" Dual Mono SEP "Tech-Amp"
Chrome Magnum replied to Chrome Magnum's topic in Talkin' Tubes
I approve and thanks! I did want to do the post but I'm very happy that you did it already. The internets confuses this old guy sometimes. I hardly know how to Kindle someone on my Apple-Pod! =D (seriously, though, thanks) Also, Maynard sends his best! -
Ground up build: my "Weapons Grade" Dual Mono SEP "Tech-Amp"
Chrome Magnum replied to Chrome Magnum's topic in Talkin' Tubes
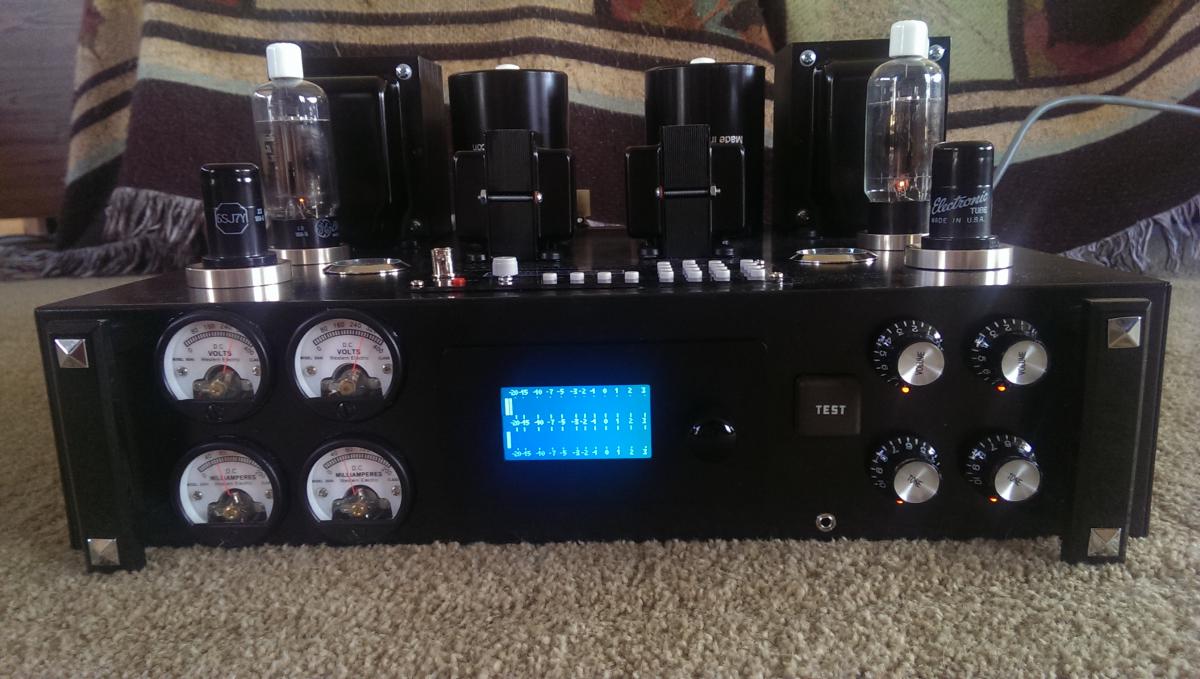
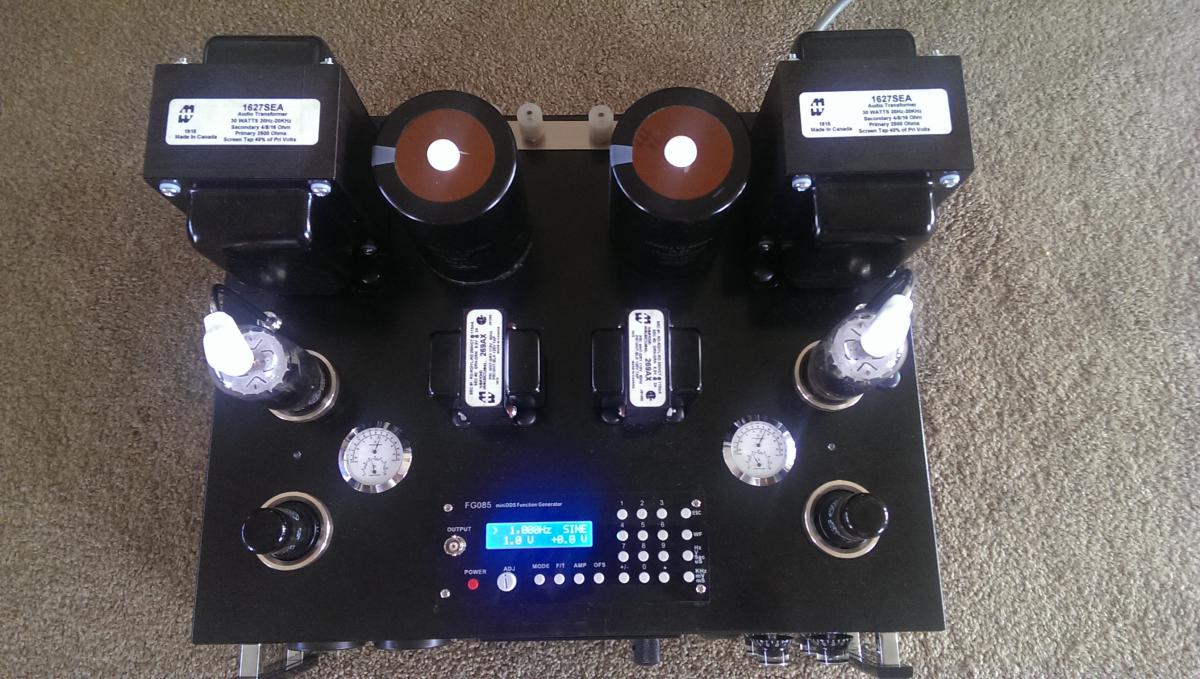
Thanks! The amp circuit is a Maynard original. It uses 6SJ7's and 6BG6's I built it into the chassis first and tested it, so that I'd know if any of my add-ons were causing any issues once they were installed and powered up. Maynard's design is hum-less and noiseless and fortunately, my enhancements did not add any noise either. He designed it to accommodate those gorgeous NOS Coke can caps that I so wanted to use. That made it necessary to marry them with equally impressive OT's for aesthetic's sake. The good news is that those OT's bring a lot of base to the show, which Maynard's design powers through with ease. So, at around $400.00 total, the (4) Hammond X-frmrs represent just under half of the parts cost for the whole build. No surprise there. The chassis is a Bud Box from Mouser and the hardest part of the construction was making the various holes and cut outs perfect. I measured 4 to 6 times before cutting once. The analog meters were literally the only ones available that looked good/right. They are from e-Bay (Chinese) and even though this really isn't typical in my experience (even though there is reason to believe it should be), two out of four of them had minor problems which I did not discover until they were installed. (sigh) I took them out and fixed both (luckily) and re-installed. There are a lot of little extras, too numerous to mention but to name a couple, there's the pin-point leds that I used for the volume and tone knob markers and the tiny little chassis holes that you can just make out between each tube pair are access holes for the feedback pots. The small black knobs beside each output tube USED to be for cathode resistance adjustment. But Maynard's opinion was that that was unnecessary and it added potential for drift and etc. I bowed to his experience and replaced them with fixed resisters. However, that left me with some nice mil-spec 100 Ohm, 3-watt pots installed that were not doing anything. I ended up using the one on the left for the analog meter back-light dimming and the one on the right for the marker led dimming. Yay, mindless, harmless tweaking! Of course the feature that makes the whole thing pop is the integrated waveform and performance display. I wish I could take credit for it but the truth is, those are widely available as complete functional modules. This one was around $100.00. The user has only to power them up and supply a properly scaled input to them. They come in many styles and configurations, so finding one for your application is not a problem. The same goes for the signal generator. I considered making one from a dedicated chip but I found what you see here for $40.00,,, FORTY DOLLARS! For that I got a great looking, perfectly sized, digitally synthesized, drop it in the hole and you're done, audio generator... No brainer. You'll notice there are no through holes or bolts or rivets, etc in the deck. This gives the top side of the chassis a very clean look. Maynard always cuts some very neat little vents for his power resisters to cool through but I could/would not consider that for this build. What I did was install a 12 volt muffin fan inside which circulates air over those resisters. It seems to do a fine job as they stay cool and the deck thermometers stay below 90 degrees. I'm guessing that spreading the heat around inside the aluminum chassis allows it a lot of surface area to wick off through. That's the ten thousand foot view. I hope it helps but please contact me with any more questions/comments you may have. Cheers, Stu -
Ground up build: my "Weapons Grade" Dual Mono SEP "Tech-Amp"
Chrome Magnum replied to Chrome Magnum's topic in Talkin' Tubes
Thanks for noticing! =D And thanks to everyone else who left positive comments!! -
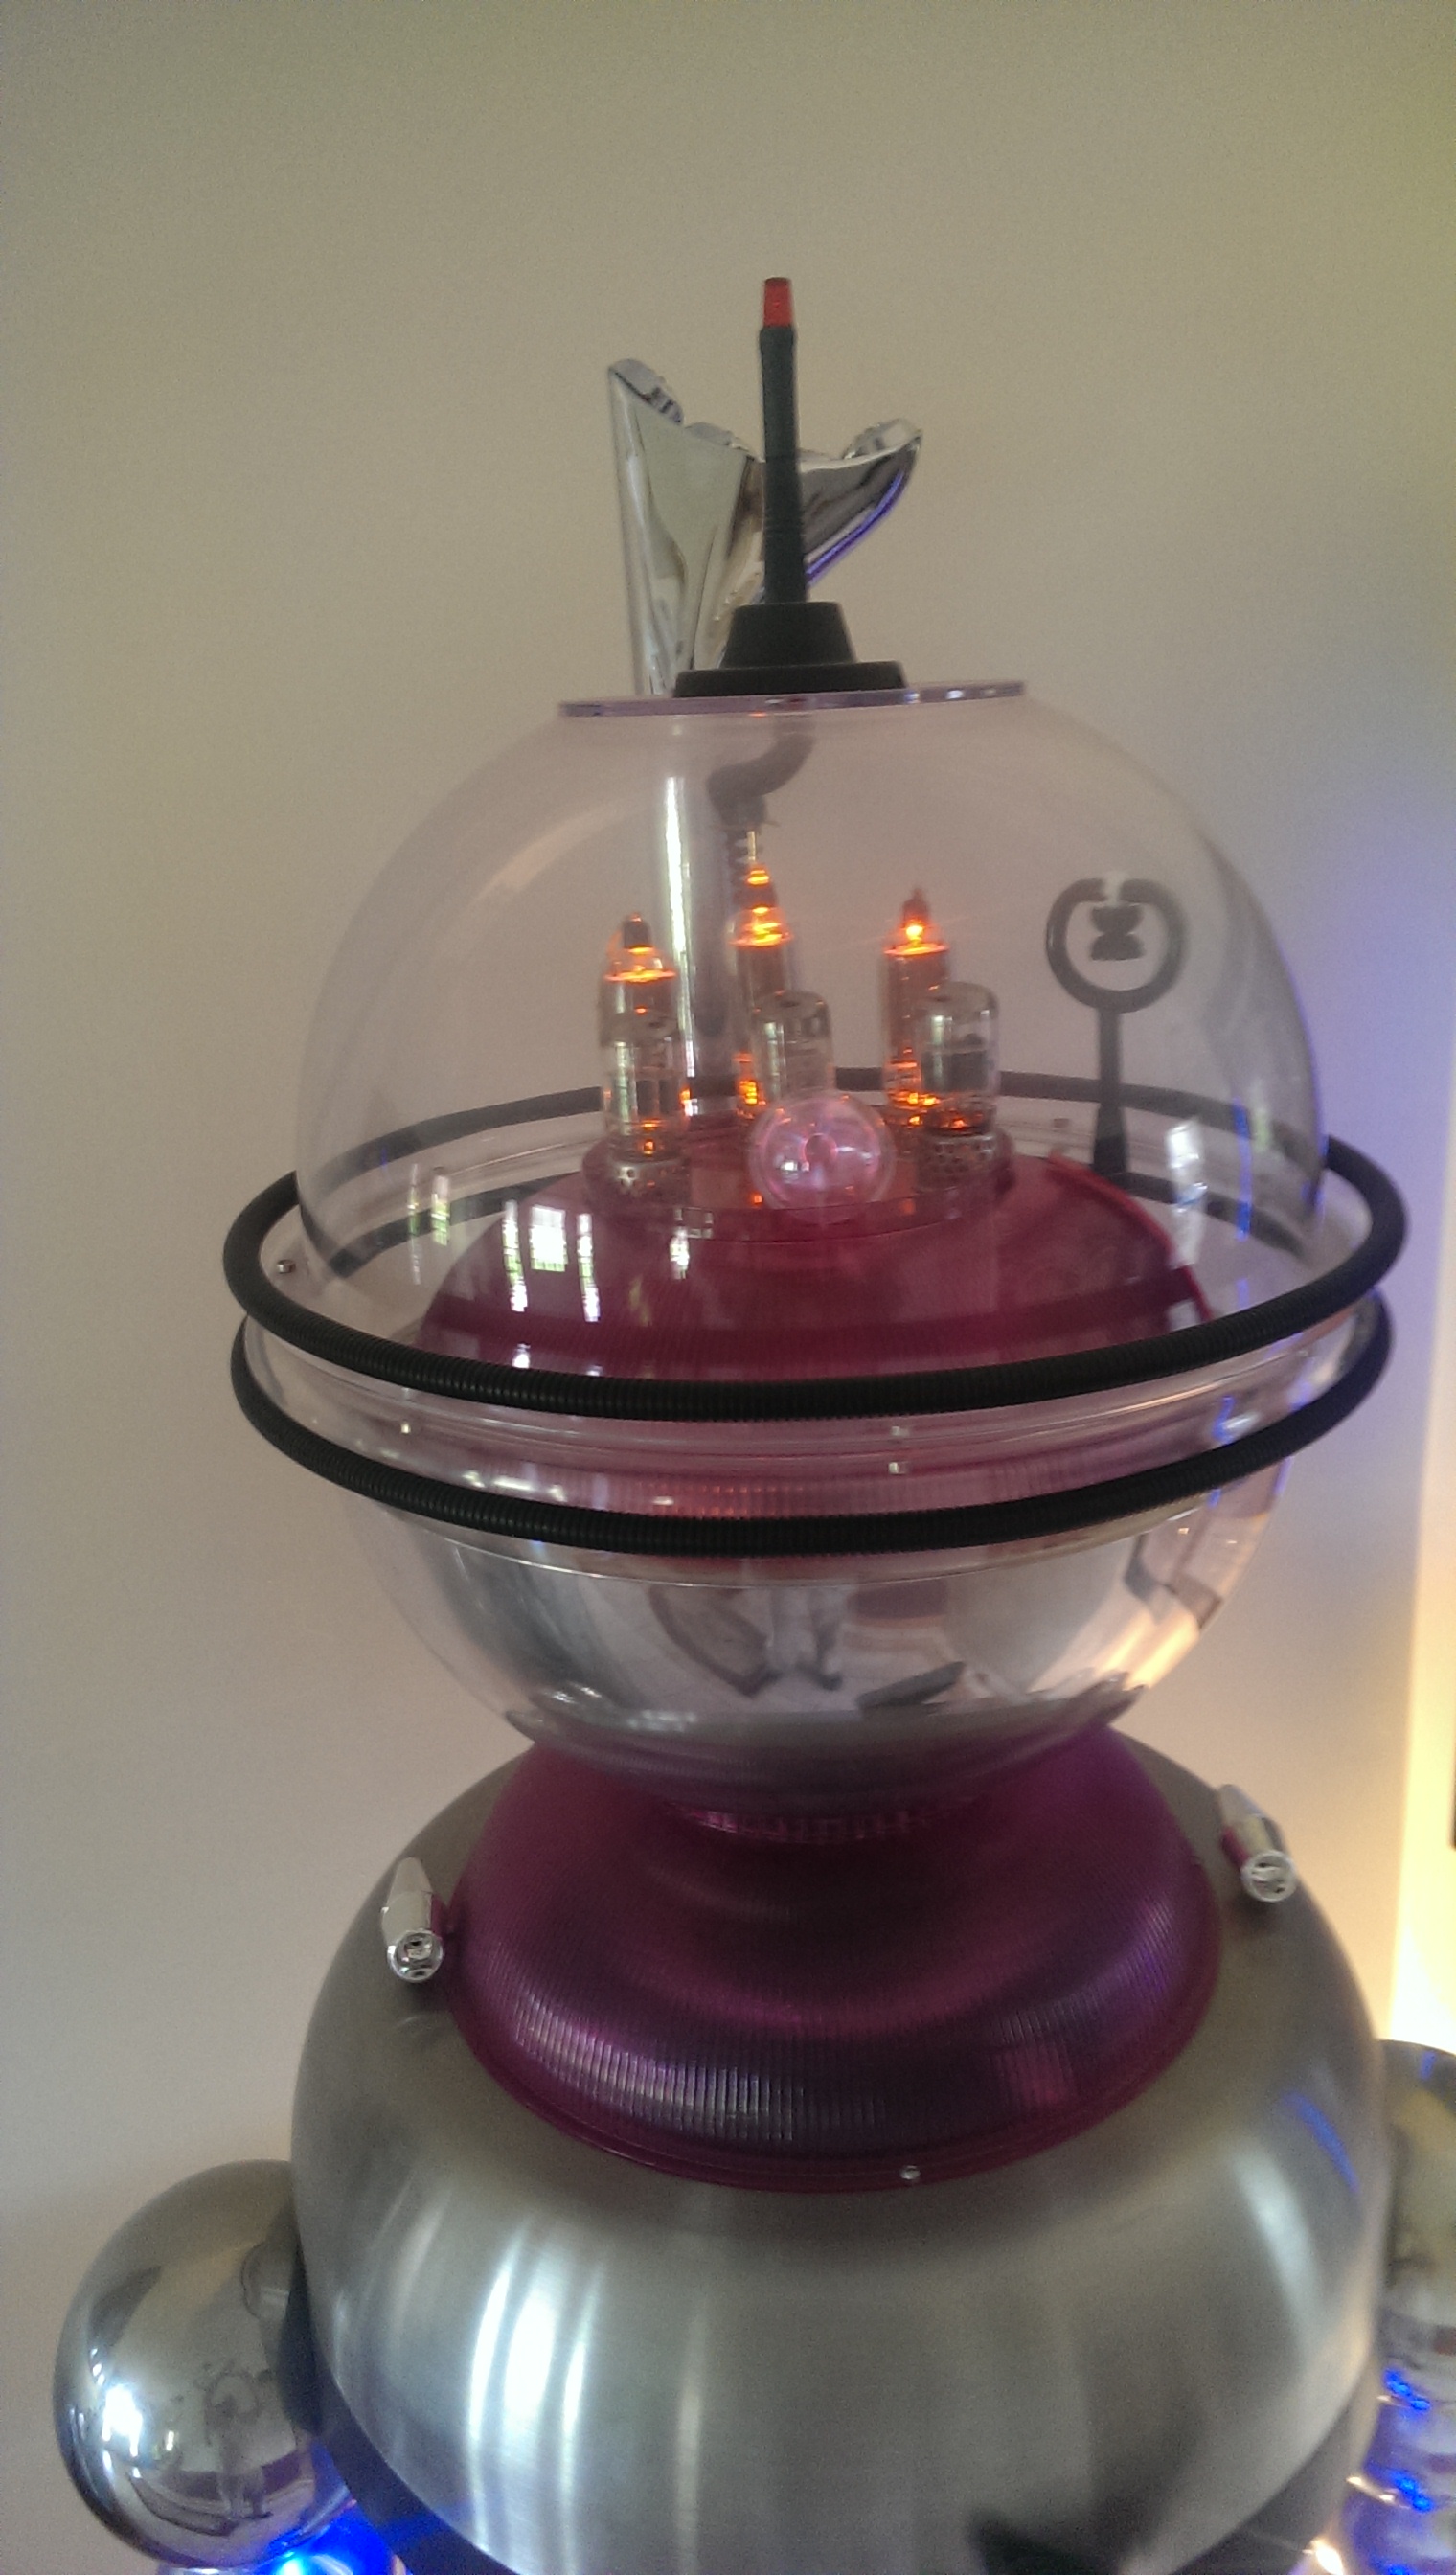
Many of you know Maynard the "Tube Amp Designer" and fortunately, so do I. In one of our talks, I mentioned to him that I had some NOS Coke Can capacitors that I really wanted to incorporate into an amp build. I said I thought it was time to build not only an impressive sounding amp but an impressive looking amp as well. Anyway, be careful what you wish for when Maynard is listening because within the week, he had designed and sent me the print for this dual mono SEP amp with truly impressive specs. He knew my love for tweaking, so he included a special front-end tone control circuit as well as an adjustable feedback network in the output section. That was last Summer. I have never before committed this kind of time to a build but I figured it was about time to see how high I could set the bar for myself. I must admit that my respect for Maynard's design was the genesis for that. A half year later and the "Tech-Amp" was born! Not only is it littered with displays and diagnostics for assessing it's operational status and performance but it also has it's own built in audio signal generator. No more finding my sig-gen and hooking it up. With this amp, I just hit the "TEST" button and the input to the amp switches from the front panel jack to the generator's output for immediate use! I hope you agree that it is an impressive looking amp and as for the sound, like I say in the you-tube video; "This amp plus the Klipsch KF-28's, make sure that my neighbors are listening to good music too!" And yes Maynard, I CAN blow out a match with the bass ports! =D I've attached some still pics and here is a short but entertaining You-Tube of it in action: (Sorry for the "Shaky Cam" in some of the transitions.)

-
Here it is! The "Little Sweet Potato" SEP spud amp!
Chrome Magnum replied to tube fanatic's topic in Talkin' Tubes
You are a national treasure Maynard! And so are your designs! Thanks for making them as well as yourself available for us to build them... =] Transistors and chips?! I don't need no steenking transistors and chips! -
The long awaited "Little Sweetie" mono SETs
Chrome Magnum replied to tube fanatic's topic in Talkin' Tubes
Mouser's great! So's Maynard... Flawless design and execution as usual Maynard! You're designing 'em faster than I can build 'em! (Not complaining) =] -
Lowest Power (Tube) Amp Driving Klipsch Heritage Speakers?
Chrome Magnum replied to Wolfbane's topic in Talkin' Tubes
I'd request that you guys speak English but you're writing it so,,,, the trouble is surely on my end... Carry on... I'll be in the back seat, listening to the grown-ups. =] -
Pretty! The more filaments the better. Makes me wish those metal tubes,,, weren't =] Thanks for the pic...
-
Thanks for that Sloth. Yeah, I thought your comment hit the "bit-bucket" too. My explanation looked a little weird without your question.
-
Thanks Carlooch!!!
-
So yeah, the first thing I installed was the amp and ran it for a base line so that I'd be able to hear if any of the stuff I added had any effects on the noise. All that stuff behaved and did not add any noise. So it's all amp noise, but not really that bad either. Stu
-
Apologies for the multiple posts of this one article. I had a heckuva time getting this thing to load (been trying for a day) and this resulted as part of that. Stu
-
Apologies for the multiple posts of this one article. I had a heckuva time getting this thing to load (been trying for a day) and this resulted as part of that. Stu