Search the Community
Showing results for tags 'x-over upgrade'.
-
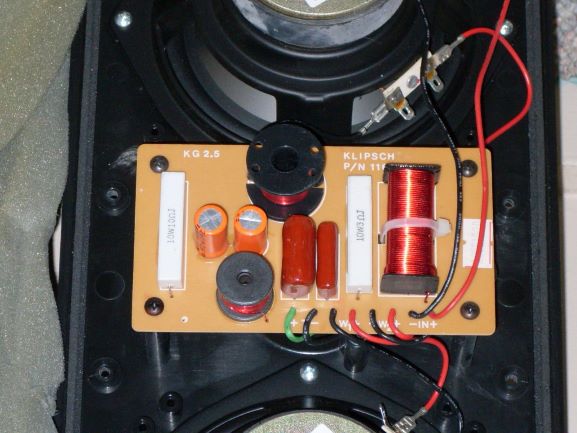
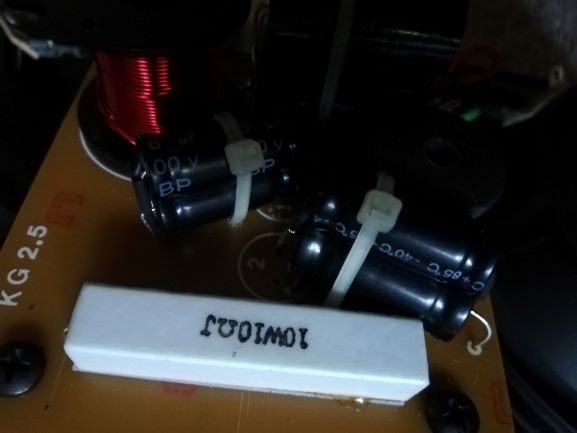
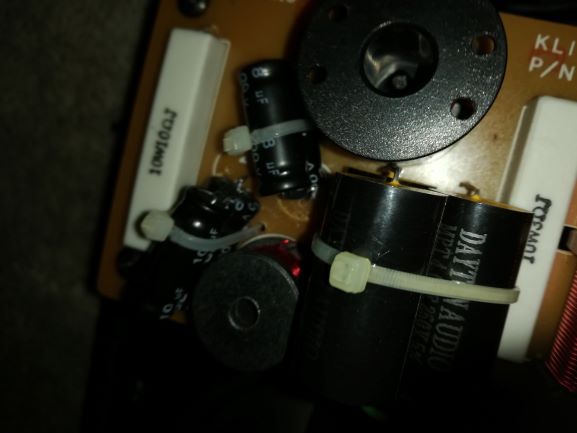
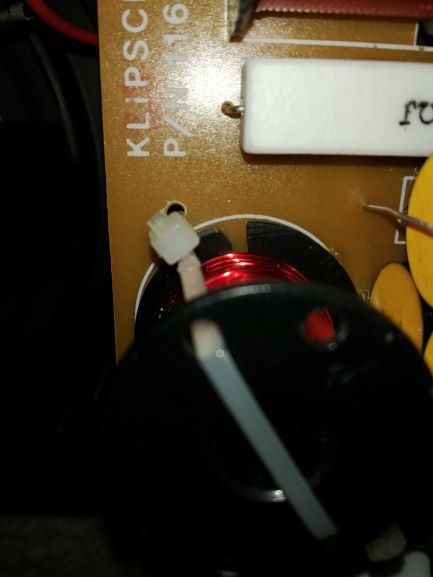
UPDATE (4/3/20): Still hope everyone is doing well and finding ways not to succumb to "cabin fever" 😵 Since I did a tweeter upgrade recently, it gave me a chance to take another pic of the x-over board showing how I fixed the loose coil using tie wraps. I have added that to the collection of photos below....Cheers.... ------------------------------------------------------------------------------------------------------------------------------------------------------ Hope everyone is hunkering down and hanging in there with all this coronavirus stuff going on. Be smart and stay healthy!!! I finally got around to updating my 20+ yr. old KG2.5s. I opened the spkrs. to verify cap values and found they were KG2.5s, not KG2.2s as I had come to believe for some reason (see TL;DR below...it was a definite "D'oh!" moment). Anyway, now that I had verified parts, I ordered them and they arrived a few days later. I set aside some time to do the upgrades. I planned to do 1 spkr. at a time since the new caps would be combinations to equal the original values AND some were axial (leads on either end) instead of radial (both leads on same end). This also meant drilling some new holes and figuring out how to secure the now dual-cap configs. I prob'ly could have found actual values but my research into that meant buying more (in some cases, much, much more) expensive upgraded caps (Mundorf, Solen, etc.) and spending nearly 1/2 (or more) of the price of the spkrs. Just didn't think it prudent for these spkrs. Ended up with Dayton caps for the tweeter circuit and Parts Express-branded caps for the electrolytics. TL;DR - Not remembering my spkr models - When I started the upgrade I opened 1 spkr. (configuration is a heavy plastic front panel with both woofers(?), the tweeter and the x-over PCB mounted to it which is then mounted into the front of the box with 8 wood screws) and removed the x-over board. That's when I noticed a couple of things wrt the model. I saw KG2.5 printed on the PCB (possible explanation for cap values I didn't expect), and my first thought was maybe this was a mfg. error and why I bought them (KG2.2) at a fairly good price way back when. Then I looked at the part number printed on the woofer (and I use that term loosely). It was not the one supposedly used for the KG2.2s. So, out to the garage I ran to find the original box and, sure enuf, it said KG2.5. Then I realized I should look at the back of the spkrs. Once again, it was confirmed they were KG2.5s. My guess is my confusion came from the fact that I had collected a fair amt of KG2.2 tech docs and found very little for the KG2.5s. Somewhere along the way my brain decided to "remember" the spkrs were KG2.2s. Go figure.... Performing the mods/upgrades - Doing the actual mods was fairly straight forward but required some adaptations for the new caps. Original caps in the woofer circuit were unbranded radial electrolytic NPOs: 25 uF and 18 uF both @ 100V and 10% tolerance. I replaced them with axial (100V, 10%) 10 uF + 15 uF for the 25 uF, and 10 uF + 8 uF for the 18 uF cap. Pretty much a swap except for double the parts and axial vs. radial. In the tweeter circuit were, what I believe to be, mylar caps (usually fairly stable) at 8 uF and 4 uF, 100V. No idea of the tolerance. I replaced those using 4 uF caps. I simply used one 4 uF cap for the 4 uF replacement (duh! , and paralleled two 4 uF caps to replace the 8 uF. The new caps are 250V (only voltage available and a nice margin anyway) @ 5% (I would expect an improvement here over the old ones, tho I have no idea). Both old and new caps are axial, with the new ones a bit longer. Both sets of caps required new holes to be drilled to solder in the leads. I initially considered using a non-corrosive adhesive, but opted for tie wraps instead. Thru-holes were drilled in the PCB to provide mounting for the tie wraps. Given the caps were now double stacked (and because of the limited space available due to the new the 4 uF and "8 uF" caps grouped into a 3-cap arrangement, so to speak, having to fit into a smaller 2-cap space), I felt the tie wraps would offer better security and stability. Two of the original coils/inductors were constructed on plastic bobbins with a plastic insert pin (and some glue) used to hold the coils to the PCB. One of them came loose somewhere along the way and I was able to use tie wraps, as well. to resecure it to the PCB. I drilled holes in the PCB for this and used the holes already formed in the bobbins as secure mounting points (See last pic). Results of the upgrade - I've been using the upgraded spkrs for a couple of weeks at this point and I have to say I notice a better clarity on the mids and upper range. I sense there is a bit of improvement (maybe more of a restoration) for the low end, but my ears aren't sensitive enuf to really tell. Besides, I have a Klipsch 10", 150W subwoofer to take care of that so I set the receiver LFE crossover to be a bit higher (80Hz vs. 50Hz) to take a bit of the stress off the "woofers" I also detect better sonics out of the spkrs and restored clarity in the "voices" of instruments. Overall, I'm very happy. Total cost was ~$25 and a couple of hours of my time (Tie wraps were "free" cuz I had them in my parts bin So, enuf words. Time for pics. This first pic is the original x-over PCB before I swapped out caps. The 2 orange upright caps on the left side of the board are the 25 uF (left) and 18 uF (right). The 2 burnt orange caps in the center are the 8 uF (left) and 4 uF (right). You can also see how everything(!) is mounted to the front panel. Tweeter is underneath the x-over board. 2nd pic shows the completed upgrade and x-over reinstalled. Note the new mounting holes drilled to accommodate the larger, axial electrolytic caps. Not as obvious are the new holes drilled to accommodate the slightly longer tweeter caps. Pic 3 shows the tie wraps used for the double-stacked electrolytics and how they were oriented to make them fit. This pic shows tie wraps and new lead holes (~1/4" past the old holes) for the 8 uF (left in the group) and 4 uF ("nestled" in on the right) caps. Note that all 3 caps are tied in a group. Here's a pic of my fix for the loose coil. You can see the hole (one on the other side, as well, but out of view) I drilled for the tie wraps.


