


wwh
-
Posts
49 -
Joined
-
Last visited
-
Days Won
1
Content Type
Forums
Events
Gallery
Posts posted by wwh
-
-
I have unfortunately forgotten the specifics on this one, but I believe it was in the Pacific Northwest and is now gone.
I think this is Jonas Nordwall at the Organ Grinder restaurant in Portland.
More information here: http://www.sonicstudios.com/theatre.htm
Good stuff. After all, what other musical instrument can be measured in horsepower?
- Bill
-
Remember also that RAID 1/5 isn't a substitute for true backups. RAID will protect against physical disk failures, but not against software / user error or lightning. It's useful technology, but offline backup is also necessary (such as a USB hard drive, stored offsite if possible).
Also, regarding hardware vs. software RAID -- software has a distinct advantage. With H/W RAID controllers, their on-disk format is usually specific to the controller (3ware, Highpoint, etc.), so if the controller fails, you'll need to replace it with a compatible controller before you can read your disks again. With software RAID, you should be able to read the disks on any machine that supports the software and the disks.
-
Are all three facets of that corner going to be veneered?
I had a similar problem, and just rebuilt the corner using All-purpose Bondo (in the wood filler section at Lowe's)and a sander to shape.
-
I had a similar problem in one of my corners with radiant baseboard
heat and a windowsill, so I made a gap filler using 2x3 framing screwed
to the wall covered with 5/8" particleboard (sort of like half of a
false corner).
-
I
have considered attempting this using a decent 6-channel sound card and
DSP software driving a 6-channel home theater receiver like the
Panasonic XR55. Maybe not ideal, but as an experiment.
I
dunno why I can't remember the receiver at the moment, but it's
supposed to have 7(?) channels of the quality digital amps. A lab
partner of mine was mentioning them and how they usually go for like
$50 on E-Bay or something crazy like that. I'll try to find out what he
was talking about. There are some possible concerns with the digital
amps, but nothing that couldn't be remedied with a little DSP.
Speaking of which, what DSP software are you referring to?
BruteFIR,
perhaps feeding an M-Audio or RME 6-channel board (something ALSA
supports). The Panasonic XR55 (or XR57) is routinely under $300, and I
believe has 7 discrete inputs. However, I think it uses all digital
internally, so there would be the DAC -> ADC -> DAC problem.
-
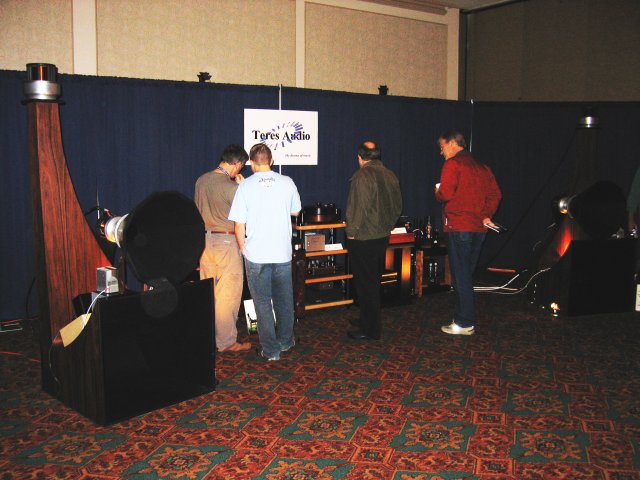
I would like to attend RMAF.
Did you notice if Josh from ElectronLuv was there with an insane tube and horn system.I
don't think ElectronLuv was there, but I did see some impressive horn
systems -- see below. I enhanced the picture because my flash couldn't
illuminate the large room.
I went on Saturday and tried to see most of it, so didn't linger
long. Next year, I think Friday would be a better choice -- smaller
crowds, so more opportunities to listen to my own music.
-
What about PWK's upgrade, the Jubilee?
Maybe someday...
If I can try to relate to what you're describing, it sounds like you're
hearing the throatiness of exponential horns and the effects of
collapsed polars. Does it sound like someone is cupping their hands
over their mouth?Somewhat.
It's not really an annoyance, just something I noticed recently by
comparison. Kind of like a PA horn (exponential coloration?), but less
extreme.Is there any amount of graininess or tizziness to the sound that you
don't like? The distortions of DACs are pretty easy to distinguish when
you know what to look for.Is this the same sort of audible DAC distortion as reducing 16-bit samples to, say, 12-bit?
Before moving to fancy passive crossovers, I think it makes more sense
to pursue the route of active crossovers. Not only will they be able to
provide better crossover transitions (especially with time-alignment),
they will be able to be reused in case anything else changes in your
speakers. Passive crossovers can be optimized for only one speaker
configuration. Time-alignment
isn't going to have a huge impact on the distortions I think you're
describing, but it's going to introduce a level of cohesiveness and
overall smoother sound. The other nice thing about active crossovers is
they often come with a few bands of EQ too - which might prove very
useful in taming any driver specific frequency response aberrations.I
have considered attempting this using a decent 6-channel sound card and
DSP software driving a 6-channel home theater receiver like the
Panasonic XR55. Maybe not ideal, but as an experiment.One thing you didn't comment on is the quality of the acoustics of your
room. Do you notice the same shrillness everywhere in the room? Or does
it seem like the actual sound of the problem shifts as you move around?It's
most detectable at the "sweet spot." Elsewhere, not so much. The room
is an odd-shaped basement (finished, wall-to-wall carpet). The speakers
are about 17 feet apart, and I sit 8.5 feet from the center of the
front wall. The ceiling is just a little over 7 feet. -
I had the opportunity to visit the Rocky Mountain Audio Fest last weekend,
and heard some very impressive top-dollar systems.
I haven't done much critical listening of other dealer systems over the years,
so this was one of my first opportunities to really experience the
top of the line.
After comparing with my Khorn system, the Khorns still impress compared to
systems costing much more. But, I have noticed some shrillness or harshness
in things like trumpets, high frequency violin, etc., that was absent in
many of the systems at the show. Sometimes it kind of sounds
like there is a kazoo somewhere in the orchestra (subtle, though).
So, I have made that critical mistake -- pondering upgrades.
To prevent the upgrade path from ending in Chapter 11, :-)
I'd like to make modifications that are likely to be effective, so any
advice or anecdotes are appreciated.
My Khorns are 1981 stock, except for Bob Crites rebuilt AA networks.
Cast K-400 with K-55V, K-77M tweeter.
Amp is a Crown D-45, and source is Slim Devices Squeezebox 3.
Possible changes:
- BEC upgrade tweeters. I know my speakers were sometimes driven
at high levels during their first 25 years. Never abused, but is non-fatal
tweeter damage possible, or likely? How could I tell?
- Lowering the squawker -> tweeter crossover frequency, in case the
behavior I've noticed is at the high end of the squawker's range.
- Vacuum tube amp -- SET or push-pull? The little engineer voice in my
head says that any decent amp, thermionic or solid state, should be
roughly the same when operating within spec, in their linear range. So
I'm skeptical that this really matters, but am willing to consider it.
- Outboard DAC. The Squeezebox has a rather good 24-bit DAC built in,
but many use a fancier outboard. The Squeezebox is very good through
headphones, though, so I'm doubtful there's much to be gained here.
- ALK Trachorns + BEC tweeters (+ ALK ES networks?) This is rather expensive
for my taste, but there are many positive testimonials out there.
- 6 channel DSP crossover + tri-amp each speaker. I think this would be
fun to try, but rather expensive.
- Do nothing -- Just stop being so analytical and enjoy the music.
Your thoughts?
- Bill
P.S. I think Klipsch should show their wares at next year's RMAF. It's
a lot of boutique manufacturers, but there are some larger companies
represented -- B&W, JBL (they had a pair of Hartsfields there), etc.
I'd love to hear Klipsch's new flagship system in person.
-
The other thread is here:
http://forums.klipsch.com/forums/thread/804053.aspx
I
wasn't aware of the ART USB phono device that DrWho suggested in this
thread, but I have added it to my Christmas wish list. I plan to
digitize several of my rare LPs since I use a server full of FLAC files
as my only source, but any transfers like this will degrade the
quality. Your best option (for quality, if not convenience) may be just
to use the LPs directly as you are currently. -
I have successfully used an open-source tool called Gnome Wave
Cleaner to perform declicking on LP transfers. It runs natively on
Linux, but somebody may have ported it to other OSes:There are also several interesting links on this page about denoising algorithms in general for those with a technical interest.
One thing to beware of if using your motherboard's built-in line
in is that many onboard A/D chips sample at 48kHz fixed, and if 44.1kHz
is requested by the capturing software, it is resampled by the device
driver. Many of these resampling algorithms do a poor job. To avoid
this, I capture the raw WAV file at 48kHz and then use sox to resample
to 44.1kHz using quadratic interpolation. The open-source Audacity tool
can handle the capture, initial editing (and splitting tracks), and
resampling as well, and is available for Linux, Windows, and OS X:http://audacity.sourceforge.net/
- Bill
-
I assume you're referring to the thickness of the paper backing -- 10 mil or 20 mil. That would be some *very* thin veneer. [
]The 20 mil backing makes the veneer stiffer and more resistant to
careless handling. I used 10 mil walnut for my Khorns because it was
cheap, and had no trouble with it's durability during installation.
Even the 10 mil backing is rather heavy -- kind of like a thick paper
grocery bag.
Also, if your piece has edges you're going to veneer, the 20 mil paper may make a more visible line at the corner.
What are you veneering?
- Bill
-
$400?! I assume you're looking at the new Model 1400?
I've had a Model 1200 for about 4 years and really like it.
Initially, I used it as a source for a SET headphone amp, but more and
more I find myself plugging the phones directly into the Stereo-link.
The 1400 claims to have an enhanced headphone amp, but the 1200 has no
problem driving my 24 ohm phones. The stereo-link's noise floor is
significantly below that of my headphone amp, and even at the phones'
low impedance is practically inaudible (and far cleaner than the
computer's line out). Also, the Stereo-link adjusts its sample rate,
unlike most computer's internal DACs now that resample everything to
48kHz (usually poorly, depending on algorithm).
It uses the common Philips UDA1321 single-chip USB DAC, and should be
compatible with any software that handles standard USB audio devices (I
use Linux, so I needed to avoid any goofy proprietary drivers).
I originally selected a stereo-link vs. one of the cheaper USB DACs
because of the separate power supply. I have never compared it to one
of the $40-$60 USB-powered DACs, but the design rationale seems sound
(don't source the power from the potentially noisy 5V USB line).
-
So... how do they sound?
Thanks for all the compliments.
This is the first chance I've had to listen to them in a proper room. I
first heard Khorns (in fact, these exact Khorns), at a neighbor's house
when I was about 8 years old. Of course, I found them impressive then
(and *big*), but didn't know about horn loading and such things. The
previous owner had them in diagonally opposite corners of an "L"-shaped
rec room, mainly used for parties but not set up for critical listening.
Then, when I bought them, I had to do the refinishing first due to the
mold, so I never set them up as a pair. I sent the networks to Bob
Crites to be refreshed while I was doing the veneer.
They sound better than I ever expected. My previous speakers were DIY
2-ways similar to the NHT Super One. They were fine in a smaller room,
but the Klipschorns sound much more controlled and detailed. I guess a
reasonable analogy would be this -- most of us know "flabby" or
"tubby" bass (vs. tight or well controlled). Compared to the
Klipschorns, my previous speakers have flabby mids and highs as well.
Now I'm slowly relistening to a file server full of music, and enjoying every minute...
- Bill
-
Could you tell us a bit more about where you got the material and any special tools etc that you found helpful.
One of these speakers had been mold damaged on the bottom, so I
replaced the bottom panel and sealed the moldy parts of the remaining
wood (front face and sides) with "Clear Penetrating Epoxy Sealer" from
rotdoctor.com. This stuff soaks into wood like oil, but hardens.
However, when hard, it's pliable like wood (you can drill it, hammer on
it, etc.), and won't shatter like standard epoxy.
I filled the area on the front face where the veneer peeled with Bondo
"All-purpose Putty" from Lowe's. I also discovered a few deeper flaws
in the rotted area (2 to 3 plies into the plywood), and some loose
knotholes under the birch layer on the other speaker, so I dug them out
and filled with Bondo as well. Bondo works best if applied no thicker
than 1/4" at a time, but it sticks to itself, so for thicker patches it
just requires repeated application.
After curing (24 hours, but Bondo is usually ready to sand in about 30
minutes), I sanded the surface smooth using sandpaper wrapped around a
scrap of hardwood flooring (so, very smooth and straight). I had used
an orbital power sander, but the foam pad allowed the sandpaper to
conform to lumps in the surface rather than flattening them).
The veneer is flat-cut 10-mil paper backed veneer from tapeease.com. I
ordered 2 4x8 sheets because these veneer strips are already
"book-matched" and applied to the paper backer, so I didn't have to
align veneer edge-to-edge across the face. I did center the veneer
pattern on the speaker surfaces, though, for a nice symmetric look.
I cut the veneer using a standard utility knife with a new blade and a
metal straightedge. Cutting across the grain is easy, but when cutting
parallel to the grain, sometimes the grain will steer the blade where
you don't want it to go. In these cases, I found that many passes
across the cut (like 10-15), while pressing very lightly, worked best.
Each veneer piece was cut 1/8" to 1/4" too large in each dimension,
then trimmed flush with a utility knife after gluing.
I applied the veneer with Weldwood contact cement from Lowe's (the
"Original formula", not the gel or water-based kind). For the large
panels (tops and bass bin faces), I used 4 4-ft pieces of plastic water
pipe to keep the surfaces separated for alignment, then pressed the
cement together along the centerline and rolled the pipes apart,
working out air bubbles as the veneer adhered.
I was advised not to use a rubber "J" roller, so I just used a 4" wide
piece of wood with a sharp corner, slightly rounded, to press the
veneer down.
At first, I sanded the veneer with the sanding block mentioned above,
but found that this caused "shiny" spots where the veneer was harder,
such as at knots. So, for the veneer surface, a pliable sandpaper
substrate works best (a foam sanding block, or just a handheld piece of
sandpaper).
I applied 3 coats of Watco Danish oil (the "natural", untinted flavor).
After each oil application, I allowed the oil to sit for 20 minutes and
thoroughly wiped off the excess with paper towels. In some areas, this
can slightly lift the grain, so that splinters tear out tufts of paper
towel. So, to remove the splinters and paper I sanded lightly (very
lightly) between each oiling.
The single most useful tool, I think, was the Internet. Here are some informative links I found:
Leveneer veneer application instructions:
http://woodworkerssource.net/Contact_Us/links/veneerapplication.pdf
Another loudspeaker veneering project:
http://home.hiwaay.net/~rgs/ellis1801f/veneering.html
And the very informative articles from Greg Roberts:
http://www.dcchomes.com/WalnutKhorn.html (see links at bottom of page).
-
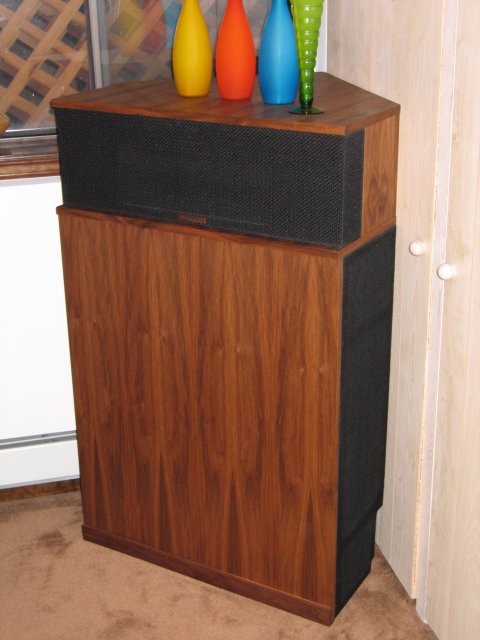
And the right side...
-
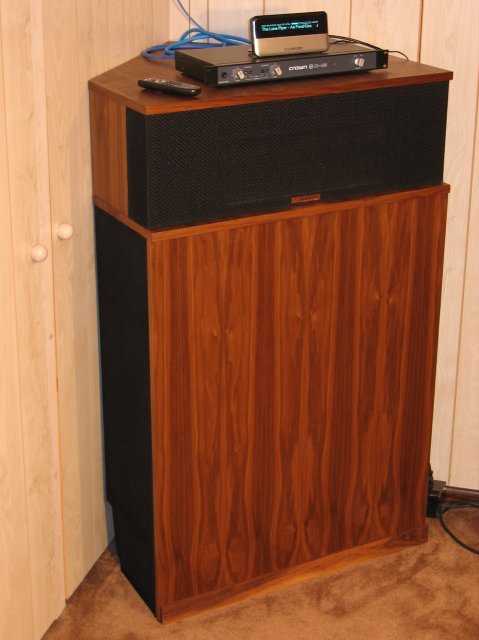
Whew -- done finally!
Below are pictures of the veneered and finished left and right speakers,
respectively, with my "minimalist" system on top (Crown D-45 -- thanks for the
recommendation leok, and Slim Devices Squeezebox 3).
Thanks to all who provided excellent advice here. I ended up using stinky
contact cement for all veneer -- even the edge banding. To make the edge,
I just cut strips out of the 4x8 sheets I had -- it was actually easier than
I thought.
I sanded the veneer with 220 grit paper and applied 3 coats of natural color
Danish oil (I wanted a low-gloss finish).
I filled the peeled bottom edge of the one speaker with Bondo wood filler and
sanded smooth, and I found a couple of voids inside the face of the other
speaker (essentially, knotholes that had loosened beneath the original birch
veneer). I also excavated and filled these.
I did check each woofer back chamber for leaks, but they were remarkably well
sealed.
- Bill
-
Hmmm.. Only one attachment permitted per message?
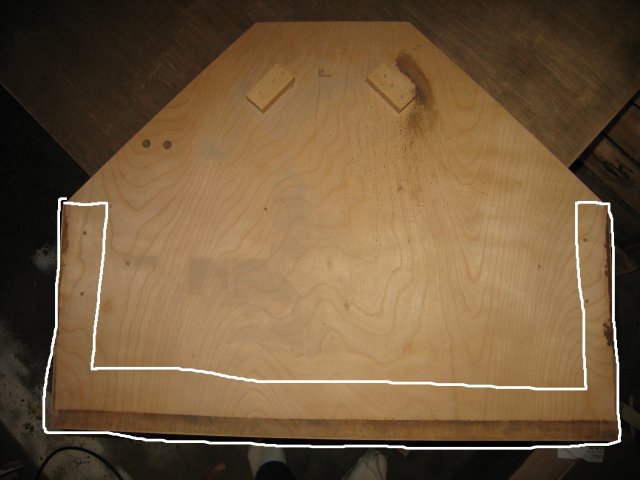
Anyway, my plan with question 3 was to veneer the area outlined below,
under the squawker/tweeter motorboard and the top section's side panels.
-
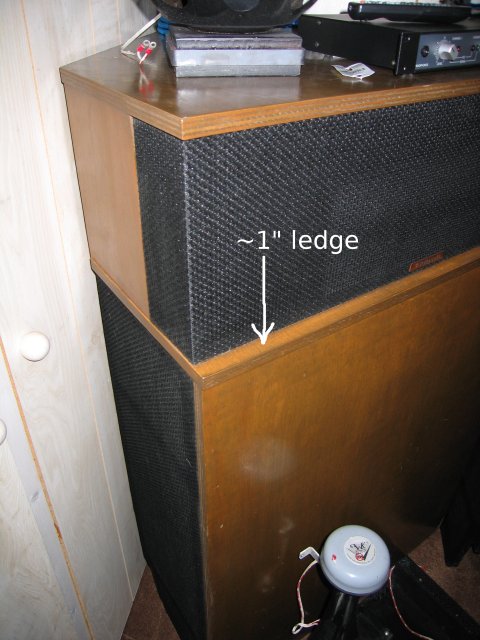
A clarification of question 3 -- these are style "C". The ledge is the
front 1" or so of the top section's bottom panel, shown below.
-
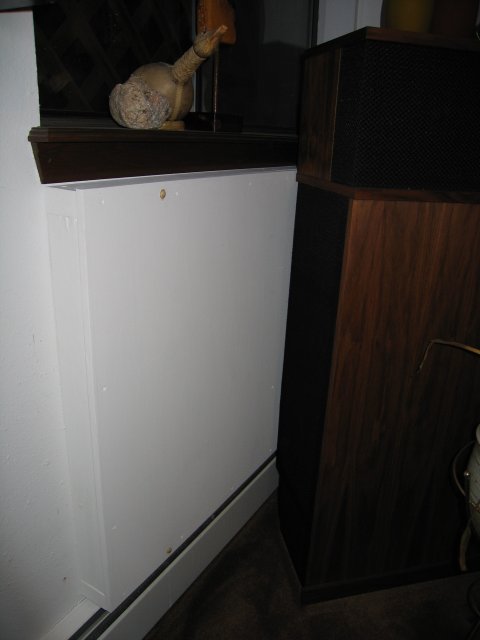
I purchased a set of Khorns a few months ago that had been water / mold
damaged on the bottom and 4" up the face. I used an epoxy product to
seal and strengthen the mold-damaged wood, but the bottom was beyond
repair. I have finally completed sealing / replacing the moldy parts
(see first pic below) and am preparing to re-veneer both speakers in
the set (only one was damaged, but both speakers -- raw birch from the
factory -- were stained a strange poop brown color and the varnish was
applied across the grain, causing unsightly drip lines.)
I have read most of the veneering information in these forums (it's
amazing how much expert woodworking information there is in the Klipsch
forums), but have a few detailed questions that remain unanswered.
So, veneer experts:
1. I plan to use the PVA glue + iron technique to attach 10 mil
paper-backed walnut veneer. Has anybody used this technique on a flat
surface as large as the Khorn bass bin? Any problems?
2. The bottom 4" or so of the birch separated on the mold damaged
speaker. I have removed the loose veneer (see second pic below), but
obviously can't veneer over the resulting "step" in the surface. If the
new veneer is roughly the thickness of the birch that was removed, I
plan to just cut an extra piece to fill in (sanding and using filler,
of course). Will I have any problem bonding 2 veneer layers in this
area?
3. How should I veneer the small ledge on the bottom panel of the top
section (just along the bottom of the grille)? Will veneering only the
visible portion (1" or so wide) cause trouble reassembling the top
section? I have considered veneering under the motorboard and between
the top section's bottom and side panels, essentially raising the top
by the thickness of the veneer. Any reason I shouldn't?
4. To prepare the existing surface for reveneering, I have removed the
old polyurethane with chemical stripper and sanded. The surface is very
smooth -- should it be roughened for better adhesion?
5. After stripping, I used an orbital sander on the stripped surfaces,
including the edges. I realized later that the sander's foam pad caused
the edges to become slightly rounded. Will this cause a problem
attaching the edge banding? If so, how can I re-square the plywood
edges?
6. I plan to cut the edge banding out of the same 4x8 sheets I
purchased for the primary surfaces. Is it easier to attach the edge
banding before or after veneering the adjacent surfaces?
7. I have selected a flat-cut walnut veneer and plan to put only a
satin clear finish on it. Any recommendations? Polyurethane, tung oil,
etc.?
Thanks in advance,
- Bill
Replacement bottom panel and tailboard:
Removed front veneer:
-
The wood surrounding the screws on the left side panel that hold it to
the bottom panel is rather soft. My concern is essentially acoustic --
there are two other baffles above the bottom panel that are undamaged
that form the actual horn, but it looks like the bottom panel itself
contains the woofer's back chamber. So I wouldn't want leakage around
the bottom board.
I think I can address that by pouring glue into the small gap, as was
suggested, then sanding the whole thing and painting it with primer. I
was just looking for additional ideas / warnings / etc.
- Bill
-
Fortunately, these aren't from New Orleans -- I bought them from a good
friend and neighbor who, as we found out when we moved them, has a bit
of a plumbing problem...
I had planned to put a trim strip along the front anyway, so for
cosmetic reasons, I could get one wide enough to cover the stained
area. I'll try the wood filler / glue on the bottom first, for
structural integrity. Cosmetics don't matter there anyway.
Thanks for the advice.
- Bill
-
Attached are the following pictures:
bottom - overall view of the bottom.
lt_side - Left side if the speaker was upright (side with the woofer
access door). This is the panel that has the most extensive damage. The
stain is about 1.25" wide.
rt_side - Right side detail.
inside_lt_bottom - inside view of the bottom board, front corner, from the woofer access hole.
inside_rt_bottom - inside view of the bottom board, front corner, from the woofer access hole.
The bottom board feels solid now that it is dry. The big problem is the
right side board -- the damaged section is sort of "spongy."
Bottom:
Left side:
Right side:
Left front corner, from inside:
Right front corner, from inside:
-
Greetings! I've been lurking here for a while, and recently acquired a
set of 1981 type KCBR Klipschorns. Unfortunately, one of these sat on a
damp carpet for a few months and mold has grown on the bottom and
wicked about 1/4" up the side and front panels.
I've cleaned the moldy wood with a strong bleach solution. It is
currently drying, and it looks like the structure is still sound, but
the plywood has separated slightly on the sides.
How simple do you think it would be to replace the bottom panel? It is
obviously screwed together and also glued. I don't see any water damage
inside (through the woofer access panel), but very little of the top of
the bottom board is visible from in there.
Any advice?


Let's see your Klipsch speakers.
in 2-Channel Home Audio
Posted
Here's a panoramic view from the listening chair I stitched together. The front wall is actually 6 closet doors, so the Khorns have to be moved to get out the Christmas decorations...