WakeJunkie
-
Posts
423 -
Joined
-
Last visited
Content Type
Forums
Events
Gallery
Everything posted by WakeJunkie
-
I received a PM asking for total cost of the screen so I thought I would put it public: 6409 Moleskin Matte (Silver) $12.00 3.0 $36.00 977 Moleskin Matte (White) $12.00 3.0 $36.00 Product Cost: 72.00 Shipping Cost: 14.10 Grand Total: $86.1 Item# Name Price Yards Total www.spandexworld.comScreen Tight with spline (Lowe's): $31.94 Qty 2: 1x4x10 - already had Qty 2: 1x4x8 - already had Qty 2: 1x2x8 (bracing) - already had Lumber prices vary so much across the country it is probably useless to post anyway. The quality of the wood will make a big difference in cost. $20-$40 in lumber depending on those factors. Screws and washers: $8.00 approx (already had) Total cost $146-$166 for everything plus mounting hardware if you have no supplies on hand. I built brackets out of scrap metal in my shop. My out of pocket: $118.04 You could skip the screen tight, but I would recommend against it. It really is worth the extra, and if you ever need to change fabric due to damage or upgrade it would be very easy.
-
I could not be happier with my screen. Silver Spandex over White. Screen tight from Lowe's worked great. 3 yards of spandex is enough for 130" at 16:9 and no more. If you have a bright projector go for it! You will not be disappointed. Ambient light still affects it some, but not as much as my white screen which will be great for football parties. The center sounds great behind it. What more do you need to know? If you use the screen tight and you don't like the spandex....(Highly unlikely) you can always spend 4 or 5 times as much and upgrade fabric easily later. Stop digging and start building that AT screen.
-
I am overdo to post some pics for the group. I just grabed the camera and took a few snaps before walking out the door today. I need to take the time to get good pics....but I am already a week behind. The front colums are held in place by magnetic cabinet latches to make for easy access to the masking if I ever need it. I still need to trim the rack, build the wooden air grate, and walnut faceplates.
-
Kind words from a fantastic best friend. Thanks Bro.
-
Thanks, It seems like it is taking forever, but after looking back I started with the remodel exactly a month ago yesterday. I was traveling two of those weekends.
-
Yes, the top bar is a a roller that roles up the bottom and rolls down the top and vise-versa. They are simply wound different directions on the tube. I agree completly. I just have to big a room for a single dimmer and the mastro can't have two switches in the same room working independently off IR. That is why I wanted the spacer system. I will have a scene for: 1:Eating at the bar watching a move. 2:Dark movie with possible accent (walk around) lights. 3:Low lights for Football parties, large group gaming and when I hit pause/stop during a movie. 4:Well lit, but not full bright. The two master control switches apear to have full on, full off, and 4 scenes. I hope I have that right. Good detailed documentation on that system is a little hard to come by.
-
Trying to match the color of the existing Birch wood walls stained with Red Mahogany was not easy. Oak and Birch stain NOTHING alike. To get the color to match: (none of these are Gel Stains) 1. Pretreat with oil based wood conditioner 2. Stain with a mixture of 1 part Rustolium Brand Cabernet stain and 3 parts Minwax Red Mahogany. 3. After that dries for a day stain again over the top with Minwax Dark Walnut. Needless to say that recipe took a little time to perfect. A couple coats of varnish and attach the backing and it is ready to move into the room. Raised panel doors will come soon.
-
Detail pics of the masking guides. I wrapped the velvet around the aluminum guide bar and attached with 3M high strenght spray adhesive. It does a good job of letting it slide almost silent.
-
Picked up this Lutron Spacer system off Ebay and a Harmony One remote today. 4 programable Scenes and 4 lighting zones. I currently have 3 zones, not counting the pool table. Maybe some accent lighting around the bottom of the bar so you can see to walk around when the movie is going??? I am sure I will come up with something. Best Buy has the Harmony PS3 adapter in stock for the same price as Ebay so I will pick that up today.
-
Top and bottom mask are complete, tested, and working beautifully. The remote works fine if you point it right at the reciever, I am hoping the Harmony One I just ordered is a little more forgiving on where you point it. The reciever will be relocated into the rack with the rest of the gear so you point the remote the same direction for everything in the room. The masking will drop behind the cabinet when open.
-
If I would quit breaking tools I would get it done much faster. I say you should all just bring work clothes. []
-
Built a custom return air box and patched the wall back up after installing it. I am making custom walnut faceplates for the rack right below it....there is no way I am installing a white metal air vent right above it. I will be building one out of wood. Instead of the filter laying flat on the wall like most, I built a slot to slide the filter in so I can make the opening the same width as the rack for asthetics. The giant doggy door on the left is where the sub will sit.
-
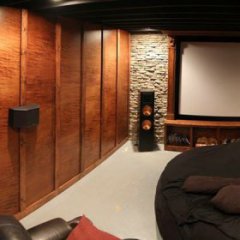
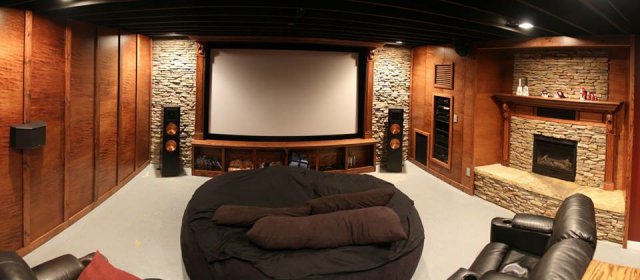
I built this Saturday from solid Red Oak. Only the backing is ply. I know it won't matter much, but with the exception of the backing it all came from the same 100+ year old Oak that was uprooted in a storm. It is just over 11' long, 11.5" deep inside. and will go under the screen once I get the finish on it complete. The sides extend an extra 3" so the cabinet will have a pocket behind it for the electric masking to drop behind when not in use. Building raised panel doors with hidden hinges for it as well. This will be used mostly as a blanket cabinet with the far right cabinet having power outlets for Xbox 360/PS3 controller chargers.
-
The fears are over! I love my Epson 8350 on a silver screen. I finally set the projector and PS3 on the bar and did a test run. It was a bit dark with the settings from my 100" Da-lite (no surprise). I turned off Econo Mode and it looked great with no further adjustments. I will go through the calibration disk once I have audio hooked up. DEEP BLACKS, great contrast, bright crisp whites. It looks like a 130" LCD... I am impressed. My test movie was Narnia, Prince Caspian. Why? because it was the first wide screen movie I came across in the blu-ray rack. I started things up, PS3 menu 16:9, previews 16:9, film 2.4:1....press of a button and the top masking aligned perfectly (within 1/8")! The bottom mask (bare aluminum bar currently) sat about 1" to low which is not a surprise since it is set for a 2.35:1 format. I am sure other adjustments will be needed, but overall I am very pleased. Triple velvet from Jo-Ann's did a great job, it is as black as black could possibly be and seemed to absorb all stray light.
-
I really like the idea of the RF7ii's in Cherry. Simply Elegant! With all the woodwork in my room I feel like this would look fantastic in there. I love how the RF7 2's have the solid wood front.
-
Just an FYI for those building. 3 yards of spandex is exactly what you need for 130" 16:9 screen. I only trimed a couple inches on an end.
-
Klipsch<%2FSPAN>&jsonp=vglnk_jsonp_13682124402058" id="yui_3_7_3_1_1368211429726_543" rel="nofollow" target="_blank" title="Link added by VigLink">Klipsch R-2800-CSM Ceiling speaker
-
We share that. If you catch me spending a day just relaxing...I am sick or seriously injured. My 11 year old daughter suggested I put a huge aquarium behind the theater seats separating the pool table from the HT end of the room. "A big one, that goes to the ceiling." Cool idea, but I will get ill if I can't see the football game while shooting pool. Check out my bathroom remodel if you haven't already. : "Clothing Optional Media Room" I have been browsing the forums for years, Youth is my best friend and finally talked me into creating the account and posting the build. I finally can comment on post. Maybe when I finish this leg of the project I can have time to enjoy others work and more.
-
I have browsed your page on several occasions. Mostly if I ever want to feel inadequate about my Sub. ha-ha. I love the attention to detail with the decorations. Very nice. The Amp rack is still my favorite visual aspect of the room. My masking system is also IR remote controlled. Components from the Da-lite remote controlled screen. The codes should be easy to program if I ever get my Harmony remote.
-
Thanks MichaelandKlipsch. I appreciate the complements. They really motivate me to keep posting. It is boring to post in a thread that nobody replies to.If you have any questions about this masking setup let me know. I will help where I can. Do you have a 2.35:1 masking to a 16:9? It actually is bigger than I realized. Even with projecting the image and trying it you don't get the same effect. I love the way it looks in the room.I really like the look of the silver spandex. It isn't so "in your face" bright white spot on the wall when not in use. Aesthetically it looks great. I just put it up last night and am anxious to find out how I like it with the projector. I honestly am nervous about it being to dark....We shall see.
-
2" rigid fiberglass accoustic insulation behind the center speaker. The top masking is attached and complete. I need to figure out what is broken on the sewing machine to sew a weight pocket for the bottom one before I can put it on. At least that is the easy of the two. Silver spandex over White. Can't wait to try the projector.
-
I built the masking guide system yesterday. 10' aluminum top and bottom. I got lucky and found these at a discount warehouse for $10 each. I removed all but the back flat bar so it would slide between 1/8" steel flatbar and a sanded 2x4. I put glued a strip of wood i the channel to give me something to staple the fabric to. I wrapped the fabric a full rotation so it wrapped all the way around. the side masking will have a 5/8" 45deg routed edge covered in velvet that will fit in the groove. This will provide overlap.
-
-
I tested the Masking system last night and it worked flawless. See it in action:http://www.soleproductions.com/Shaun/AVS/DIY_Screen_Mask.MOV I used mason line and duck tape for the test run. I will be using paracord for the final install to reduce streaching. The top rail will be held by the velvet and won't require string.
-
Thanks Youth. I only have 2 Saturdays before your group gets here. Tell your kids to bring work clothes ;-) I like the way you call it "Precise and calculated" most people just call it anal. Thanks Dave, It has been fun so far. I wish I could just take off work for a week and finish it. It would go faster, but all the wood is from a local kiln and I get it rough cut (except 2x4's). Wonderful wood, it just takes time to straight line and plane every board.