

WakeJunkie
-
Posts
423 -
Joined
-
Last visited
Content Type
Forums
Events
Gallery
Everything posted by WakeJunkie
-
All 5 cowbells are safely out of the massive dust zone I have created during this build. We live in the country. We even have a MSU cowbell by the back door we use to call the kids in for supper.
-
If you ever wondered how an electric screen knows where to stop here it is. On the top right you see a long slender gear. It spins as the screen goes up and down. The smaller gear on the brass threaded rod moves up and down (left to right) that rod as the long gear spins it. When it reaches the end it presses the plastic plunger with the spring into the blue NC momentary switch to break the circuit. This is repeated on flip side with another nut setting the 'up' stop point. After a bit of frustration I finally figured out that this switch had failed. luckily I was able to find one at Radio Shack last night on our way to see Iron Man 3.
-
Started cutting pieces for the lower cabinet that will be below the screen. Used up the wood I had already planed, so back to the planer I went. I have a pretty large stack of oak that needs maybe 2 more passes and it will be ready to build with.
-
This is the walnut for the faceplates of the rack. I will use the plunge router to cut out the openings exactly the size of the Xbox360, PS3, etc. This is just one pass through the plainer and wiped with a wet towel. No stain required, just some poly or maybe tung oil.
-
I also built the screen Saturday. I used pocket hole joints (glued and screwed) instead of "L" brackets mainly because I already have a pocket hole jig...why buy brackets? I built it about 1" bigger in each direction than needed for 130" diagonal screen so my masking can overlap. Screen tight installed. Reinforced the corners with 1/4 plywood. Didn't get a pic, but I mitered and attached shoemolding to the front edge so the fabric would stand proud of the center supports, and I would have no edge bleed through.
-
I had a busy Saturday in the HT. It was my only day to work down there so I hit it hard. I framed up the equipment rack, and moved the stud that would be in front of the opening where the sub will sit behind the wall. I also framed up the side walls for the small equipment closet to separate it from the workshop. Due to the AC ductwork it will be one of those duck to get in kind of closets. You can see I will have front and rear rack rails to support deep rackmount fixtures such as drawers and maybe a future Rackmount UPS. I ended up with a 47" rack.
-
Yes, only the Center will be hidden. With all the woodwork going into this room I hope to one day upgrade to a nice pair of Cherry RF-7s. Something that would be more of a showpiece in the room. I found a pair, they just cost as much as this entire project.
-
Finally finished the stone on the screen wall. Going to the mill tomorrow to pick up some Walnut for the equipment rack faceplates.
-
Looking forward to it! If the weatehr is nice we will spend the weekend wakeboarding. Otherwise we will spend it in the HT. Not a bad weekend either way. Ordered these for the fireplace and the top of the colums on each side of the screen. This one is for the fireplace mantel:
-
Scratch coat of morter before applying the stone. Progress on the stone is very slow... I put the bottom of the Center channel about 18" above the bottom of the screen. I just wanted to be certain that no masking would get in front of it.
-
Between a sinus infection and my Daughter's birthday party I didn't work much this weekend. I did manage to have a productive Sunday Afternoon. My Daughter was my helper when I was cutting the concrete for the speaker behind the screen. I cut in a steel brick ledge on the front and back of the 12" block then cut the rest of the hole and took it out with a sledge hammer. I welded 1.5"x 1/8" flat bar between the front and back brick ledge to hold them in place. I Built a simple 3/4 plywood box for the center to sit in. It is 14.5" tall, 36" wide, and 19" deep (inside). Big enough for any forseable upgrade.
-
That would be sweet!....but it is more like a 5 hour pop over here.
-
 Looks Fantastic. Bluetooth adapter streaming from your smartphone is the way to go in my opinion. It also gives you a screen without having a TV. I know you also have an IPAD which would make a great controller for Itunes and Pandora. Don't forget about Spotify from your PC nearby. It is great to set up a playlist of any song you ever wanted to hear and let it play, and it is free.
 -
I am outside of Huntsville AL. Lived in MS until after graduating MSU and taking a job up here. Raised in Brookhaven.
-
That would be sweet....But. Two reasons I have not seriously considered it. 1. It is a woodshop, way to dusty for any electronics to have open airflow of anykind. 2. Noise into the house. Currently the concrete wall with the screen on it separates the HT from the Bedroom end of the house. The HT can be used at a moderate level without disturbing my wife sleeping in the master bedroom. When the guys come over, we play Halo until the early morning hours.
-
Made some progress. Without the flash is a more realistic view of what it looks like: Started removing the plywood from the workshop side of the wall. I am building an enclosure for the sub and an equipment rack that will recess into the wall.
-
Love the A/B comparison. Love the new furniture. The Forte's old school look didn't stand a chance against the B&W's modern slick look when it comes to wife approval. Besides, they look smaller. That is a good thing in wife terms. Can't wait to hear them in person. Great photos as always.
-
The electric screen components are for my electric masking system. I am building a fixed screen.
-
I found model number info on the motor: 60KTYZ Input 110V 60Hz Speed 15 RPM No brand name or other markings except "102" written sideways on the label.
-
All screen materials are here. Picked up the ScreenTight from Lowes yesterday.
-
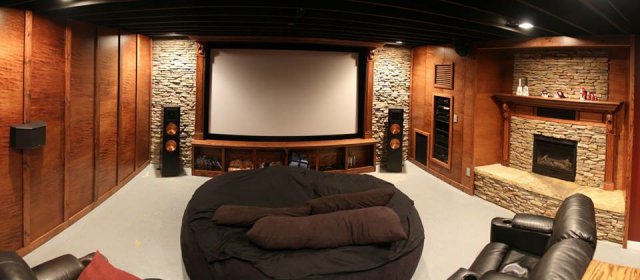
Is it just me or does this picture make the room look small? The stone on the side is 3ft wide, screen is 130" diagonal for scale.
-
I went ahead and took all the AV gear out of the room out of fear of dust dammage. I will be cutting a hole in that concrete wall soon to build a window to set my Center channel in behind the AT screen. Of course no build thread is complete without the famous Blue Tape Screen! I have all the materials to build the screen and have to talk myself out of it. Once it gets mounted it is hard to get anything done laying in the beanbag eating popcorn.
-
I have been searching and have not yet found anyone posting settings for their Epson 8350 using a silver/grey screen. Anybody have one they could share settings as a starting place for mine.? I found settings for a white.
-
All the parts shown so far are from my existing Da-Lite 100" remote control electric screen. Instead of selling it and hunting for parts I just sacrificed it for the cause. Parts seem to be worth more than the screen is. I will have to replace the existing tube (1 1/2" inside diameter) with a longer one to reach across the larger screen. The tube will have a line hooked to each end of the bottom masking wound backwards. When the tube spins to roll down the top masking, it will roll up the bottom masking.
-
Finishing one project before starting on another just doesn't make sense for a guy with A.D.D. I started scavenging parts for my Remote Controled Electronic Masking System. Motor is on the right. On the left is the unit that sets the stop point for up and down. It is basically a rotation counter. I was worried that I wouldn't be able to set it low enough that it only moved the 8 inches down required for masking. It had Allen wrench adjustments that made it easy and after about 100 turns I had it limited to about 8 inches. I wrapped a fabric tape measure around the tube and you can easily hear the mechanical relays engage and disengage at the top and bottom of the range.My 16:9 130" diagonal screen should be 113" wide and 64" tall. A 2.35:1 that is 113" wide is 48" tall. 64-48=16" I set it based on 8" down and 8" up. Just getting it in the ballpark right now, I am sure there will be plenty of fine tuning after it is built. More details to come on this as I build it.