adam2434
-
Posts
301 -
Joined
-
Last visited
Content Type
Forums
Events
Gallery
Everything posted by adam2434
-
Forte (I) crossover caps and other refresh items
adam2434 replied to adam2434's topic in General Klipsch Info
Yeah, the Forte I has the binding posts coming through the board, so they have to be desoldered before you can separate the board and cup. Pics of Forte II crossovers I've seen do not have the binding posts coming through the board. -
Forte (I) crossover caps and other refresh items
adam2434 replied to adam2434's topic in General Klipsch Info
The binding posts are circled in red. The lead wires have to be desoldered from the binding posts to get the board off of the terminal cups to gain access to the solder side of the board. I don't see how one could gain access to the solder side of the board without doing this. Did I miss something big? Yeah, I know that having them off the floor reduces the bass, but that's where they have to fit for now. If I ever rearrange the unfinished part of the basement, I might be able to find a spot for them on the floor. Perhaps moving them closer than 1' to the back wall could help with the bass on the stands? I have them at about 9" now, and the bass sounds pretty good, but yeah, I'm sure it could be better...
-
Forte (I) crossover caps and other refresh items
adam2434 replied to adam2434's topic in General Klipsch Info
Thanks! I built the risers when I got the JBL LS80 floorstanders a couple months ago. The height of the risers put the JBL tweeters at ear level when I'm standing, which is how I listen in this room...working out, putzing around with electronics and speakers on the workbench, etc. Prior to the JBL's, I had a shelf on that wall and used bookshelf speakers - tried several brands/models and finally realized that a bookshelf speaker would just not cut it in this large open space at higher SPL's. To get the Forte tweeters to ear level, I would need to add about 8" to the risers. However, when I bend down a bit to get my ears at tweeter level, I do not notice a significant change in sound, so adding 8" to the risers is not a big priority. -
My Forte I's are plywood - just had them open to do crossover work.
-
Forte (I) crossover caps and other refresh items
adam2434 replied to adam2434's topic in General Klipsch Info
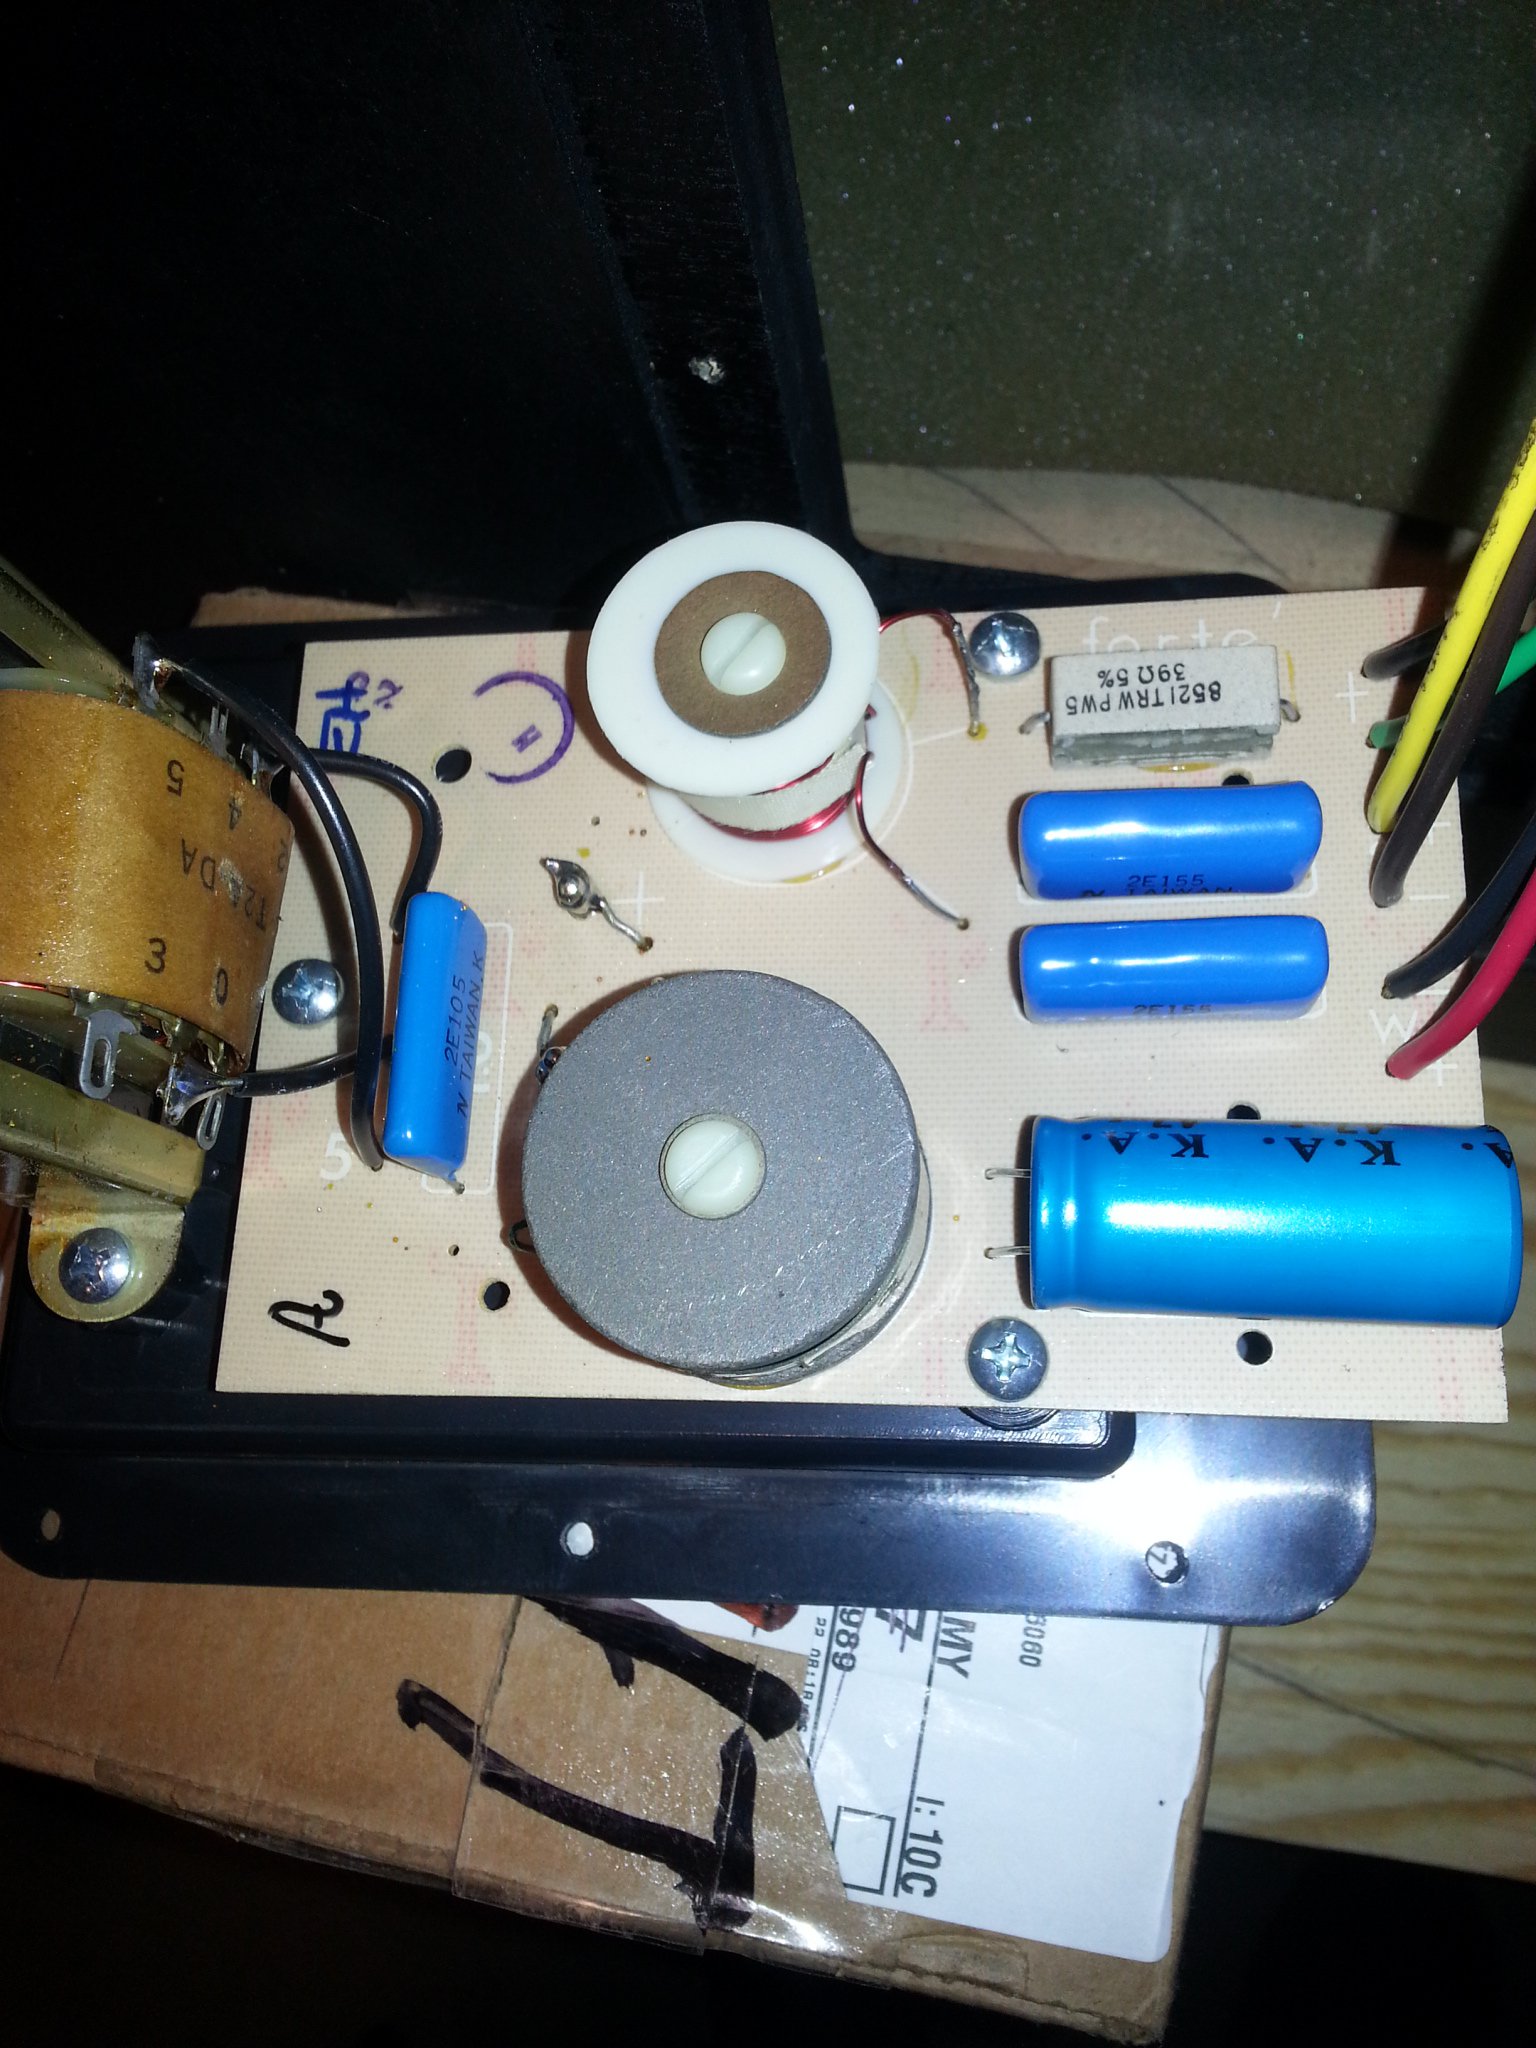
My original intention was to only replace the 30 year old NPE’s, figuring they were in need. I’ve only owned the Forte’s for 1 week and had never heard a pair before buying them. So, I can’t say that I was trying to fix a problem with the sound – they sounded very good prior to the cap replacements, but I figured the NPE’s were tired or soon to be. You and others convinced me to go ahead with replacing the film caps too. I finished the 2nd crossover yesterday and played them for a few hours, but only really listened to them about an hour while working out. I’ll play them more today. My initial impression is that the new caps make the speakers sound significantly cleaner, more open, and more detailed across all frequencies, but especially in the high frequencies. So far I’m pretty impressed with the sound, and I may prefer them to the JBL LS80’s I’ve been using in this location for a month or so. That’s pretty surprising to me because the JBL’s are a newer design (2008) with a $3000/pr original price. I’ll report back when I get a chance to do more listening. Getting the terminal cups back into the speakers was a major pain. The tolerances to get them back in are very tight. On the 2nd crossover, the height of a couple of my solder joints on the top of the crossover would not allow the terminal cup to go back in. The solder joints on the top of the board need to be nearly flush to get the terminal cup in. I had to remove my solder, clip the leads to nearly flush, then resolder 2 joints to get the terminal cup in. Getting the terminal cups back in and getting the leads off the binding posts were the most difficult parts of this job. The rest of the job was pretty straight-forward, although time-consuming for a relative novice like myself. For both speakers, I worked on the crossovers with the wires attached to the drivers. The 1st speaker was upright. I placed the second speaker front-down, which made the work easier, as I could simply rest the crossover on the back of the speaker. I’m kicking myself a bit for not thinking of replacing the resistors with Mills while I had the crossovers out. But I am definitely not going back in for that. I attached a couple pics of the full speakers. Not much to see, given that they are in the unfinished portion of our basement. These Forte’s will probably go to one of my kids someday when they have a place of their own. I need to try to cover some scratches and nicks in the black finish. A black Minwax stain pen did not work, so I’m looking for other options. In additional to soliciting input, my intention for this thread was to provide some detailed insight to others considering refreshing their Forte’s. Thanks to all that provided input.
-
Can someone recommend me a nice decent priced dac.
adam2434 replied to BlessedPrince's topic in General Klipsch Info
If you use the analog output from your Mac, your receiver will to an A-D then D-A conversion if you use bass management or any other processing. Plus the signal is limited by the quality of the Mac's DAC. These are limiting factors to sound quality. Before you get an outboard DAC, I suggest you try the digital optical output from your MAC. I'm not at Apple guy, but I believe most Mac's output digital optical from the headphone output. Using this, you will keep the signal in the digital domain and will only be using the DAC in your receiver. If you are using Airlplay built into the receiver, an outboard DAC would not be relevant, as you would be using the DAC in the receiver. -
Forte (I) crossover caps and other refresh items
adam2434 replied to adam2434's topic in General Klipsch Info
after...
-
Forte (I) crossover caps and other refresh items
adam2434 replied to adam2434's topic in General Klipsch Info
Site won't let me upload the after shot...need to make it smaller I guess. -
Forte (I) crossover caps and other refresh items
adam2434 replied to adam2434's topic in General Klipsch Info
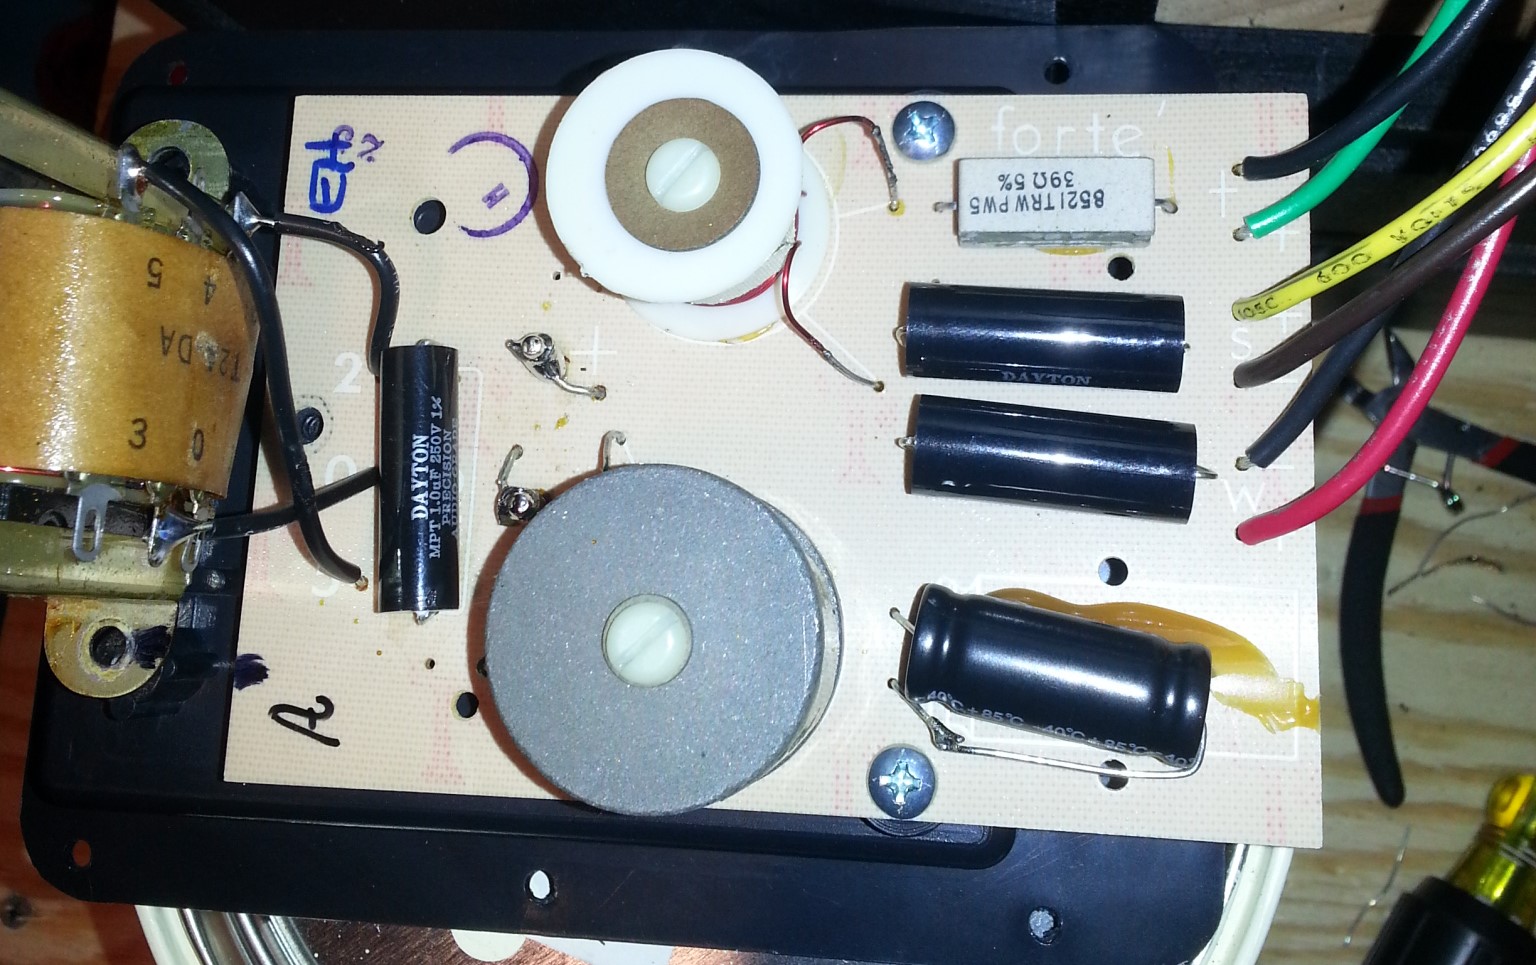
Not much to see regarding the grill peg inserts , but here's a before and after shot of the 1st crossover. Plan to get started on the 2nd one in a bit. I used klipschfancf4's J-hook reco for the to make the axial NPE work.
-
Forte (I) crossover caps and other refresh items
adam2434 replied to adam2434's topic in General Klipsch Info
Forgot to mention that I used Liquid Nails Perfect Glue Fuze It (PG-00) for the grill peg inserts. It's a clear, flexible glue that comes in a small tube. The package said it was good for wood and rubber, so I figured it would be a good choice. I used a small craft foam applicator to put a layer in the holes in the motorboard as well as a layer on the insert, making sure that I had a thin layer on the lip of the insert too. After inserting the inserts into the holes, I applied pressure to the inserts every few minutes until the glue set up in about 30 minutes. I believe that gluing the inserts did help seal the cabinet a bit, as the PR push test seems to last a bit longer. -
Forte (I) crossover caps and other refresh items
adam2434 replied to adam2434's topic in General Klipsch Info
Will do, just got the first speaker all back together. I'm done for the night and ready for an adult bev. Hope to tackle the other speaker tomorrow. Will post pics and impressions after I get both done. -
Forte (I) crossover caps and other refresh items
adam2434 replied to adam2434's topic in General Klipsch Info
Thanks for the input. I just finished soldering the first one and I am testing it before adding some hot glue to the new caps and and remounting it to the cabinet. All 3 drivers are working! The worst part was desoldering the leads from the binding posts. My guess is that there is so much mass there that is was hard to get the solder to flow into the braid. I removed all the solder from each cap joint with the braid. Sounds like I did not need to do that based on your input. Now the tricky part is going to be getting the terminal cup back into the cabinet. If I try to put the top in first, the big inductor at the bottom does not want to go in the cabinet. Not sure how I got it out of there in the first place. -
Forte (I) crossover caps and other refresh items
adam2434 replied to adam2434's topic in General Klipsch Info
My experience is pretty limited and I'm already struggling with desoldering the leads from the binding posts. I'm trying to use desolder braid to take up the old solder, and it is just not wicking up the braid. I've got the Weller set on 4 of 5, so pretty hot I would think. Feeling pretty dumb and frustrated at the moment. -
Forte (I) crossover caps and other refresh items
adam2434 replied to adam2434's topic in General Klipsch Info
In the audiokarma link I posted above, the guy just pulled the terminal cup from the back of the speaker and worked on it without removing the PR. Am I seeing that right? -
Forte (I) crossover caps and other refresh items
adam2434 replied to adam2434's topic in General Klipsch Info
Parts Express is only around 30 min away, so I may run up there after work tomorrow to get the following caps, if time allows. 47uF NPE with +/- 10% tolerance (better than the typical +/- 20%). This cap has axial leads, but should still work in the radial holes, based on what others have done. Interestingly, 2 of the 4 reviews mention using them in Forte's http://www.parts-express.com/47uf-100v-electrolytic-non-polarized-crossover-capacitor--027-352 I will go with these for the film caps: http://www.parts-express.com/dayton-audio-pmpc-15-15uf-250v-precision-audio-capacitor--027-212 http://www.parts-express.com/dayton-audio-pmpc-10-10uf-250v-precision-audio-capacitor--027-210 In the audiokarma thread I linked above, looks like the guy replaced the caps without removing and disconnecting the drivers. Is this how others have done it? I will also glue the grill pin inserts in the next few days. The PR push test takes about 2 seconds for the woofer to return. I'll be curious to see if gluing the grill pin inserts impacts this. They pull out of the motorboard easily, so there is no way they are air-tight in their current state. I do not see any old glue on them, so looks like they were just pressure fit by the factory, which is not adequate. Have folks found the need to reglue or reseal the interior cabinet joints? I've read that folks have done this, but not sure what drove them to do it. Could they feel air exiting the joints? -
Forte (I) crossover caps and other refresh items
adam2434 replied to adam2434's topic in General Klipsch Info
I was looking at the Erse NPE's earlier this evening but only saw ones with axial leads, whereas the crossover uses a 47 uF NPE with radial leads. However, the guy in this thread made axial leads work. http://audiokarma.org/forums/index.php?threads/re-capped-my-fortes.371297/ -
Forte (I) crossover caps and other refresh items
adam2434 replied to adam2434's topic in General Klipsch Info
Yeah, might as well also replace the 1.0 and 1.5 uF caps with Dayton Precision caps for a couple bucks each. Do all the drivers and horns need to be removed and disconnected in order to replace caps, or is there enough slack in the wires to allow work on the crossover with wires connected to the drivers? Also, any recos on a good radial 47uF electrolytic for the woofer circuit? Parts express only has a cheap one with +/- 20% tolerance. I'd be willing to spend a few bucks on better electrolytic with tighter tolerance and better reliability/longevity. -
Forte (I) crossover caps and other refresh items
adam2434 replied to adam2434's topic in General Klipsch Info
Interesting...I had always heard that film caps do not deteriorate significantly over time, and therefore would not need to be replaced for the purpose of bringing the speakers back to factory specs. I'm thinking that a 47uF replacement would need to stay electrolytic, as a film cap of that value would be too large for the board. The other caps are (2) 1.5uF and (1) 1.0uF. I would think that Dayton film caps would fit on the board in the 1.5 and 1.0uF spots (if I decide to replace the film caps too). By the way, I have used Dayton film caps in the past on a pair of Acoustic Research AR18s that I refoamed and recapped. The crossover was a single cap on the tweeter - that was an easy crossover refresh. -
Forte (I) crossover caps and other refresh items
adam2434 replied to adam2434's topic in General Klipsch Info
Thanks for the input. Elmer's glue, huh? I thoughts that was only for paper and popsicle sticks. Regarding the screws, I don't think any are stripped...yet. They just could not be tightened further. -
Forte (I) crossover caps and other refresh items
adam2434 replied to adam2434's topic in General Klipsch Info
Want to expand this topic beyond crossover caps to include other possible refresh items that could bring them back to original performance. For example, I read that the grill peg inserts and woofer/PR gaskets can leak air. Several of the grill peg inserts come out of the motorboard attached to the grill pegs. Should I consider gluing the grill peg inserts and replacing the woofer/PR gaskets? Interestingly, all but a couple of the woofer, PR, and horn screws were very tight and could not be tightened further, although the terminal cups could be tightened a bit. Generally, I have found that both new and used speakers could use a bit of screw tightening. The only other speakers I've owned that were super tight from the start are my RF-7 II's. Perhaps Klipsch has the driver torque set optimally in Hope. -
Forte (I) crossover caps and other refresh items
adam2434 replied to adam2434's topic in General Klipsch Info
Have not opened them up, but they guy I bought them from was the original owner and did not seem like the type that would replace the caps. In fact, I mentioned to him that the electrolytics would likely need to be replaced and I don't think he knew what I was talking about. -
Just picked up a pair of Forte (I) and am thinking that it would be good to replace any electrolytic caps in the crossovers, since they are around 30 years old. From some internet photos and schematics, looks like there is a 47 uF electrolytic in the woofer circuit, but the rest appear to be film caps. Does this sound right? I know there are various levels of Forte crossover upgrades and mods out there, but I'm thinking more along the lines of bringing them back to factory specs, rather than investing in upgrades at this time.
-
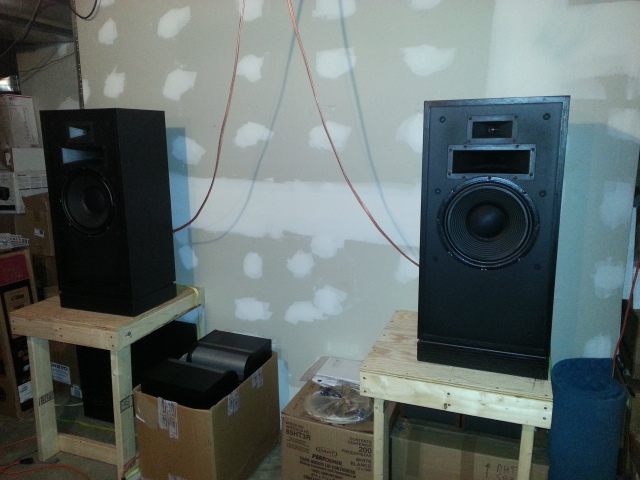
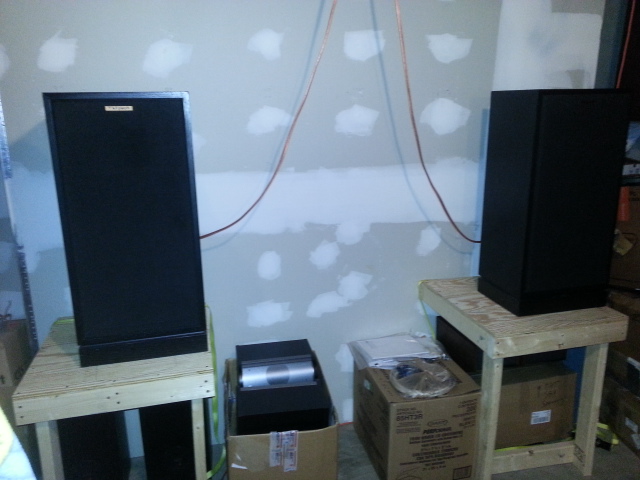
Got the Forte's set up this morning. Color me impressed so far! They make me want to push the volume because they sound so clean and balanced. They are in a "bad" room - the large, unfinished portion of our basement where we have exercise equipment, storage, etc. They are on 31" platforms that I built when I got the JBL's mentioned above. The platforms put the JBL tweeters at ear level when I'm standing. The Forte's tweeters are about 8" below my ears when standing. I may add around 8" to the platforms if the Forte's end up displacing the JBL's.
-
I picked up the pair of Forte's this evening. They are in good working order. Paid $425, but the guy included some 80's electronics (which I have no use for) - an Onkyo Pro Logic receiver, Sony CD changer, and Sony tape deck. Maybe I can get around $40-50 for the electronics, which would make the investment around $380. They guy was obviously stand-up and said that 2 other guys were interested, so I jumped on them. He listed them yesterday. They are black and have some scratches and nicks - nothing major. Grills are nice and there are no dents in the woofer and PR dust caps. So, I'm wondering if folks have recos for touching up the scratches. I know a sharpie will do ok, but wondering if there is a better option. I'll see if a hardware store has a black stain stick, or something of the like. I'll test these in the unfinished portion of our basement, where I am currently running JBL LS80's, which retailed for $3000/pair in 2008, but sold for $1000/pair recently on Amazon, which is when I snagged a pair. Curious about how folks feel about the Forte's vs. RF-7 II (which I also own). In today's dollars, Forte's would be around $2,400/pair, so significantly less than RF-7 II retail price.
-
OK, thanks. Might take a look at a pair today, although I need more speakers like I need a hole in the head.
.jpg.3906714f0ba97012f6efbf289ac94f72.jpg)