BillL001
-
Posts
21 -
Joined
-
Last visited
BillL001's Achievements
Member (2/9)
1
Reputation
-
R-110SW / R-112SW / R-115SW Repair Blog
BillL001 replied to ngen33r's topic in Technical/Restorations
Thanks a lot Poul for the explaination! So the C48 cap can't help to sustain the power level. I was only hoping that maybe by change a cap rating, we could do away with the jumper. After all, the amp came without the jumper and worked fine before the R39 resistor was burned, so in theory the amp should work in its original condition without the jumper, and somewhere along the line when we replaced all the caps, somehow that caused power supply drop to the U5 circuit problem. Well, it could be that another component on the PCB was burned or damaged that caused that, not any of the capacitors we replaced. If that's the case, we probably will never know, since we don't have the schematics of the amp. So I guess that we'll just have to live with that extra jumper on the board. At least tat make the sub working again in my case, and I can live with that. For that knocking sound problem, during my re-cap process, it happened once before, when I replaced all the caps except C47 and C48 caps. After I replaced those with the new Nichcon caps, that sound stopped. It only happens again now for a few min after I added the jumper. That's why I was asking about changing C48's capacitance or power rating. But the problem isn't significant for me, as it only happens when I power on the sub, and after a few min the knocking will stop, so I can live with this. I don't have osc. socpe now (used to have one), so I won't be able to troubleshoot it further trying to find its cause. Honestly, I have already wasted more time than I like for this poorly designed sub (even though the process of buying new caps and resoldering them is kind of fun), and I don't feel like wanting to waste more time on it. I guess now my amp can no longer go back to its original state, even after the re-cap and changing R39 to 10W to reduce the heat. But I can live with this as long as the sub works. Thanks again for your jumper solution that brought my sub to its working state again! -
R-110SW / R-112SW / R-115SW Repair Blog
BillL001 replied to ngen33r's topic in Technical/Restorations
This is exactly what I told the Klipsch support person on the phone, and I even read their own warranty policies for their subs on this web page, but the customer support person refused to cover my sub for 5 years, by saying a burned resistor is a faulty material and it was only covered for 2 years. What a lame execuse! The person told me this on the phone was named "David" (who knows if that's his real name or not), who has a horroble attitude, and only kept telling me that "there's nothing we can do for you, and you just to have to buy a replacement amp". A total jerk who has no smmpthy at all to their customers. No one should ever by another Klipsch sub, given they have this kind of horrible warranty coverage for their own badly desinged product, lack of sympthy and consideration to their customers, and have such poor customer service! I know their new subs now have the 5 year coverage, but that doesn't solve any problem of borken subs for many of us the existing customers. Their new subs may well be getting better, but that doesn't do anything for me and many others who bought their poorly designed subs, and Klipsch just just irgnored us with no help at all. Just look at this long list of people who are waiting for their Klipsch subs to be repaired - many people have been waiting for more than 2 years, and there are more unfortunate Klipsch customers continue adding themselves to this list. Such an awful and pathetic situation for so many people, yet Klipsch doens't give a damn. A few of us on this thread are lucky enough to know electronics and how to use soldergun, understand electronics parts specs, and can repair the broken sub by ourseleves, but the vast majority of the Klipsch customers don't have this skill, so all they can do is put themselves on that waitling list and just keeping waiting, becuase Klipsch refused to do the repair or free replacement for these poor folks (just like they refused to give me a free replacement amp). Clearly, these people refuse to send more money to Klispch to buy their amps, instead rather just keep waiting. I don't blame them for refusing to spend more money on Klipsch. As soon as I got my amp repaired, I immediately retuned my replacement amp back to Klispch, becuase I don't want to give them more money. Unless Klipsch send me a free replacement amp, in my mind they are just a horroble and pathetic company! People like me who got burned by them, ultiamtely will vote with our wallet, and will never buy their product ever again, and will also tell all our friends never buy a Klipsch's product. -
R-110SW / R-112SW / R-115SW Repair Blog
BillL001 replied to ngen33r's topic in Technical/Restorations
Yes, good point! I will wrap some insolations warppers around the copper, to prevent it from ever touching the PCB. In the long run, I'll replace the resistor with the chasis type you recommended. Thank you Poul for the spec and purchase link! Looks like to be a great one to use. Also, amazing to see that this is a 50W one, much higher rating than my 10W one, and way higher than what Klipsch originally put on the PCB which was a 1W tiny one. I have two other questions that I'd love to hear your thoughts and comments... 1. In your previous post you mentioned that the C-48 capacitor (at the edge of the amp board) serves as a time delay for U5 power swith chip, this made me wonder the following: what if we use a higher rated cap for this capacitor, from 100uF and 20V, changing it to 500uF or 10uF, and maybe 50V, so that when the power to the capacity was cut off by other part of the circuit, there is still enough power left in the capacitor to power the U5 chip, would that prolong the power to the chip so that its power will not get cut off? If this can keep the chip powered, we maybe able to take off that jumper, and just let this capacitor keep the sub going when it plays low frequencies or playing high volumes, and will not be shut off. Do you think this could be a fix for the power dopping problem? In other words, since capacitors can provide a delay in power being switched off, would increase its power saving rating be able to keep the power on long enough? 2. I noticed that sometimes when I just power on the sub, the sub produces some continuous knocking or ticking sound from its cone - see below video: https://youtu.be/oVeK4VuoMs0 I can only stop this sound by flip the swtich in the back from Standby to off, and then to Auto and to Standy again. But if I use the sub for a few more minutes such as playing some songs, this ticking problem goes away. It could be something that fixed the problem after the amp board warming up after a few minutes. I recall that I had this problem after my first round of replacing all the caps except the two caps on the edge - C47 and C48, and this problem went away after I replaced these two caps. I wonder if increasing the power rating of these twop caps could solve this problem. Or could it be due to one of the cap's pings wasn't solder on correctly. Don't know if you ever encounter this problem, and if so, would love to hear your comments. Thanks a lot! -
R-110SW / R-112SW / R-115SW Repair Blog
BillL001 replied to ngen33r's topic in Technical/Restorations
Yes, feature-wise, the subs from other brands are not necessary better than Klipsch's subs, and I agree with you on that. What I meant "poorly designed", is the fact that Klipsch's design used underrated resistor that continuously bakes the capacittors around it, and also the fact that when the sub is in standby mode or even not in use at all but just plugged into AC power, that resistor will continue generating searing heat and cooking the caps. None of the other brand subs have this particular problem, so Klipsch's engineering on this board design (or more likely, their contractor who did this design) was poorly done, and poorly tested durng product development and testing. The fact of matter is, if we just leave the Klispch subs plugged into power all the time when they are not in use, they will still burn up the caps, and this actually does not only happen to the R-115SW subs this blog was about, but many other Klipsch subs (just see the number of repair vidoes of various Klispch subs here: https://www.youtube.com/@supremeinnovationsllc/streams and you'll get an idea just how bad and how pervasive this problem is on Klipsch's subs. Heck, I have a cheap Logitech sub that has been plugged into AC outlet for 7 years straight in a row and never powered down, and nothing on it gets burned at all and it's still working, yet my Klipsch R-115SW was fried within just a few months while plugged into the AC outlet. -
R-110SW / R-112SW / R-115SW Repair Blog
BillL001 replied to ngen33r's topic in Technical/Restorations
I did test the SPL-150 amp after getting it, and I did not see it get hot anywhere - touching the back plate it's not even warm. So yeah, the fact that the original R115 amp gets hot while in standby mode is definitely something wrong in its design or in manufactuering - I tend to think it's a bad design, since getting hot on standby mode happened to so many people as a common problem. But in your case of the SPL150 still getting hot, it might be something else on the PCB. I figure that it's draining some current while the sub is in use, isn't a too big problem for me, because now I tune the sub off when not using it, the time when it's powered on is relative short, only during movie watching or music playing time. If the resistor is fried again, I'll just replace it again. If that happens, next time I'll put on better heat diverting copper cables, or mount it against the aluminum plate in the middle as a heatsink. I think eventaully I will get rid of this poorly designed Klipsch sub down the road and buy a SVS or a Hsu sub as its replacement someday... Thanks! -
R-110SW / R-112SW / R-115SW Repair Blog
BillL001 replied to ngen33r's topic in Technical/Restorations
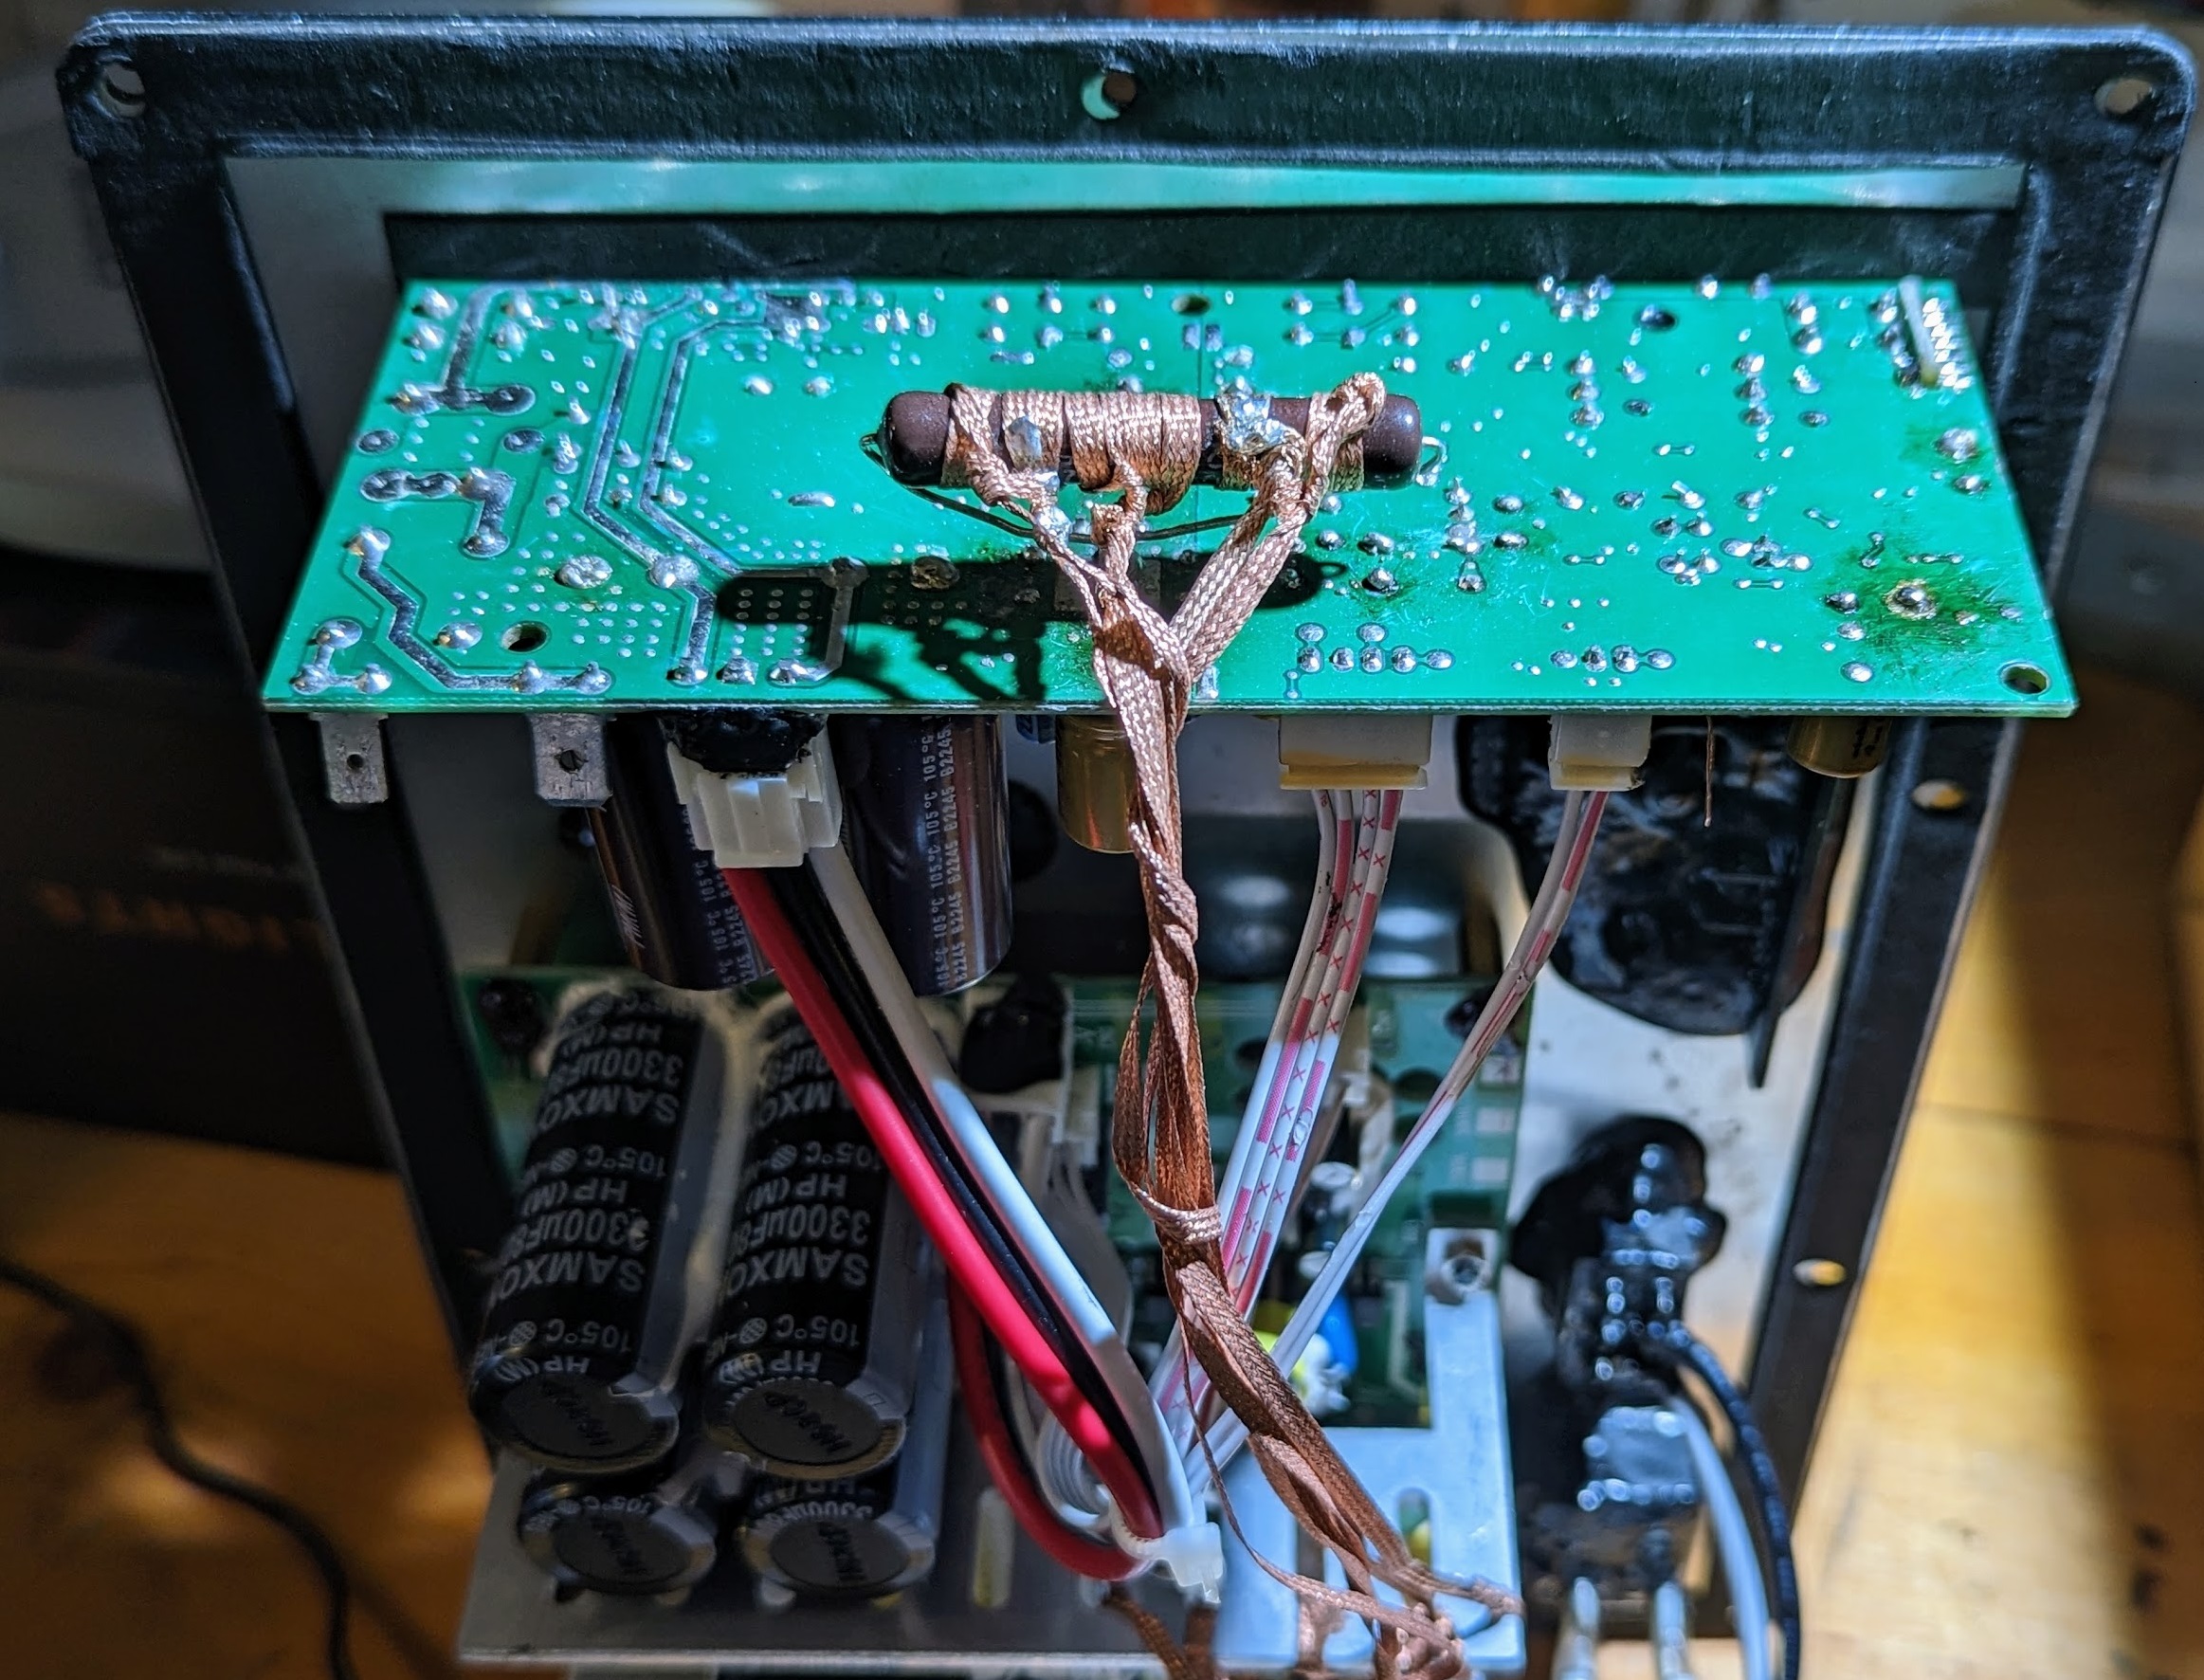
Also, just to add... When I was testing the jumper fix, I had the amp board half way open on the sub, so I could expose the 10W R39 resistor I replaced, and be able to touch it, just to see how hot it gets. I could feel its temperature by touching it after playing just a min or so short video with mostly low frequencies, and it's searing hot! I also noticed that if I turn the power switch on the sub from Auto to Standby, it was still extremely hot and the temperature did not going down. So clearly, this faulty amp board design is going to easily fry the resistor if you put in the original spec of 1W or even 3W. So take it from me, do not use 1W or 3W or even 5W resistor at R39 position, but instead get a 10W resistor! And mount the resitor on the other side of the amp PCB, so it won't keep baking the capacitors on the board, which burned so many people's amps. Just to help reduce the temperature, I took the amp out board again, and wrapped on more copper strips around the resistor, and attaching the other end of the strips to the alumnum plate in the middle of the amp board to act as a heatsink, hoepfully this will reduce the temperature on the resistor somewhat: Given that the resistor still gets hot when this amp is used in the sub, I don't know how long this 10 W resistor will last. So adding one more layer of protection, now I plug the sub power supply to a surge proector box where I plugged in the TV, the AVR, and other media devices such as Blueray, etc., and after watching the TV or listening to music when I am not using the system, I shut off the surge protector box, which tuns off the sub as well, so the resistor is not going to bake anything inside when the sub is not in use. If the resistor fried again someday, I'll just keep replacing it. End of my jouney of repairing this Klipsch R-115SW sub with a faulty designed amp board.
-
R-110SW / R-112SW / R-115SW Repair Blog
BillL001 replied to ngen33r's topic in Technical/Restorations
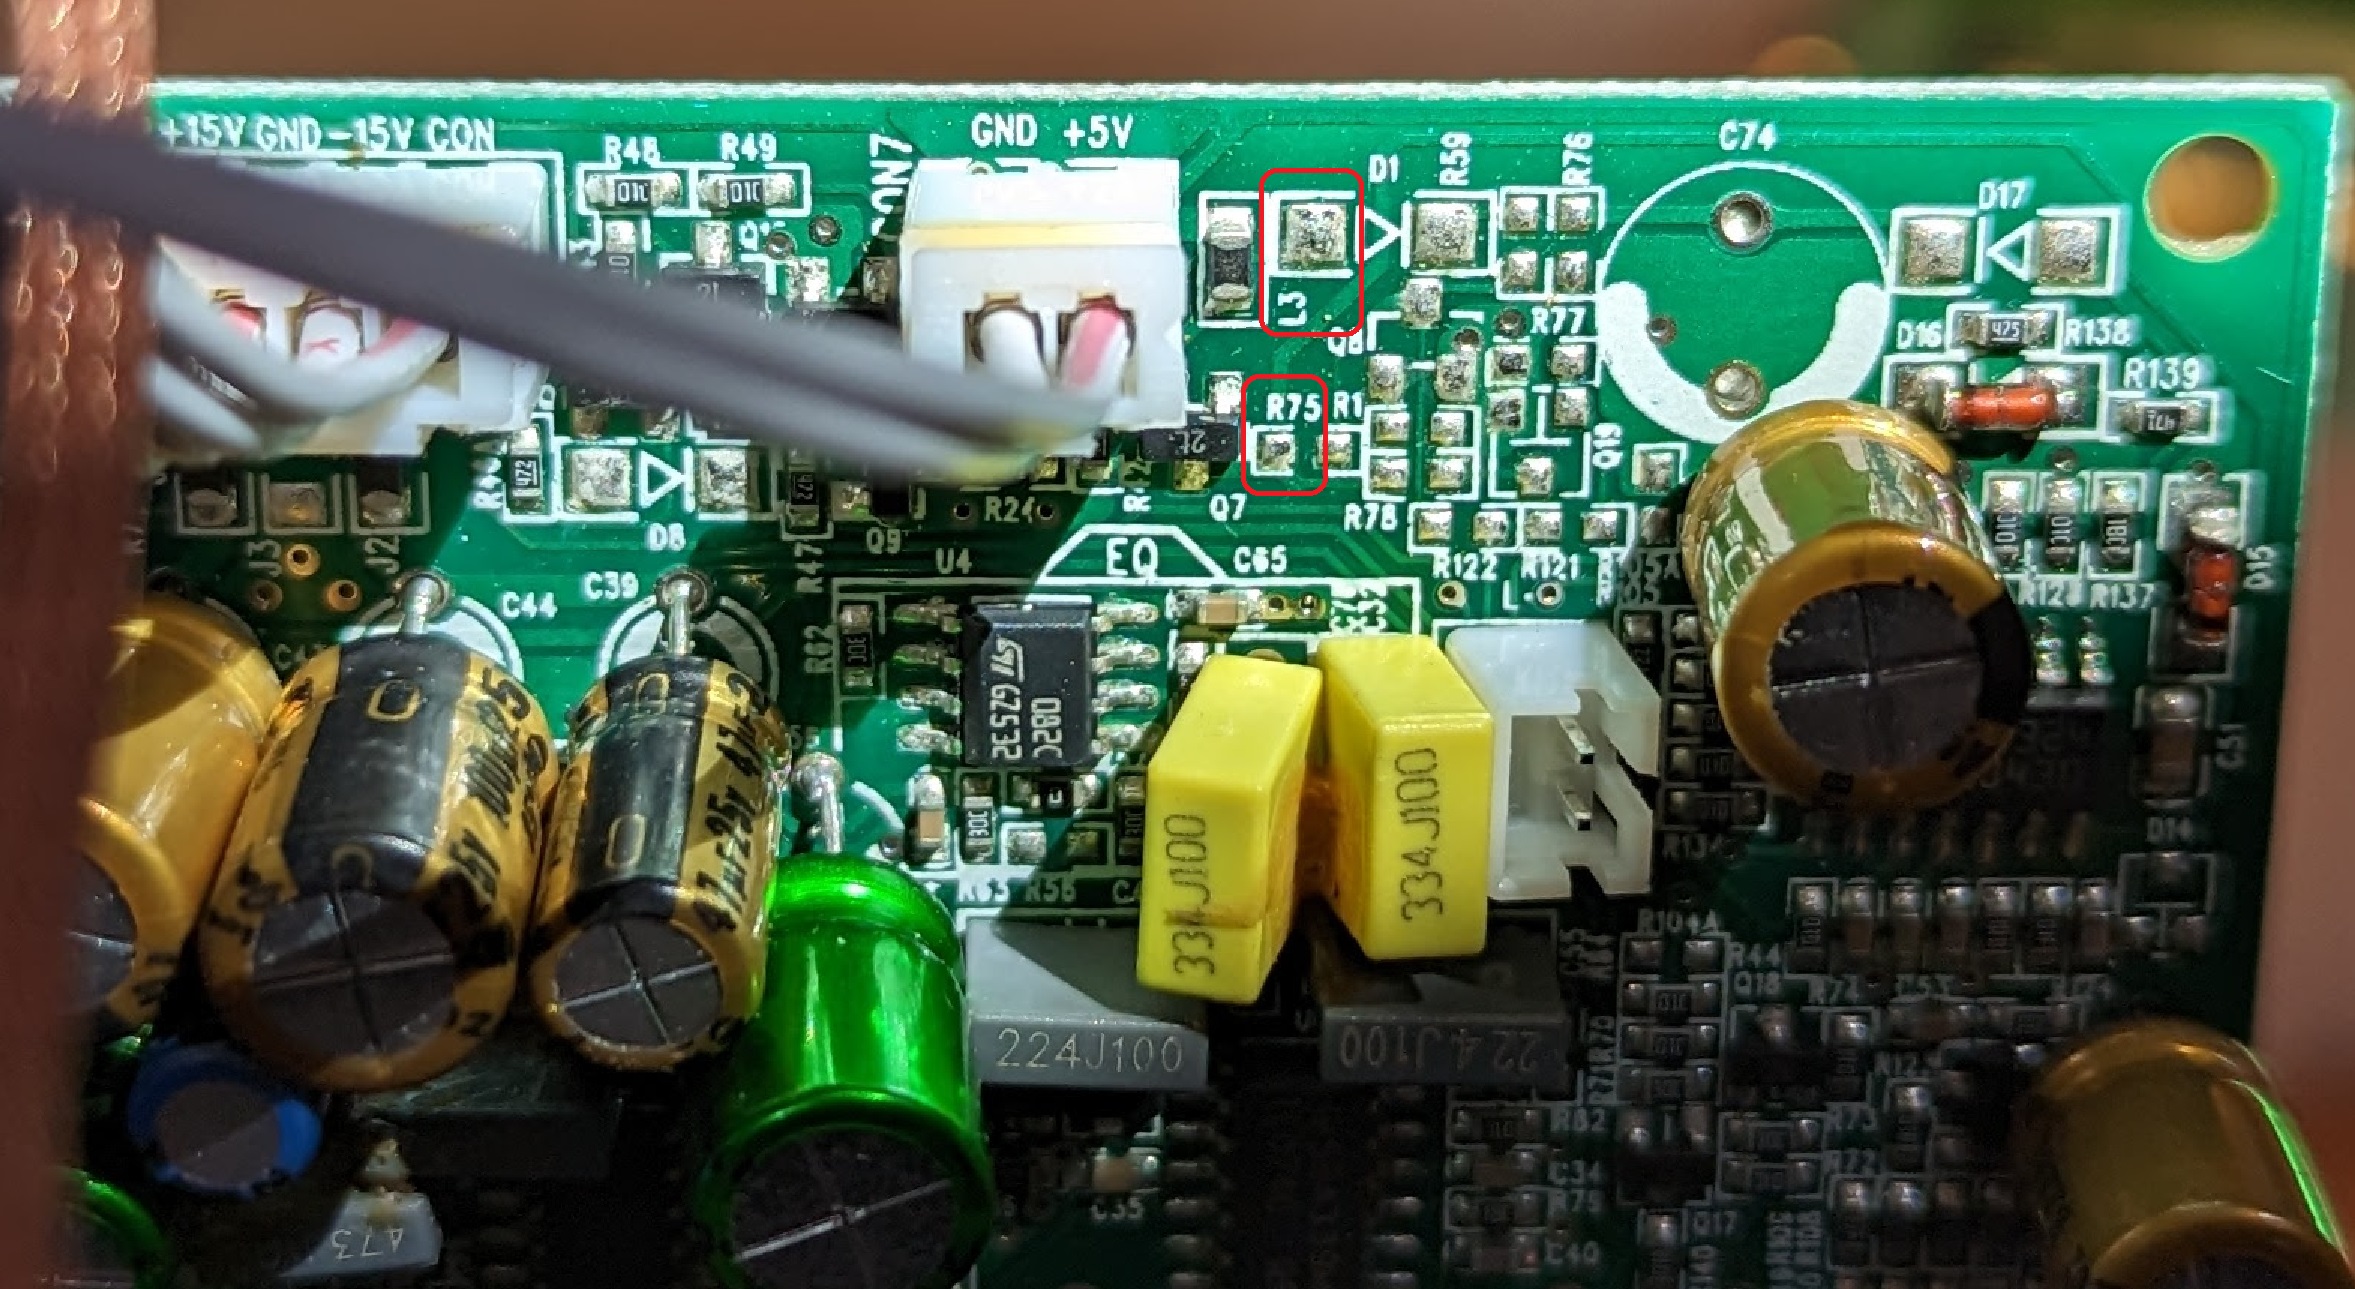
Thank you Stephen for the reminder! Yeah, after I made the post yesterday, I noticed that I got one end of the jumper at the wrong place, after looking at Poul's pictures again, so I was going to tried it one more time by re-solder the jumper. So this afternoon, I gave it one more try, and was thinking that if this doesn't fix it, this will definitely be the end of my attempt to repair this sub. Well, guess what, after re-solder the jumper, now it's fully working! So now it's totally fixed, thanks to Poul's great suggestion. Here I moved one end of the jumper to the one end of the resister next to the mark L3: After putting it back into the sub, it first had a few clicking sound right after turned on power, and I was like, "oh no!", thinking this is still broken. But after turn the switch in the back to off and then on again, the clicking sound stopped. I then turn the gain knob to 11 o'clock, slightly less than midway position, just don't want to blow anything up in case the jumper would cause any a short circuit. So I hooked up the sub cable to the AVR, and tunred on TV and selected YouTube, and played the speaker test frequency sweeps video. It started at 5Hz, and the sub was quiet, and it then played 10Hz, and the sub's corne started pumping. Before it would stop after 2 seconds, but now it continued to play through the end of the 10 seconds 10 Hz, and when the 20 Hz playing started, the sub continued to working, instead shutting the power off after 2 seconds. I was thrilled to see the sub held all the way through the remaining frequency sweeps all the way to 100 Hz finish. I then turned the gain knob to 2 o'clock position, slightly higher than the mid way position, which make the sub very loud per my volume setup in the AVR. I then repeated the whole frequency sweep again, and the sub successfuly play the whole video without shutting off. So the sub is now fully repaired to its original working condition, after this long battle of replacing caps and trying out different things. Special thanks to Poul for his detective work to find out the 5V supply issue and made the suggestion here, now I got my amp board fully rescured! I can return the SPL-150 replacement amp board back to Klipsch. Thank you Poul for saving me $200 bucks! Now that we know what to do if your amp acts similarly to mine after you replaced all tjhe caps and the resistor - if it shuts off after a few seconds of playing low frequencies. Just add that jumper. This is a valuable knowledge from this user community that even Klipsch doesn't know 🙂 Thanks again everyone!
-
R-110SW / R-112SW / R-115SW Repair Blog
BillL001 replied to ngen33r's topic in Technical/Restorations
Last update on repairing my R-115SW sub amp: I got my new replacement amp from Klipsch, so I decided to try the fix that Poul suggested: adding a jumper between L3 and R75 (he had a typo in his post saying it was R73) - between the two red cicled spots: I used a thin copper wire as the jumper: It was harder to solder the jumper on because of the tight space, and I accidentally touched my soldering iron with the plastic wite plug next to it and burned off some plastic on the plug. Fortunately there's damamge to the wire, so it didn't affected the wire and the plug. Anyway, this method unfortunately did not fix the problem for me. It actually somehow disabled the amp. After plugged in the amp to the sub, the front LED is on, showing it got the power, but when playing sound through the AVR, the sub stayed quiet and did not do anything - no sound, and the woofer corne did not even move, while the power LED was on. I pulled off the jumper wire and tried it again, the sub was back to its half-working state: it plays music as normal, but when I feed low frequecies sweeps from 5 Hz - 1K Hz from the AVR, the sub stopped playing when the 20 Hz frequency was playing, and the power LED turned off, exactly like its state after I replaced all the caps. Since I got the SPL-150 amp from Klipsch, I swapped that one in, and the sub worked perfectly again like new, and playing frequencies sweeps did not run into any problem, as the sub started produce sound at 10Hz, then 20, 40, 60, 80 Hz, and so on, all the way to about 100 Hz, before the L/R and center speakers started taking over. I suppose this would be the end of my attempt to repair the original R-115SW sub's amp, given that there's no solution available on how to get it to work for playhing frequencies from 10 Hz - 30Hz with the volume setting at 40% or higher on the gain knob without shutting itself off. I am going to use the sub with the SPL-150 amp as the replacement, until someday it burned out again. If it happens outside of its warranty period, I will just throw away this whole Klipsch junky thing, and go get a SVS or Hsu or Polk subwoofer. Thanks everyone!
-
R-110SW / R-112SW / R-115SW Repair Blog
BillL001 replied to ngen33r's topic in Technical/Restorations
The replacement amp that Kilpsch sells to customers to repair the R-115SW subs, is the SPL-150 amp, which Klipsch claimed to be compatiable with the R-115SW sub. I just got mine in the mail after ordered it with a discount Kilpsch gave me. Too bad to hear that this amp board also getting hot, and yours also broke due to some internal fault. I tested mine, and it appears to be OK, although time will tell if this one is going to last or not. The new SPL-150 amp had silicon glue pured all over the capacitors and resistors, so it's not going be repairable by us the users like we have tried for the original R-115SW amp. If this replacement amp burns out again, we have no other choices but either order another amp from Klipsch yet again, or throw out the entire sub for good. -
R-110SW / R-112SW / R-115SW Repair Blog
BillL001 replied to ngen33r's topic in Technical/Restorations
Hi All, On the subject of repairing the broken amp board, I am at the point to give up... While it's been fun trying to fix the amp by replacing all the caps and the R39 resistor, this whole "fix-by-ourselves" thing ultimately is not something we can ping hope on, or guarantee it will work, because without seeing the sechmatics, it's like shooting in the dark blindly without knowing exactly what problems we have if it's still not fully working. In my case of getting the amp half-working after re-cap it, but still having issues of it will shut off after only a few seconds when playing 30Hz or lower frequencies, or play the sub at a high volume (turning the gain knob at mid-way or higher), it feels like I am hitting a dead end, since there's no schematics to help us to analize further, and no clear directions as to what's the cause to the problem and what's the right fix. I posted a question about my repair still having this issue to the comments section of one of Mr. ngen33r's repair videos on YT, and surprisingly he replied, and asked if setting the volume lower would keep the sub going. But after I provided the answer to him, I no longer getting any further reply from him. I don't blame ngen33r for not providing timely answers there or no longer coming here to help us, since he has no obligation to answer any of us, but the mere fact that we can't just keep waiting for weeks or months to get answers if our repair doesn't fully fix the amp, it made me to doubt the feasibility and validity of trying to fix this by ourselves without the schematics and without any help from Klipsch. So with this realization, I decided to bite the bullet and go ahead order the replacement amp board from Klipsch, just to get the sub working again, so I won't waste all the money that bought the sub, and at least bring it back to full working condition and getting some use out of it. I may try the method of adding a jumper later as Poul suggested above, after I get the replacement amp and not concerned with potentially frying my original amp with an additional jumper. This whole experience of getting no support from Klipsch, for a faulty product design that they refuse to take the responsibility and have done nothing to help the customers, should be a lesson for all of us that we should never ever buy another Klipsch subwoofer again! Such as bad company with pathetic customer support and service! Wish many of you have a better luck than me in your repair effort! -
R-110SW / R-112SW / R-115SW Repair Blog
BillL001 replied to ngen33r's topic in Technical/Restorations
Thank you Poul for your post here! Could you please provide the URL link to the page where you found that someone did that jumper and fixed the problem? Just adding jumpers to a PCB without knowing the schematics and its design, could be very risky or even dangerous, because it could cause short circuit, components damage, or in worst case, even fire, if our boards are somehow different from yours. Since you said one of your boards doesn't have this jumper and also works, it shows that there are some variations in the boards, which we don't know exactly what are the differences since we don't have the schematics. So while I totally believe you in what you said that this could potentially fix the problem, it still would be better if we could see what was the reason and the thinking behind the fix from whoever came up the idea as to why he tried this fix in the first place, if possible at all. If not, I will give this a try, after getting my replacement amp I ordered from Klipsch, so I could use my original amp as a guinea pig to test this fix, and even if it winds up destroy the amp board, it won't hurt to test this on the exta amp board that I no longer need. Thanks a lot! Bill -
R-110SW / R-112SW / R-115SW Repair Blog
BillL001 replied to ngen33r's topic in Technical/Restorations
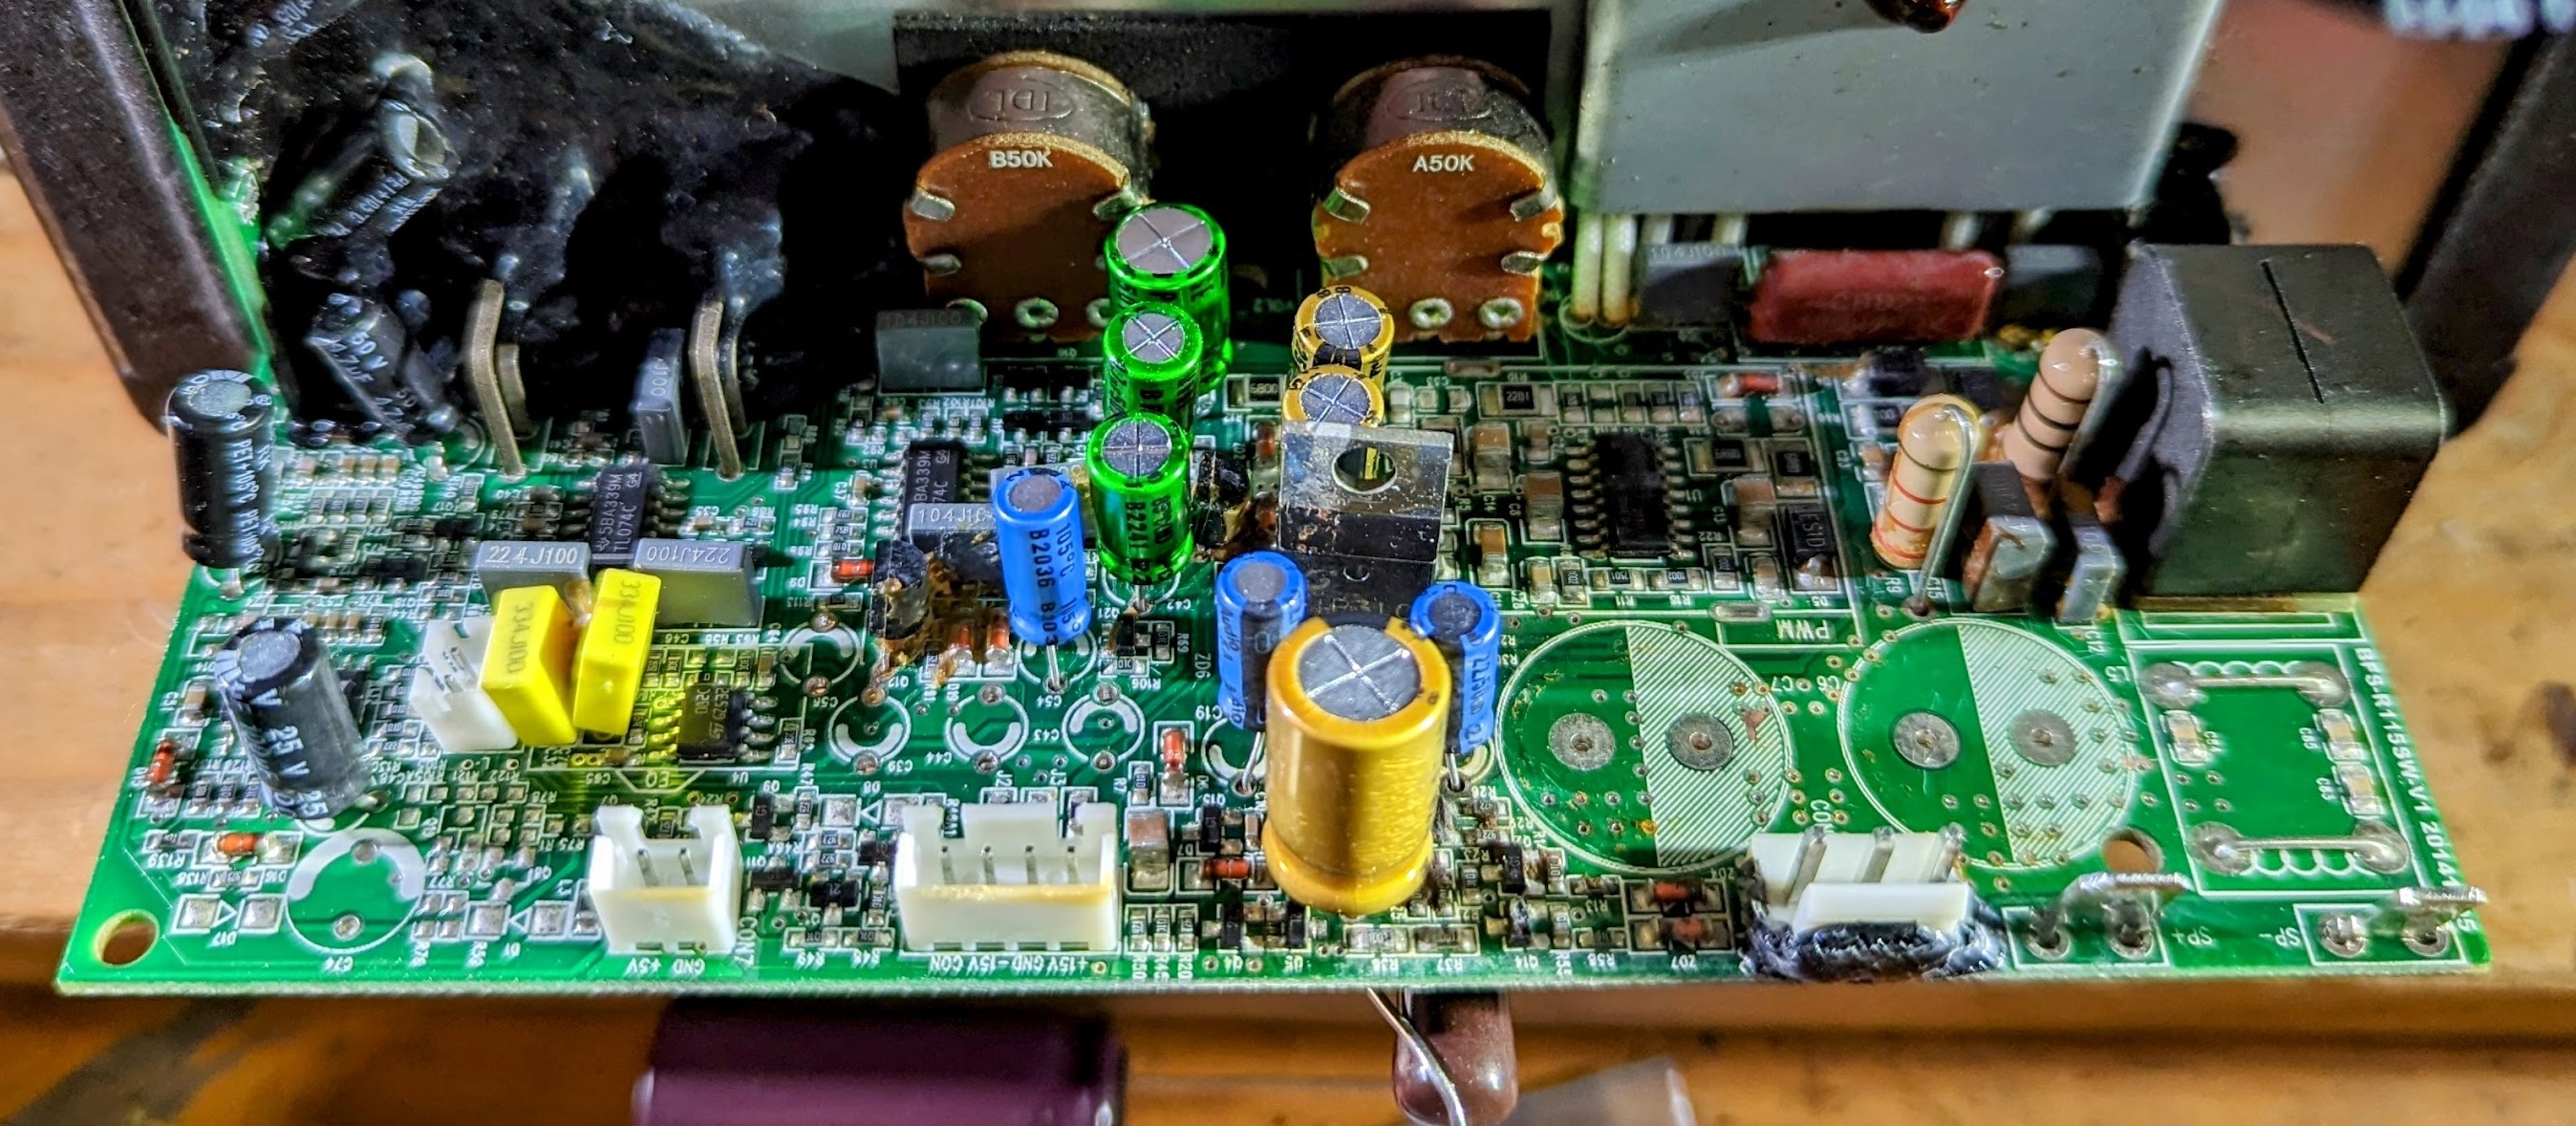
4. So I decided to replace the other two caps on the far left side as well: With all the caps replaced, I also wrapped the 10W resitor with a copper strip, to divert the possible heat to the alumnum plate in the middle of the amp board to act as heatsink, to keep the resistor cool: Now putting this back into the sub, the sub is working again! - the power LED would stay on, and there's no beating sound when flipping the switch in the back to either On or Auto or Standby. So it works exactly as it should be, which is great! I played some music from YT on TV, and the AVR sending the LFE singnal to the sub worked fine, as I could clearly hear the lows, as well as placing my hands on the sub corne I could feel it's shaking. So all these are good. Now the problem... I then played some low frequency sweping videos on YT, and ran into this problem: when I played frequency from 40Hz and above, the sub works fine, but if I play 30 Hz or any lower frequencies, the sub would shut off, and the green power-on LED light will turned off. I would have to pull the power cord off for a few seconds, and then plug it back on, and flip the switch from Auto to On, and the LED will by on again. From what I can tell, the only difference in what I put on the board vs what's original at R39 pins, is the 820 ohm resistor I am using now is rated as 10W vs what's the original buned up resistor which was 1 W. As far as all the caps, they are the same specs, and I made sure they are all installed with the correct palarities. I didn't not change the MOSFET, as I assume what's on the board is still a good one. So what's puzzling is, why the amp would cut off the power when it plays 30Hz or below frequencies, as I don't think the 10W resistor at R39 could be the cause, because it's the same 820 ohm? I also doubt the MOSFET would be the cause becuase it's basically acting as an on-off switch to the circuit regardless the frequencies, so it must be one of the capacitors. But without knowing the circuit design, there's veitually no way to tell. I wonder if anyone has any ideas or thoughts, or suggestions as to if there's any way to fix this. Maybe increase the caps voltage ratings, or the cap values? - but that would alter the circuit design, though, right? Thanks!
-
R-110SW / R-112SW / R-115SW Repair Blog
BillL001 replied to ngen33r's topic in Technical/Restorations
3. Next, I installed all the new caps as their replacement: - bought those on Amazon, all Nichicon FG Audio Grade (gold color) or ES Muse (green color) caps: And bought the two large caps for C7 and C8 from Digikey, and they are Nichicon caps as well: So what I put on, are much better than the original caps that came with the amp board. After putting this back into the sub and tried it again, the power green LED would stay on, but the sub would generate repeated beating sound (repeating "da da da da....") when I swithed to the On mode, which still sounds broken. But fliping the power swith to Auto or Standby, the beating sound would stop.
-
R-110SW / R-112SW / R-115SW Repair Blog
BillL001 replied to ngen33r's topic in Technical/Restorations
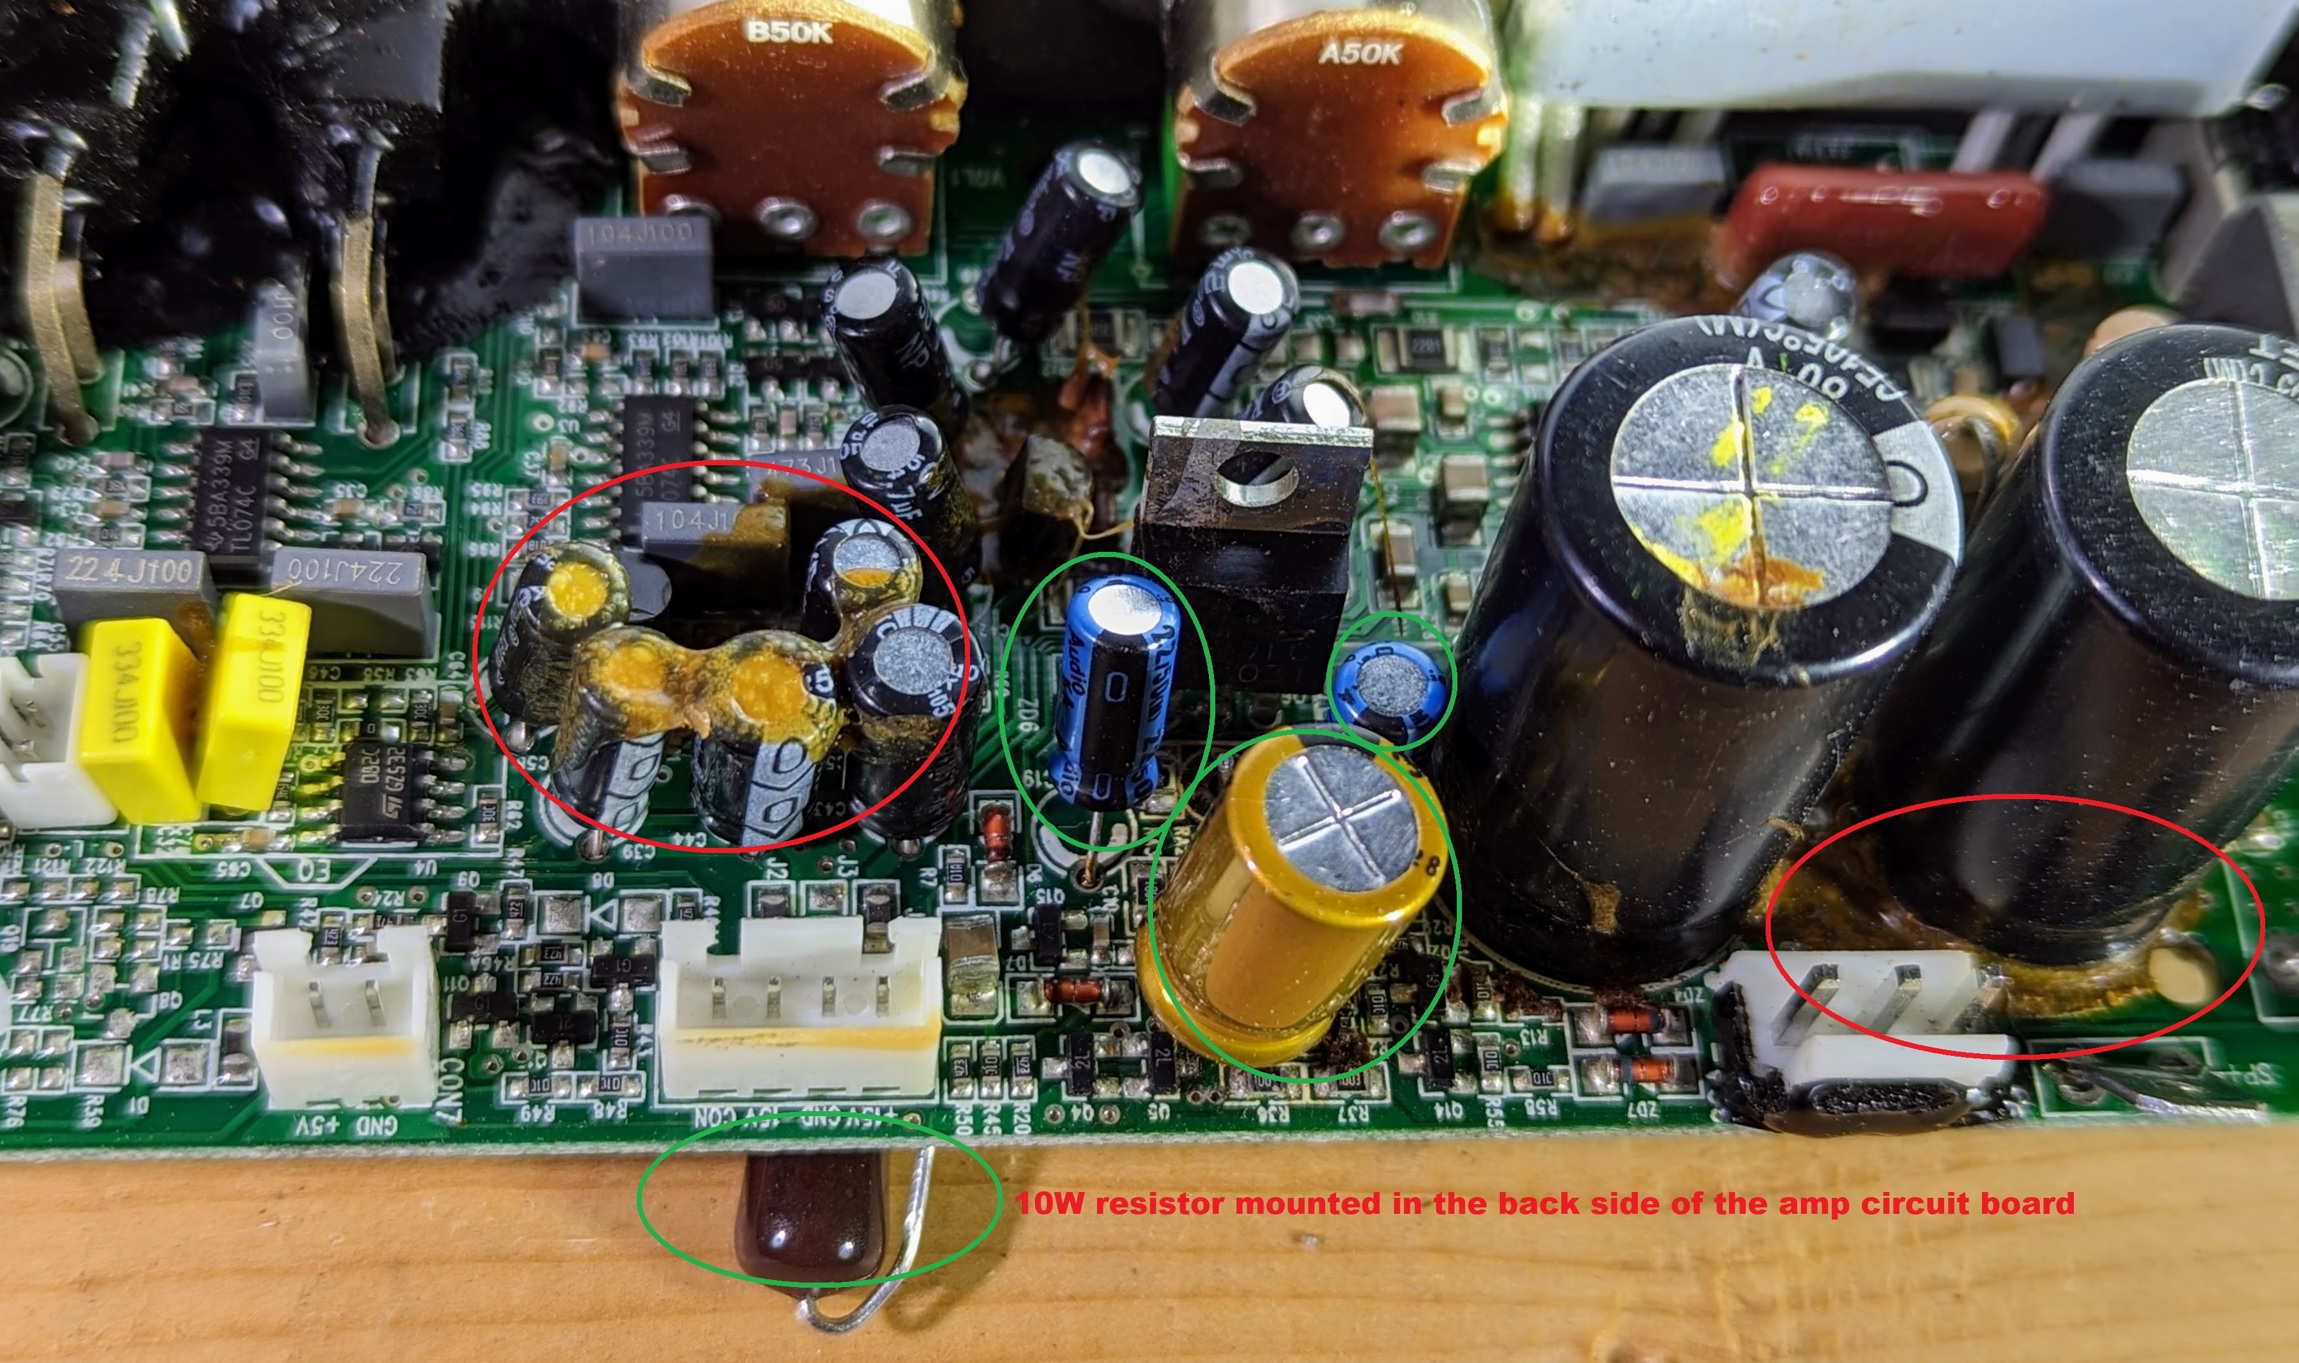
2. So next, I decided to take all the capacitors out, and clean the board as well: Here I removed all the caps including those two large ones C7 and C8 on the right side, but decided to leave the two on the far left side alone, as I thought the burned resistor most likely didn't impact them:
-
R-110SW / R-112SW / R-115SW Repair Blog
BillL001 replied to ngen33r's topic in Technical/Restorations
Hi Everyone: Latest update... I finally got all the caps replaced on my board, and got the sub working - sort of... 1. I first replaced the burned resistor and the 3 capacitors near it, and hoped that would be enough to fix the board: the 3 green circuled caps were new ones, and I left other caps unchanged. Notice those circuled in red, has some glue on top, which I thought could be the exploded the cap's internal spured onto them and those caps should be OK, so I didn't replace them, and also left alone those glues on the board below the two large caps on the right side, as I thouht those caps could have been fine and not damaged by the burning resistor. I installled the new 10W resistor on the back side of the board to avoid its temperature affect the other components on the board: Well, this fix didn't work. As my last post said, the power-on green LED wouldn't stay on.