longdrive03
-
Posts
816 -
Joined
-
Last visited
Content Type
Forums
Events
Gallery
Everything posted by longdrive03
-

Advice re cutting LaScala doghouse angles
longdrive03 replied to longdrive03's topic in Technical/Restorations
Andy, thanks for visiting last night by phone - it was very helpful on many levels. Current status is I have one dog roof glued at the toe. Attached pic shows dry fit of roof to sides and motorboard. No glue to sides yet. I'm pleased with the fit. Tonight I hope to get the roof glued to the sides and nails/screws from inside at roof joint with sides to pull it tight. and then finish routing out the woofer entry hole and maybe glue up some veneer on the inside of the top of the bass chamber. I confirmed that the Crites 15 cast woofer will fit into the doghouse (kinda important !) -
Advice re cutting LaScala doghouse angles
longdrive03 replied to longdrive03's topic in Technical/Restorations
I haven't got to the back piece with the flares yet. Still concentrating on the doghouse since its the hardest part. Will study more but off the top of my head I will need to bring the flares out to just short of the edge of the motorboard (17.5" now -- 15.5" motorboard and 2 x 1" dog sides. Do you usually stop the flares just inside the edge of the dog sides so they are not visible? Do you see any reason that the depth of the cabinet should increase from rear panel to tip of the dog roof? The motorboard (12) is set between the two dog sides (4) so that will take up 1/4" more of the space inside the cabinet but won't cause the roof tip to extend farther unless I'm missing something (which can happen) Using the 1" dog roof pieces (5) will also take up some interior volume. Do you think I should lengthen the dog roof panels (and change the corresponding angles) to bring the roof joint farther out from the back? The side panels will need to be long by at least 1/4" because the mid horn baffle is 1" thick and the rear is 1" thick and the sides overlap the rear. I have overcut the side panels so I can trim to final width. Still not 100% sold on 1" ply on dog roof (piece 5) if I find out tonight the woofer access isn't big enough and can't be modified. Any thoughts appreciated. Thanks. Here's a pic of the dog sides and motorboard that is 17.5" wide x 7.5". I have expanded the width of the inner bass bin dimension to 23 5/8" . -
Advice re cutting LaScala doghouse angles
longdrive03 replied to longdrive03's topic in Technical/Restorations
Andy, Outstanding post and pics. Now could you come cut these for me!!!!?? This helps tremendously and I now get what you explained previously - duh Very efficient jig. Here's a few pics of my progress. I'm going to cut out the woofers entry hole in the chamber bottom and see if i have room for installing the crites 15C woofer. I've widened the motorboard to 15.5" wide and I think it will fit using the 1" ply. -
Advice re cutting LaScala doghouse angles
longdrive03 replied to longdrive03's topic in Technical/Restorations
Andy do you have any photos of the jig that you referenced above? I'm not really following the narrative and photos would be great. Sounds like a great setup Oldred more pics tomorrow!! Need to redraw roof panels a bit. -
Advice re cutting LaScala doghouse angles
longdrive03 replied to longdrive03's topic in Technical/Restorations
Andy them thar is some good looking dog houses. Hey we need to take a picture and put it on the wall. It's a work of art. Glad to see people are excited about this build. I spent most of today cleaning up my shop and final rubbing the belle bass bins so I could get them out of the shop to work on the La Scala's. Had to do a little rehab work on by a rigid tablesaw because the wrench won't secure the arbor because it has rounded over. And a care cut a pair of slip joint pliers down so I could grab it and hold it to change blades. It's always something. OK I've decided to go with the old three-quarter inch ply on the doghouse roof. Put on a new blade and have learned to make an initial cut then the final cut. Hope to get the doghouse drive for tomorrow and get both of them bill so I can start the veneering. Thanks for everyone's help. -
Advice re cutting LaScala doghouse angles
longdrive03 replied to longdrive03's topic in Technical/Restorations
Thanks Carbon. Good advice. Here is the latest test cut with a much better front joint. -
Advice re cutting LaScala doghouse angles
longdrive03 replied to longdrive03's topic in Technical/Restorations
Thanks Andy for all the helpful information. I'm building a shed for friend and he wants it to be 1 inch Baltic Birch all the way around. I've had to calculate changes to the height and the width based on the 1 inch material. I've built a new jig tonight after I made sure my blade install panel was flush with the table saw top and it is much better. I recut the test panel and everything squared up nicely. You're right about the Baltic Birch being hard to cut. I've got a fairly new blade on the tablesaw but I might go with a slightly wider blade to cut down on flex. I will also make an initial cut and then slice I thin cut off of that to reduce any binding of the blade. Thanks a bunch for all the information. -
Advice re cutting LaScala doghouse angles
longdrive03 replied to longdrive03's topic in Technical/Restorations
Never mind. Figure it out that Andy is HDRbuilder and sent him PM. -
Advice re cutting LaScala doghouse angles
longdrive03 replied to longdrive03's topic in Technical/Restorations
Thanks Rick. There are several "Andys" on the forum do you happened to know his handle? Thanks. -
Advice re cutting LaScala doghouse angles
longdrive03 replied to longdrive03's topic in Technical/Restorations
Thanks for the response done. Don, hope that is it. The 1" ply (18 plys) ain't easy to cut. At the 60 degree angle the ply is nearly 1.5" thick In theory this should work like clockwork. But this is woodworking and there are usually issues. I think I'll also build a redesigned jig to have a flat bottom with a longer base that will prevent any tipping of the jig at the blade insert area. -
Building a pair of LS now - doing the hard part - doghouse. Using 1" BB ply throughout. I did a test cut on the roof top (toe end) of the doghouse and the front toe joint isn't meeting properly. I measured and there is a "bow" in joint where the two pieces meet. Towards the middle of the front joint the boards are "narrower" than than at the top and bottom of the joint. All the test parts are square and I used a slid jig I built (which is square) and made sure the piece was vertical on my tablesaw before clamping to the heavy jig which was flush with my rip fence. I've attached a few pics below. The "1 BB isn't easy to cut and I took it slow (maybe not slow enough and pushed the jig all the way through the blade. I'm probably not describing this well and will take a pic tonight of the rooftop joint. I just looked at the photo and noticed there may be a slight tilt toward the blade because the orange blade cover insert isn't flush with the table top. Not sure that would make the scoop, but could increase slightly increase the cut angle if at the beginning and end of the cut when the jig isn't straddling the blade insert? I will flush the blade insert tonight with the table top and see if that helps as well as making a preliminary cut then second final cut. Anyone have this problem and know about a fix?? I'm thinking maybe I should an initial cut then make s second cut where I only slice of 1/8"-1/4" to hopefull get smoother straight rooftop edges. All responses are appreciated.
-
Members 73 444 posts Location: Little Rock , AR A buddy of mine here in Little Rock has a pair of black LS for sale on CL at below link. He is not a forum member but I told him him I would post on the forum. He is a great guy, straight shooter. I am not financially involved in this transaction. He just sold a set of Oak Khorns to a buyer from Memphis. Don't know if the buyer is a forum member. Thanks. https://littlerock.craigslist.org/ele/5904512603.html
-
RT, You may know all I'm about to say already. The rips on the surround are on the 10" woofer which is the active woofer. This speaker is a sealed system using a passive radiator (12") and therefore air leaks are probably more of a problem than a vented system. Check on YouTube for videos on replacing the surrounds. Not terribly hard to do. Should be good as new. I suggest measuring the woofer cone if you haven't already to make sure the new surrounds have the same width. While you're at it you can do the second one after you practice on the first. These are 27 years old so the PRs may need refoaming. Someone was pushing them pretty hard to get three rips in one woofer. I've replaced a lot of Large Advent foam surrounds which can be a little tricky. A lot of the sellers have written instructions in the kit or on their website. Good luck and post pics when you're done.
-
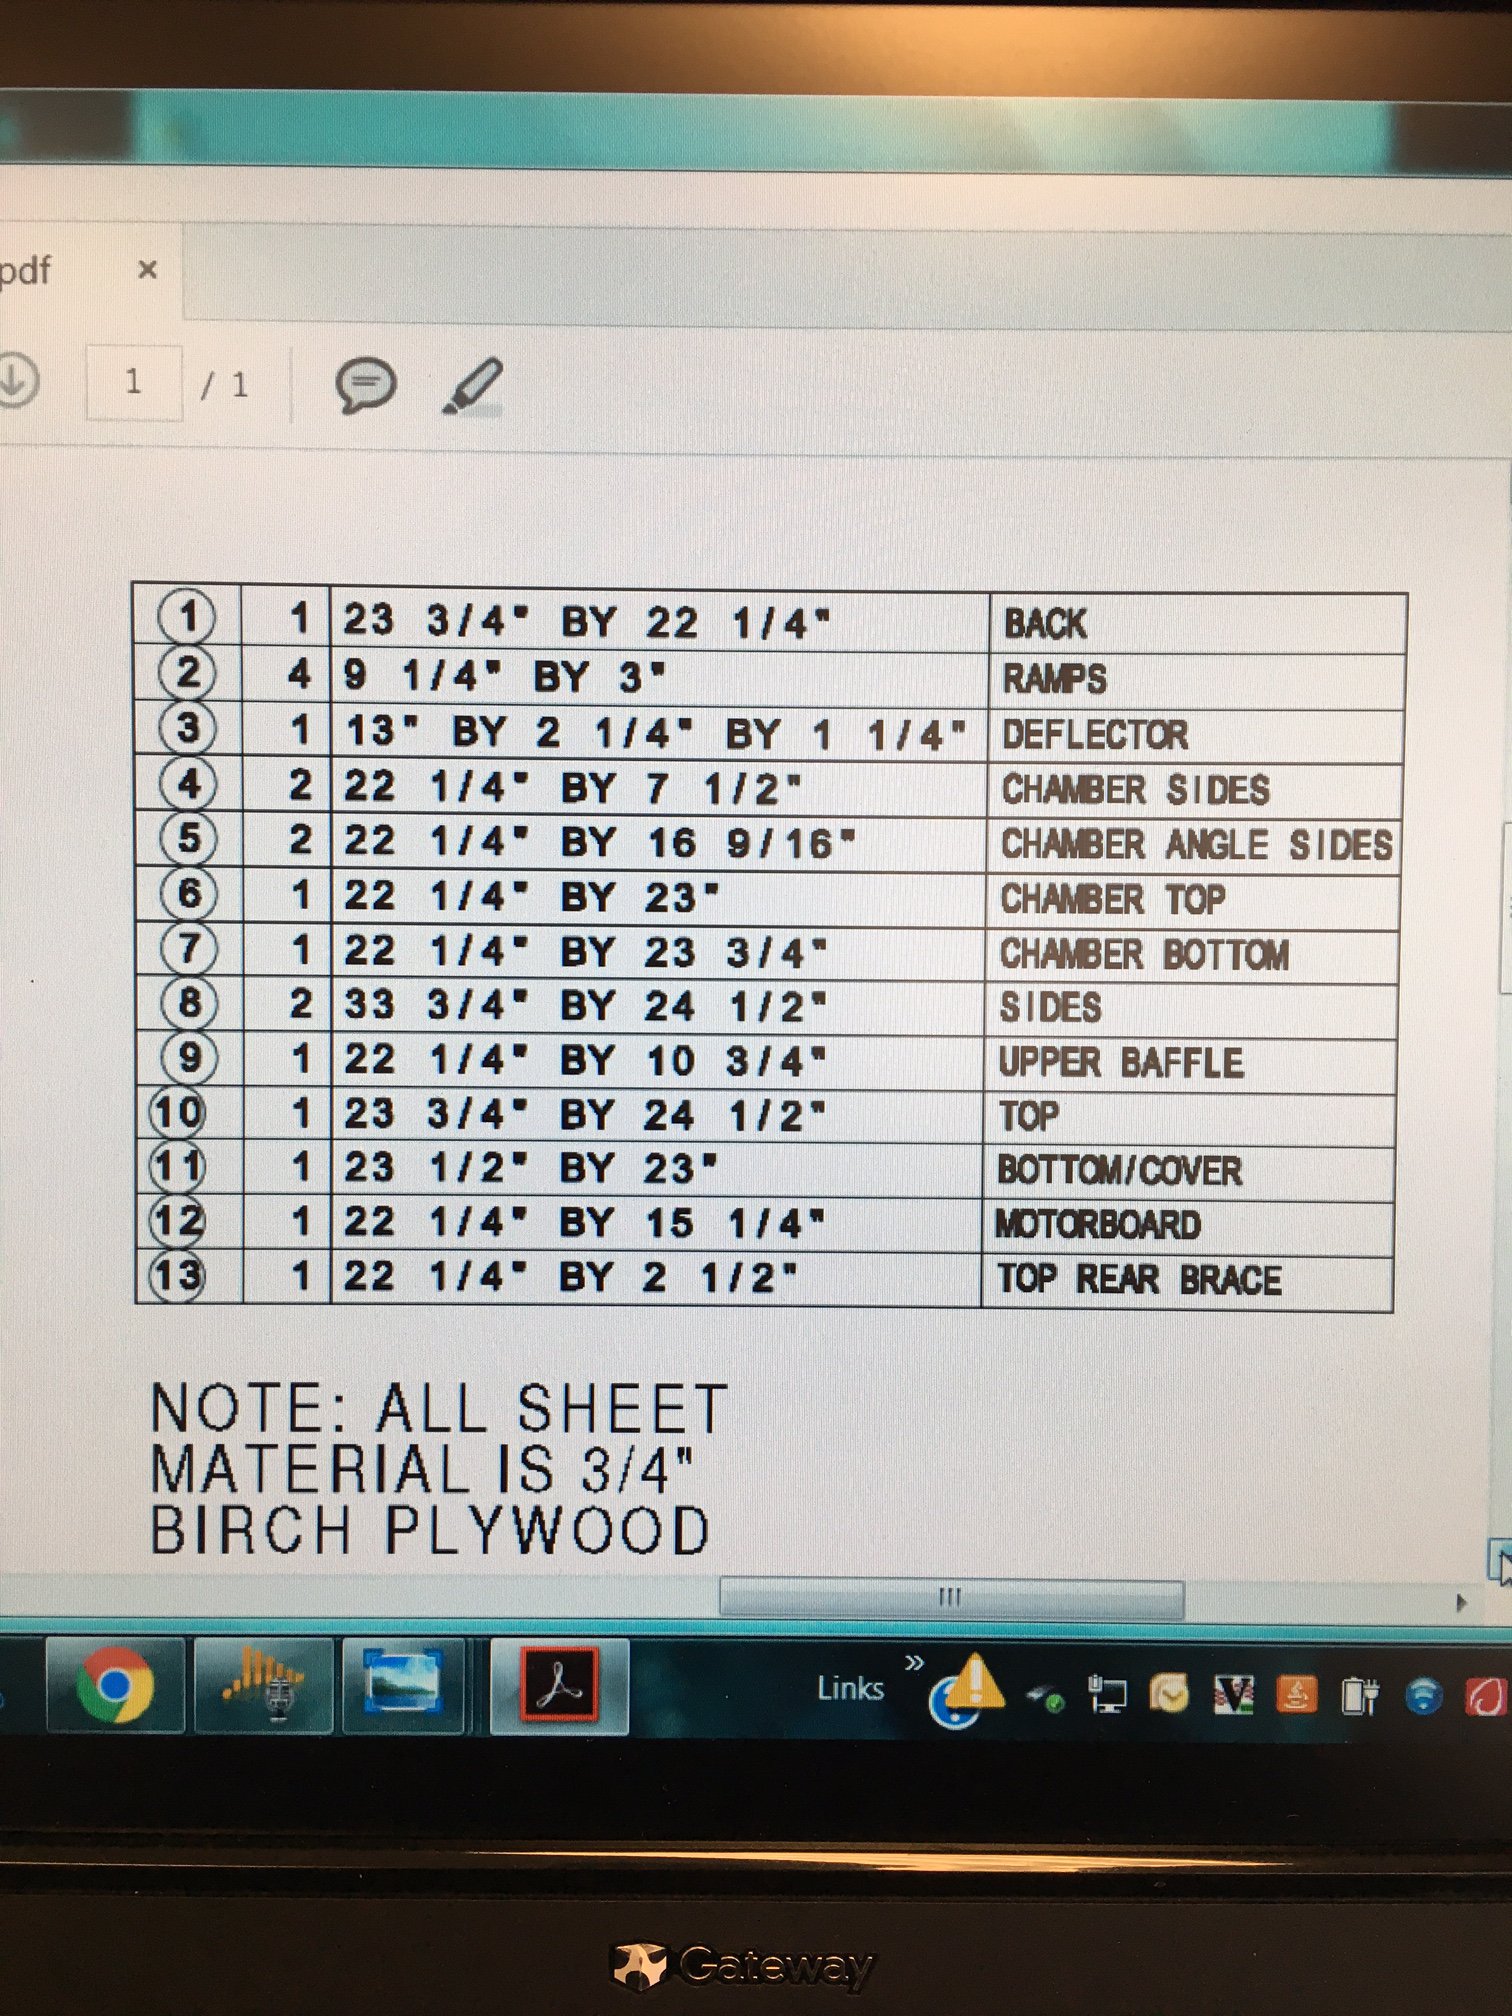
Need LaScala Plans using 1" material?
longdrive03 replied to longdrive03's topic in Technical/Restorations
I've made a cut list and it is attached below. I used the numbering system off a previous 3/4" Lascala cut list which is attached also. If anyone has any corrections or comments please advise. I assume that using the 1" BB ply will result in a slight decrease on the internal volume of the chamber - around .11 cf which should be negligible. LASCALA CUTTING PLANS 1 INCH BALTIC BIRCH.docx
-
Hello Skypig and welcome to the forum. I think you are in the correct form because there are a lot of people with more knowledge than me that can assist you. I'm surprise someone hasn't responded already but it's probably because it's Thanksgiving. I'm certainly not an expert but You will get better base if the RF7s Have a wall or corner behind. Someone will probably be able to give you more detail on that. I have built a set from scratch and they definitely need vice support. Good luck with your inquiry mate. My brother-in-law lived in Melbourne for three years and absolutely loved it.
-
They are listed on CL. He just recently got these.
-
Correctimondo they are oak and I know that since I helped move them. Im an idiot. This is the first post on these.
-
Need LaScala Plans using 1" material?
longdrive03 replied to longdrive03's topic in Technical/Restorations
Thanks guys. my simple calculations is to add 1/4 inch vertically and horizontally times the number of pieces in that direction. Need to cipher hard to avoid short cuts. No 4 I kinda did the same with the Belle build I'm completing now. I used 1.25" ply on the sides which turned out to be 1 3/8" after the Veneer on both sides was added. Sounds great on the bass but haven't decided which horn to use since I may do a 2 way using the EV ND6X driver. I've got a friend that will probably buy them if he can find two K500 mid horns. Anybody have any K 500 Horns for sale???? -
Does anyone have a cutting list for the LS using 1" (mdf or BB)? Please advise. Surely (stop calling me Shirley) someone has taken the time to map this out (so I won't have to!!!). Thanks in advance. Any members build the LS with 1" material and if so did you use it throughout the entire speaker or just certain panels?
-
Members 73 444 posts Location: Little Rock , AR Posted August 11 · Report post A buddy of mine has these for sale on CL in Little Rock for $2,995.00. Oiled walnut 1994. Good guy. Straight shooter. I have no financial interest in these!!! He also has a pair of black LaScalas that he is willing to sell. https://littlerock.craigslist.org/ele/5884499111.html
-
NEED HELP WITH S/N ON KHORN AND CROSSOVER ON LASCALA
longdrive03 replied to longdrive03's topic in Technical/Restorations
Thanks for info guys. Does anyone have a schematic for the AL4 crossover? -
Reattaching Metal Badges On 1976 Heresy's
longdrive03 replied to mea2112's topic in Technical/Restorations
Double-sided tape will probably work. You might want to try some adhesive putty with just a couple of dots on the badge which should hold it. -
NEED HELP WITH S/N ON KHORN AND CROSSOVER ON LASCALA
longdrive03 replied to longdrive03's topic in Technical/Restorations
Thanks Dean. I've never seen one before. Any idea when that was used in LaScalas? -
A buddy of mine has a set of Khorns and LaScala. Need help with serial numbersr /year. Khorn serial number is KB OAK OIL 221494031. Khorns have AK-3 crossovers LaScala IS LWBK17-0011009. Blake paint in good condition but has a strange non-klipsch looking xover shown in pic. Anyone have info on source of xover? Thanks.
-
Here is what one looks like now.