Rudy81
-
Posts
3556 -
Joined
-
Last visited
-
Days Won
2
Content Type
Forums
Events
Gallery
Everything posted by Rudy81
-
LOL, spoke too soon, buyer changed his mind overnight. Still available.
-
$1200 without any drivers and that is what they sold for. With the low price of the Euro vs the dollar, you can buy them new from BD-Designs, but remember the shipping is expensive and then they need to be painted. There is also a VAT tax added by BD-Designs IIRC. I am aware of a guy on eBay that sells copies from Eastern Europe, but you have the same shipping and paint issues. Buyer beware on eBay of course. I can say that Bert of BD-Desings is a stand up guy and very responsive to questions.
-
Oris are sold pending funds. Oops, buyer changed his mind....back up.
-
Double Stack ESS AMT-1 with Wings--Possible Kit for Heritage
Rudy81 replied to Chris A's topic in Technical/Restorations
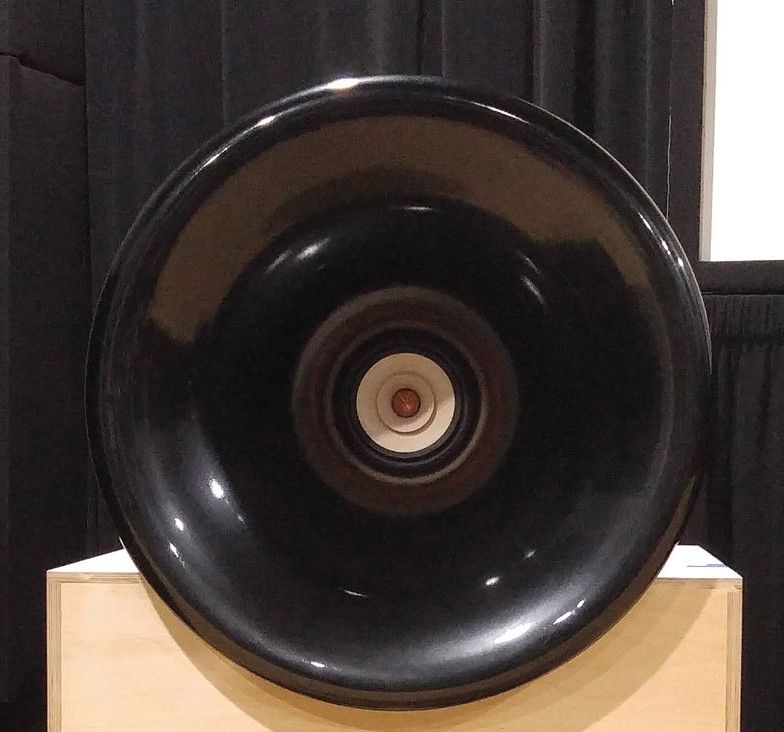
The leads are no more fragile than any winding in a speaker. They are fragile only is so far as you don't pull directly on the wire leading to the diaphragm since there is nothing to stop you from ripping the wire off its solder joint. The putty is only there to keep the diaphragm in place. For example, you leave the leads connected to your barrier strip and pull up aggressively on the AMT to pull it out of its slot.....you rip the wire right off the solder joint INSIDE the diaphragm. I can post pictures if you wish! And no, you can't solder it back on! 😱😱😱😭😭😭 -
Double Stack ESS AMT-1 with Wings--Possible Kit for Heritage
Rudy81 replied to Chris A's topic in Technical/Restorations
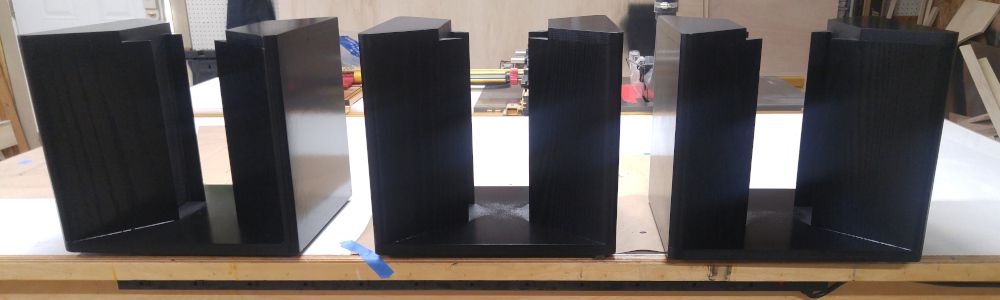
Another wings set close to being done. Now I have to wait for the lacquer to dry and let the fumes die some before bring them in. One note. During my build I placed the small internal braces for the wings right up against the driver sides. During the final gluing and nailing, a couple of pieces moved in a few thousands of an inch....enough to require sanding to allow the driver to slide in.....Grrrrr....wasted of half a day fixing that mistake. Other than that, these should work for my room.
-
PMs shortly
-
Double Stack ESS AMT-1 with Wings--Possible Kit for Heritage
Rudy81 replied to Chris A's topic in Technical/Restorations
What I meant to ask was the distance form the back of the AMT to the front wall of your room. I suspect that if you are too close to a room boundary you will lose some of the openness and magic this driver exhibits in my room. The HF200 will be a worthy opponent for sure. -
My Oris 150s will be going on other forums and are still available if anyone has any interest. These are local pickup only in the North Texas area. PM for information. Drivers not included, but are available.
-
Double Stack ESS AMT-1 with Wings--Possible Kit for Heritage
Rudy81 replied to Chris A's topic in Technical/Restorations
@Pete H, how far is the stack from the front wall of your listening space? What HF were you using before for comparison? -
Double Stack ESS AMT-1 with Wings--Possible Kit for Heritage
Rudy81 replied to Chris A's topic in Technical/Restorations
I'm just hoping to have a more finished look when all done, yet be able to remove a driver if needed. I am currently leaning to cutting a piece that would fit perfectly in the void left at the top and just use double sided tape to stick to the top of the second driver. Not at all a big deal, but something to close the 'driver slot' and have a finished look. -
Double Stack ESS AMT-1 with Wings--Possible Kit for Heritage
Rudy81 replied to Chris A's topic in Technical/Restorations
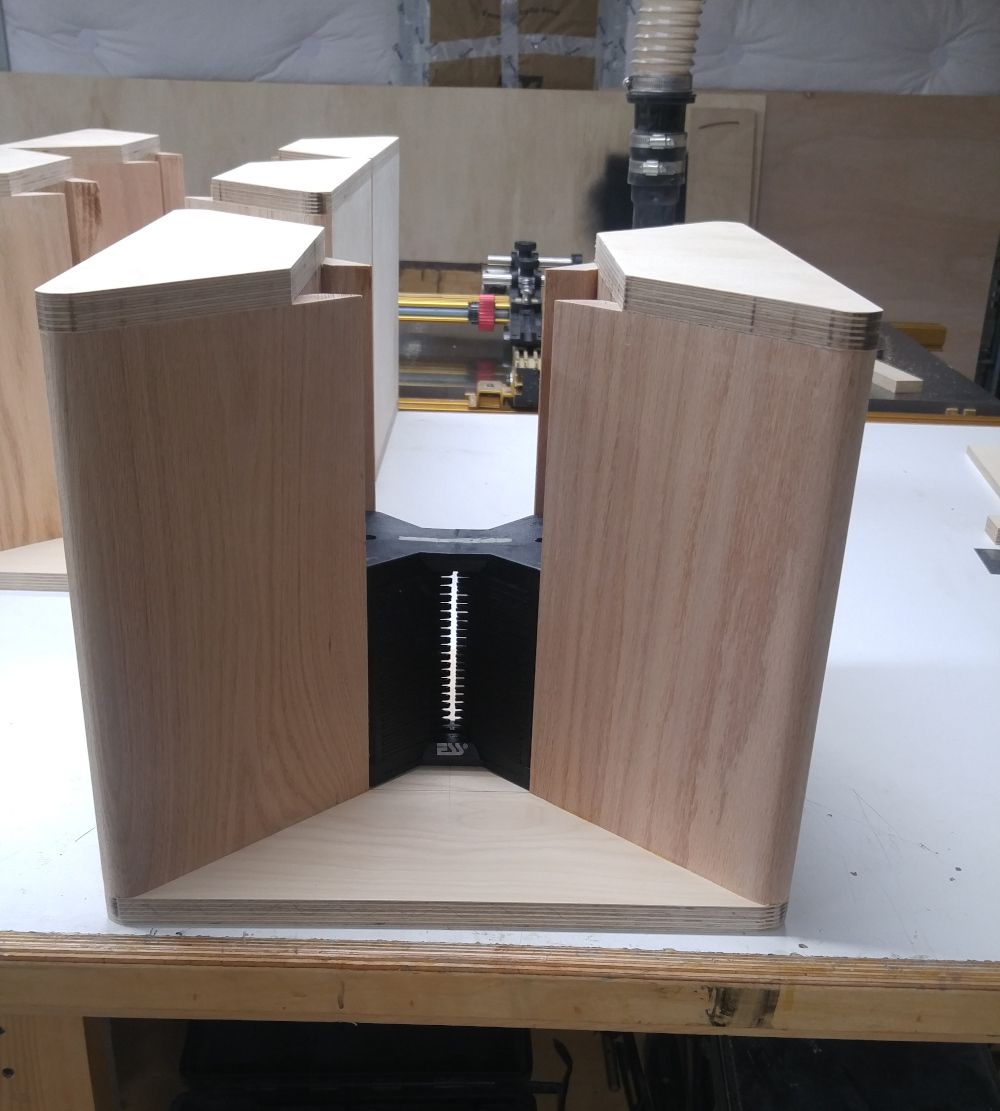
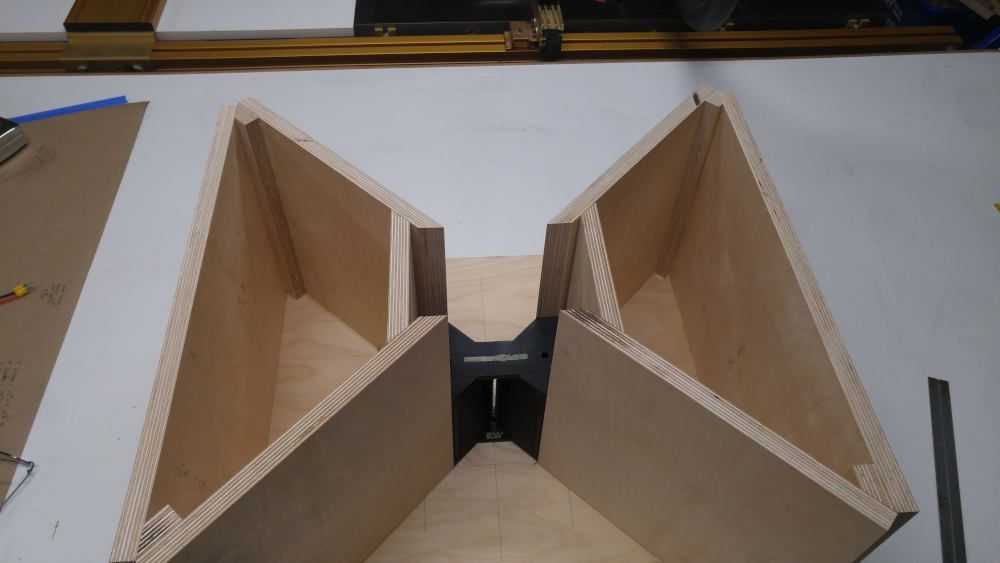
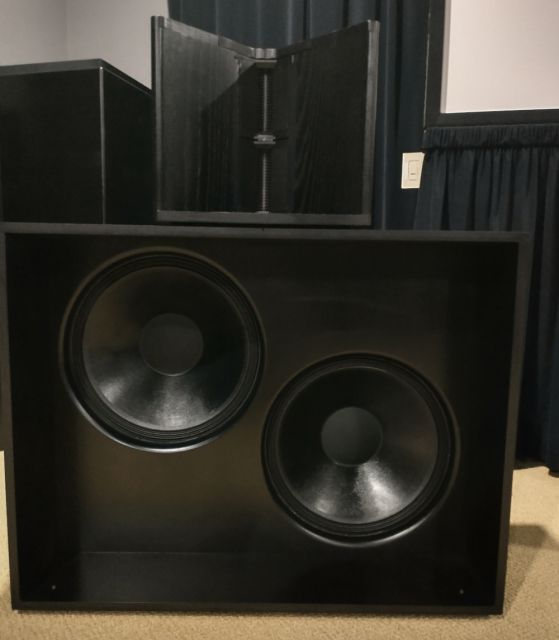
Ha! For reference, this took me two full days in the shop and I had the lumber on hand. Because the driver cases are not 'perfectly machined' it consumes time fitting each set individually....but, I think worth the effort. I think this will be the final solution until someone can come up with a true horn vs. a waveguide. Overall size is about 14" wide and 13" deep IIRC. Wings are made from stock Oak that is 7.25" wide. Used about a 4'x8' sheet of plywood for the base and sides. IMHO, the 12" sided symmetrical prototype I made before this is just too dang big and heavy. Closing off the sides certainly makes the whole thing look more 'finished'. Still brainstorming on how to close off the open top, yet make it accessible if you need to remove a driver. I will likely be crossing higher than where I am now....I'll see how they measure up and then go from there. -
Double Stack ESS AMT-1 with Wings--Possible Kit for Heritage
Rudy81 replied to Chris A's topic in Technical/Restorations
I'm still in pain after having trashed that diaphragm. 😰 -
Double Stack ESS AMT-1 with Wings--Possible Kit for Heritage
Rudy81 replied to Chris A's topic in Technical/Restorations
They should look fairly nice when painted. Since I know how they will perform, I will hold off on measurements until I have a chance to finish them totally. -
Double Stack ESS AMT-1 with Wings--Possible Kit for Heritage
Rudy81 replied to Chris A's topic in Technical/Restorations
Without wings they sound fantastic, but you lose the boost between 500hz and 2khz. If you take measurements, you will see that the lone AMTS need a little help between 1khz and 2khz. Otherwise, they are pretty dang amazing. -
Double Stack ESS AMT-1 with Wings--Possible Kit for Heritage
Rudy81 replied to Chris A's topic in Technical/Restorations
Thank you. I've built so many I've lost count and learned along the way. I decided to forgo the threaded rods, not necessary for our application unless you want to bolt them down. Have yet to figure out how to make open top look good once the drivers are in there. Otherwise, I should be good to go. -
Double Stack ESS AMT-1 with Wings--Possible Kit for Heritage
Rudy81 replied to Chris A's topic in Technical/Restorations
Progress on the final design.
-
Double Stack ESS AMT-1 with Wings--Possible Kit for Heritage
Rudy81 replied to Chris A's topic in Technical/Restorations
In my initial testing, I did note that the 'top' did kill the openess and airy properties of the AMT. However, please understand that I did not do much testing on that, and the 'horn' I built had 90 degrees of flare on all sides. The top and bottom of the driver are approximately 120 degrees IIRC. So, I would guess that a properly designed and tested horn would likely exceed any results I have gotten. But, for me, I have achieved what I needed to for my 2-way system. In an ideal world, I would love to see ESS come up with something that is more commercial and nicer looking than anything I could cook up. Ricky, of ESS, is working on this type of thing and I have steered him to check on our progress. I suspect the Heil has a great future if someone with knowledge and engineering expertise could spend time on this. I don't have that kind of know how. Building a true horn for this driver would be a huge undertaking I suspect. -
Double Stack ESS AMT-1 with Wings--Possible Kit for Heritage
Rudy81 replied to Chris A's topic in Technical/Restorations
My wires are all purple and blue. I guess they got a new shipment. I never have figured out the purpose of the Warning plate other than for clamping a single driver to the top of the ESS speaker. Remember, these were designed to be bolted to the top of their speakers in single unit fashion. Fire'em up! '' -
Double Stack ESS AMT-1 with Wings--Possible Kit for Heritage
Rudy81 replied to Chris A's topic in Technical/Restorations
Chris, file en route to you. Micahel, I will keep the new mock-up for you. -
Double Stack ESS AMT-1 with Wings--Possible Kit for Heritage
Rudy81 replied to Chris A's topic in Technical/Restorations
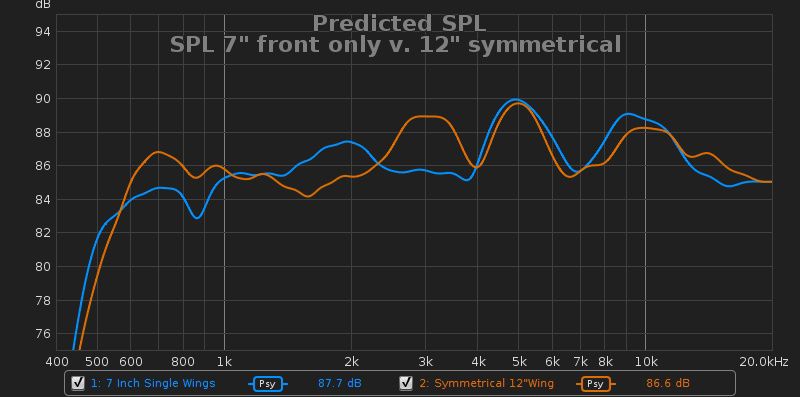
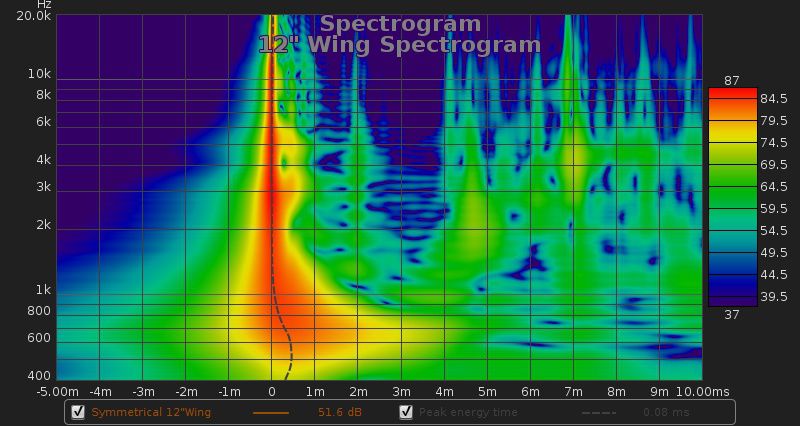
Based on my previous tests with varying wing sizes and these results, I believe that for me, the smart play is to keep what I have. If anything, maybe add symmetrical wings to the 7" setup. The results above show just a couple of db improvement in the lowest range, which in my case is not necessary. One of the down sides, is the new prototype size. It is rather large and poses some placement challenges for my center channel. The other down side is the slight loss of performance between 1.2khz and 2.2khz. All in all, it is a game of trade-offs and the added work, cost, size and weight don't make the very marginal gain worthwhile for me. That is, unless I missed something. -
Double Stack ESS AMT-1 with Wings--Possible Kit for Heritage
Rudy81 replied to Chris A's topic in Technical/Restorations
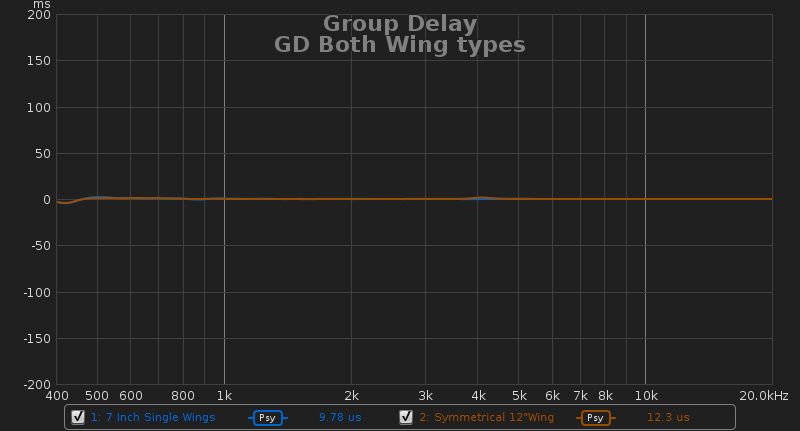
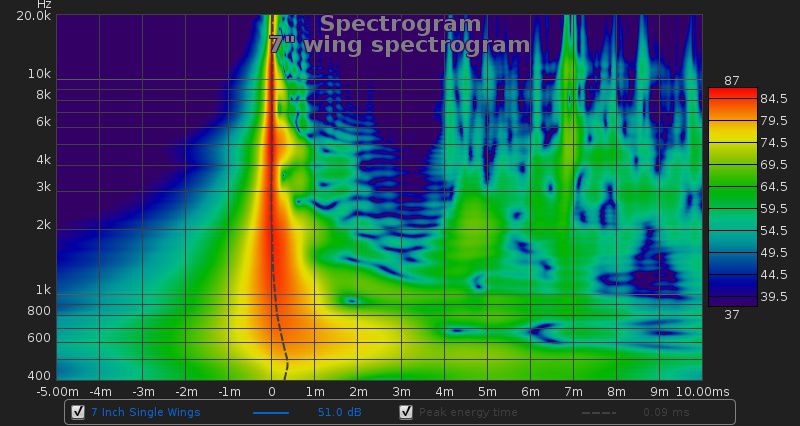
Ok, here are the results comparing the AMT stack in my current 7" asymmetrical wing setup vs. the prototype 12" symmetrical wing setup. These were taken with no xover for just the stack, no LF was on at the time. Sweep was run from 400hz to 20khz so as not to push the driver too much....I'm already down one diaphragm. I will leave things hooked up tonight in case anyone wants some other measurement. Please let me know what you think. The mic was never moved between reading and I did the best I could to keep the driver position consistent. The brown line is the 12" symmetrical prototype results. If @Chris A could interpret, that would be a bonus.
-
Double Stack ESS AMT-1 with Wings--Possible Kit for Heritage
Rudy81 replied to Chris A's topic in Technical/Restorations
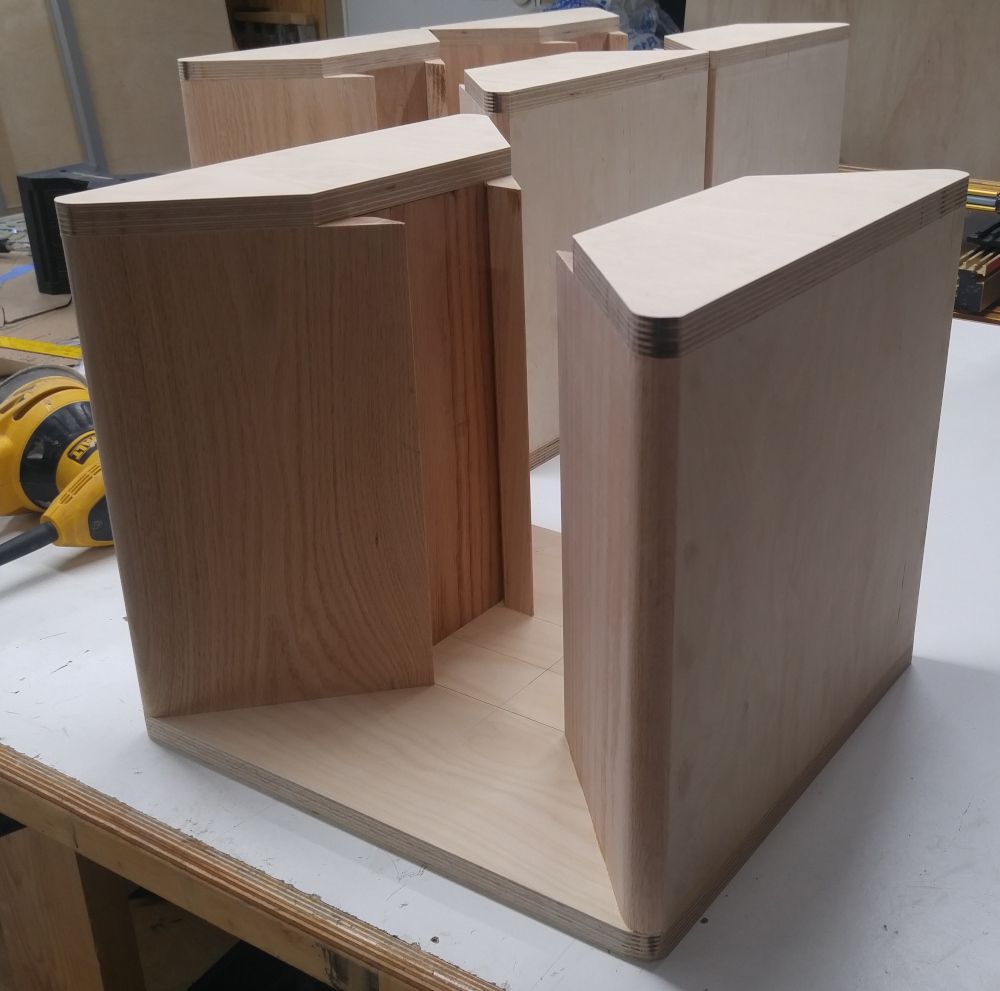
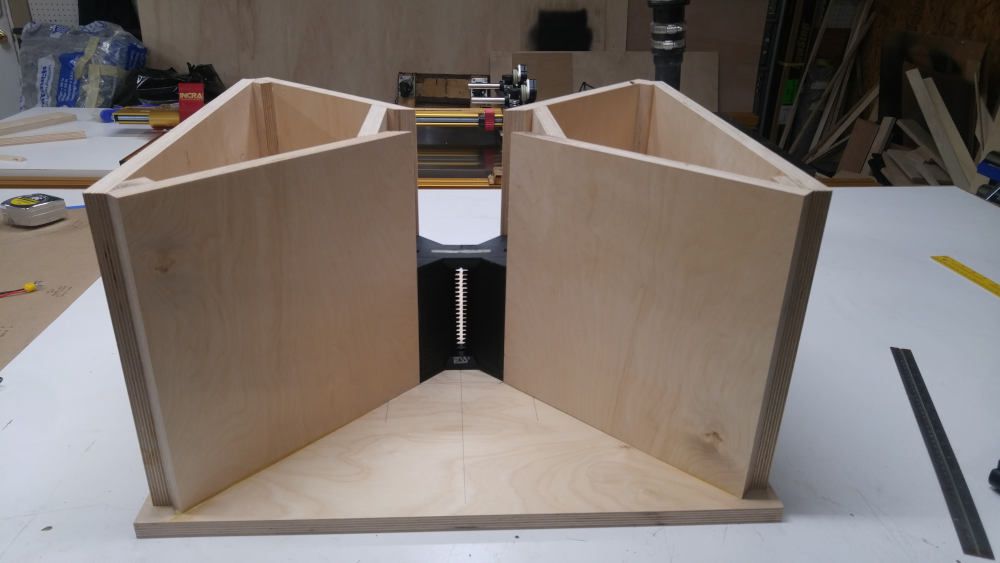
I hope to just use what you see above to take my measurements. I don't think rounded edges and a top would make much, if any, difference in the response. Overall, the base of the structure will be roughly 24"x24"......which is a reasonable size and can be used on top of most speakers we are dealing with. I will post sweeps ASAP. -
Double Stack ESS AMT-1 with Wings--Possible Kit for Heritage
Rudy81 replied to Chris A's topic in Technical/Restorations
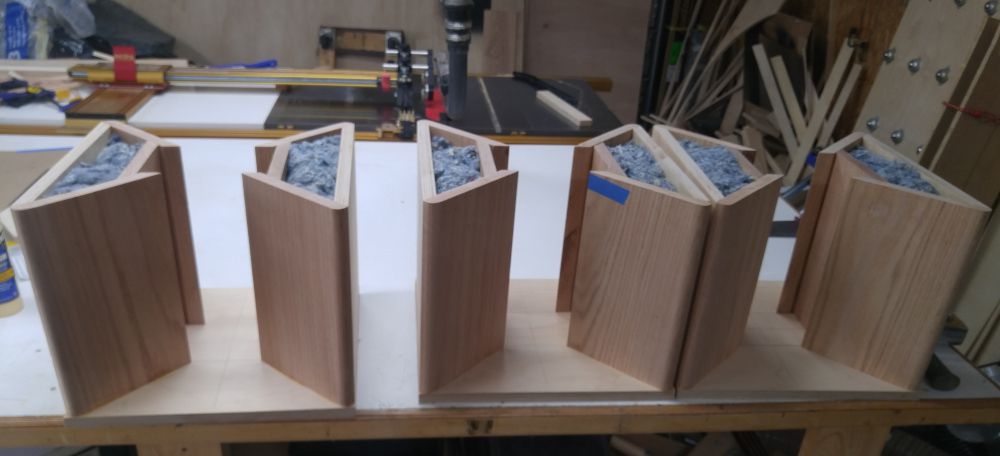
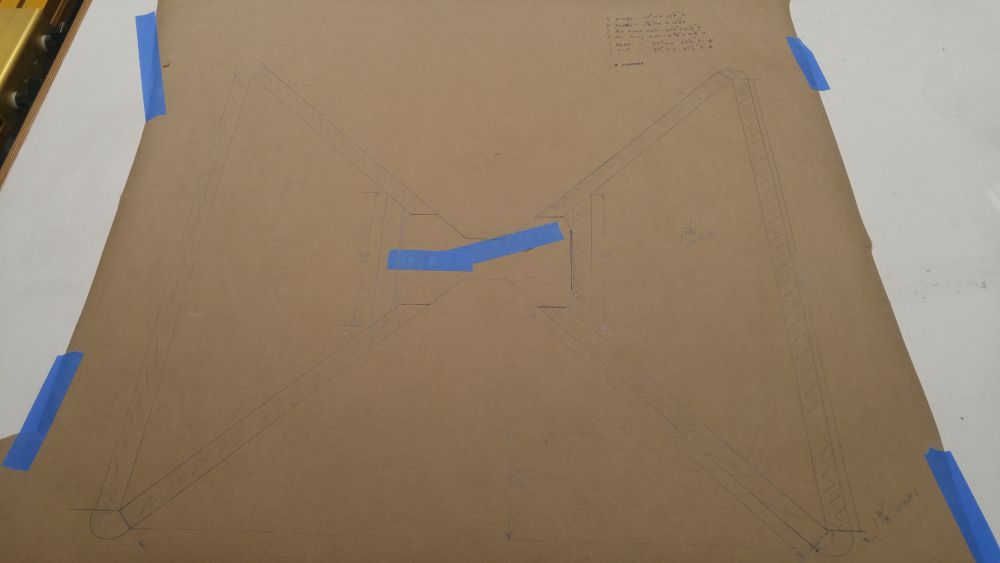
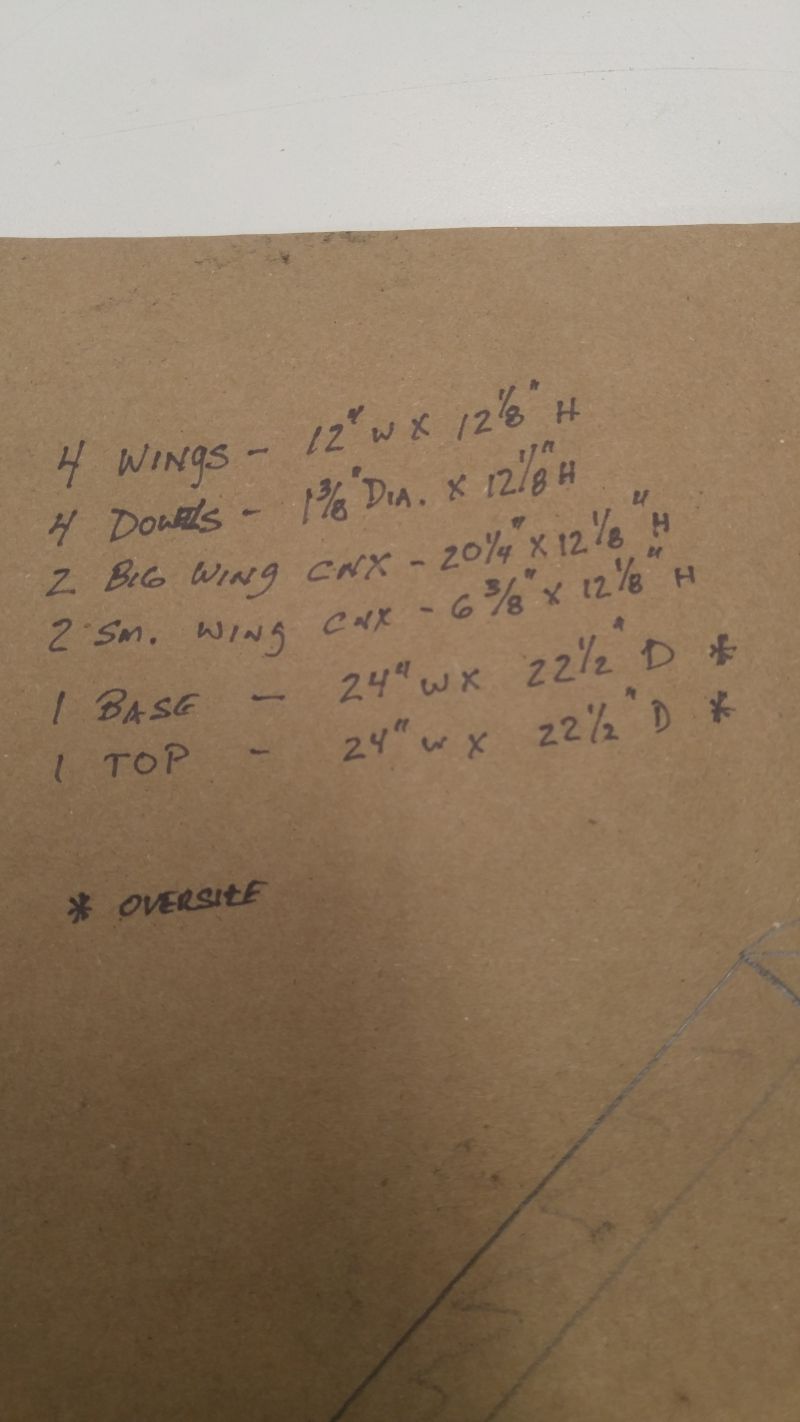
Besides trashing one of my AMTs, I did manage to get some work done. Here is the latest contraption. I am including measurements and drawings in case anyone is interested. Should I get promising SPL and xover point results, I will finish the rounded corners and go from there.
-
Double Stack ESS AMT-1 with Wings--Possible Kit for Heritage
Rudy81 replied to Chris A's topic in Technical/Restorations
Thank you sir, but no. I now have the perfect 'model" while I wait for a new diaphragm to arrive and two extra drivers in case of future issues. Apparently, the wires are soldered with some very precise and exotic process. Soldering irons are totally out. I'm sure if I even got close to the diaphragm with a hot iron, the plastic itself would melt instantly. -
Double Stack ESS AMT-1 with Wings--Possible Kit for Heritage
Rudy81 replied to Chris A's topic in Technical/Restorations
Word to the wise....be VERY, VERY careful when working with the AMT wiring! I just learned an expensive lesson, all self inflicted. I am working a new prototype and was using one of my AMTs to take measurements and setup the new prototype. After my initial measurements, I re-assembled the stack and set it aside. Later, I needed the AMT again for setting up my lumber pieces and I FORGOT that I had re-assembled the stack and attached the wires to the power strip. I pulled the AMT and one of the wires ripped out of the diaphragm. I called ESS and I now realize it is impossible to solder or FIX what I did. What a bummer. I just put in another order for a backup pair since I just trashed one. Painful!