rcarlton
-
Posts
1246 -
Joined
-
Last visited
Content Type
Forums
Events
Gallery
Everything posted by rcarlton
-
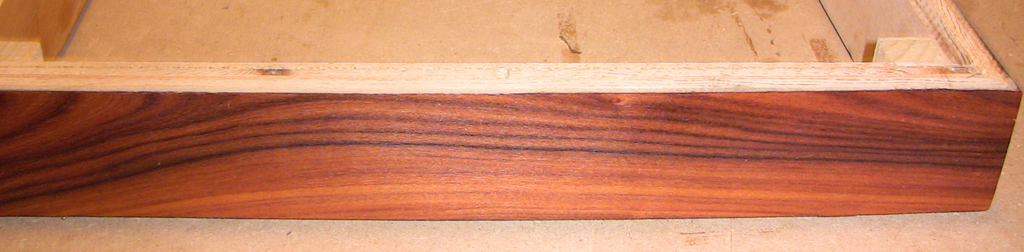
Rosewood seems to be a splintery type of wood so care must be taken with cutting along the grain and against the grain. A nice feature of the glue is it tends to reduce the splintery nature of the wood so we got near perfect edges. As far as basic triming goes, I just flipped the cabinet over on some MDF and carefully cut with the knife. I then used a veneer edge planer and 80 grit sandpaper to true up the edges. The end grain is another matter...we got some splinters along the end grain ~1/32 to 1/64" and about 1/168" thick. I've attached an extreme closeup that illustrates this. The edge is a little proud and has not been final sanded by any means. I sand the edge with a downward stoke at an angle to minimize splintering.

-
Final picture tonight. One surface done. Nine more to go.
-
A quick rub down to see the grain.
-
Close up of the joint. Once the wood cooled and relaxed it became even tighter. The perforated tape was used on some small cracks in the veneer. We taped the other side as a precaution.
-
You can see the buckle the bar forms.
-
More ironing.
-
Ironing the second piece down. Notice the 1/8" bar and tape. Steps in making a tight joint. Iron down veneer piece one. We made a pencil mark on both sides to line the veneer up. Place an 1/8" rod about an inch from the joint. Tape the second piece of veneer to the first piece. Iron up to about 2" of the joint. Remove the rod. Iron toward the joint to make a tightly compressed joint.
-
Ironing the first piece of veneer down.
-
Applying glue to the veneer. Note tape around 3 edges. That serves 2 purposes; holds the veneer down and keeps glue from getting on the other side.
-
Bookmatching the veneer. I do not show shooting the edge of the veneer which is the next step.
-
Using a straight edge to rough cut the veneer.
-
Made some progress tonight. Veneered the bottom. Glueing the bottom.
-
How about his little honey for an inexpensive record cleaner? It can be found at Walgreen's. I use distilled water. It is out of stock because audiophiles have been buying them. Here is a YouTube description of the cleaning process. Another video using this cleaning method.
-
No updates. Want to practice bookmatching some more. Also looking at brush on lacquer as a finish. We have 3 samples that it looks fantastic on. Tung oil has proven to be a little difficult to use on the Rosewood. Doesn't soak in evenly. Still looks great.
-
One more. To be continued. BTW I have a house painter and a doctor going to help me with the rest of the veneering.
-
The title of this thread is Cornwall decorators....so where are they? Starting with the base:
-
Here is the glue I use.
-
Here is what the glue and roller look like.
-
One more.
-
Detail. I see Yosemite Sam in the middle.
-
Greg, Thanks for the kind comments. Next step....I have been using contact cement and wanted to try a different method. I didn't want to go through the expense of making a vacuum bag for Cornwalls. Not sure what type of pump or how big of an air compressor I would need to modify to make that technique work. That left heat bonding with an iron. So I needed another project to work on...which led to a CD case. Simple design ...3 shelves, variable heights, large base, butt joints. Tried Tite Bond from Home Depot, thinned to thick cream consistency...works, but seemed a little finicky...really had to make sure edges and corners were sealed tight. Even had a small bubble. Moved onto some glue from Joe Woodworker I really liked. Better bond heat lock glue. Used a roller to apply the glue.
-
More.
-
Started the groundwork on my Rosewood Decorator Cornwall project. Here is a before picture. Some may remember the Bubinga Heresy project. I will be using a couple of veneering techniques I haven't used before. One is book matching. So I went to work on my MAC1700 cabinet. Walnut Burl...3 coats of Tung oil, 4 coats of rub on clear polyurethane.
-
Grab the McIntosh.......run.......[Y]
-
Yep. Makes you wonder if he used the right values. If the project seems too involved try Terry DeWick. He is one of the most respected McIntosh repairman.