


djk
-
Posts
6342 -
Joined
-
Last visited
-
Days Won
2
Content Type
Forums
Events
Gallery
Posts posted by djk
-
-
" It has been used for many years by manufacturers and techs. "
Good way to damage transistors.
Small signal transistors become noisy after their base-emitter junctions are avalanched (reverse biased).
You can buy an ESR meter on ebay for $20 or so, it's not the value of the cap that's the problem, it's the ESR.
https://www.ebay.com/sch/i.html?_from=R40&_sacat=0&_nkw=ESR+meter&_sop=15
-
"rotate the woofers every ten years is a good idea also gets you inside for a visual. Suspension sag is not a reported problem with the K33 but it is still a good thing to practice rotation. Install fresh electrolytic capacitors some time after 25 years is a good plan and they will see you to the grave and entertain your grand children."
+1
-
ProCore2?

-
 1
1
-
-
Rob Gault
-
Compliance Officer
Company Name Eminence Speaker
Dates Employed Oct 2009 – Present
Employment Duration 8 yrs
Location Eminence, KY
Oversee Compliance with Environmental Regulations at Eminence Speaker
-
Research Scientist I
Company Name Georgia Tech Research Institute
Dates Employed Nov 1982 – May 1985
Employment Duration 2 yrs 7 mos
Location Smyrna, GA
Microwave antenna measurements
Education
-
1
-
The original LaScala was a top-loader design, you removed the top, the mid horn, the woofer hatch, and then you could access the woofer. On a top-loader you only need remove the hatch and add the ported board across the back.
Two 4" diameter by 7" long ports seem to be the best.
An EV Interface A EQ makes the vented LaScala flat to 32hz.
Other versions can be made to work with a change to two resistors per channel.
(also older AudioControl EQ's)
-
http://www.hagtech.com/pdf/bugle2schema.pdf
Passive EQ (between stages) makes record tics and pops almost vanish. Board only $49, whole kit $239.
-
 1
1
-
-
Notes refer to building the bass section of a split LaScala, I built 24 in the late '70s.
*****************************
Cut all 22-1/4" items without moving the fence, box will be square that way(rip oversize and re-saw if need be).
Set the blade to 30*, take your time and get it right. If your blade heels (most do), set the fence to be parallel with the blade. The set on the teeth should just shave the aux fence.
An auxillary fence is used to cut the 60* angle, the board will be fed vertically into the blade. Use the next chamber angle board as a push board, then the ramps, then an absolutely square push board will be needed for the last item.
Cut all ramps in one piece at 60* and 30*, then re-saw to 3" (add for your saw kerf).
A brad nailer is used on the 60* boards to attach to the chamber sides and (later) make the front angle.
I use 8d galvanized casement nails for about everthing else. With skill they can be driven flush without a nailset and leave no mark on the wood.
Lay the chamber sides into a groove on the saw top. Lay the chamber angle sides on top and square up with the table edge. Tack in with two wire brads, then carefully pull appart. Apply glue to the joint, re-assemble, tap the two brads in all the way, and check to see if it is still square. Nail the rest of the joint with brads. Check for square (easier to fix now than later). This is all much easier than it sounds.
Set the T-nuts (I use a c-clamp), make sure they have threads!. Glue and nail the ramps onto the motorboard. Draw lines on the motorboard so your nails will actually hit the ramps. Blunt the point of the nails to avoid splitting. Dry fit. Drive two nails for each ramp, but only a fraction of an inch into the ramp. Mark the order of the ramps on the motor board. Knock apart. Glue. Drive the nails home, add a third nail to each ramp if you like. Use a Surform body file if you need to lose any wood that hangs out past 22-1/4", the points should hang over the 15-1/4" width.
Line up the motorboard assembly with the back and draw nail lines for the ramps. Cut the deflector shorter than 13", it will save a lot of grief. Attach to the back. Are your nail lines going to be visable?
Dry fit the side/angle assembly to the motorboard with a couple of blunted nails. Start all the nails you will use. Glue. Make sure its square. Drive home the nails. Repeat for the other side/angle assembley. Use a small spacer to keep the front angle open while you work. When the whole mess is square, remove spacer and use the brad nailer on the front angle.
If the doghouse is not square at this point, stop and fix it.
Dry fit the chamber bottom to the back with two or three nails, then dry fit the doghouse to the bottom with a couple of nails. Glue on the bottom. Glue on the back. Dry fit the chamber top. Glue on the top.
I use a two-flute panel cutter with a guide bearing to cut the woofer mounting hole in the bottom, use the brad nailer to tack on a guide for the router to follow the front edge of the cut.
-
" 20 solution. This looks to be the only option if you want to go that cheap. :
Don't waste your money (like I did).
-
Paul W. Klipsch launched the Klipschorn loudspeaker in 1946.
It (really) doesn't look much different today.
Need a shot of the backside to guess the age.
-
3
-
-
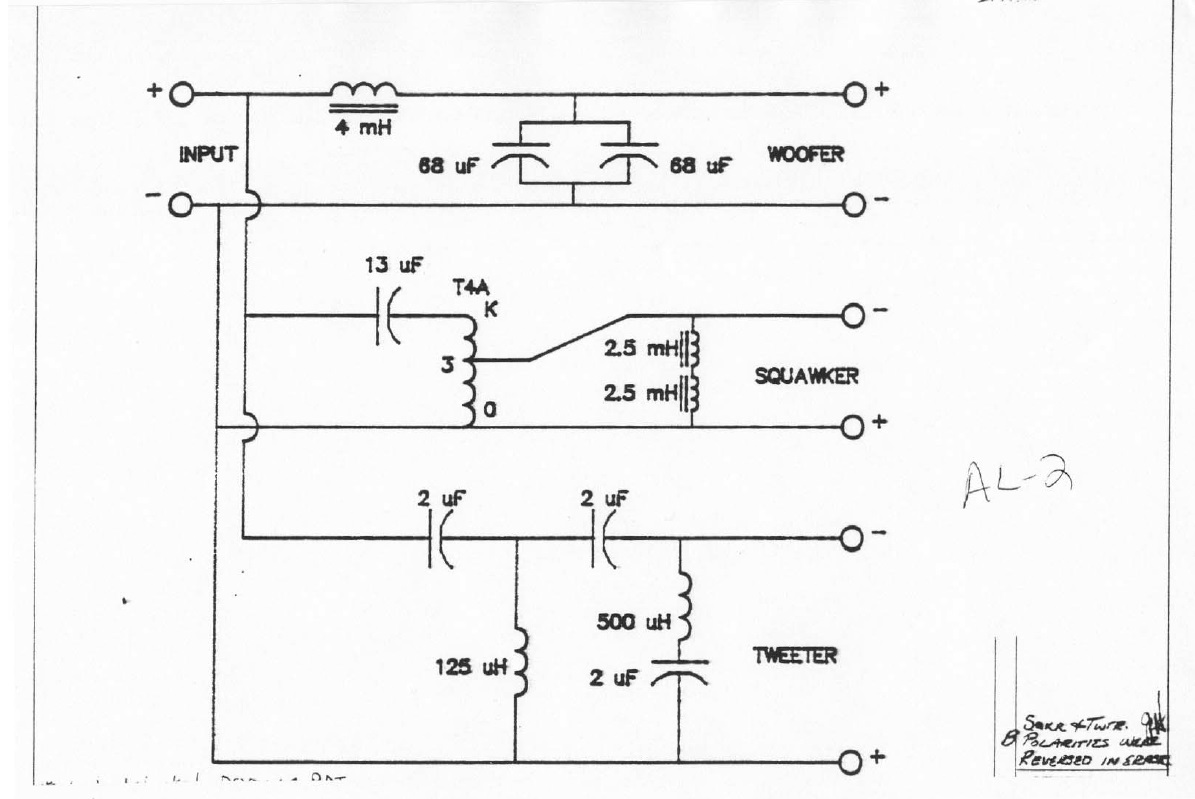
'87 would have an AL variant, did not have zeners.
Check the solder joint where the 125µH runs into the lower 2µF and then runs to the tweeter + connection. When this connection has a cold joint the speaker will keep blowing tweeters like mad.
-
1
-
1
-
-
-
" Here's mine: Mr. Klipsch, your product failed the "Lion Test". You need more base response! LOL! "
Here's mine:
What part of "seldom roar during the day" didn't you understand?
-
1
-
-
-
Use an electronic crossover and add a subwoofer, it will be smaller, and sound much better.
At one time I used a set of four JBL 2231 pro 15's as a sub for HIP's, they laid waste (went lower, played louder, etc) to the Klipschorns they were on top of.
These days a pair of modern 12's (with some power) would do the job.
https://forum.speakerplans.com/cheap-driver-box-combination-to-get-low-and-loud_topic89375.html
-
1
-
-
You need a steep filter to remove all the junk below 30hz from the phono.
Something like this will do:
-
1
-
-
Aside from being about 18dB down at 20Khz, how does the Dayton (actually) sound?
-
1
-
-
Looks like Zinc Chromate?
Common on EV magnet structures (woofers too).
-
Ozone will destroy the rubber parts in your turntables and tape recorders, be careful.
-
" When one breaks, not sure what the next move is. "
3D printer?
-
A rather lame design, I gave mine away.
-
A very small, shallow design with an 8" woofer, a 12" PR with 400 grams of added mass, flat to 30hz.
1974 Electro-Voice interface A
-
" When ever I use my Sansui 5000x I am in hurry to replace it. "
Back in the day I fixed a ton of those.
The original design was such a POS that Sansui offered a completely new design board for replacement (rather than repair).
-
The tinsel leads fail where they are crimped with a ferrule to the voice-coil wire (under the dustcap).
Cut off the dustcap leaving about an 1/8" ridge on the cone. Split the ferrule with a pair of sharp sidecutters. Use your ohmmeter directly on the voice-coil wire. If it measures right, replace the tinsel leads, and dustcap. Wick the solder out of the terminal on the frame, run the new lead through the terminal eyelet, bend it over and then solder it to one of the lugs. Coat the tinsel lead going through the terminal with Weldbond.
The solder must have some silver in it (2% or better). Glue a new dustcap onto the ridge (you left on the cone) with Weldbond.
-
Eminence will only sell custom cone kits to the original customer (Klipsch), in large quantity.
-
2
-


Jubs clones gets top hats
in Technical/Restorations
Posted
So, when is not a Klipsch?
Stephens P52LX2
Stephens 103LX2
EV 15 WK
Klipsch K-33-J
Klipsch K-33P
Klipsch K-33E
WE (Western Electric) 713A
Stephens P15
University SAHF
K-55-V (two versions)
K-51
K-55-M
University MID-T-4401
EV T-35
K-77
K-77M
etc.
During my tenure as an authorized Klipsch dealer I saw even more drivers than this show up from time-to-time.