

bliss53
-
Posts
661 -
Joined
-
Last visited
Content Type
Forums
Events
Gallery
Everything posted by bliss53
-
Here are some current pics of the theater room with a trial of 5 heresies.
-
Thanks for the info. I guess I will pass on purchasing these for a future project. Maybe a nice lascala two way?
-
I typed a long reply and it did not post. I did something wrong. I use a bosch trim router with a flush cut bit. I trace the circle from a motorboard and cut inside the line about 1/8" with a bosch cordless jig saw. The bosch jigsaw blades are the best I have used so far. I use the motorboard or template as a guide for the bearng on the flush cut bit to remove the 1/8''. This method allows the bit a longer life and the cut is easier to control. I have made a template for most of my cuts in case I need them in the future.
-
Net picture of woofers
-
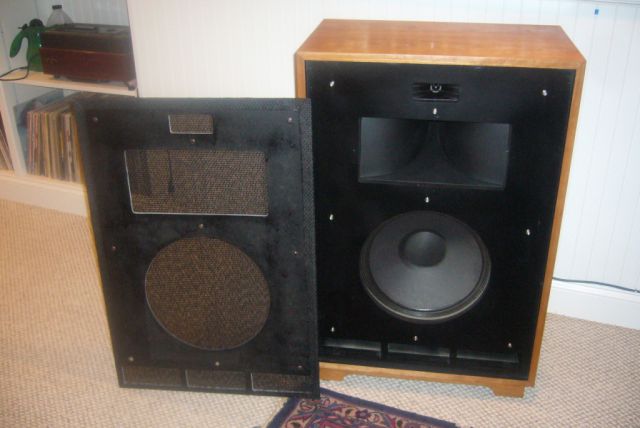
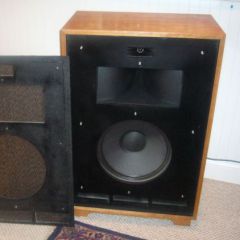
Is anyone familiar with these components? What would they sound like? I have a line on these but I would need crossovers and cabinet plans. Can anyone guide me? See the stock picture from the net. A different seller on the net referred to the horn/drivers as "potato mashers"
-
Here is an example of the grain. I will take some pictures of the actual veneer to night.
-
Maple? Birdseye? Why did you chose maple over Walnut? N I remembered you saying that you liked lighter wood and the maple was actually less than the walnut. It is flat cut veneer not birdseye curly or tiger. LEt me know if this is ok?
-
In process pic three. Need to sharpen the corner and fill a few chips in this one.
-
In process pic two. This area will need a forth coat of filler.
-
In process pic one
-
Before pic two
-
Adding maple veneer to some pretty bad heresy unfinished decorator style cabinets. Has taken a few layers of 2 part wood filler. to replace the missing plywood. Almost ready for veneer. Before pic one.
-
In process pic 2
-
In process pic 1
-
Before pic 3
-
Before pic 2
-
Refinishing some oak cabinets. Some veneer chip repair. Cut holes for gothover horns. Cut down the risers about an 1/8 of an inch to remove the damaged veneer edges, reinstalled the staples and metal feet. Next is the black paint, make grills, and install K72, K57, K33 drivers with a gothover network based on an ALK design with an added tweeter attenuator and adjustable taps. Before pic 1.
-
The TD 124 MKi and MKII are both idler drive tables not direct drive. A belt drives a a stepped wheel that contacts a rubber wheel that in turn contacts the inner rim of the platter.
-
I think we have indicated the same information (after my edit). The bars are printed on the bottom of the platter on a thorens td124, but they are viewed through a small mirror which makes them act like they are printed on the top.
-
See my edit above on the motion of the strobe in my previous post. Too fast and the bars start walking to the left. Too slow and they walk to the right.
-
If I remember correctly, given that you start at the correct speed (strobe bars are stationary), turning the control dial clockwise will increase the speed (stobe bars move to left). Turning the control dial counter clockwise decreases the speed (strobe bars move to the right). Again this is from memory and my memory is not what it used to be. I will confirm tonight. I have noted that on the three tables I have done, the dial will continue to move even though you have reached the maximum adjustment. To gauge the range of adjustment you can feel uner the table for the arm movement. When everything is working as it should I hardly ever adjust my speed. I also run my power though a richard gray conditioner which may help. Edit: I was wrong the first time. I corrected the motion of the bar information above. I had it backwards. Sorry. Hope this helps.
-
One of mine would not adjust. I could only speed it up. I did all sorts of things to try and fix it. I replaced the belt. Cleaned the inside of the platter where the idler wheel drives it. I moved the magnet all over the place. It finally corrected when I rebiult the motor which included resoldering a few connections and removing the suppressor cap. I am waiting for a new cap from switzerland.
-
Building new Cornwall cabinets. MDF or Ply?
bliss53 replied to edeit's topic in Technical/Restorations
Just to clarify, the pocket screws have the advantage of drawing the parts together for good glue contact. When using a nail gun with a but joint I usually have to clamp the pieces to assure that the nails hold the joint tight and in alignment. I am probably to picky. I generally use a nail gun when I am securing rabbit or dado joints because there is some alignment built into the joint and there are more glue surfaces. -
Stain - light Oak Quartet - Would like to darken the color
bliss53 replied to jrader01's topic in Technical/Restorations
You can sand them very carefully with an orbital sander with medium then fine grit. Be especially careful around the edges and corners. Just enough to take off the finish and open up the wood pores. Get some watco walnut danish oil and keep putting on light coats until you get the desired darkness. Let each coat dry for a day or two. Wait for a week after the last coat and then add 2 or 3 very light coats of butchers wax. Buffing after each coat. I am in the middle of this process on a friends cornwalls. -
Building new Cornwall cabinets. MDF or Ply?
bliss53 replied to edeit's topic in Technical/Restorations
In my limited experience MDF sounds a little dead. The plywood produced a livelier sound in the mid bass sounds. I have only compared with Heresies boxes. I liked the standard klipsch plywood box better. On the other hand I have noticed that a center brace in the standard cornwall cabinets tightened up the clarity in the same mid bass tones.