

WakeJunkie
-
Posts
423 -
Joined
-
Last visited
Content Type
Forums
Events
Gallery
Everything posted by WakeJunkie
-
[Really!? Wow... I never figured stone to be good for acoustics. Interesting! It really looks fantastics. I didn't say it was good. The heavy texture of my stone is better than concrete block.
-
I copied this from the "Lets see YOUR Home Theater" tread to get the thoughts from the group following my build. Hey Wake, just a thought but a lot of companies will make panels / fabric with your high resolution photos. You could take photo's of your actual stone and have those images made to order. These would blend in nicely mounted to your stone areas....here's a couple to consider....... http://www.acoustimac.com/acoustic-panels/acousticart-panels/ http://www.atsacoustics.com/art-acoustic-panels.html I have considered doing exatly that with some of my landscape shots I have taken in my travels. Here are a few examples I happen to have on my laptop with me: Honestly I would rather have them made from pics I have taken of my smoking hot wife.....but doubt she wants that.
-
Hey Wake, just a thought but a lot of companies will make panels / fabric with your high resolution photos. You could take photo's of your actual stone and have those images made to order. These would blend in nicely mounted to your stone areas....here's a couple to consider....... http://www.acoustimac.com/acoustic-panels/acousticart-panels/ http://www.atsacoustics.com/art-acoustic-panels.html I have considered doing exatly that with some of my landscape shots I have taken in my travels. Here are a few examples I happen to have on my laptop with me: Honestly I would rather have them made from pics I have taken of my smoking hot wife.....but doubt she wants that.
-
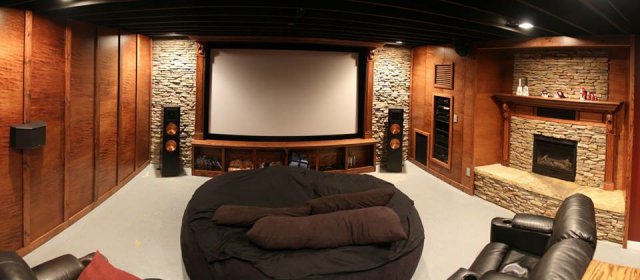
I went from bare concrete and drywall to stone. I would say it is an improvement over the flat wall. I went from a hard flat wall to a hard heavily textured wall that breaks up the reflections better. Honestly the best thing I did for that room acoustically (and comfort) is the giant 8ft memory foam bean bag from http://www.comfysacks.com/comfy-sacks. The high pitch slap echo is the area I saw reduction with the stone. I have the acoustic foam for panels that will be placed primarily around the pool table area and rear wall. I will have to test with the panels near the screen to see if it makes enough difference to bother with. I am concerned about how to build ascetically pleasing panels in a room with this wood/stone feel. I like the look I have built and don't want to screw that up.
-
Thanks guys. I can't wait to finish. SEC football starts Saturday! I ran the new gas line and ran new electrical lines for the Lutron Spacer lighting system. This thing is sweet! 4 zones, 4 scenes all controlled by the Harmony One. I am loving it. I programmed it so when I hit "Pause" or "Stop" the lights all come up to about half. When I press play they go back down. There is a master control by the stairs as you come in and another by the equipment rack. scene 1: Movie scene 2: Bar is lit enough to eat, but lights are down for a movie. scene 3: lights half up (sequenced with pause and stop buttons) scene 4: Football or Xbox party
-
Not complete, but almost there. I still have to put the trim up around the rack and fireplace and build the grate for the return air. I thought I would share my progress. Build Thread: http://community.klipsch.com/forums/t/173169.aspx?PageIndex=12
-
Telling you how little I spent will probably make you sick. I have been scavenging and finding deals for this project for a couple years. I have around $2000 in the remodel. This includes the entire screen wall including screen and masking, all woodwork, rack system, fireplace, stone, cabinets, A/C duct materials, APC UPS 3000 backup, RS-35ii speakers, Harmony One remote, acoustic insulation, and Lutron Spacer lighting system. I even purchased some tools I needed from that same budget, plunge router, and 6" joiner. *Special thanks to Craigslist, Ebay, and Habitat Restore for their support. ;-)
-
I did take off work early one afternoon, that's where the extra time came from. ;-) Thanks
-
Not to bad for a DIY project. BEFORE: (actually during, earliest pic I could find) AFTER:
-
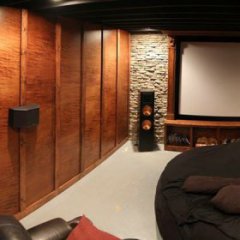
Side speaker above fireplace.
-
$34 so not to bad, but enough I don't want to do it and not keep it. With so many holes in it on a wide dispersion speaker I just wasn't sure. The black by itself may look just fine. I think I will do raised panels on each side of it to match what the cabinet doors will be.
-
Help me out.... I would like some input from you guys about how to do this speaker grill. Above the fireplace stone, below the mantel is a shelf for the RS-35ii for the right side channel. Right now black linen or spandex cloth is what I have in mind, but don't think it will look that great. Dark Red/Maroon is another other option as the pool table felt would match. I will be adding acoustic panels in the room also that would probably make sense to match. Speaker will be behind the black rectangle. Columns will match those surrounding the screen. I was considering ordering something like this to go on the grill cloth so it doesn't look so much like a speaker opening. I realize I am putting something in front of my speaker, but I don't think it would inhibit sound enough to matter on the surround speaker.
-
I'm with you. I love the stone veneer look, but it takes forever to put that puzzle together. I have spent many hours putting that stuff up. Getting the morter right helps, but you still have alot of trying pieces and cutting.
-
At well over 100lb each I had to find a way to cut the pieces for the hearth. This is what I came up with. Took apart my mechanic's creeper and built a wooden T-Square frame on it. Disassembled the tile saw from its original sled. I mounted the tile saw on the side of the table and used the 2x4 as a guide rail. I used a continuous spray from a water hose in addition to the water pump for additional cooling. For a harbor freight tile saw I was asking a lot, but it did the job. I was lucky enough to have a couple great friends help manhandle those big rocks.
-
Thanks. I had a busy day today and made good progress.
-
Just a note about the APC Smart UPS 3000. We had storms tonight and lost power 3 times for while using the HT. System never missed a beat. Short outages but I was pleased to finally not be damaging the bulb. It will handle everything except the Mackie Sub.
-
I never notice light off the pillars. The Epson seems to do a great job of keeping stray light down. The front of the pillars is invisible with the lights down. I have never noticed reflections off the sides of the pillars, but they only stick out a couple inches. The only place the light reflected off the screen is noticeable is off the wood above the screen. From the beanbag the angle is sharp enough it is noticable, but not overly distracting. I considered using velvet on that part, but asthetics of the room won.
-
Thanks for the kind words Dave. I picked up the stone yesterday, but did not have time to do much with it by the time I got back from the stone yard after work. 18" by 36" by 3" thick, and over 100lbs each. I will be getting creative with my 10" tile saw to get these babies cut.
-
Oh, how very very true. Since the remodel the room is getting ALOT more use. It is no longer the creepy basement. My Wife enjoys it with the kids even when I am away which hardly ever happened before. We are much more likely to just hang out down there. The kids wanted to have movie night last night, but I had to say "No, I am working on it." I would love to see someone try to get that 150lb 8ft diameter beanbag out of there in one piece. That would be some feat now that the big hole in the wall is gone. I started putting up the concrete backer last night. Hope to pick up the stone for the hearth today.
-
Finally making progress on the fireplace.
-
There are better routers that will do the same job, but from a cost perspective just add another Linksys WRT54G in the HT. $39 solution. There is already CAT5 running behind the false wall in the HT. A wireless bridge is unnecessary. The 4 port switch(one used as uplink) will give you a wired connection for both the Apple TV and the PS3 as well as a wifi hotspot in the room you want to use the Ipad. To configure: Match SSID, security, and authentication credentials. Put the two routers on different wireless channels. Disable DHCP and NAT on the second router. Change the default IP to an unused IP on the same logical network. Physically connect via the switchports and not the WAN(internet) port.
-
I got my RF3ii's and RC3 for <$400 over six years ago. No blemishes other than a couple grill pegs missing. Can't speak to sound matching. I added RC-35s for sides that match nicely. I have a large theater and they fill it with sound nicley. Very nice speakers. Not an impressive low end, but in your HT you have a sub for that. I got to do a side by side with Youthman's RF83's and it was hard to distiguish one from the other until you turned off the sub. I agree with SuBXeRo. Talk them down around $250 and enjoy some great sound.
-
Will the RF-5's replace the B&W DM 604 S3's?
WakeJunkie replied to Youthman's topic in 2-Channel Home Audio
Love that Cherry. I can't wait to see the reviews. -
Thanks! For my first cabinets I am proud of how they turned out. I still need to build the raised panel doors and get some better pics. I just need to take a tripod in there. The flash ruins the contrast of the stone.
