


wayneair
-
Posts
24 -
Joined
-
Last visited
Content Type
Forums
Events
Gallery
Posts posted by wayneair
-
-
I recently acquired a very nice Forté I set. One of the previous owners removed the labels. Is there a way to date them based on appearance, driver model numbers, the “..completed and inspected” internal label, and/or crossover components?
They’re oak, light green grills, the passive radiator had no sealing medium, and the crossover autotransformer is labeled “T2A-D1”. I understand that T10A autotransformer replaced the T2A at some point. The “completed and inspected” is dated 9-9, 9-10, and 9-11, which I don’t think really helps..
TYIA
-
I’ve scoured the forums for clarification, can’t find pertinent info. If anything, I’m more confused. Previously restored a set of KG 5.2s, replaced the metal domes with new Ti domes, there was no ferrofluid. The 3.5 domes are phenolic/kapton(?) with ferrofluid. I plan on upgrading these with Ti domes. The question is do I leave the ferrofluid, clean out and use new ferrofluid, or clean out and leave it dry? If I leave it or clean and use new fluid, do I need to find an adhesive to seal it? There is currently no adhesive. If I had to choose what to do right now, it’d be a roll of the dice. TYIA
-
Oh man, I feel bad, I’m sorry I didn’t reply after you asked for my thoughts, I thought I would get an email, or I just didn’t see it. You’re probably done by now. For what it’s worth, to be able to easily pick it up, what I do for boards is either put a small foot under each corner and use small washers to level it if need be, or route out an inverse half-round on the edge in the center of the short sides of the base rectangle.
-
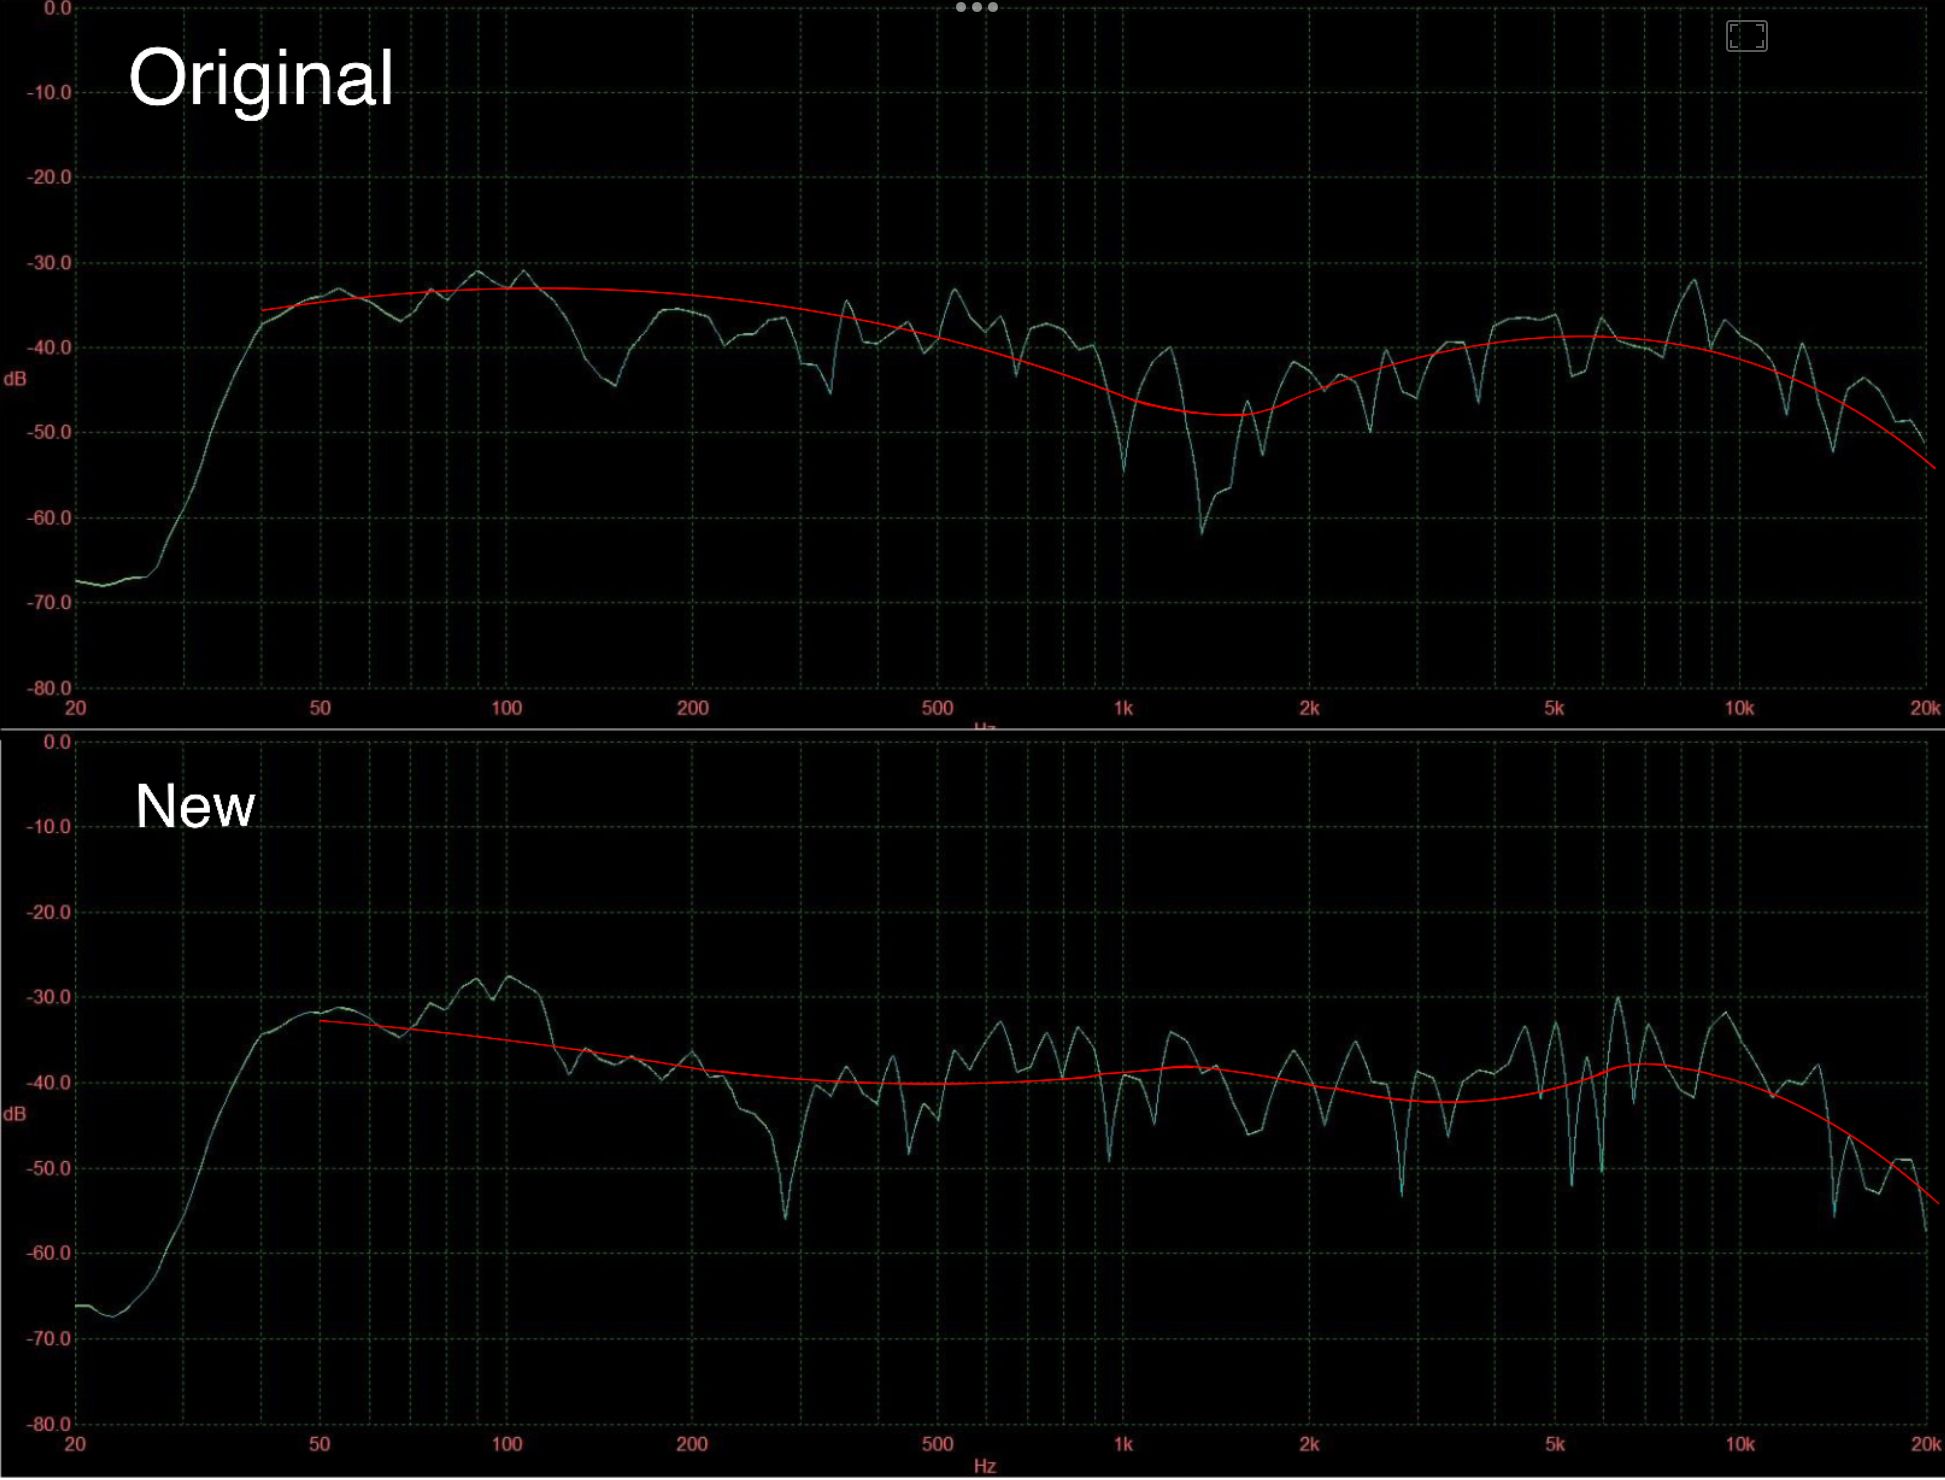
Crossovers finished and installed, new Ti domes installed, frequency response original and new. The audible difference is night and day. Credit to Crites for inspiration for my first go at a project like this.

-
Got a good deal on a R-25C. Installed new Ti domes in the 5.2 horns, just have to finish the new crossovers. I realize there may be a mismatch to you guys that are more experienced listeners, and well, I have to listen to all of my music again. Listening to this system for the first time was almost a religious experience, hearing things I've never heard in songs I've listened to for decades. I feel like I've been lied to for the last 20 years.
-
3 hours ago, wuzzzer said:
For something from that era, if you can find a KV-4 many have said it’s one of the best centers they’ve had.
The only one currently on ebay is $460+82 for shipping. 🤯. I'll definitely keep an eye out for one.
-
20 hours ago, babadono said:
Bose whatevers to KG5.2....enjoy the upgrade

Nice refinishing BTW.
Definitely enjoying it. Like going from a Vespa to a Ducati.
Thank you, I appreciate it.
-
3 minutes ago, wuzzzer said:
How big of a center can you handle?BTW, in my setup I have 5 Heresys. Three across the front and two for surrounds. For anything I throw at it, it’s absolutely the best setup I’ve ever had.
About a 24” x 12” area on the entertainment center, or I’ve ordered a mount that attaches to the TV that allows the center to mount over the screen or suspend it just under the screen.
that’s awesome.
-
2 minutes ago, wuzzzer said:
@wayneair Care to explain the laugh reaction? An exact matching LCR is always the best way to go, period.
Sorry, not meant to be nonchalant or dismissive, just light hearted, as 3 of anything is almost always better than 2.
-
17 hours ago, wuzzzer said:
A third 5.2 would be the best center.
I do not disagree in the slightest, however, space limitations would dictate otherwise..well, “space limitations”, aka the warden…uh..er..I mean..wife.
-
2 hours ago, Marvel said:
Beautiful finishes. Totally earth friendly as well.
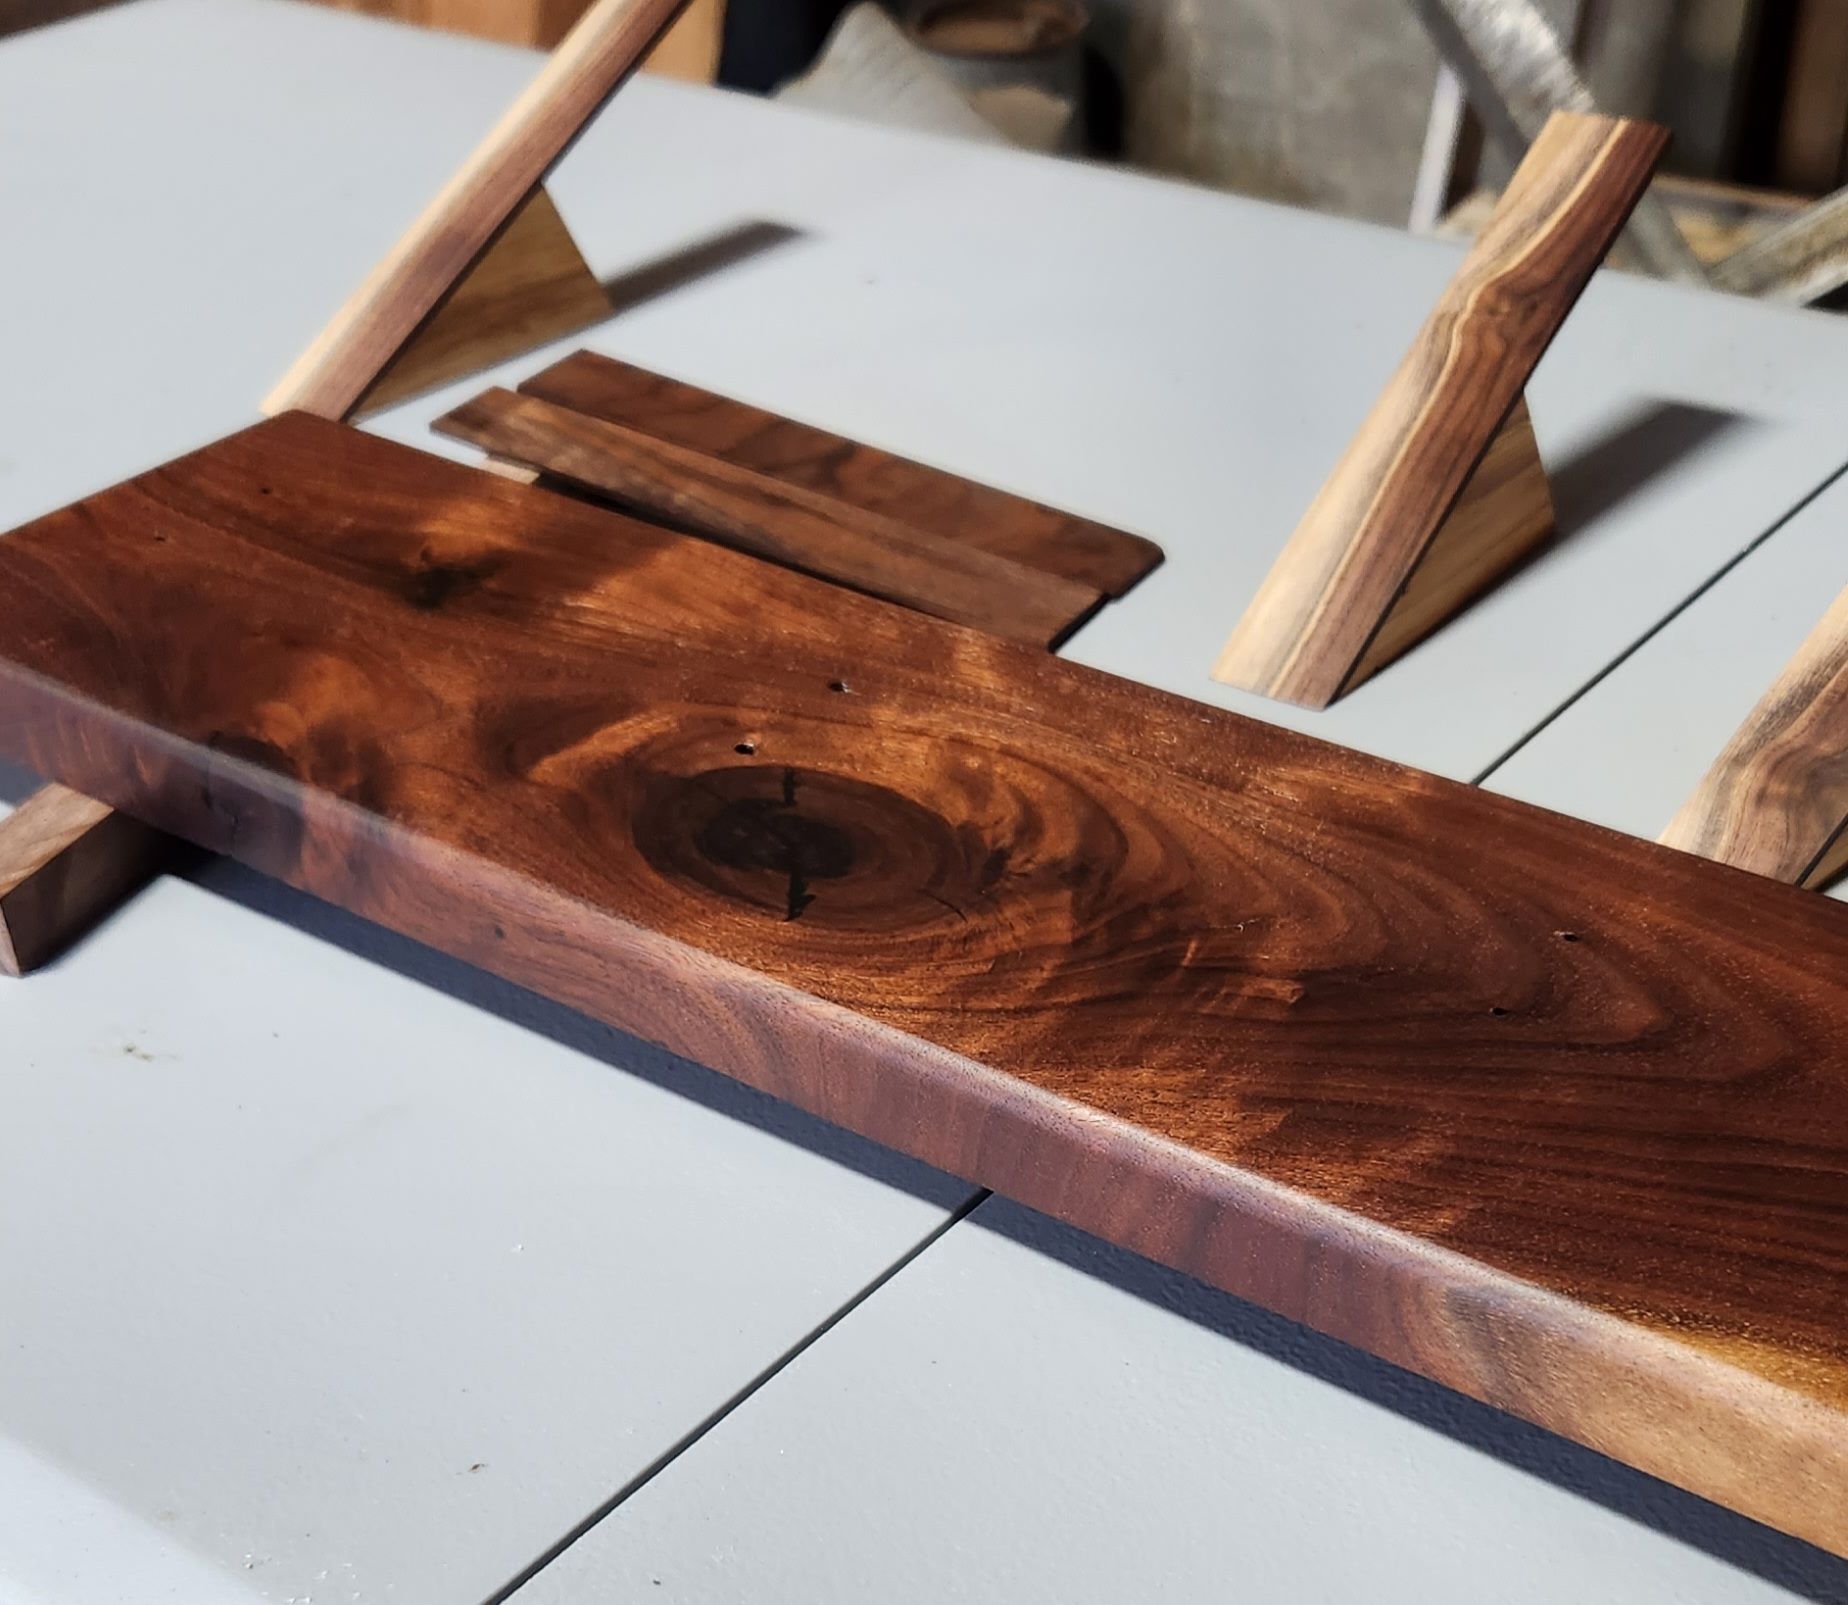
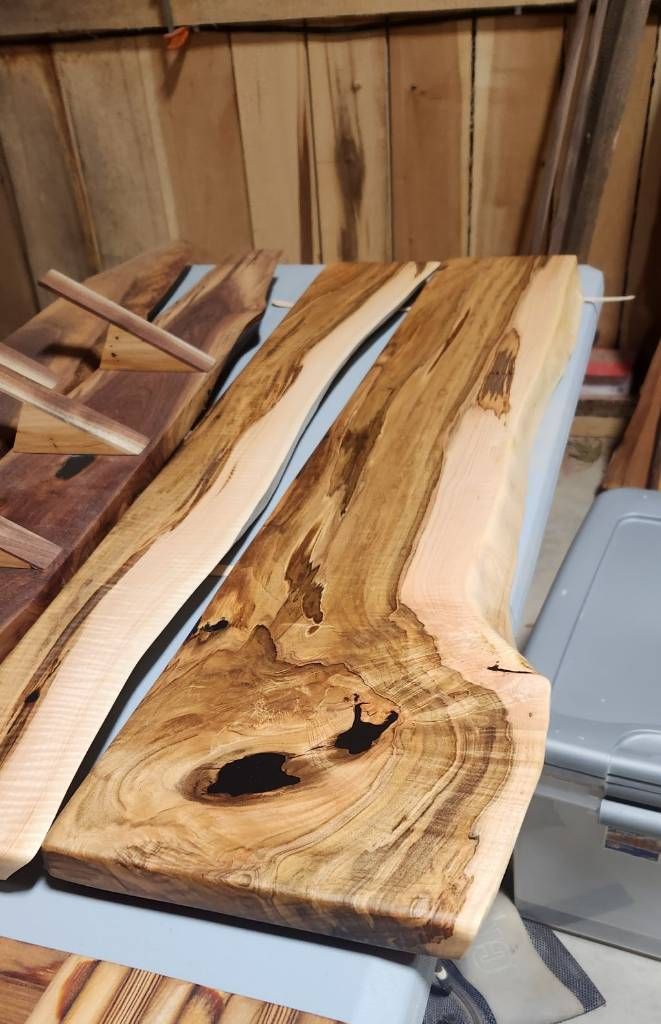
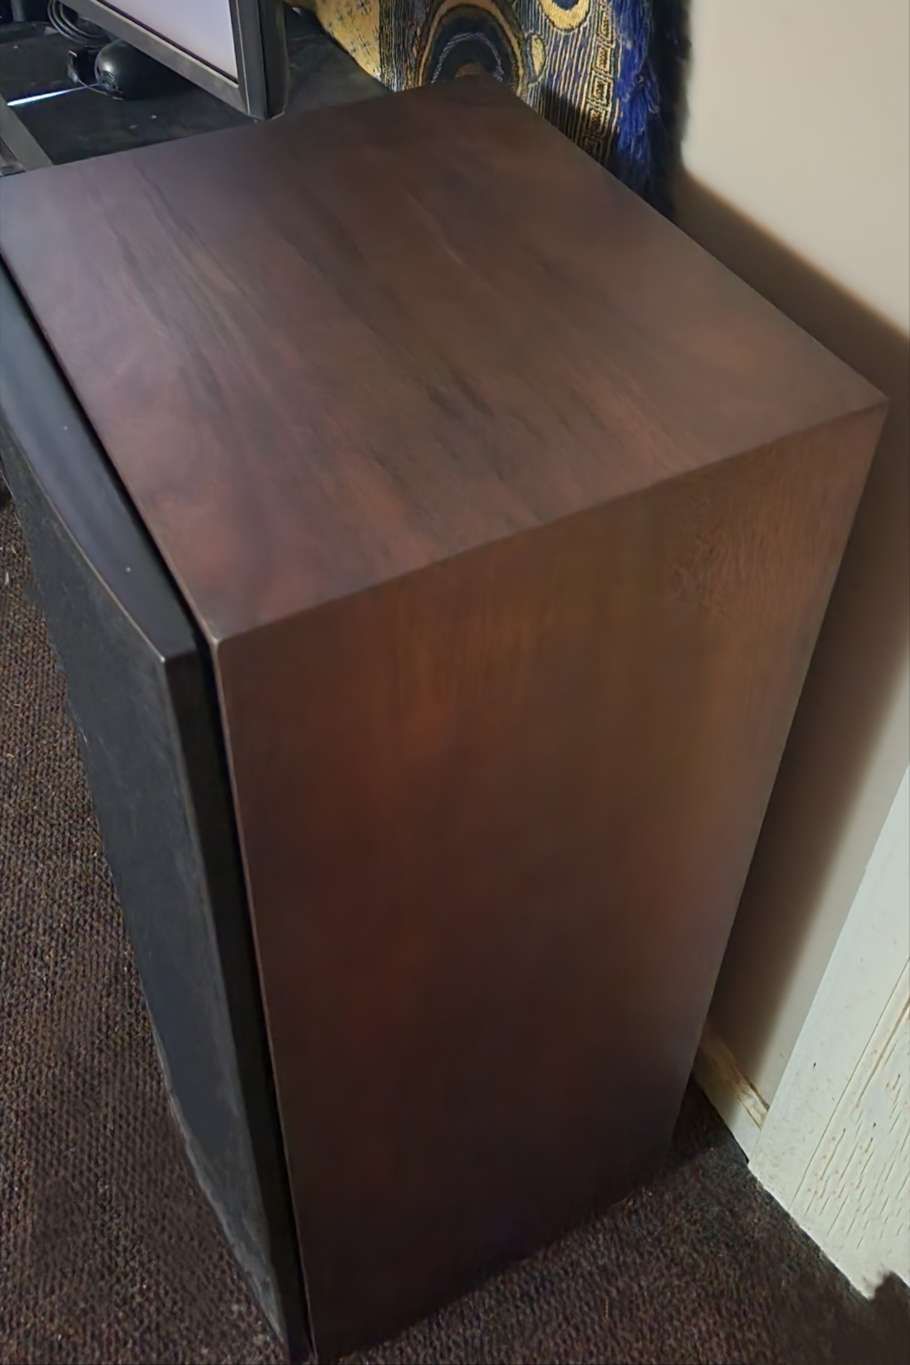
Thanks man. I really appreciate it. Top to bottom: black walnut, burl/curly/ambrosia maple, spalted maple, red oak and black walnut. All cut and milled on the farm where my shop is. All are finished with Rubio Pure (no pigment/tint).
-
 1
1
-
-
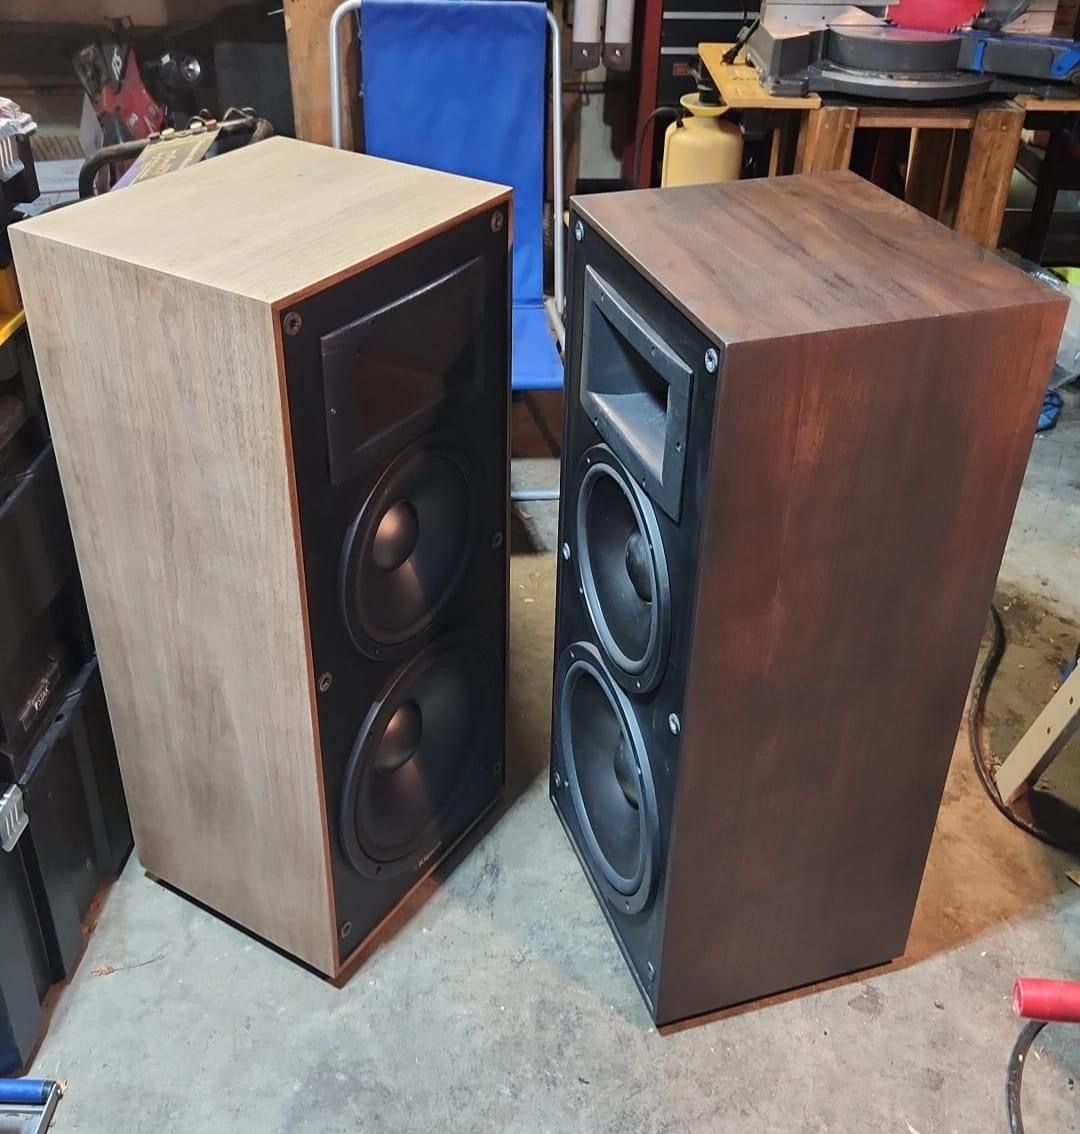
Giving the boot to my 2003 Bose system; I was military, they were cheap at the NEX, and I was young and didn’t know any better. 701 internal amp finally died. Pulled out my father-in-law’s KG 5.2s and KB-15s. Old Yamaha receiver couldn’t push the 5.2s, replaced with Sony low profile due to space restrictions, the only other options I came across were a couple of Marantz offerings that were way out of my budget. And the difference was almost a religious experience. Me: Why tf did I wait so long? Also me to me: I’m sorry, I didn’t know what I didn’t know. 😔.
Current status:
Yamaha HTR-5450 -> Sony STR-DH790
Bose 701 -> KG 5.2
Bose 301 -> KB-15
Bose VCS-10 -> ?
For center channel, should I be looking to acoustically pair the 5.2s with 2.2s, the KB-15 with KC-25/R-25c, or is there another good choice that would tie everything together?
Also, any recommendations for a powered sub to get back to 5.1 would also be appreciated. I’ll eventually get around to utilizing the 7.2 capability of the new receiver, but our living room is relatively not large so it’s not at the top of the list.
-
2 hours ago, OO1 said:
great , but seeing the results , you convinced me never to use Osmo or Rubio
I can only do what the wood will let me do, and pics don't always capture reality. I am 100% certain of what Rubio is capable of, as well as my abilities. Never stated my opinion on what you should use, I merely stated which finishes are appropriate for what based on experience; and why I chose what I used. Don't take my word on it, research it for yourself. There are hundreds if not thousands of YT vids on it. What you use is all on you.
-
1
-
-
21 hours ago, OO1 said:
I was talking of the Trade Secret https://www.tradesecret.ca/scratch-removers-for-wood/ dark bottle for Walnut , it works on raw veneer , it's dark oil
Ok. I read “This is a great way to spruce up all of the finished surfaces…” and “Camouflage scratches in finished furniture…” and. “Hides nicks and scratches on finished wood and veneer surfaces”. I didn’t read anything about raw wood, so I opted to stick with an applicable finish I’m familiar with.
Rubbed oil, especially coconut, finishes typically aren’t as durable or low maintenance as other choices on the market. Fractioned coconut oil is a great food safe finish for kitchen tolls and utensils or as a polish. I like tung oil on darker wood, not fond of the amber tint on lighter woods, also food safe, but drying time between layers is days, making the process weeks. Poly is ok for a lot of applications, but I prefer a penetrating finish over a surface coating. I enjoy shellac if I have the time and patience; doing a French polish puts me kind of a zen-state. Most recently I did a 120+ yr old 64”x44” wormy chestnut dining room table for a client that started out looking more like a pile of firewood. I love shellac friction polish on my woodturning pieces. But shellac can be temperamental as far as maintenance/touch ups go.
Since I have young short humans running around my house, a hardwax oil like Osmo or Rubio makes the most sense and I can accomplish touch ups relatively quickly and easily without moving the speakers, having to worry about little fingerprints, or fumes in the house. If the original finish could’ve been kept intact, I definitely would’ve, I’d much rather maintain than go through the whole process of removing then creating a new finish.
-
2
-
-
20 minutes ago, Iteachstem said:
Nope! Unless you are planning on running thousands of watts to them.... but I'm pretty sure you know what would happen in that case.
Most often durring "normal" listening levels, we only use several watts of power, so no need for larger wire. The main reason people change the wire inside is if they have everything apart anyway, and just want to make it look nicer.... but who really spends a lot of time looking at the insides of their speakers? Or, the other reason is that they think they will hear a difference using larger, more expensive wire. Those are usually the same people that spend thousands of dollars on pucks to keep their very expensive speaker wires off of the ground.
…a pile of ash formerly known as KG 5.2… 🔥
Essentially the point of diminishing returns. Exponential increase in $ to achieve infinitesimally smaller, virtually unnoticeable increases in performance, aka placebo.
-
1
-
 1
1
-
-
5 hours ago, Iteachstem said:
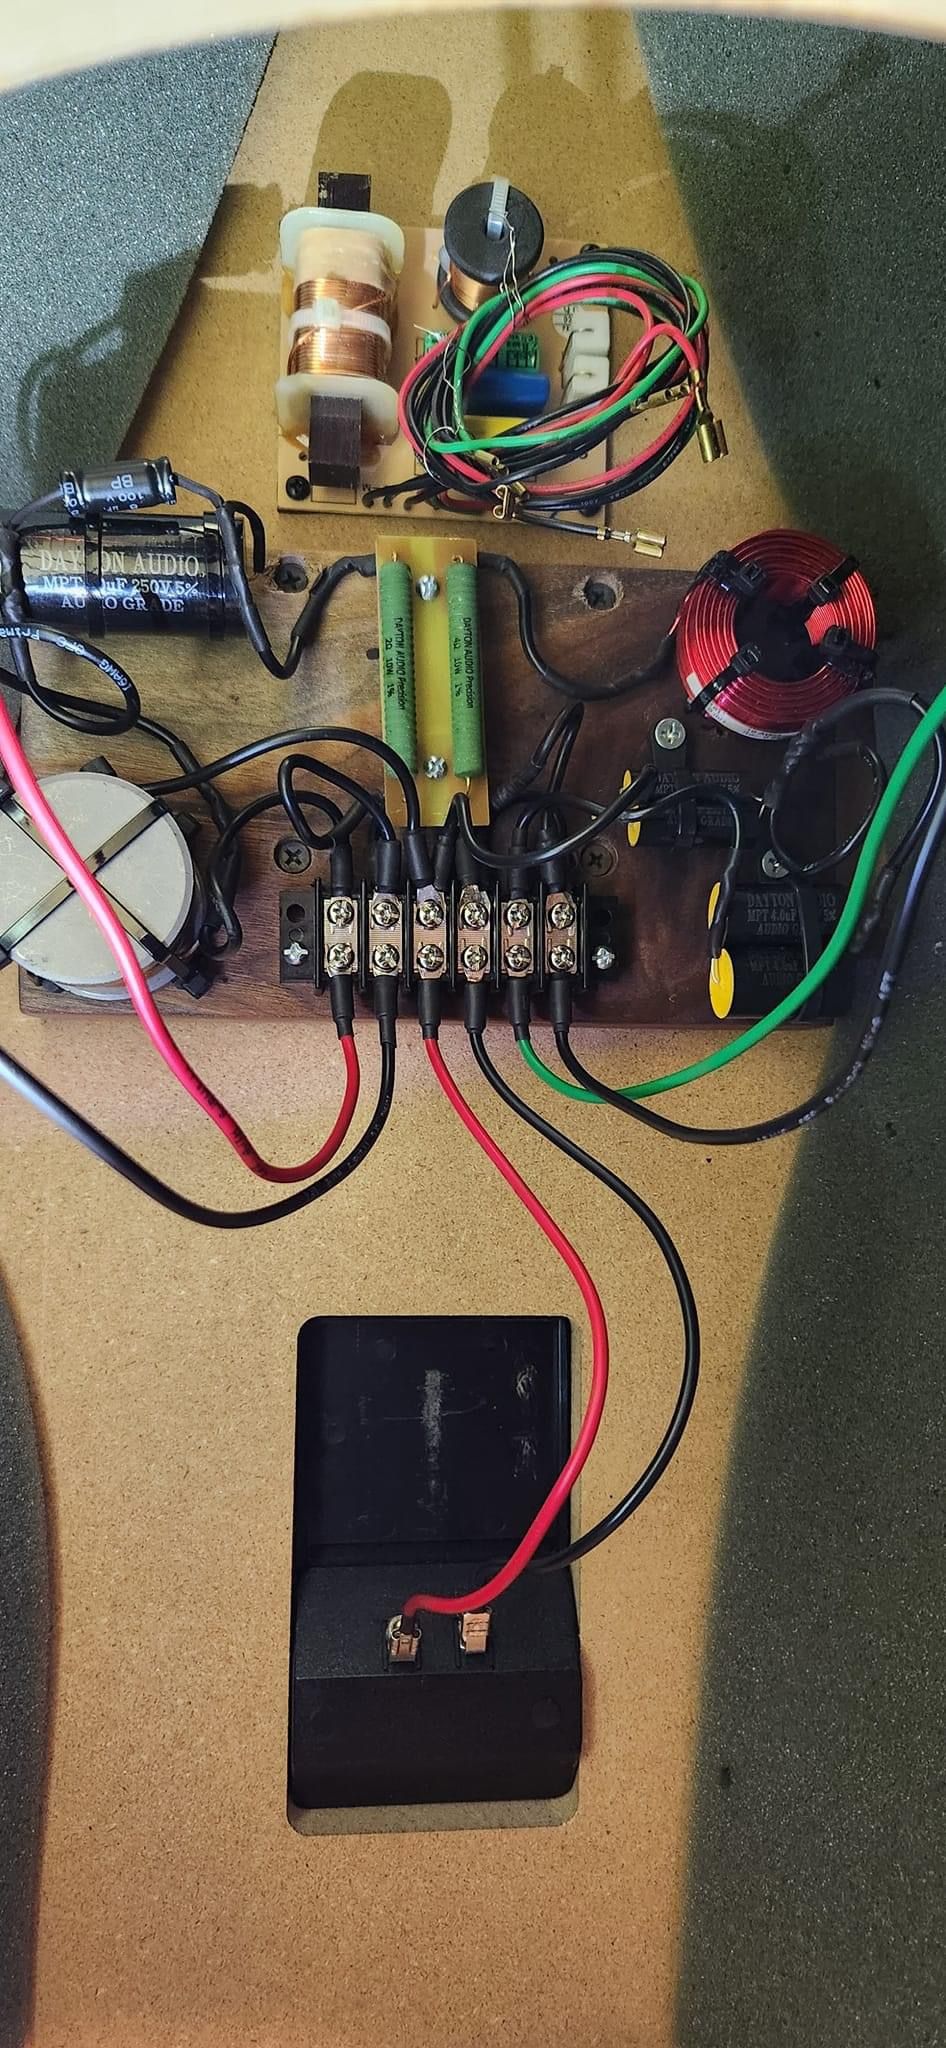
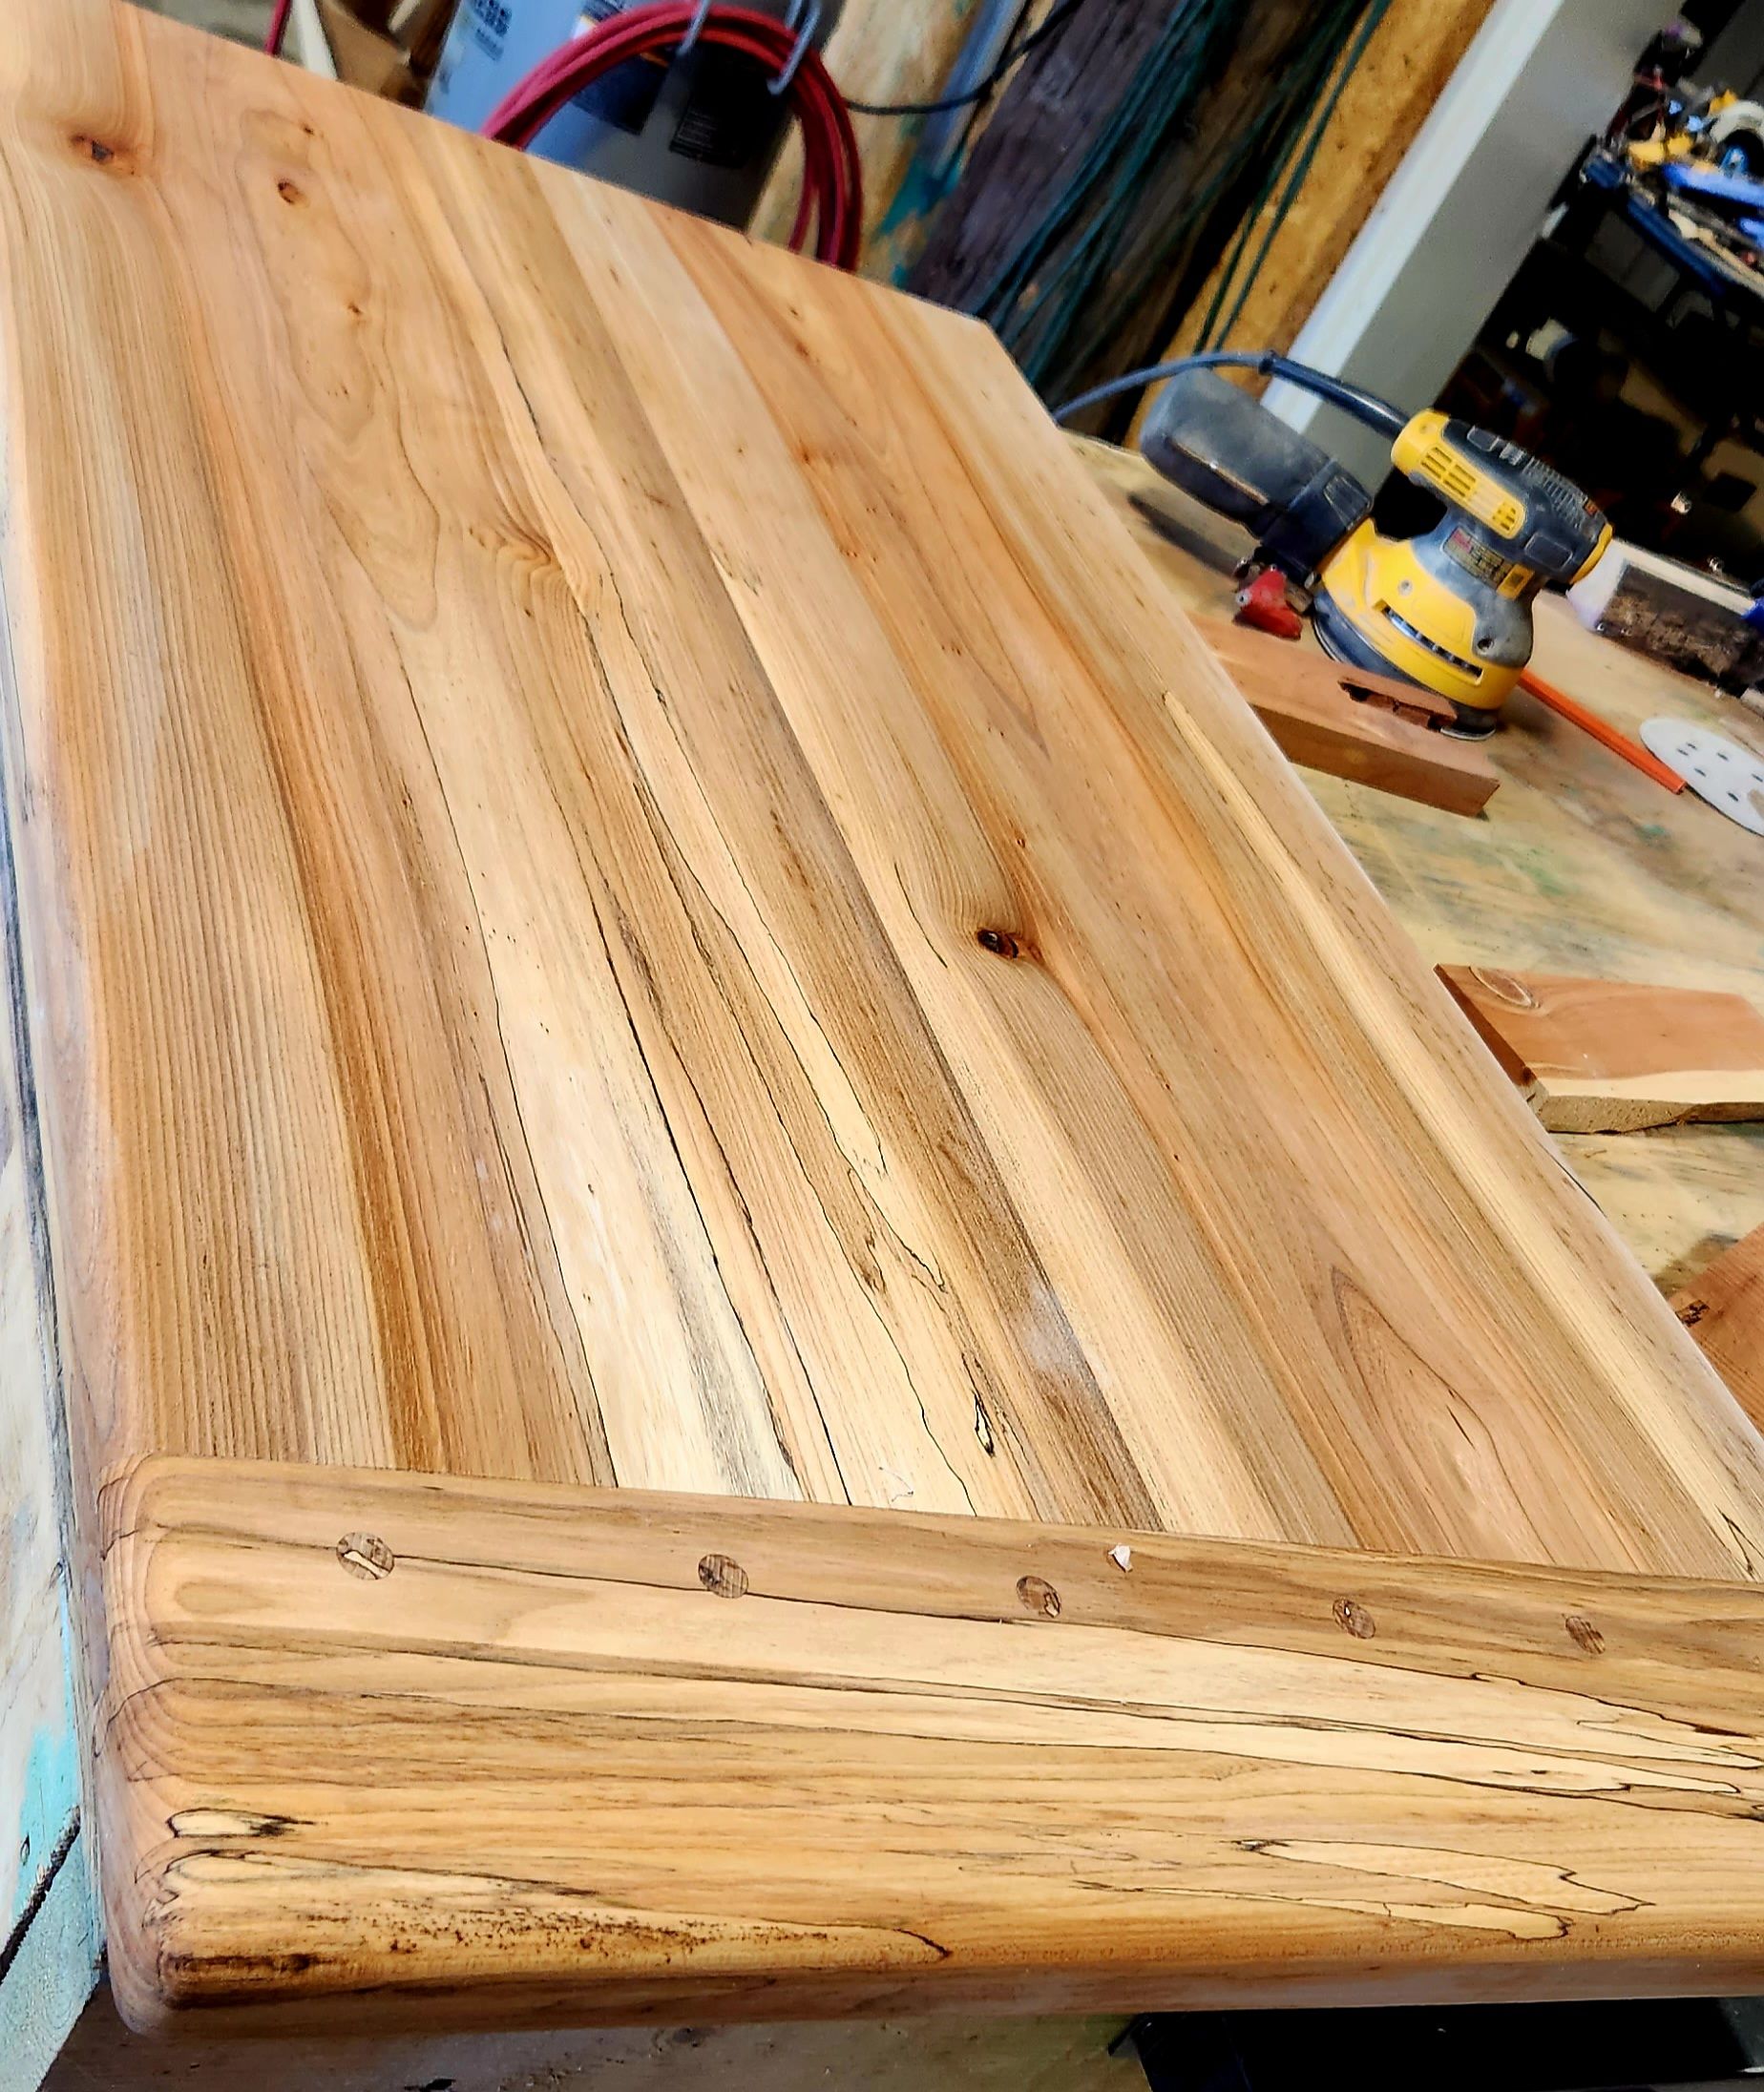
I don't usually mess around with the volume of the dampening materiel that much. Klipsch is pretty good about including sufficient material. If anything, I add just a tiny bit if they didn't have at least 3 sides covered (One side wall, the top or bottom and the back) There is damping material that you can buy, usually at astronomical cost, but I'm guessing you won't get a good return on your investment like you will by updating the crossovers. If you do a lot of woodworking, try throwing in a brace or two connecting the side walls.
There are only two vertical pieces of open cell foam inside in a ‘V’, open towards the front, the full height of the cabinet, about 1.5” thick.
any real advantage in using 14ga wire vs 16ga internally?
-
1 hour ago, OO1 said:
I tried
Trade secret is a polish, not a finish. The original finish was trash, I had no choice but to take them down to bare wood. There was no finish left to polish. Polishing bare wood is temporary at best and offers virtually zero protection. I’ll agree that polish is essential to maintaining a finish, especially with less durable finishes, like natural oils and shellac. I had to apply a finish. Rubio is simple, durable, low maintenance finish; it’s original use was for hardwood floors. I thought I might be cool to do a French polish or ebonize with iron acetate before I did the finish, but I just don’t have the time to do all that. I had literally no reason to not use Rubio. If you’ve tried Rubio and it didn’t turn out right, I’d be more than happy to offer some suggestions.
-
6 hours ago, Iteachstem said:
Nice job!
I'm a big fan of washing the speaker grills. I am finishing up a refinish on a set of KG4's and I'm always amazed at how much dirt I get out when I wash them. I put them in the tub and use laundry detergent and a gentle scrub brush and give them a good wash and rinse. The grill frames are plastic, so you don't have to worry about anything warping.
You can always tinker around with adding side to side bracing inside, but I've never heard any real difference in the actual sound of the speaker, only when you tap on the cabinet with your knuckle.
Thanks man. I 100% agree. These were loaded with dust and mold and God knows what else. I’ve doused them with a fabric/upholstery cleaner and let soak, and rinsed with hot water with a shower wand. I was hesitant to do any agitating because I was afraid of ending up with fuzzy grills. Meguire’s trim restorer worked well to dress up the frames. The cones need some cleaning too but I’m paranoid I’ll do something irreparable. I’ve ordered the components to rebuild the crossovers. The internal deadening foam was in great shape. Is there an advantage to adding more or using a different material?
-
3 hours ago, OO1 said:
@wayneair you can get a much better finish on these speakers if you buy a bottle of ... TRADE SECRET ...dark formula , sold on Amazon
They were in almost decent shape. Had a couple of spots where the veneer was punctured/gouged that I had to use Mohawk Fil-Stik. There were multiple dings, dents, scratches, nicks, staining, and sun bleaching. I was able to blend out the bleaching and completely remove the stains. I didn’t want to use oxalic acid unless I absolutely had to. There are indentations that would’ve looked horrendous if filled with wax, and I couldn’t have sanded enough to get them out, so all I could do was feather them to at least somewhat blend them in. All of the work needed was not realistically achievable, all the work that was able to be done, was done. Some scratch hider and a polish wasn’t gonna do anything for these. I did the best I could do with what I had to work with. I wasn’t trying to create an archival specimen…not like these could’ve been elevated to this level anyway. Rubio is the simplest, most durable, and most easily maintained finish I could’ve done, and leaves a nice smooth matte finish that I actually prefer.
-
2 hours ago, Marvel said:
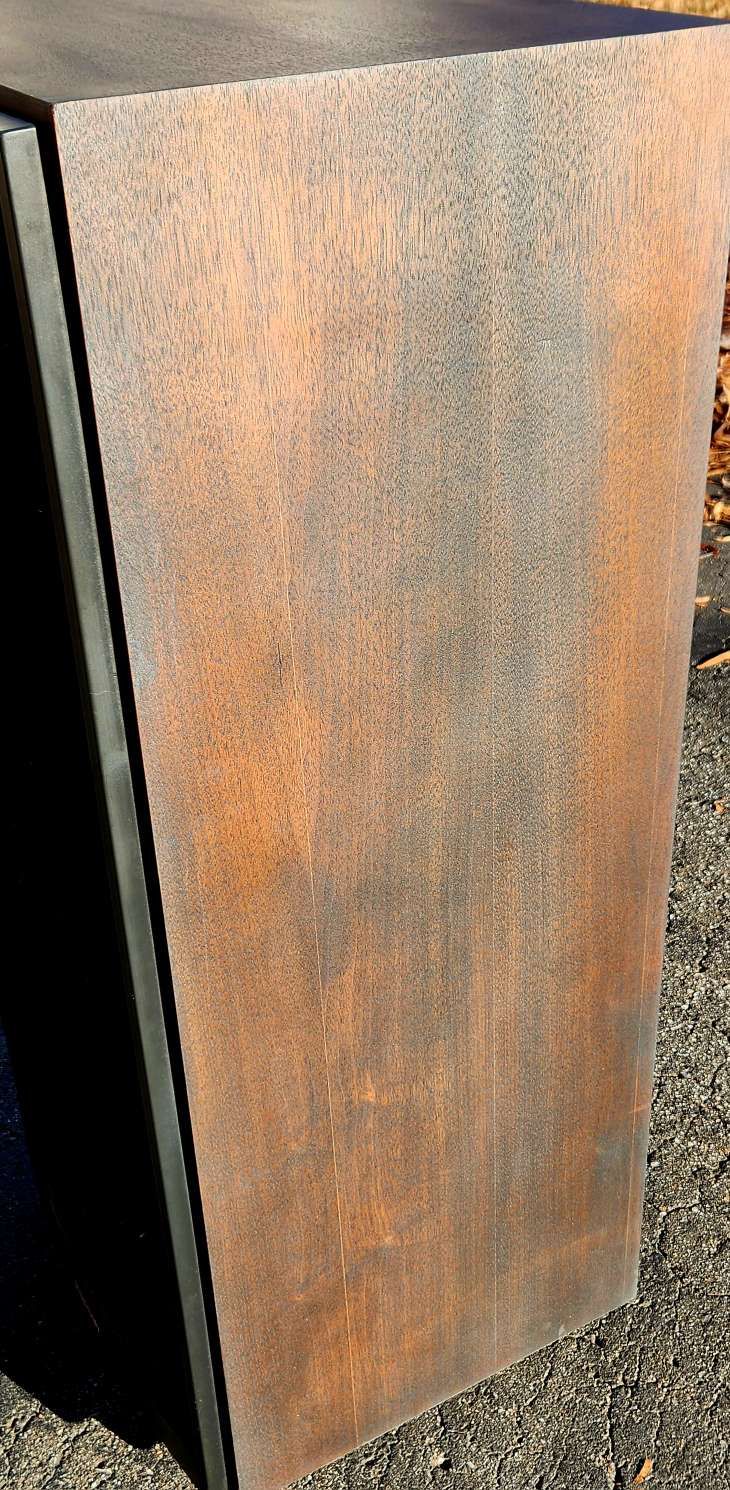
Thanks... there's some interesting grain on those cabinets..
It has some nice figuring. I can’t get a good enough pic with my phone to give a good representation. The way the pores in the denser grain were catching the light wasn’t ideal. It’s hard to catch the shimmer that walnut has when it’s prepped and finished well. It can really stand out when finished with a matte/satin product like Rubio. There’s a glimpse of it in the video.
-
12 hours ago, Marvel said:
If you can get a pic or two in daylight... would love to see them.
1. In it's place
2. Direct sunlight
3&4. Direct sunlight, slightly different angles.
-
1
-
-
57 minutes ago, Marvel said:
Walnut is pretty light. It's being used for a lot of acoustic guitars now and without a darker stain looks really nice. I've been thinking of using the Rubio on some cabinets I have but already have too many projects started and not finished.
Did you just use s single coat?
If you can get a pic or two in daylight... would love to see them.
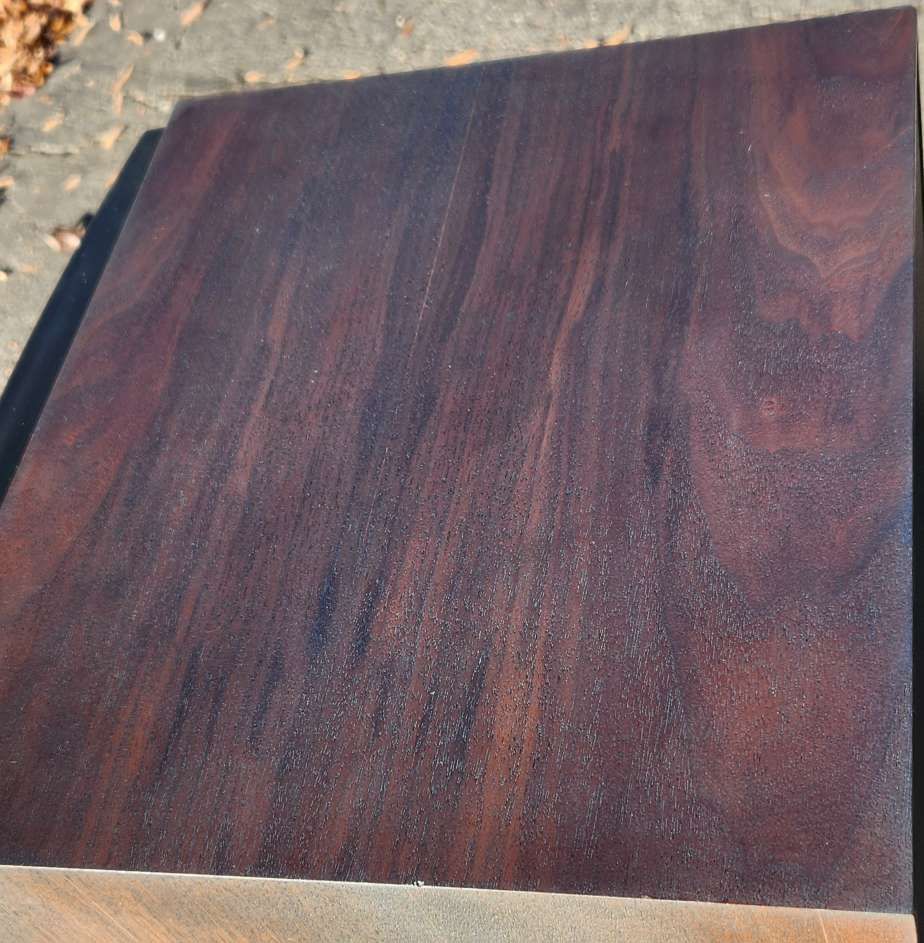
Yeah, walnut can be pretty light, especially when unfinished. This is some of the lightest unfinished I’ve worked with. There are a lot of variables from the individual tree genetics to how long it’s been cut and dried. This is why I try to complete a project with wood from the same tree if at all possible. I’ve cut some green walnut logs that were literally green with very little brown fresh off the sawmill. My dad built the house I grew up in, and was trimmed out with walnut, all cut from family land, and was a deep auburn/brown.
I’m in the planning stage of building a set of 3-way towers and will be using 1” walnut for the top, bottom, and sides; and maple front & back. It’s beneficial that I’ve already got all the wood I need at the shop. That’s after I refurbish the crossovers in these, and repair whatever reveals itself when I open them up. And like you said, too many projects..
I’ve done a bit of experimenting with Rubio colors for various projects. Even had a client request Rubio Emerald for a spalted maple countertop right out of the gate. That one hurt a little bit… What I’ve found is that with Rubio colors on walnut, and due to walnut’s larger pores, the color will show in the pores, not so much across the whole surface. Since Rubio only requires sanding to 120, I’ve found that if sand up to 180 or 220, which closes the pores, I can kinda control the color saturation in the wood. It’s more apparent in woods like walnut and oak, where the color essentially accentuates the grain patterns without taking away from or adding to the natural wood colors and tones, which was my goal here. Being that Rubio is a hardwax oil, it’s still ‘oiled walnut’.
I’ve always used just one coat. I know some will suggest 2 coats, but what I’ve found is that it’ll slightly improve appearance and performance. So 1 coat is more than adequate for most furniture. I would definitely use 2 coats on something like a family dining table for the added durability.
I’m wiring in our new receiver today (my old one couldn’t push these), it’ll be a good chance to set one up for some good pics, as the other is already in place.
-
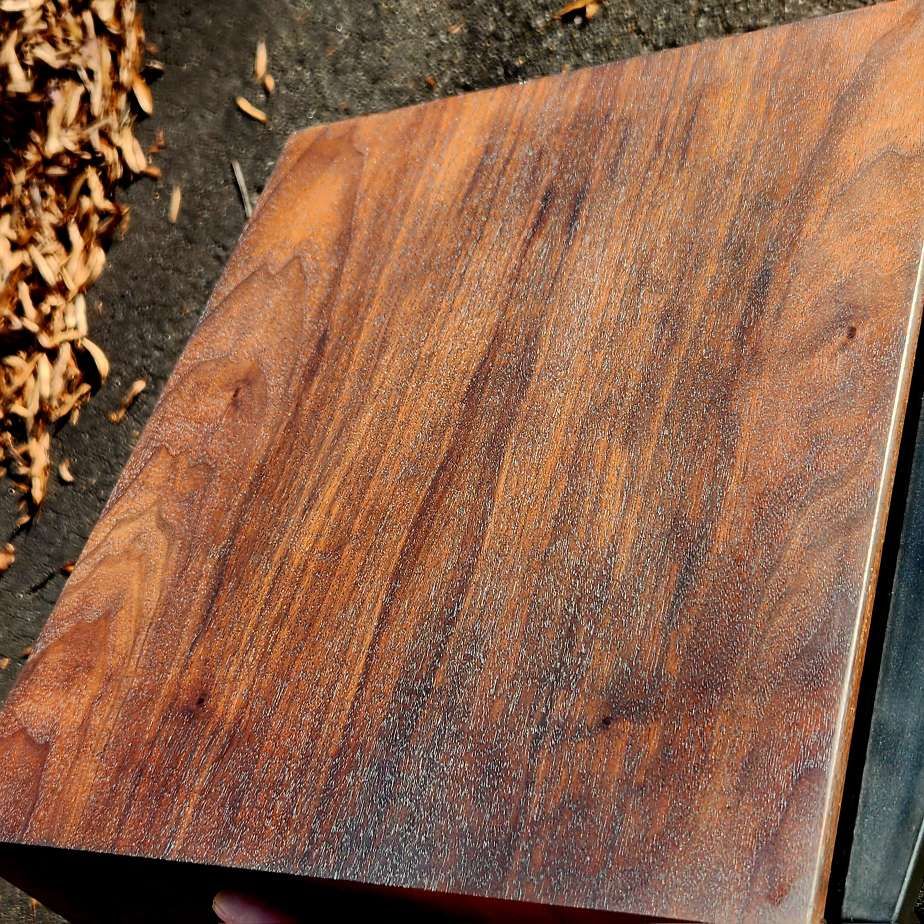
Hi, These were my father-in-law's Klipsch KG 5.2s. They're quite sentimental to my wife as he passed a few years ago. My 20 yr old Bose 701 series IIs’ finally died, and as a woodworker, refinishing these was a no-brainer. They’ll be replacing the 701s in our living room HT system.
They're the oiled walnut veneer, so I took it easy getting them down to fresh wood, removing decades old sun bleaching, scuffs, and water stains. But as I did, I became unsure if they were walnut as they became white. But after applying Rubio Monocoat , the walnut came back to life. Rubio adds a great deal of protection as it was originally designed for hardwood flooring. The pic doesn’t do it justice, as LED lighting is too harsh for capturing true wood tones.
I was going to surprise her with them, but it's kinda impossible to hide two huge 54 lb speakers anywhere in our house. She was in tears.
Now, as far as restoration goes, are there any particular internal components I should address: wiring, soldering, speaker seals, cabinet sealing, etc.?
-
4
-
Identifying Forté I with no label
in Ask the Historian
Posted
Well, looking at the rectangular input cup, I don’t see “8 ohms”, however I do see “1986 KLIPSCH AND ASSOCIATES, INC.” Seems that you’ve inadvertently pointed me in the right direction. Guess that pretty much answers my question. 😆. Many thanks kind sir.