jocko_nc
-
Posts
81 -
Joined
-
Last visited
Content Type
Forums
Events
Gallery
Everything posted by jocko_nc
-
I did this a couple of years back. Still using it today. Like the other posts, I used Heresy components for a good match. The speaker doesn't have much bass, but neither do the mains. http://forums.klipsch.com/forums/t/85987.aspx?PageIndex=1
-
does anyone here build heresy based center channels?
jocko_nc replied to bassetized's topic in Technical/Restorations
Sorry, I have been away from the Klipsch forums for a while. I have been pre-occupied with guitars, guitar cabinets, and vinyl lately. I am, however, feeling the need to dive into Klipsch again. Here is a Heritage center channel project I did about a year ago. The project worked out quite well, I hardly even notice the thing anymore. I have forgotten how unique it is. http://forums.klipsch.com/forums/t/85987.aspx?PageIndex=1jocko -
I'm running a 545 II into 1978 Heresys. No problems here, I do like the fact that 100 WPC will let them crank. jocko
-
Ditto the other posts regarding onboard amps... I recently removed a pair of Dayton internal sub amplifiers and replaced with an external power amp. I, too had problems maintaining the gain setting, as though the control pot had issues. Think about it, how could internal amplification possibly be a good thing? Heat doesn't dissipate. The components are exposed to brutal shock and vibration. You can't adjust it from the front. How is any of that good? I surmise what happened to the pot is that all the vibration wore a spot or otherwise damaged the wiper interface tot he resistor. I've seen it happen on industrial linear pots. ???. You would think the amps could take it, but at some point all that vibration has got to be a bad thing. jocko
-
Would this DIY center speaker kit work with Reference?
jocko_nc replied to Bill H.'s topic in Home Theater
I'm not buying it... Those woofers look el cheapo to me: ???. Thin stamped frame. Cheap magnet assembly. I cannot really tell, but are those foam surrounds? (They may be cloth?). They look like Goldwood to me. Samsung. ???. You can do better. jocko -
Get a pair used, use one as a center, and have a box of spare parts leftover. jocko
-
According to the calculations, here is how it came out. V = 1.95 ft^3 Effective port length is 12.50 in. Tuned to 25Hz. I'm sure it will work, it similar to what I have been using for over a year. Last time it was more like 22Hz. ???. No goofy plate amp stuffed in the back. jocko
-
Here are some more words then...

-
Do I need to put text here in order to post a pic????
-
Getting closer...
-
That's them. Parts Express sells their stuff, too. Note: The PE kits only go to 11.00 inches. ???. I bought another center section and an additional connector from somewhere.
-
There is a claculator at Precision Ports website. I think I recall the taper part does not count. ???. The taper certainly does allow for greater air velocity without disturbance or noise. I can attest to that fact. jocko
-
Internal volume is right at 2.00 ft^3.
-
Each tube will be a tad under 15 inches. Effective length will be a little less, they have a taper.
-
The internal volume was calculated with the last attempt. These enclosures are very close. The drivers came from Parts Express, they list the driver charateristics. The last incarnation worked well, very musical yet powerful. The Daytons subwoofers are great drivers: The Titanic is a monster. The Reference is powerful, yet has much more detail than some Vandersteen 2Ce's that I did a side-by-side. The critical issue for depth is actually the length of the port tubes. For a 21 Hz tune, the overall length was something like 16 inches, if I recall correctly. I had to double up with two 2.00 tubes. Allowing space for them to breathe, the box becomes quite deep. I will take about an inch out of them this time around. I don't suppose it will make a huge difference. Also, last time I lined the enclosures with foam panels and used a good bit of polyfill. I'll do the same this time. ???. jocko
-
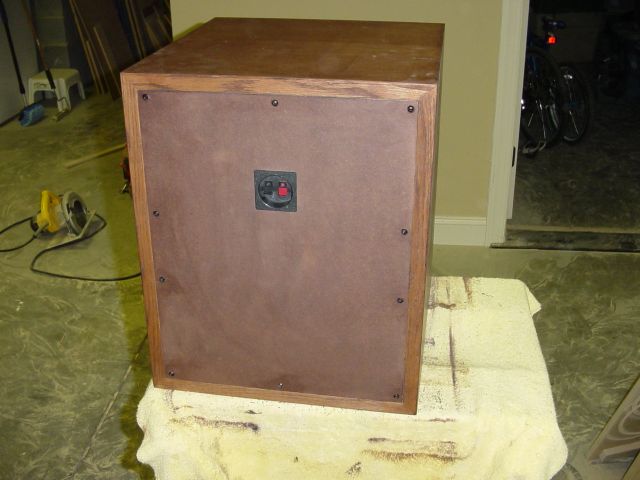
Finished soon... Yes, those are Heresy cabinets holding up the temporary workbench.
-
Yes, am a slob. No, I don't generally clean up as I go. First stain. Found the inevitable glue spots.
-
ok. It has been a few days. Edge veneer...
-
I have been using two for a couple of years now. It is a great way to go. Mine are twins, however. I am re-doing them now. Previously, each had an internal amp. Now I am going to go with an independent 2-channel amp. I will probably run a full-signal pre-out (I hope I have one left) and will run through an equalizer into that amp. That way I get stereo signal and indepentent R and L control. Also, I can easily manage levels. We'll see. jocko
-
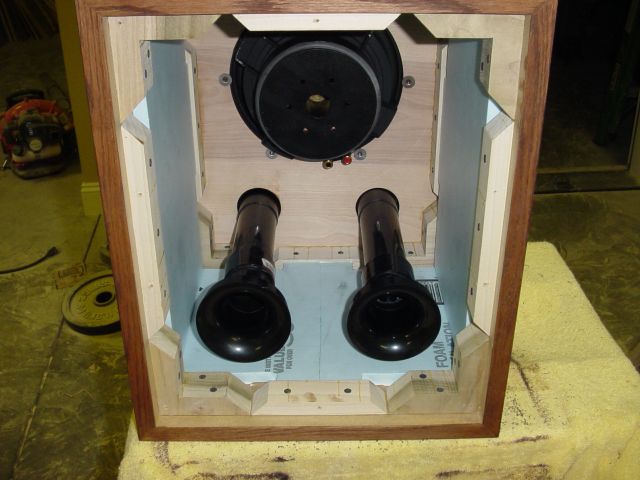
Inside number one. We're just about finished with it.
-
The tapered hole actually looks cool and as thought I meant to make it that way... Another reason to work on the two front baffle pieces independently... It's a Ryobi, but it is a 1/2 inch drill and 18V. Came with extra battery, too. I'd highly recommend for the money.
-
Ryobi... Lower cost but still a decent tool. With the Precision Ports. Another note, I have learned a few things since the last go-around: Tapered and / or odd size holes. I needed a 4.00 hole for the ports, since I trimmed them last time there is not a lot of room. 4.00 needs to be 4.00. I don't have a hole saw at 4.00, they may not even make one that big. Too small for the router jig. I drilled with a saw at 1.75, then widened it with a 3/8 rabbeting bit. Each pass is 3/4 larger. Three passes made 4.00. I kept the tapered cuts, since the precision port is tapered as well.
-
The specs were accurate, a real good fit. Note: Like many, I don't have a proper jig for cutting holes. My router isn't even have a plunge function. I made a jig out of a small scrap of clear plexiglass. The plexiglass mounts to the router replaces the bottom panel of the router. Measure from the cutting tip over to a point on the plexiglass equal to one radius of the hole you want. Drill a small pilot hole there. Drill a similar hole at the center of the baffle. Clamp a third piece of wood to be the support, also with the same hole. Run a nail through the jig, through the baffle, and into the support. Now you can only rotate in a circle. The bit will eat down into the support, just make sure it doesn't go all the way through. When your part is done, the center point is still maintained by the support. Mark the hole on the jig as to what size hole it made. You can walk the router down into the part w/o a plunge function. jocko
-
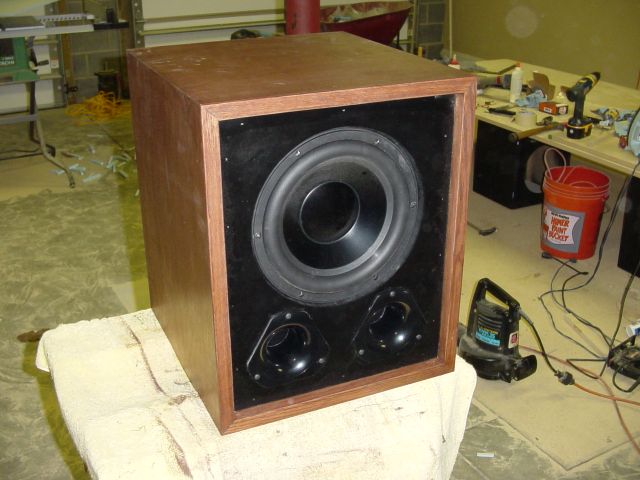
Here is one of the front baffles. MDF up front and birch plywood in the back, better for t-nuts to hold. I learned last time not to mount the driver flush to the front of the baffle. The subwoofer is quite thich and requires a lot of excursion travel, your grille becomes a project unto itself. This time I recessed the driver 3/4 back in to the baffle. Horray for me. Note to anyone building this way: Do not try to cut both panels at the same time. That is a rather length router bit. A jigsaw will NOT turn a corner in material that thick without tapering the cut at an increasing angle. Even is you are making two holes of the same size, do them individually.
-
one more...