cueman Posted March 26, 2005 Share Posted March 26, 2005 So, my newly acquired Industrial La Scala's are nice, but I much prefer the look of the birch cabinets. Woodworking is a hobby of mine and I'm sure I have every tool needed for such a job. The question is, are there plans available for such a project, or should I just try to duplicate what I have now. It seems I would almost have to tear them apart to figure it all out, especially the dog house, which I'd rather not do. Somebody may want these black cabinets when I'm done. But maybe not. They do have an awful smell to them. I think they've been in a smoke filled club for years. In a search I found some posts on some mods someone did with beveled glass tops, but the pictures are long gone. They were old posts. I'd like to maybe do something different and make them unique. Ideas or pointers? Todd Quote Link to comment Share on other sites More sharing options...
djk Posted March 26, 2005 Share Posted March 26, 2005 http://forums.klipsch.com/idealbb/view.asp?topicID=60957&sessionID={A7B93C7C-88BA-47E1-B821-391B06D21DF6} Quote Link to comment Share on other sites More sharing options...
cueman Posted March 26, 2005 Author Share Posted March 26, 2005 Yup, that ought to do it. Thanks !!!! Todd Quote Link to comment Share on other sites More sharing options...
Tony Reed Posted March 26, 2005 Share Posted March 26, 2005 If you decide to dump the industrial cabs, I might be interested. Tony Quote Link to comment Share on other sites More sharing options...
cueman Posted March 26, 2005 Author Share Posted March 26, 2005 I'll post here when I finish new cabinets. These plans look great and it doesn't look too difficult. Looks like some precision cuts are involved though. I'll let you know Tony. Todd Quote Link to comment Share on other sites More sharing options...
Marvel Posted March 26, 2005 Share Posted March 26, 2005 djk posted this before, and it should come in handy: Cut all 22-1/4" items without moving the fence, box will be square that way(rip oversize and re-saw if need be). Set the blade to 30*, take your time and get it right. If your blade heels (most do), set the fence to be parallel with the blade. The set on the teeth should just shave the aux fence. An auxillary fence is used to cut the 60* angle, the board will be fed vertically into the blade. Use the next chamber angle board as a push board, then the ramps, then an absolutely square push board will be needed for the last item. Cut all ramps in one piece at 60* and 30*, then re-saw to 3" (add for your saw kerf). A brad nailer is used on the 60* boards to attach to the chamber sides and (later) make the front angle. I use 8d galvanized casement nails for about everthing else. With skill they can be driven flush without a nailset and leave no mark on the wood. Lay the chamber sides into a grove on the saw top. Lay the chamber angle sides on top and square up with the table edge. Tack in with two wire brads, then carefully pull appart. Apply glue to the joint, re-assemble, tap the two brads in all the way, and check to see if it is still square. Nail the rest of the joint with brads. Check for square (easier to fix now than later). This is all much easier than it sounds. Set the T-nuts (I use a c-clamp), make sure they have threads!. Glue and nail the ramps onto the motorboard. Draw lines on the motorboard so your nails will actually hit the ramps. Blunt the point of the nails to avoid splitting. Dry fit. Drive two nails for each ramp, but only a fraction of an inch into the ramp. Mark the order of the ramps on the motor board. Knock apart. Glue. Drive the nails home, add a third nail to each ramp if you like. Use a Surform body file if you need to loose any wood that hangs out past 22-1/4", the points should hang over the 15-1/4" width. Line up the motorboard assembley with the back and draw nail lines for the ramps. Cut the deflector shorter than 13", it will save a lot of grief. Attach to the back. Are your nail lines going to be visable? Dry fit the side/angle assembley to the motorboard with a couple of blunted nails. Start all the nails you will use. Glue. Make sure its square. Drive home the nails. Repeat for the other side/angle assembley. Use a small spacer to keep the front angle open while you work. When the whole mess is square, remove spacer and use the brad nailer on the front angle. If the doghouse is not square at this point, stop and fix it. Dry fit the chamber bottom to the back with two or three nails, then dry fit the doghouse to the bottom with a couple of nails. Glue on the bottom. Glue on the back. Dry fit the chamber top. Glue on the top. I use a two-flute panel cutter with a guide bearing to cut the woofer mounting hole in the bottom, use the brad nailer to tack on a guide for the router to follow the front edge of the cut. Quote Link to comment Share on other sites More sharing options...
cueman Posted March 26, 2005 Author Share Posted March 26, 2005 Thanks Marvel. I'm off to look at some birch plywood now. I guess I'll start with (2) 4 X 8 sheets. I'll probably make a few mistakes along the way. Hopefully not too many. I'm guessing the sheets will run close to $50 a piece. I'll spend most of my day dusting off and lubing up my equipment. It's been over a year since I made anything. Todd Quote Link to comment Share on other sites More sharing options...
Marvel Posted March 26, 2005 Share Posted March 26, 2005 cueman, You might also want to search for the discussion on proting the bass bin on the LS. You can do it much easier while building a new set than adding it later. Marvel Quote Link to comment Share on other sites More sharing options...
cueman Posted March 26, 2005 Author Share Posted March 26, 2005 Well I commited myself to the project, and have so far hacked up 2 pieces of birch plywood. I'll definitely be buying a 3rd piece. One thing that is different from my Industrial cabinets to the plans is that on the Industrials, the bottom piece countersinks into the base. It has 2-1/2" boards framing the bottom, and the bottom piece fits into that. At this point I can build them either way. What will be the best way to cut the holes into the baffles? This stuff tears up pretty easily. Even with a zero clearance insert in my table saw, I still got a little bit of tearout on the boards when cutting cross grain. Nothing too serious though. I do have a router table if that would help. So far so good. This is going to take me a couple of weeks I think, depending on how hard I go at it. As far as porting the bass bin, what threads I found seemed to have pros and cons, so I think I will just leave them stock, unless someone can convince me otherwise. Thanks, Todd Quote Link to comment Share on other sites More sharing options...
Tony Reed Posted March 26, 2005 Share Posted March 26, 2005 cueman: Do you have any pics of the industrial cabinets you could post? Tony Quote Link to comment Share on other sites More sharing options...
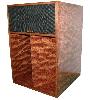
cueman Posted March 26, 2005 Author Share Posted March 26, 2005 Yes, I have 2 pics I just took, keep in mind the cabs will only be available if I am very successful at building the birch cabs. And after spending $150 on birch plywood, I had better be. There is nothing wrong with them really, except like I said they need to be deodorized. I painted them and also spray painted the plastic corner protectors and plastic side protectors. I rolled the cabinets and it came out good, but it is 2 different shades of black. Go figure. There is also a small chip of plastic broken off of one of the speaker terminal boxes on the back. I can send you a pic of that if you want. Todd Quote Link to comment Share on other sites More sharing options...
cueman Posted March 26, 2005 Author Share Posted March 26, 2005 And pic 2 Quote Link to comment Share on other sites More sharing options...
cueman Posted March 26, 2005 Author Share Posted March 26, 2005 Here's the chip. It's not major Quote Link to comment Share on other sites More sharing options...
cueman Posted March 26, 2005 Author Share Posted March 26, 2005 The black paint I used definitely has a green tint to it. I need some info on the deflector as well. Can I glue 2 pieces of the plywood together to make that? Can I get grill cloth somewhere and also klipsch badges? I want to make those as well. Thanks, Todd Quote Link to comment Share on other sites More sharing options...
Daddy Dee Posted March 26, 2005 Share Posted March 26, 2005 Klipsch parts has the LaScala grills available in black with badge attached. The grills have velcro for fastening to the speaker. Quote Link to comment Share on other sites More sharing options...
cueman Posted March 27, 2005 Author Share Posted March 27, 2005 Thanks Daddy Dee. I also noticted in the plans that the point of the dog house comes up flush to the front of the cabinet. On the industrials, it is back a half an inch or so. Anyone have an exact measurement, if there is such a thing? I've also watched the last half a dozen ebay sales, and it looks like the point is definitely not flush to the front on any of them. Just improvise here? I like the look of it back off the front a little better. Thanks, Todd Quote Link to comment Share on other sites More sharing options...
Marvel Posted March 27, 2005 Share Posted March 27, 2005 When you follow the directions and build the "doghouse", just make sure the back side is the correct distance from the rear (3" channel). I've look at different pick on the Klipsch site, and it looks like the point comes to the edge. Maybe 1/4" on some. See the image below: What do you mean by "deflector"? Marvel Quote Link to comment Share on other sites More sharing options...
cueman Posted March 27, 2005 Author Share Posted March 27, 2005 OK that's a good picture. Looks wierd like the side panels are almost flared out at the bottom. The deflector is a piece that looks like it is attached to the inside of the back panel, right in front of the woofer to 'deflect' the lows?? It is just about the same size as the opening for the bass in the motorboard. First thing the sound hits I guess. Look at the 3D drawing in the link provided in the second post. Or look at the PDF file of the plans, it's in there. Funny thing is, I just pulled one of my woofers and I don't have that deflector piece in my cabinets. It is supposed to be right in between the ramps, but I don't have it. Todd Quote Link to comment Share on other sites More sharing options...
Marvel Posted March 27, 2005 Share Posted March 27, 2005 I think most have called it a splitter. You can cut it from a piece of 4x4, trimmed to 3". Then do a couple of 45 degreee cuts on it. Quote Link to comment Share on other sites More sharing options...
cueman Posted March 27, 2005 Author Share Posted March 27, 2005 OK thanks. I just pulled the other woofer. One cabinet had the splitter and one didn't. Strange. Todd Quote Link to comment Share on other sites More sharing options...

Recommended Posts
Join the conversation
You can post now and register later. If you have an account, sign in now to post with your account.
Note: Your post will require moderator approval before it will be visible.