psg Posted September 20, 2010 Author Share Posted September 20, 2010 Ok, first questions: What to buy from parts express? Just the suggested driver and some binding posts? I have regular monoprice 12 AWG speaker wire. Driver: Dayton RSS390 HF-4 http://www.parts-express.com/pe/showdetl.cfm?Partnumber=295-468 Binding posts: Dayton BPA-389G HD Binding post (pair, gold) http://www.parts-express.com/pe/showdetl.cfm?Partnumber=091-1245 Next, placement... The plans say: In most cases you’ll have best results with the cabinet mouth on the floor against one wall, about 18 inches from the adjacent wall. I am confused by this. If the mouth is against a wall, then it is sealed off. That can't be right. Or it is facing a wall, about 18 inches from it? That would fit the look of nyt's HT room pictures... EDIT: Man! If it's 18 inches from the wall, then it sticks out by an astounding 54 inches! It's freaking huge! Quote Link to comment Share on other sites More sharing options...
nyt Posted September 20, 2010 Share Posted September 20, 2010 You can get posts or a panel. I went the panel route, doesn't matter either way. You also need to get some speaker gasket tape for the access panel. 260-542 Speaker Gasketing Tape 1/8" x 1/2" x 50 ft. Roll 260-309 Gold Recessed 5-Way Banana Speaker Terminal Rectangle I angled mine into the corners. You don't have to go a full 18" from the wall, some say it sounds best there, see what works for you. Leave it up against one wall, and face it at the other, or aim it at the corner. Quote Link to comment Share on other sites More sharing options...
jason str Posted September 20, 2010 Share Posted September 20, 2010 You will need an amp for power. T- nuts and bolts for driver installation and access door installation. You may want to add some rubber feet so not to scratch your floors when moving. Hardware store goods: Trim nails to hold your project together while it dries. 2 tubes of PL Premium 18" off the wall is preferred but not necessary, wall or corner loading will add volume but for the most part not necessary. I will suggest some round speaker cable to make your runs easier unless you plan on using the access door for mounting, then it really does not matter. Quote Link to comment Share on other sites More sharing options...
nyt Posted September 20, 2010 Share Posted September 20, 2010 lots of people use the dayton 240 which you can get from PE. I went with something with a bit more headroom and picked up an elemental designs lt500. Quote Link to comment Share on other sites More sharing options...
psg Posted September 21, 2010 Author Share Posted September 21, 2010 Good idea about the recessed banana speaker terminal! These feets look nice: http://www.parts-express.com/pe/showdetl.cfm?Partnumber=248-8786 T-nuts and bolts for the driver: http://www.parts-express.com/pe/showdetl.cfm?Partnumber=260-779 I don't see how the access panel gets attached in the plan. Should I get two of these kits? I thought I wasn't in a hurry for the driver, but i see that you need it early on to put the T-nuts at the correct location. I'd better get my order in ASAP! Shipping to Canada will take longer. Quote Link to comment Share on other sites More sharing options...
nyt Posted September 21, 2010 Share Posted September 21, 2010 The access panel is cut out of one of the sides of the THT. Try to make the cuts as clean as possible, and finish them with a jigsaw. The panel is cut out of the 36x36" side, and the cleaner you make the cut, the cleaner your access panel will be, since the piece being cut out is used as the panel as well. The bracing for it is one of the last steps in the plans iirc, but cutting it out is early on. Quote Link to comment Share on other sites More sharing options...
psg Posted September 21, 2010 Author Share Posted September 21, 2010 I figured the panel would come from another piece of wood. Making the hole will leave a gap at least the size of the saw blade, and how do you start such a hole without drilling a hole big enough to fit a jig-saw? [Read the instructions] A plunge cut! This isn't for novices, is it? So my purchase list is okay? Do I need a second set of T-nuts and bolts for the access panel? I really don't see where the instructions say how it is attached. I wish the plans came with a required parts list. Quote Link to comment Share on other sites More sharing options...
nyt Posted September 21, 2010 Share Posted September 21, 2010 The plunge cut is fairly easy. I'm by no means a woodworker and I didn't run into any issues building the enclosures. For the access panel, I ended up using self tapping metal screws =] I didnt feel like pre-drilling the holes, and using wood scews would have split the edges. http://countercultured.net/pics/ht/tht/build37.jpg http://countercultured.net/pics/ht/tht/build38.jpg http://countercultured.net/pics/ht/tht/build39.jpg Quote Link to comment Share on other sites More sharing options...
psg Posted September 21, 2010 Author Share Posted September 21, 2010 Gotcha. Gonna need a lot of screws so best to do it that way. Thanks! Quote Link to comment Share on other sites More sharing options...
jason str Posted September 21, 2010 Share Posted September 21, 2010 Buy the 50 pack of T nuts and bolts, you will need them for the woofer mounting and the access panel, using self tappers may work OK but if you need to get to the driver for any reason the self tappers will strip out rather quickly making nothing but a headache with noisy leaks robbing you of performance from your new build. Quote Link to comment Share on other sites More sharing options...
nyt Posted September 21, 2010 Share Posted September 21, 2010 Buy the 50 pack of T nuts and bolts, you will need them for the woofer mounting and the access panel, using self tappers may work OK but if you need to get to the driver for any reason the self tappers will strip out rather quickly making nothing but a headache with noisy leaks robbing you of performance from your new build. yeah, gotta be real careful with the self tappers not to overtighten. I used nice long ones and got a good bite without stripping any of em. I really just didnt feel like drilling out holes for that many tnuts, especially since i built two at once, and then having to worry about getting a good gasket seal around the hole as well. Quote Link to comment Share on other sites More sharing options...
psg Posted September 21, 2010 Author Share Posted September 21, 2010 T-nuts and bolts for the driver: http://www.parts-express.com/pe/showdetl.cfm?Partnumber=260-779 Hmm. When i add the woofer to the cart, a popup suggest these instead: http://www.parts-express.com/pe/pshowdetl.cfm?&Partnumber=260-778 Cast Frame 1/4"-20 Speaker Mounting Kit These are bigger, but several people commented that the bold were too thick for thire woofer. Do you remember what size you used? Quote Link to comment Share on other sites More sharing options...
psg Posted September 21, 2010 Author Share Posted September 21, 2010 Cross-posted... Buy the 50 pack of T nuts and bolts, you will need them for the woofer mounting and the access panel, using self tappers may work OK but if you need to get to the driver for any reason the self tappers will strip out rather quickly making nothing but a headache with noisy leaks robbing you of performance from your new build. I see. I dunno, that's a lot of holes to line up! I see the nuts (PN 081-109), but not the matching bolts... Quote Link to comment Share on other sites More sharing options...
jason str Posted September 21, 2010 Share Posted September 21, 2010 I used a different woofer for my build, ask P.E., they may be of more help regarding your driver. Tack your panel with trim nails, do not bang em all the way in for easy removal ( be sure its straight, this will be its final resting place), then drill out your bolt holes. Remove your panel, drill out the holes in the cabinet to fit your T nuts. Install your T nuts and install your panel. You may want to use some washers on the heads of your panel bolts so not to mar up your panel. Nothing to line up if its done properly. [] Quote Link to comment Share on other sites More sharing options...
psg Posted September 21, 2010 Author Share Posted September 21, 2010 I used a different woofer for my build, ask P.E., they may be of more help regarding your driver. Tack your panel with trim nails, do not bang em all the way in for easy removal ( be sure its straight, this will be its final resting place), then drill out your bolt holes. Remove your panel, drill out the holes in the cabinet to fit your T nuts. Install your T nuts and install your panel. You may want to use some washers on the heads of your panel bolts so not to mar up your panel. Nothing to line up if its done properly. Nice! I suppose I can even use a couple of brad nails with low pressure on the compression so they don't go all the way in, to make it easier to pull them out. Of course, big hex bolts may not be appropriate here since they will stick out quite a bit... Quote Link to comment Share on other sites More sharing options...
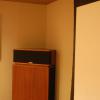
nyt Posted September 21, 2010 Share Posted September 21, 2010 Most people use some kind of self tapping screw it seems, since its just a lot easier. Businses cards work really good to line up the panels with. I ended up painting over the screws I used, let me see if I can get a pic for you. I was going to stain them originally, but ended up painting black since the stain I had wasn't penetrating good, and I had black paint handy. Not the greatest finish work, but its in a dark theater and the panel faces a wall / speaker so its not visible. Quote Link to comment Share on other sites More sharing options...
jason str Posted September 21, 2010 Share Posted September 21, 2010 Just use a plain old hammer & trim nails, 2 or 3 nails hand pounded nails won't kill ya. Most air nailers leave a indentation in your work anyways leaving you more finish work in the long run. If you can't find screws you like from P.E. find something that suits your fancy from your local hardware store & just get the T nuts from P.E. Quote Link to comment Share on other sites More sharing options...
psg Posted September 21, 2010 Author Share Posted September 21, 2010 Yikes! Order all ready and I find out it's $85 shipping to Canada! Now I see I should be buying Dayton parts through Solen in Montreal... Let's see how much they charge for the same driver... Edit: so far so good. The Driver is just a few dollars more and shipping is under $30. It's a lot closer and without customs to clear, so should get here quicker too. I don't see gasket tape on their site though, so I am losing time email them about it. I won't wait more than tomorrow mid-morning before calling them. Quote Link to comment Share on other sites More sharing options...
psg Posted September 21, 2010 Author Share Posted September 21, 2010 Most people use some kind of self tapping screw it seems, since its just a lot easier. Businses cards work really good to line up the panels with. I ended up painting over the screws I used, let me see if I can get a pic for you. I was going to stain them originally, but ended up painting black since the stain I had wasn't penetrating good, and I had black paint handy. Not the greatest finish work, but its in a dark theater and the panel faces a wall / speaker so its not visible. Are those brad nails showing on the outer edges? [] (okay for the hammer and nails!) Quote Link to comment Share on other sites More sharing options...
jason str Posted September 21, 2010 Share Posted September 21, 2010 Most hardware stores will have some kind of material for gasket making. Tape backed insulation will work, cork, construction paper, you get the idea. Glad you found something local. Shipping cost is outrageous sometimes, even here in the good old US of A. Quote Link to comment Share on other sites More sharing options...

Recommended Posts
Join the conversation
You can post now and register later. If you have an account, sign in now to post with your account.
Note: Your post will require moderator approval before it will be visible.