Mike Lindsey Posted January 23, 2006 Share Posted January 23, 2006 I know Craig has been busy lately, and wanted to know if someone can talk me through replacing a couple of cans on my Scott 299. They work perfectly fine, but the reason I want to replace them is so that I can put the case on it, and it won't fit unless I have the regulation size cans on there. Please see the pic and you will know what I mean. I have removed the bottom cover and can tell that this won't be simple. It appears I need to desolder a few things in order to slip the old cans out. It also looks like some resistors (or caps, I can't tell) are attached as well. When I get a chance I will take some pics of this and upload. Any help would be appreciated... Mike Quote Link to comment Share on other sites More sharing options...
3dzapper Posted January 23, 2006 Share Posted January 23, 2006 Mike, It is a good idea to take some pictures of the "business end" of each can you wish to replace for reference. Get two of these and the needed clamps: http://www.partsexpress.com/pe/showdetl.cfm?&DID=7&Partnumber=020-607 Changing them out won't be hard. Rick Quote Link to comment Share on other sites More sharing options...
drewb Posted January 23, 2006 Share Posted January 23, 2006 If I am not mistaken the original can caps in the Scott are 2" high. Parts Express says the diameter is 1 3/8". Looking at the picture it appears the ratio of height to diameter would make them at least 3" tall. This is the problem the poster is trying to solve. It appears as though someone has replaced the original Scott cans with newer (and taller cans). Unfortunately these 2" cans appear to be unobtainium. I have taken to installing radial caps under the chassis to solve the problem. In this case he would want to remove the offending cans. I have found that sink hole plugs from the plumbing department at Home Depot make an acceptable looking hole filler. Quote Link to comment Share on other sites More sharing options...
Mike Lindsey Posted January 23, 2006 Author Share Posted January 23, 2006 They are indeed 2" tall. The 2 offending cans are 3" and 3.5". Mike Quote Link to comment Share on other sites More sharing options...
arfz28 Posted January 23, 2006 Share Posted January 23, 2006 Mike looks like you have a scott 299a second version like mine. Looks like somebody replaced a couple of the factory cans with taller ones. When Craig rebuilt my scott 299a he replaced 3 cans on it, the 2 in the back and the one in the middle up front. He left the 2 up front on the right alone, he said they rarly go bad. Anyway the replacement cans on mine are black ,about factory size and maby a tad bit smaller. They say JJ on them, I think they are a JJ TELSA CANS. They look good and sound very good, they have a tad bit more bass than the factory cans. I have the original cans and they are still good that came out of my 299a, I only replaced them because of reliability reasons, I figured if I am getting the amp rebuilt might as well replace the 40 year old cans.Anyway get ahold of Craig and see where he got the cans. For some reson I think he might have got them from tubesandmore.com, I really cant remember for sure. Wife is gone for a couple of days and took the digital camera or I would post a picture of the cans, will do so wedsday when she gets back. Quote Link to comment Share on other sites More sharing options...
Mike Lindsey Posted January 23, 2006 Author Share Posted January 23, 2006 Thanks for the replies. Craig replaced the large one in the back (3.5") when he went thru mine, as it was the only bad can at the time. I think he didn't want to wait for the proper size can and I told him to go ahead. The other one up front was already there.Mine's a 1960 and I didn't know it was called a 299A, but was sure it wasn't a 299B.Keep the information coming...Mike Quote Link to comment Share on other sites More sharing options...
3dzapper Posted January 24, 2006 Share Posted January 24, 2006 Drew that picture is out of proportion. The height as stated in the Parts Express catalog is 2" (page 121). I have put quite a few of them in Scotts with no problems. Rick Quote Link to comment Share on other sites More sharing options...
Mike Lindsey Posted January 24, 2006 Author Share Posted January 24, 2006 So are the Ruby gold caps what I need then? Would these be better than what I have in there now? Would it be worth replacing all 5 of them for $70? I feel pretty blessed to have bought mine for $75 locally, and had Craig rebuild it for parts cost only and shipping ($113). I have since put some vintage Telefunken 12AX7's ($150) in it, and that made a huge difference. And just this week I purchased a Mullard 5AR4 rectifier for another $70. So I've got about $400 in it but it's the best $400 I have ever spent. I'm still a little worried about tackling this myself, but if I screw it up I can always send it back to Craig to get fixed. Mike Quote Link to comment Share on other sites More sharing options...
NOSValves Posted January 24, 2006 Share Posted January 24, 2006 Mike, If I remember right the cans were already installed in your amp and back then cans were impossible to source for replacment at a reasonable price. You have a couple of options on replacement now but the big problem we have here is your camera sucks[] This is going to make giving a newbie advise very hard. The two rear cans are simple to replace. But the one up front has 4 sections and since it's already replaced were going to need some good pictures to see how it was done to advise how to redo it now. Can you get access to a descent camera to take some under chassis shots? Wish my memory was better but 4 years is a long a$$ time LOL!! Craig Quote Link to comment Share on other sites More sharing options...
PrestonTom Posted January 24, 2006 Share Posted January 24, 2006 Mike, Please be careful!. With all due respect (and I may be misjudging), if you indicated that you were uncertain about distinguishing between resistors from caps. This may not be an appropiate DIY job for you. Capacitors on a power supply can hold a very large charge for a very long time. If you are uncertain about what you are doing, you can get a very large jolt (even if the unit is unplugged, or has been unplugged for a long time). This is no joke. Good luck, -Tom Quote Link to comment Share on other sites More sharing options...
Mike Lindsey Posted January 24, 2006 Author Share Posted January 24, 2006 Hey Craig, You did end up replacing the big can in the rear... I have the email and the invoice (parts cost) to prove it. No big deal to me... I will always be indebted to you. Yes... my camera is from my camcorder and does indeed suck. LOL It does take better pictures in the daytime, however. I will pull the bottom and take some pics. If I can't get any closeups I will try and find a better camera. I'm in agreement, Tom, if it doesn't look like I can do this I'll ship it to Craig. Just so you know, I was teasing about the caps/resistors statement, but it doesn't go much beyond that. I have also done a little soldering in my lifetime, but I'm still not very good at it. LOL Mike Quote Link to comment Share on other sites More sharing options...
drewb Posted January 24, 2006 Share Posted January 24, 2006 Rick, You are correct. They are 2" high in the catalog. I had the pleasure of going to the warehouse when I was in Cincy over the holidays. Good people to deal with with a great selection at good prices. I still believe our newbie may have to do some under-chassis cap installation. If I am not mistaken the Scott has 4 section caps in some locations. 2 of the sections where 25mf-35v for the preamp section. He will need to determine what the big caps are and what needs to be done. As everyone has said better pictures, along with some under-chassis shots would help. Quote Link to comment Share on other sites More sharing options...
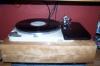
arfz28 Posted January 25, 2006 Share Posted January 25, 2006 Mike here is a picture of my scott 299a with the new cans that Craig put in awhile back. Quote Link to comment Share on other sites More sharing options...
Mike Lindsey Posted January 25, 2006 Author Share Posted January 25, 2006 Very nice and clean! What tubes are you using? I just picked up a vintage Mullard 5AR4/GZ34 (replaces a Sovtek) to go with my Telefunken 12AX7's, and hoping it sounds as good as it looks. Mike Quote Link to comment Share on other sites More sharing options...
arfz28 Posted January 25, 2006 Share Posted January 25, 2006 Mike I run telefunfen 12ax7 in the preamp section, an ampex bugal boy 5ar4, JAN phillips 6u8a phase inverter tubes, and Russian 6n14n-eb (7189) output tubes. I cant tell much difference changing any of the tubes except for the 12ax7, I think this is where most tube rolling will do you the most good. I really never tryed any different output tubes thow because a set of NOS 7189 will run about 100 bucks, too rich for my blood right now. Quote Link to comment Share on other sites More sharing options...
NOSValves Posted January 26, 2006 Share Posted January 26, 2006 Hey Craig, You did end up replacing the big can in the rear... I have the email and the invoice (parts cost) to prove it. No big deal to me... I will always be indebted to you. Mike Ahhh I remember now the local Ma and Pa electronics shop had a few NOS twist locks I bought up and used on a few amps. I'm sure you can handle it if we have some pictures of how the unit is now wired. Just close ups of all three cans in question. The parts will cost about $50 or so. I install them complete plus shipping for $80. The shipping will cost 1/2 of the work is the drawback. Craig PS: I just dug through my old emails and yes I did install one can. I installed the one in the back. The tall one in the front had already been replaced. The reason we didn't order all new custom cans (only thing avaiable at the time) was to make the amp case freindly would of meant buying two at $55 or so plus shipping. You replied that you already had $250 total in the amp so you thought it not advisable to spend more LOL!! Now these amps go for $450 to $700 in rebuilt state. Man those were the days weren't they!! Quote Link to comment Share on other sites More sharing options...
Mike Lindsey Posted January 26, 2006 Author Share Posted January 26, 2006 Thanks for replying guys. Here will be 2 pics of the one in the front, and then just one of the back (taller) can that you replaced previously. Again, these were taken from my camcorder so be kind. :-) Quote Link to comment Share on other sites More sharing options...
Mike Lindsey Posted January 26, 2006 Author Share Posted January 26, 2006 Pic 2 Quote Link to comment Share on other sites More sharing options...
Mike Lindsey Posted January 26, 2006 Author Share Posted January 26, 2006 The tall one in the back... Quote Link to comment Share on other sites More sharing options...
NOSValves Posted January 26, 2006 Share Posted January 26, 2006 Mike, Okay good photo's. If I was you I would replace all 3 cans though. The one original remaining in the back after all is 45+ years old. The two in the back are simple you just disconnect all connections to the outer tabs which is ground which will reattached to the new single ground connection on the new cans. The other two connection to the center tabs are the actual B+ connections which the new cans will have two new connections marked with a +. As far as can removal you need a 1/8 drill bit to drill out the rivets do this from the bottom side. You will also need 6 machine screws and nuts to mount the new cans. The can up front is a little more complicated. if you look at the photo you will see two connections that have small 1.5k resistors running from the positive tab directly to ground, These two positive tabs also have a wire that runs over and connects to a pin 8 of the two tone control/preamp 12AX7 tubes. When changing this can you will replace these two sections that are low voltage with small axial lead 25uF @ 50V electrolytes and bypass these caps with 1.5K 1/2 watt resistors. Then you simply solder the positive end of the cap to pin 8 and the negative to the nearest good ground connection. Now you replace the other sections just like above making sure all connections are attached as original. The pictures will give you a perfect reference if you get confused. The best bet in this case is to do one can at a time then fire up the amp and see if it still works. This way if you goof up you will narrow done the source of your problem. Parts list www.tubesandmore.com 3- C-EC50-50-500 JJ Telsa clamp mount cans 3- S-H122 clamps for above cans 2- C-SA25-50 Sprague Atom electrolytes 2- R-A1D5K resistors If you want a easier and original looking way to do this it is possible but cost more. Your can buy 3 - C-EC20X4-475 these are identical to original but have 4 sections to each on the back two just solder two/two sections together to make them efectively two section cans and reattach the same as oringal. The front can just reattach as original. When using these you have to save the wafer football mounting device so you have to just simply use your needle nose pliers and bend the 4 outer tabs back and forth until the snap to remove the old can from the wafer then slide the new can in and twist the tabs hence the name "twist lock can". Now looking at it do you think you can handle it? Quote Link to comment Share on other sites More sharing options...

Recommended Posts
Join the conversation
You can post now and register later. If you have an account, sign in now to post with your account.
Note: Your post will require moderator approval before it will be visible.