RoboKlipsch
-
Posts
1333 -
Joined
-
Last visited
Content Type
Forums
Events
Gallery
Everything posted by RoboKlipsch
-
Chris A has talked before about sub placement with 2 channel listening, not to say he's the final word but he seems to really know his stuff. He does recommend that the subs be fairly close to the mains for 2 channel listening. If you think about it, you're basically just chopping up which speakers play the low tones - the subs or the mains. Moving the subs far from the mains, even with the timing corrected for position can still have some location issues. If the sub is right next to the main, it is located by the main, which is ideal. The issue with the entire placement then becomes whether or not the 2 mains are actually placed well. If they are, then the subs will be fine there, and the sound will all come from the soundstage. This is all true for one listening position. Then when you expand it to an entire couch, or several different pieces of furniture, it becomes a compromise because the room will influence what can be heard. How far is the listening position(s) from the soundstage, and how far are the walls and ceiling...it all plays into what you hear at any given position. Subs really cannot be fully optimized without some form of measurement. But generally speaking if I remember right, Chris said the subs should be within a half or quarter of the wavelength of the longest room dimension...or something like that.
-
 I've measured my RF52iis up to 20K and they were solid. My guess is also the microphone placement. I find pointing it straight up at the listening position is the easiest for me to get good readings across the spectrum. Especially at the high frequencies they should have no problem reaching the mic.
 -
My 2c is dependent upon your true goal -- If you want to fill the room and are going to listen to 2 channel music almost all the time, that's one big room. I listened to the horn subs at SWL's place once, and I have never heard music sound as good as it did in his listening room. I believe he had 2 right next to each other and I could not identify what they were at first and thought they were furniture. They were that solid, strong and invisible blending with the music. They were made by a member here in the forum. I think you could scale 2 up to any potential SPL output needed. If you like home theater or TV and want the full effect than I would have to push towards ported subs. Although bigger is usually lower tuned, bigger is not always necessary, that depends more upon your preference - does it need to play low LFE from movies? For that size room, I would strongly consider changing your mindset and getting 4 of something that are lesser but still impressive. In that size room 4 will balance things out across the listening positions and provide a big boost in overall output. Which sub to get depends upon how many you get. I can't stress enough (imo) that getting 4 lesser ones would provide a better result than 2 better ones. 2 or 4 of the SVS PCs would be really nice, but I question how tall they are and if you really want that in your room, even in the corners. But if you end up with just 2 subs, get the ones with the most output as that's one big room. Again I can't say enough times how much happier I think you'll be with at least 2, and preferably 4.
-
I have always found it odd though when they say things like this listing: I took it to a guitar shop and paid to have it tested. Ummmm, there's 4 drivers in there and two wires per speaker to set it up and test. Try turning volume up and down....done. Saying that makes me believe far more they haven't been tested, but I admit, I've only been at this for less than a year really.
-
I was thinking the same. I was going to buy them and then sell them to someone on the forum at cost after testing them out. But $100 is steep. No bids yet so either nobody will bid and he'll relist lower, or 1 person will bid at 300 and that will be that. Certainly with 100 shipping it's no bargain, but it's still the lowest overall price for a working pair I've seen in my limited time.
-
No affliation. Decent looking rb75s on auction ebay. No bids only 300 for pair. Significant scratches and torn grill but supposed to be fully functional. Good luck someone here should get these. On mobile so no link. Simply go on ebay put in klipsch rb75
-
Roboklipsch's DIYSG 4cft ported build using Legacy EF 15" Driver
RoboKlipsch replied to RoboKlipsch's topic in Subwoofers
It was too hard to try and lineup the precut baffles. One had different dimensions to fit over the entire front....so after the build was necessary unfortunately. I was thinking of using the bolt and washer method...have u done that? -
Roboklipsch's DIYSG 4cft ported build using Legacy EF 15" Driver
RoboKlipsch replied to RoboKlipsch's topic in Subwoofers
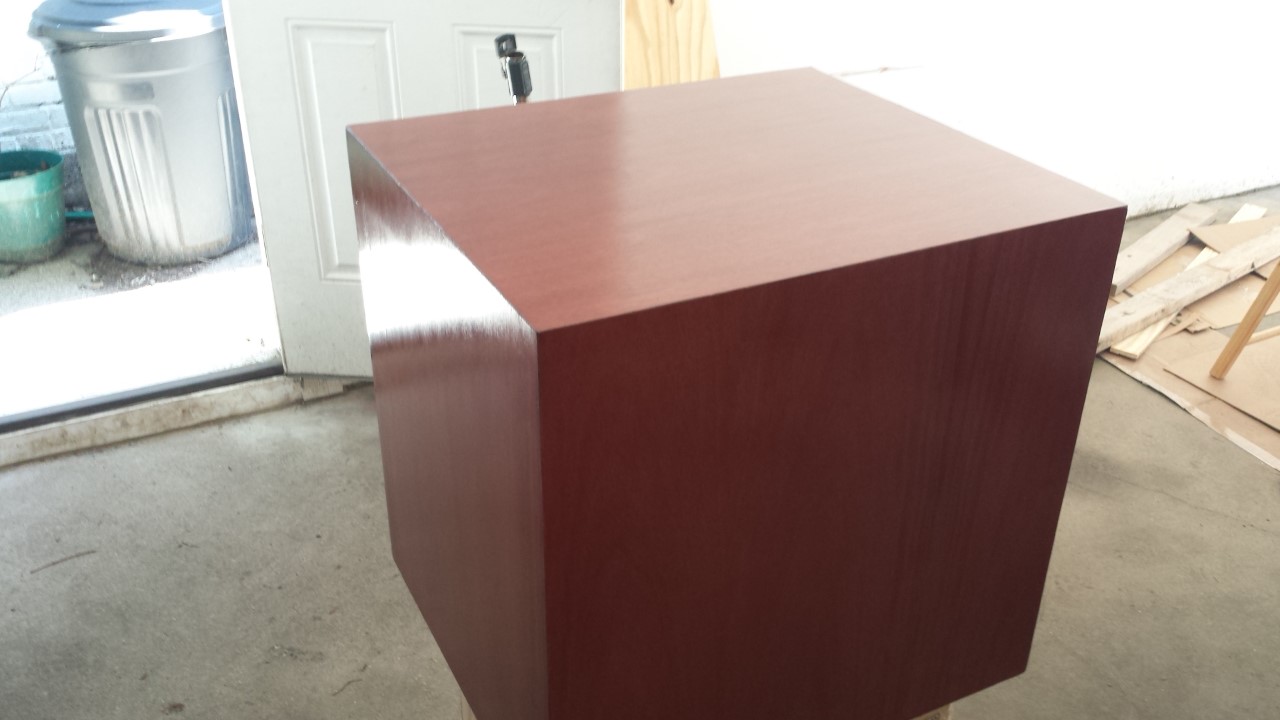
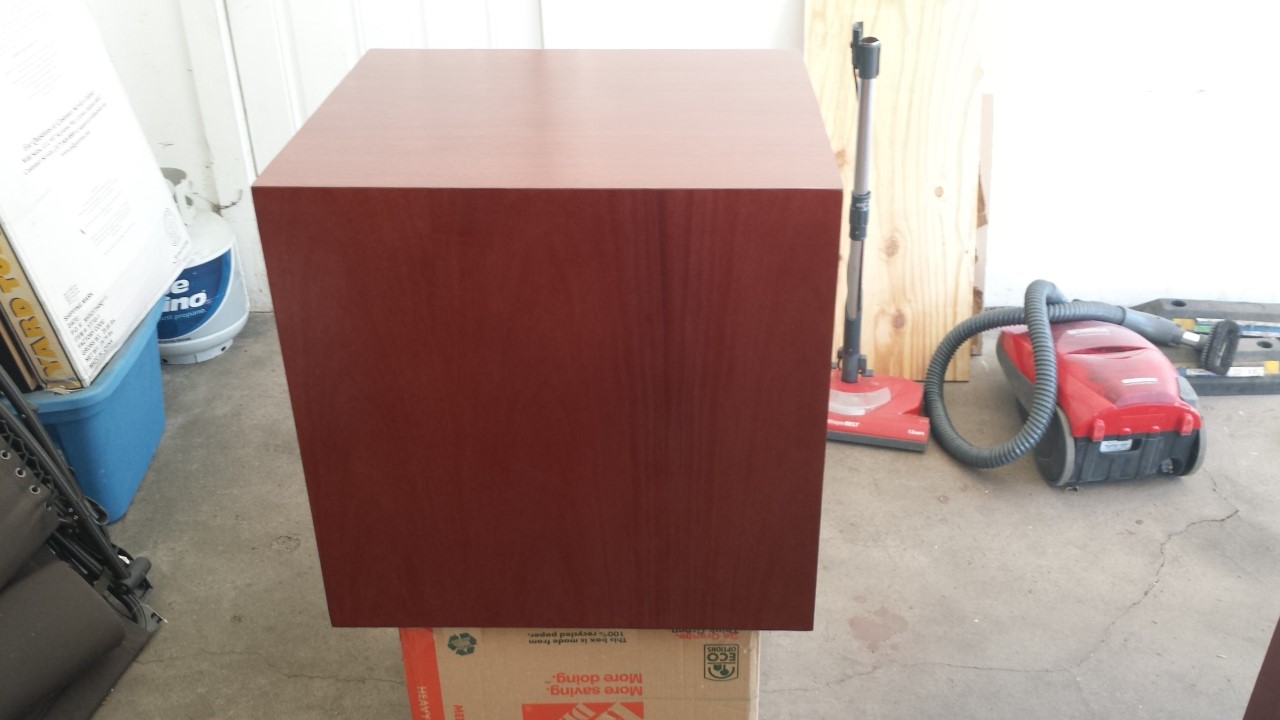
Update: Well today as far as the subwoofer build is concerned....I'm just about done. All the hard work is complete, I just have to wait for dry time to expire and then put in the T-nuts, the wiring and the binding posts....and it should be ready to go Process: So the final step in finishing is spray lacquer. Using rattle cans, although the Deft Gloss ones don't have the rattles in them for some specific reason. I got 3 cans, which was plenty....on Amazon about $6 a piece. I sprayed the bottoms first, put on 3 coats with about a half hour between, and then let them sit 2 days to dry. Application occured during about 70 degrees, but humidity rising and approaching 80%+. It seemed to go pretty well. I had a few pool spots from a previous finish (I think the sealcoat) on one of the bottoms, but am not worrying about the bottom. They provided a good testing platform for using the lacquer. Held about 6 inches away, spray back and forth not stopping and moving quickly. First coat very light to give the others something to adhere to. Make sure to apply with lots of ventilation -- the thinner in the cans will kill you, literally, if you don't and build enough in a closed room. Never do in a closed space without ventilation. Allow to dry approx 30 minutes between coats, although the last 2 coats I allowed a bit longer as it was humid. Also extermely flammable, do not smoke, do not start a car, don't even turn on a light switch while applying (according to the experts). I was very careful, garage door mostly open when applying. Winds were very strong - 20 to 30, so I did not open the door all the way as it wasn't necessary and would blow to hard. I put on 6 coats onto the other 5 sides yesterday. 6 coats. I planned for 3, but it went on so easily, and I had enough left to easily do 6. So i did. Temps were about 65 and humidity was a ridiculously low 20-30%. So low, it dries before hitting the surface! You have to hold it even closer in those conditions, but drying time is amazing. Dry most likely in 5 minutes, but I gave about 30 between coats, and more like 45 on the last few. Dust and bugs are a problem, but I did very well and had little of either. I noticed some dust on the tops, as the lacquer was actually drying on the way to hitting the tops. So I held it a bit closer and made passes that stuck beautifully. Why do 6 coats? Thin coats are important, as drying time becomes longer with thicker coats...and if a coat isn't really fully dry, drying time can go to weeks or months or never. If you missed a spot, the next coat covers it. They blend together chemically and cover each other well. Easiest step was the lacquer imo of everything, although it still has a few pitfalls. So that's it. I am letting them dry at least a few more days, no rush. Then the T-nuts, wiring, drivers, and on to placement and testing Pictures...as usual, lighting tells many different stories. Same boxes with same finish. A few may be taken while the lacquer is wet, but all are the same boxes and finish. Lighting varies depending upon night, day, door open, etc. Once totally complete, I know the pics will come out great outside and indoors with better lighting.
-
Roboklipsch's DIYSG 4cft ported build using Legacy EF 15" Driver
RoboKlipsch replied to RoboKlipsch's topic in Subwoofers
Hi Scrappy -- yes that looks right. I hadn't gone through in enough detail, it looks like that's the one center option offered. It also happens to look pretty awesome, mirroring some of what maybe a C7 could do? Or more? I'm a home theater guy, I'd be looking to improve my RC52 if I make a change. -
Klipsch RSW 15 vs Klipsch R-115 better deal?
RoboKlipsch replied to JeffKKlipsch's topic in Subwoofers
I can argue the RSW-15 which I recently had one of, the 115SW, or DIY. It really comes down to what you want. You need to hear an RSW if possible, or at least go hear the 115SW in a store to compare to the RSW you might go visit at someone's home. RSW-15 is a classy sub, looks great, considered to be one of if not the top Klipsch-made consumer sub ever. That's saying a lot. Resale value is very high, assuming you keep it in good shape. R-115SW is the current top dog at Klipsch, getting excellent reviews here and elsewhere such as AVSForum -- not a small thing. You get a warranty, specs that match performance (see a few threads in our subwoofer sub-forum) and a very reasonable price if you purchase it using the tips from the guys and gals here. Resale values are currently very high still, even if you own it a year or two you can get much or most of your money back if you keep them pristine and keep the boxes. DIY is another animal. It requires either some work - or better yet, if you're not interested in the work, finding someone to build them for you (usually easy) -- or someone who already has some built but is willing to sell them. Why do this? Well you get much more for your money, especially once you go beyond just 1 sub. The simplest and most key thing to understand about DIY is this -- we build DIY subs because most of the big box companies including Klipsch design their subs with aesthetics foremost in mind -- performance is important, but secondary to how well it well look and it's size in an average room. Compromise is usually the size of the enclosure, limiting performance. The 115SW however is beyond that typical sub. Those would be more like the 110 or 112 or their lesser counterparts, the 10 or 12sw Listen, consider, purchase, and if not satisfied, buy something else. Don't worry about it, have fun with it, and buy whichever is on your mind the most. -
No rf7ii consideration?
-
Roboklipsch's DIYSG 4cft ported build using Legacy EF 15" Driver
RoboKlipsch replied to RoboKlipsch's topic in Subwoofers
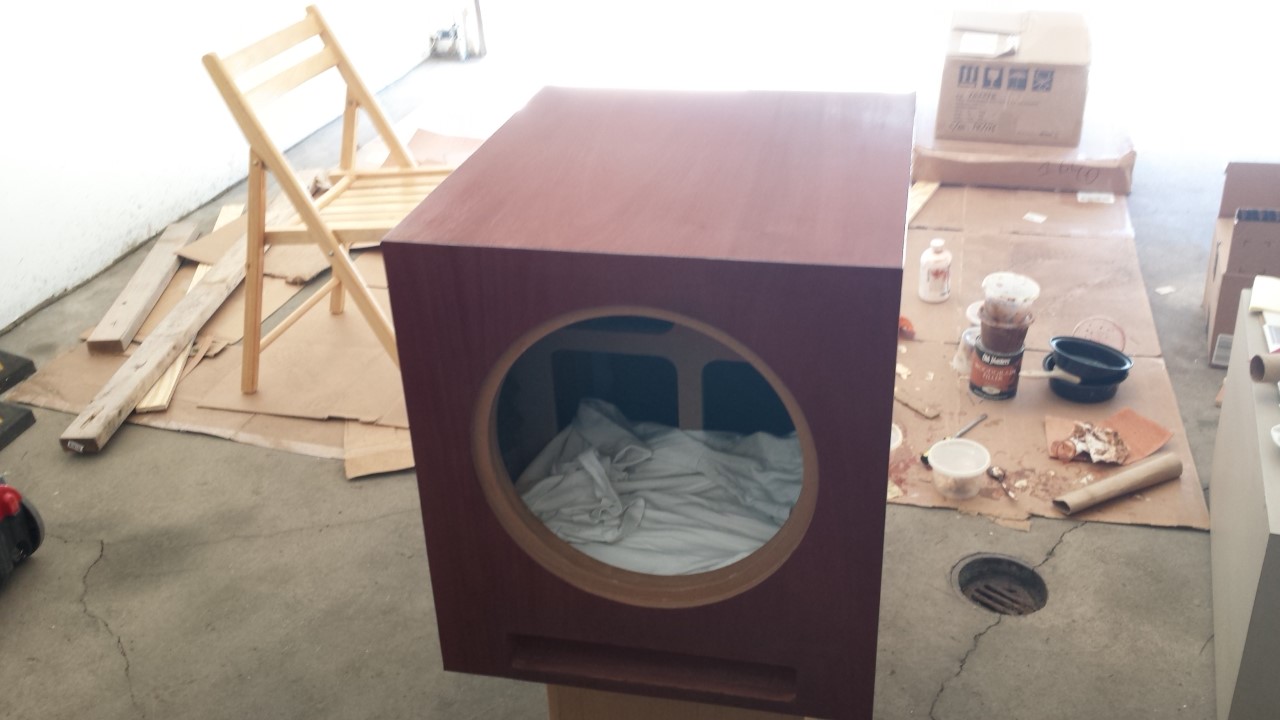
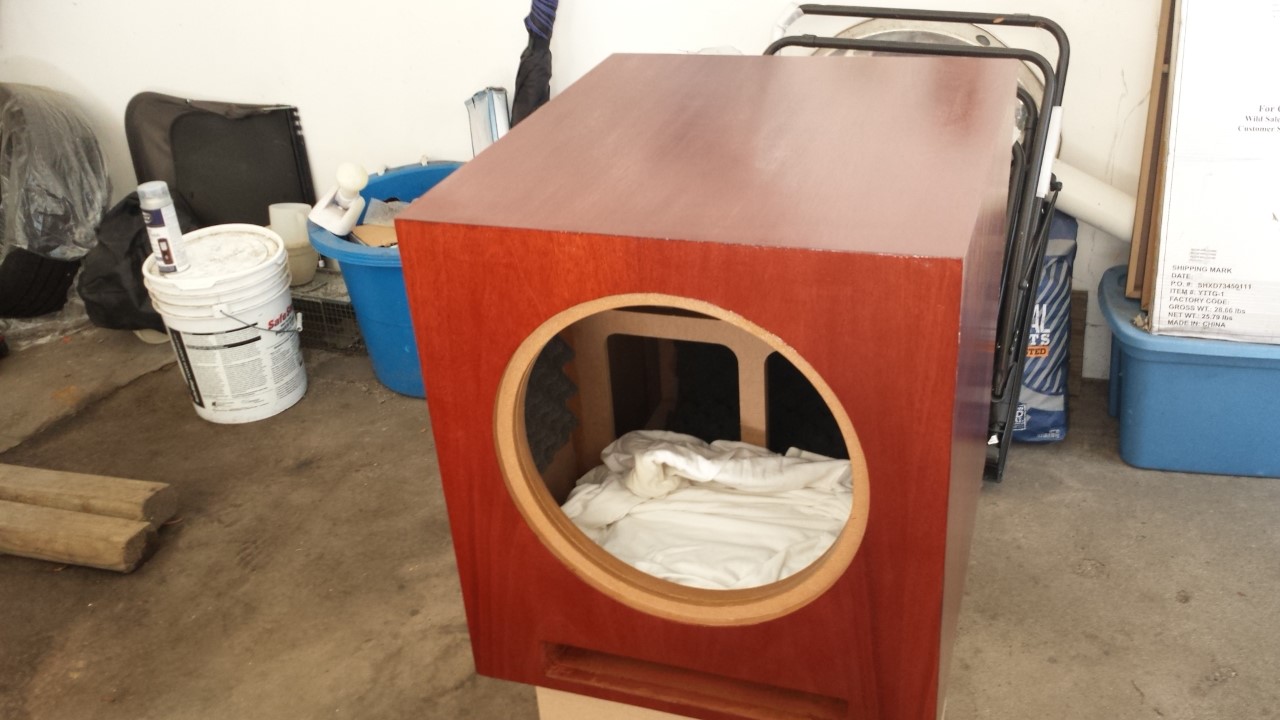
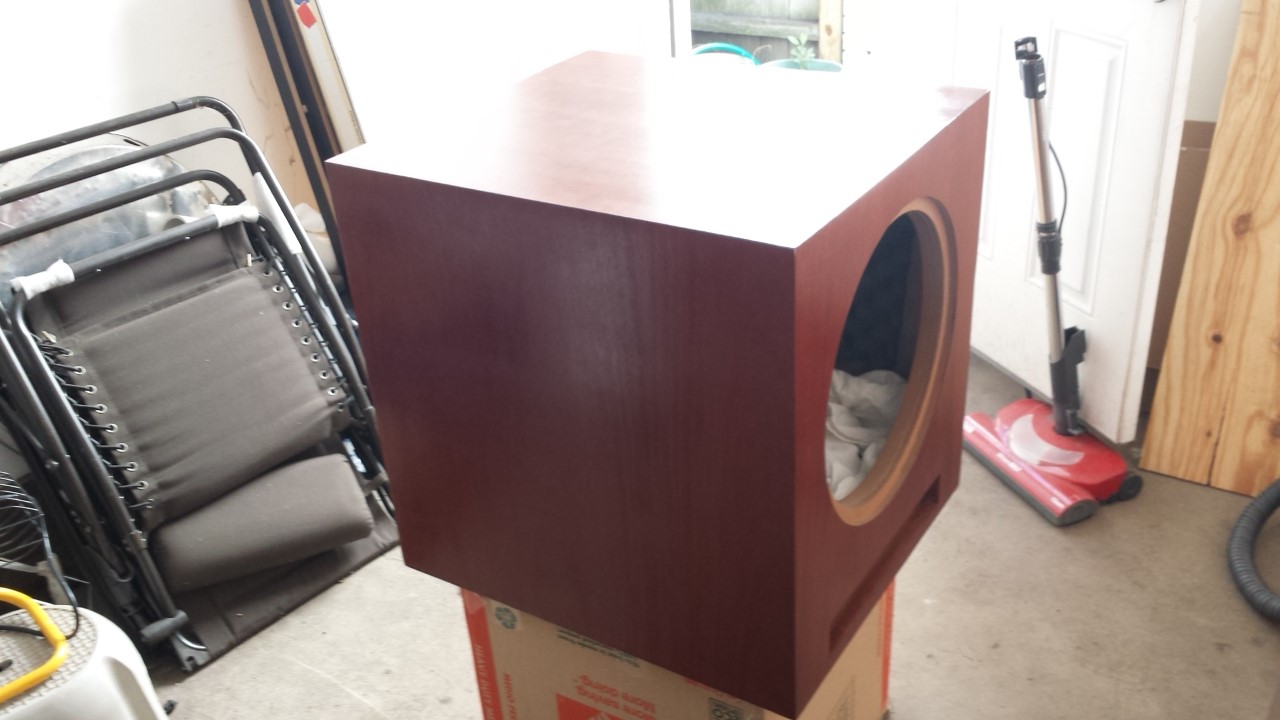
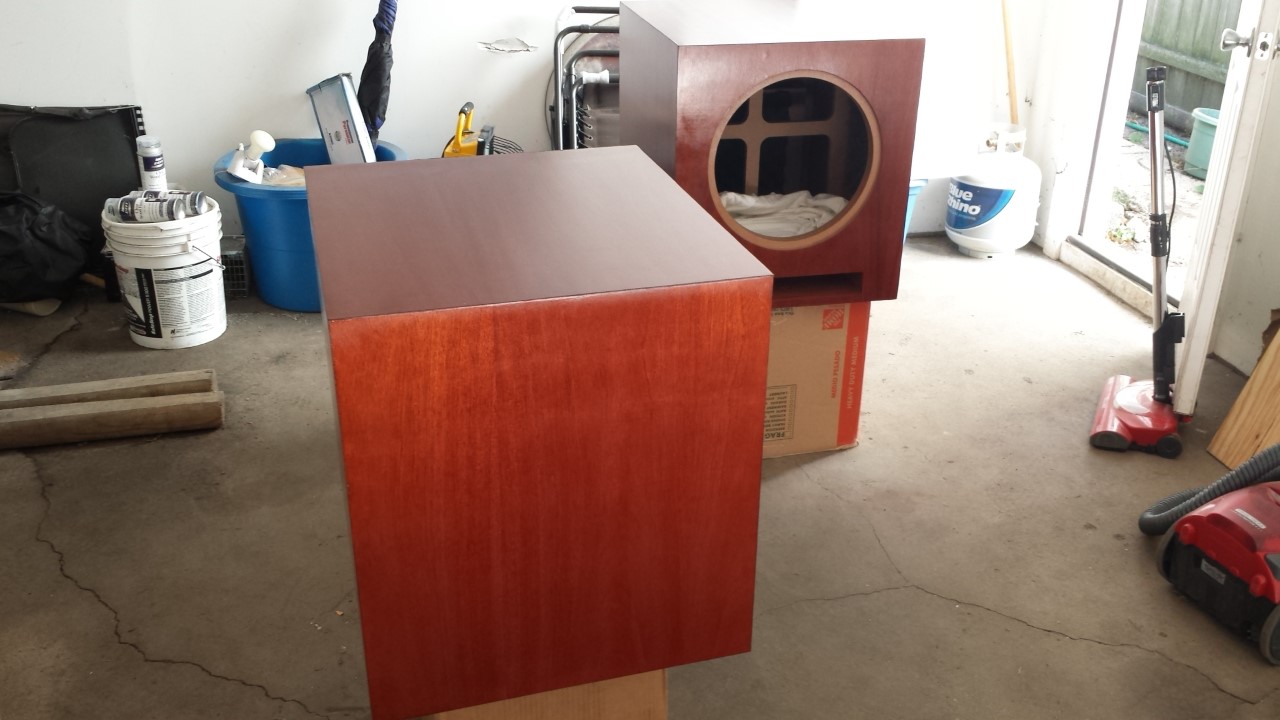
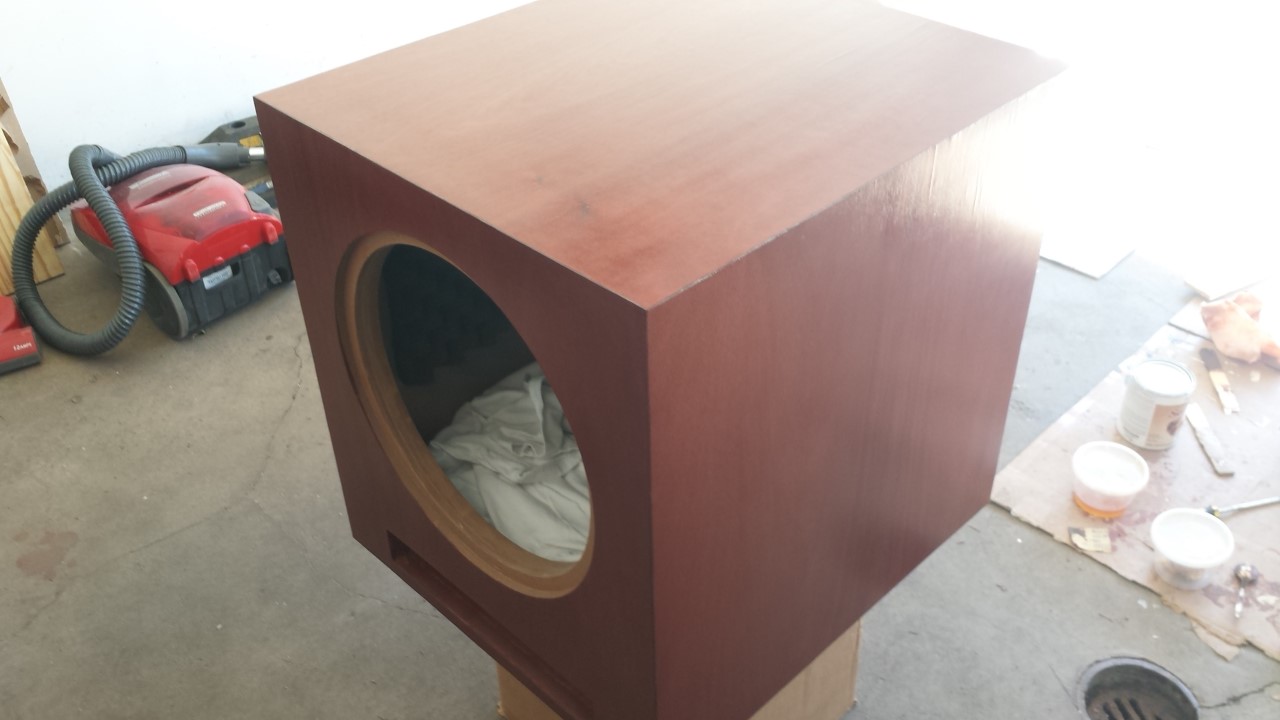
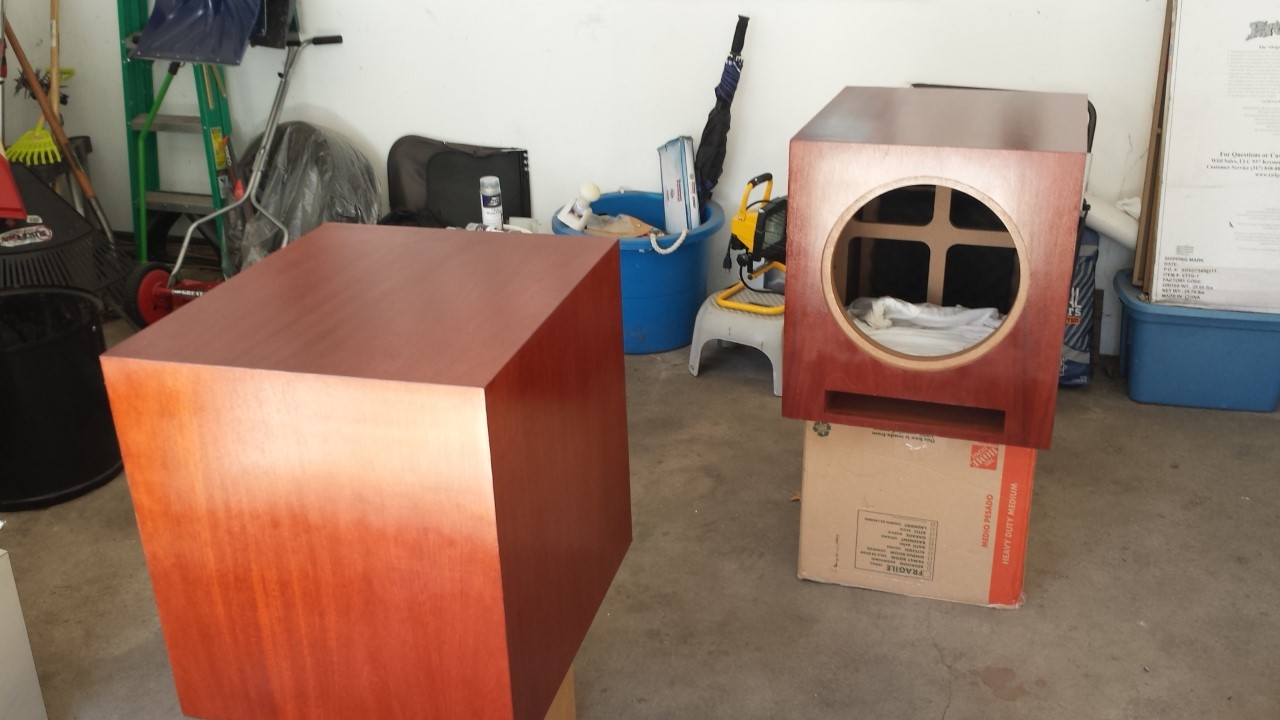
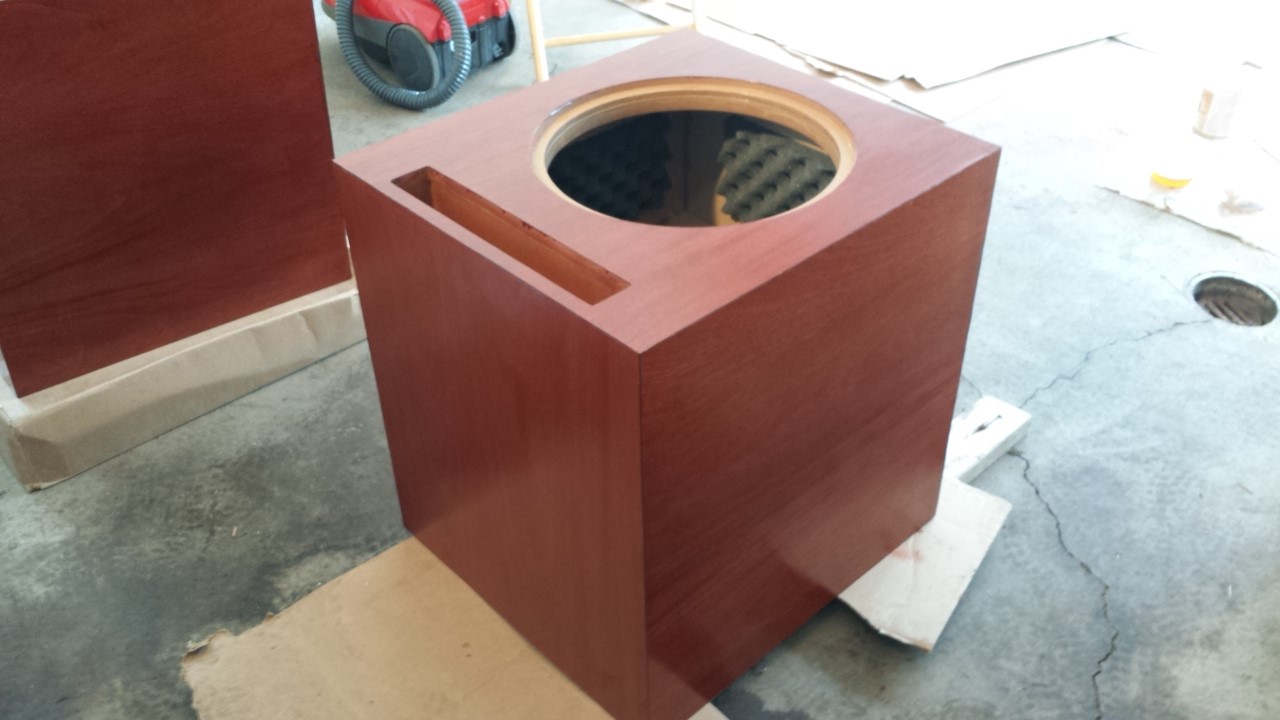
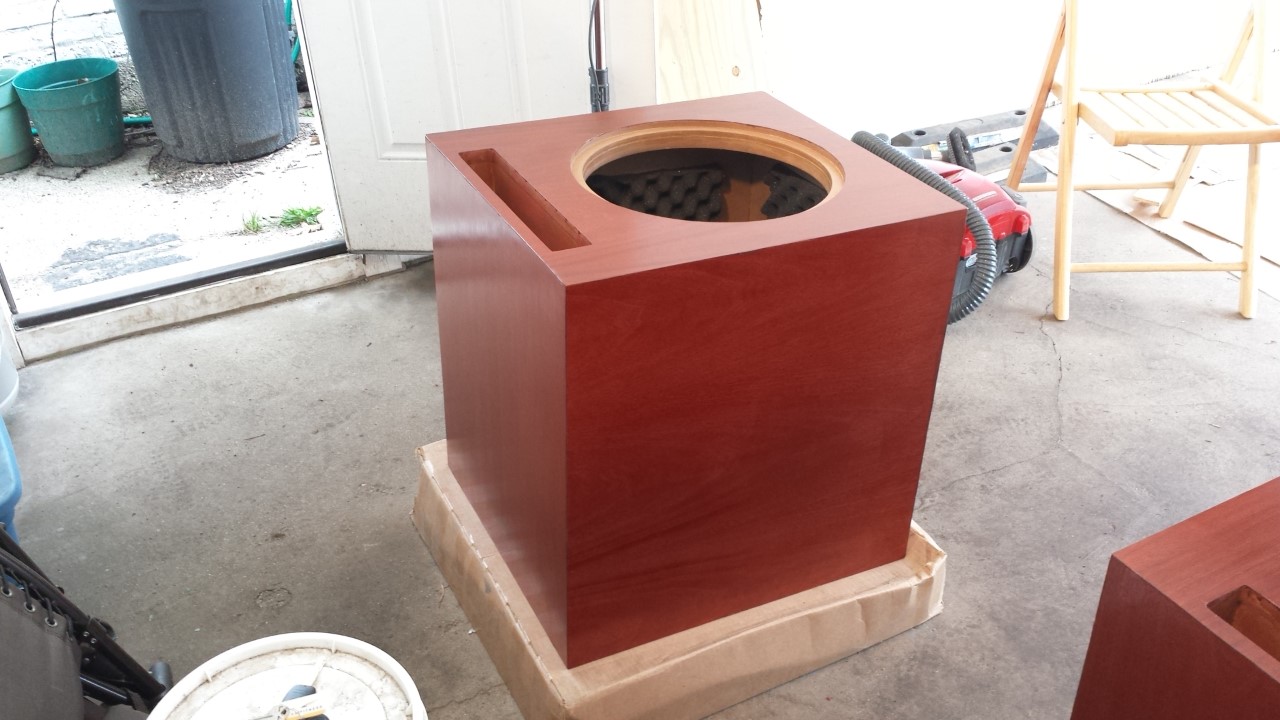
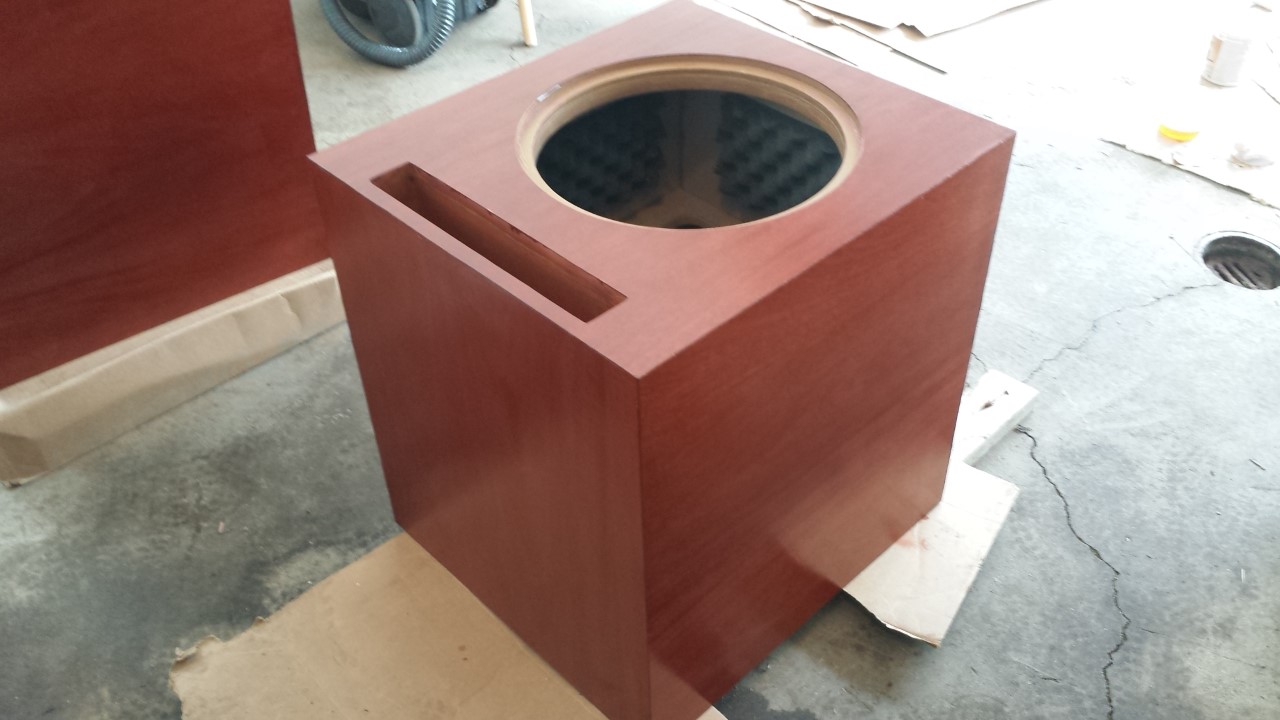
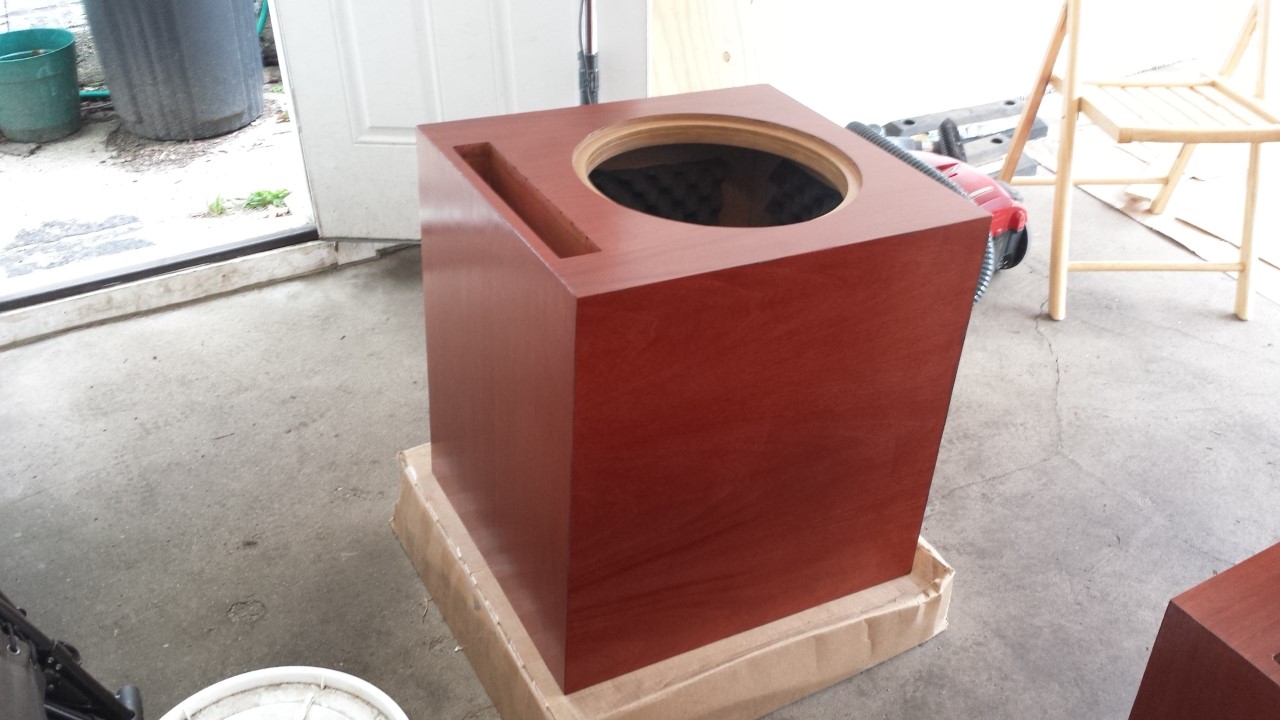
Epic see-through window to watch the action -
Roboklipsch's DIYSG 4cft ported build using Legacy EF 15" Driver
RoboKlipsch replied to RoboKlipsch's topic in Subwoofers
Never too late and I'm considering it If I had the finishes when building the boxes I would have used just the dye. In this case I did the same after they were built but didn't spend enough time sanding it to really get the dye down deeply. Building the boxes I focused entirely on having really good glue bonds without leaks. With more sanding and removal of some of the glue it would dye better. I think there's enough dye on the bottoms of the ports that they will look matching as is when the subs are upright. But black paint might be a really nice feature there. -
Roboklipsch's DIYSG 4cft ported build using Legacy EF 15" Driver
RoboKlipsch replied to RoboKlipsch's topic in Subwoofers
I'm not actually sure. I was so focused on the subs I didn't spend a lot of time on the center options, but maybe the Cinema 8 or the like. Suggestions if I ever go down that road? -
Roboklipsch's DIYSG 4cft ported build using Legacy EF 15" Driver
RoboKlipsch replied to RoboKlipsch's topic in Subwoofers
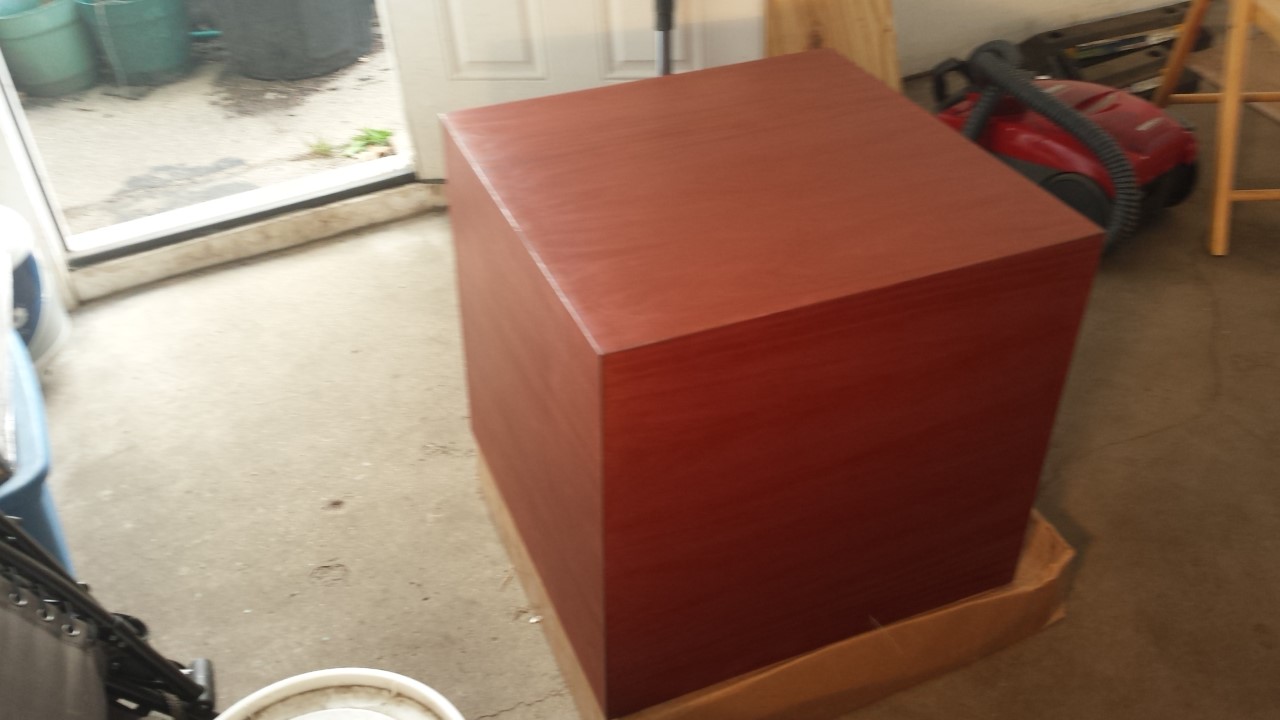
Update: Having applied the SealCoat with a brush in the early stages (to seal the mdf after gluing the box together), I remembered that it did leave a nice thick coat but also left brush marks (which were sanded). After having applied a few things with a pad (cotton rag soaked in a particular chemical), I decided to seal the dye/wood filler/stain finish using a pad instead. Since the pad leaves a thinner coat, but a much nicer/smoother finish imo, I am using 4 coats instead of 3. Application of the 1st and 4th coats are a bit more careful. Coat 1 even though it is over dried wood pore filler/stain, could still lift a bit, so I am careful to put down a thin, even coat. Coats 2 and 3 are a bit thicker with less concern for perfection. Then coat 4 tries to get a nice even finish overall. Approximately 4 hours per side of the box total....coat, wait and hour...coat, wait and hour, coat, wait an hour, coat, wait an hour, then do another side. By doing 3 sides in a day, over roughly 12 hours, all sides are able to dry for a day or more before potentially being turned over where dryness is important. This is slower than necessary -- you could seal 5 of the sides at once, wait, and seal again. But with a flat surface I am finding it's much easier to get an even coat. I'd rather go slower and get a better finish than rush this step and potentially leave it less than the best a rookie can do in his first outing. So the pictures. I have a few below. Garage open on a cloudy day, lights on in the garage, side door open. Just not easy to get a perfect picture in there as the light by the edge of the garage is bright, but back by the windows where I'm working it's a lot darker. Anyway, I think these came out better and certainly sharper at least. A big benefit of wiping on the sealer is that sanding may not be necessary. The coats on top of each other melt into one another when applied within a few hours of each other, so dust and bugs are the enemy. So far there hasn't been any problem with either, so things are moving along nicely. If all goes well, the boxes will be sealed by the end of the evening. Tomorrow I will lacquer the bottom, which was actually sealed on Wednesday, giving it plenty of time to dry fully. It will get a few days to cure and then the boxes will be turned over, and I will lacquer all the rest at once. Using a spray can lacquer I think it will go just fine....hopefully In the pictures below, the two sides were finished last night, the baffles were just coated with their 3rd of 4 coats, so they are a bit shiny and wet still potentially.
-
Roboklipsch's DIYSG 4cft ported build using Legacy EF 15" Driver
RoboKlipsch replied to RoboKlipsch's topic in Subwoofers
LOL there you go encouraging me. I'm not going to even say what center I thought about The lighting in the garage is actually pretty bad. Plenty good to see what I'm doing, and I have worklights for nighttime or when I need bright lighting. But for taking pictures it's been a quick snap after each step. I'm putting on the SealCoat now not missing a day lol. Once complete tomorrow I'll take some shots and see if I can get the color to come out right. The wood itself is a light brown slightly pink wood. With the dye added it became a really bright cherryish red. Sealed it darkened to a slightly more brown/orange color. Wood filler and stain made the big difference, turning it to a rich brown color. Sealing that is darkening it. With this finish it looks like the lighting has a huge impact on what you will see. But I know I can get some good shots. By the end I'll be sure to get shots in the sunlight where you'll get the true color, and then in a well-lit room. -
Roboklipsch's DIYSG 4cft ported build using Legacy EF 15" Driver
RoboKlipsch replied to RoboKlipsch's topic in Subwoofers
Thank you! There's some blur as i was holding the camera in one hand. Ill take some sharp ones. -
Roboklipsch's DIYSG 4cft ported build using Legacy EF 15" Driver
RoboKlipsch replied to RoboKlipsch's topic in Subwoofers
Well now that you mention it, the idea of building a really big nice center channel from DIYSG again.... -
Roboklipsch's DIYSG 4cft ported build using Legacy EF 15" Driver
RoboKlipsch replied to RoboKlipsch's topic in Subwoofers
Picking up where we left off on the finishing process, the dye had been put down and then sealed with the dewaxed SealCoat. The next step in this process involves filling the wood pores with a combination of Old Masters Woodgrain Filler and ZAR's Early American Wood Stain. The ratio is 2 parts woodgrain filler and 1 part stain, mixed in a container. Applied by using a small spoon to scoop from container, and then rubbed into the finish with the grain back and forth until worked in thoroughly. Then it sits for a while, from 5 to 15 minutes or so depending upon the weather conditions, and then is rubbed off with a clean flannel rag against the grain, with a final rub with the grain. The results of this step were finished in the last couple of days. Pictures are below. I only have a few decent shots as I was holding a light and the camera, but will take more soon. I was shocked how much this step improved everything. Most of the imperfections from the last step were covered completely by the filler/stain combination, and the color of the stain went over the dye from earlier, taking the reddish color to a nice rich brown. I did touch up each panel with the dye rag as a step before finishing -- when I finished putting the filler on each panel, I touched up the next panel with the dye. It is suggested that the pore filler dry for 4 hours before recoating, or 16 hours before sealing. I waited 4 hours in each case before turning it over to the next side, and now that they are all complete, they've all sat for 16+ hours. Surprisingly, since I started working on this I have not skipped a single day. Today however with the rain...I may not have a chance to do any of the next step, which is SealCoat x3. I can't remember a day without working on the subs lol....
-
Roboklipsch's DIYSG 4cft ported build using Legacy EF 15" Driver
RoboKlipsch replied to RoboKlipsch's topic in Subwoofers
That's a good idea! FDog although this process is 100% fun and will provide way more bass than I could afford otherwise, there's an underlying stress involved in my first build. I have never done most of these things so each one requires some reading, some youtube videos and a lot of thought -- as you know Having a project out there that isn't complete weighs on my mind and I want it done! -
I'm thinking you go with the home team and pick up a couple R-115SWs if placement in those spots will work well. \
-
OMG that's some sick work. WTF who knew you were a perfectionist?
-
Beautiful finish wow!
-
This hobby is a drug if there ever was one.
-
Roboklipsch's DIYSG 4cft ported build using Legacy EF 15" Driver
RoboKlipsch replied to RoboKlipsch's topic in Subwoofers
I've picked those ************* up and turned them over or moved them so many times now that I will never drag them Of course, 45 more pounds will be added to each box once the drivers are loaded. So there's that Am I being lazy not putting in longer bolts and the blocks?