Moderators Youthman Posted April 4, 2009 Moderators Share Posted April 4, 2009 Well after 4 long months, Tim finally came today to begin installing the false wall. I am very pleased with the way they turned out. Best part about it is that I barted for them. He's building my cabinets in exchange for me building his ecommerce website. It works out great for both of us. He is supposed to come back sometime next week to install the side panels that will conceal the main speakers. I still have to mount the screen, it's just leaning up against it for now. I have posted a lot of photos of it in my build thread (see signature) so I won't duplicate them all here. Quote Link to comment Share on other sites More sharing options...
DU73 Posted April 4, 2009 Share Posted April 4, 2009 looking fantastic already. [Y] great pics.. Your theatre room is really coming along. Quote Link to comment Share on other sites More sharing options...
tommyboy Posted April 4, 2009 Share Posted April 4, 2009 looking fantastic already. great pics.. Your theatre room is really coming along. I can't wait to see it when it's all done!!! Quote Link to comment Share on other sites More sharing options...
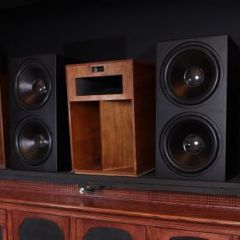
Moderators Youthman Posted April 4, 2009 Author Moderators Share Posted April 4, 2009 Thanks bro. It has been a long time coming and something that I have always dreamed of one day having, just never really believed the dream would come true. Thanks to the poor economy, we got a really good deal on the house, cheaper than we were going to build and got so much more for our money in features and actual price. I need some suggestions on how to mount the screen. The Elite screen is designed to use 6 or 8 wall brackets that slide into a groove on the back of the screen. I do not have a wall behind the screen, it is all open as you can see from the pics below. The screen fits pretty snug left and right (1/8" gap) and has a 1 1/8" gap at the top. I need to secure the screen to the cabinet without drilling into the frame of the screen. The screen needs to move up maybe 9/16" to center it into the frame. They plan on making a shim (I think that's what they called it) that will mount in front of the top part of the screen to hold it into position. I do not know how low it will hang but I don't want to cover the top velvet border too much since that's what hides any overspill. Also, if they cover part of the top border, it will appear to be shorter than the bottom border unless it is only 1/2" overhang or less. The more I think about it, the more the shim idea might work best. With that, the screen does not have to be raised up any. It will have the same look as the cabinet. I would need to add velvet to the top and bottom gap. Just wanted to get some input and ideas. Here you can see a closer shot of the cabinet frame that the screen will fit into. Shot of the back of the screen when positioned into place. You can see that the top is leaning back against the cabinet, the bottom is out further to prevent it from falling forward. When mounted, the bottom would be flush with the cabinet. Closer shot of the back of the screen. Not much to attach too except for the groove where the mounting bracket clips slide into. They fit into the same groove that the white clips are in that hold the material to the frame. Quote Link to comment Share on other sites More sharing options...
Moderators Youthman Posted April 4, 2009 Author Moderators Share Posted April 4, 2009 Thx Tommy. I'll be sure to post pics once the cabinets are finished. Quote Link to comment Share on other sites More sharing options...
Moderators Youthman Posted April 4, 2009 Author Moderators Share Posted April 4, 2009 I figured out a very simple way to mount the screen. I used the 4 supplied wall brackets and then secured the brackets to the frame using zip ties and an L bracket I had left over from our vertical blinds. Quote Link to comment Share on other sites More sharing options...
tommyboy Posted April 4, 2009 Share Posted April 4, 2009 I was just about to recommend something like that. Zip ties are the handiest "tool" to have at home! I, like you, also dream about a HT room when we buy our house also. I would love to take advantage of the housing being so cheap right now, but being military, I don't want to buy now, then a year from now, get sent somewhere else. Then, like so many co workers, get stuck stressing about what to do with the house. Know what I mean? Quote Link to comment Share on other sites More sharing options...
roaddog359 Posted April 4, 2009 Share Posted April 4, 2009 its looking awesome youthman!!!!!!!! Quote Link to comment Share on other sites More sharing options...
Moderators Youthman Posted April 4, 2009 Author Moderators Share Posted April 4, 2009 I would love to take advantage of the housing being so cheap right now, but being military, I don't want to buy now, then a year from now, get sent somewhere else. Then, like so many co workers, get stuck stressing about what to do with the house. Know what I mean? Totally can understand that. Be patient, you'll have one of your own soon enough. Thx roaddog. Quote Link to comment Share on other sites More sharing options...
derekd2 Posted April 4, 2009 Share Posted April 4, 2009 Looking good Youthman! Do you have any plans to ever utilize the extra "presence" speakers that your Yamaha receiver is capable of. It looks like you have a great setup to put in a couple of in wall speakers up front if you ever wanted. I'm dubious of the actual audio enhancement they provide but I still want to get mine set up at some point. Quote Link to comment Share on other sites More sharing options...
peshewah Posted April 4, 2009 Share Posted April 4, 2009 WOW! Quote Link to comment Share on other sites More sharing options...
Moderators Youthman Posted April 4, 2009 Author Moderators Share Posted April 4, 2009 Do you have any plans to ever utilize the extra "presence" speakers that your Yamaha receiver is capable of. Thx Derek. I really have no plans to use "presence" speakers. Check out this thread that we recently discussed on it. Quote Link to comment Share on other sites More sharing options...
liebherr954 Posted April 5, 2009 Share Posted April 5, 2009 Very nice! When I movie night? Quote Link to comment Share on other sites More sharing options...
Moderators Youthman Posted April 5, 2009 Author Moderators Share Posted April 5, 2009 Very nice! When I movie night? Thx. Still have to hook up all of the gear. Can't really do that till he finishes the cabinets. Hopefully it will be finished this week and she'll open for business. Quote Link to comment Share on other sites More sharing options...
Moderators Youthman Posted April 8, 2009 Author Moderators Share Posted April 8, 2009 Try to visualize this...Tonight my 10yr old son and I got a little brave and decided to mount the RC-64 in the top part of the cabinet above the screen. The room is 10' high and the cabinets stretch from the floor to the ceiling. I currently do not own a ladder so I brought in our bar stools. Jacob and I stood on the barstools and I hoisted him into the cabinet from the open sides to unscrew the two screws that are temporarily holding the top center panel cover in place. Once removed, I moved 4 barstools in front of the cabinets. Jacob said he was nervous about having to pick up a 62 lb speaker. I told him "If I didn't think you could do it, I wouldn't have put you up there. I trust you son." What a cool teachable moment for my son to hear his Dad say I trust you with a $600 speaker and I have confidence that you can help Dad move this speaker without damaging it. I placed a towel inside the cabinet for the RC-64 to lay on since the cabinet is made of wood and would scratch the bottom of the speaker. I placed a pillow on two barstools and laid the RC-64 on the pillow. Standing on the other two barstools, I lifted the RC-64 and gently slid it into place in the upper cabinet. My son helped me to gently guide and slide it into position. Once positioned, I had him hook up the speaker and I lifted the rear of the speaker while he screwed in the angle adjustment. Jacob did an amazing job. He was nervous about being inside the cabinet and being that high off the ground but he trusted his dad because he knew that I wouldn't put him in a situation where he could get hurt. To my surprise, the angle was almost dead on with my primary listening position. I really didn't think it was going to be enough angle but it was. My wife was in bed so we didn't get to test it out very much until she came in and asked to turn it down. I'm really hoping it isn't too distracting with the center being above the screen. Probably no one will notice, but I notice because I know where it's there. We'll see if it is distracting once I get a chance to play a movie at a good volume. Now that I see how the cabinet was made, it would have been PERFECT to have an acoustic transparent screen and have mounted the RC-64 directly behind the screen. Arggg. Too late now. LOL. When I ran the YPAO in the yamaha, it said not to use Back Surrounds if I did not have Side Surrounds (since I currently have a 5.1 setup) so I switched the RB-35's to the "Surrounds" and wow, what a diffference. To be honest, after mounting them, I totally was not satisfied with the surround effects. I felt I was not really hearing them. Granted, when I turned them off, I did notice them not being there and I realize surround speakers should not bring attention to themselves but I really wasn't hearing much from them during big surround scenes. In the short, semi-loud scene we watched, I totally heard a difference. Guess it helps when you have the speakers connected to the correct terminals on the receiver. Here's a shot of the speaker in place. Quote Link to comment Share on other sites More sharing options...

Recommended Posts
Join the conversation
You can post now and register later. If you have an account, sign in now to post with your account.
Note: Your post will require moderator approval before it will be visible.