Stolenrs Posted April 17, 2010 Share Posted April 17, 2010 Ross, I'll probably not go with the roller route since it really won't benefit me much unless I can get it to roll completely out in front of the cabinet about 4" - 6". Getting inside the false wall would be a little tricky but I have done it a time or two. What you aren't going to do my idea??[] Well, I still wish that I had a dedicated room, have all these ideas in my head to try out sometime, the funny thing is after I posted that I started to watch an episode of DIY mancaves (very cool show) and they were building shelves that way for components. Again compliments on the room, hope the shelf turns out the way you want it. ~ ross Quote Link to comment Share on other sites More sharing options...
BluBitRates Posted April 17, 2010 Share Posted April 17, 2010 what amp did you get youth? Edit: never mind i thought this was the DIY audiorack thread. Post pics when you are done Youth and give us impressions of the amp. Did you get it locally or have it shipped from someone? By the way your main wall there looks really nice close up. Where did you purchase your rc-64 from? Quote Link to comment Share on other sites More sharing options...
Moderators Youthman Posted April 17, 2010 Author Moderators Share Posted April 17, 2010 what amp did you get youth? I bought a Parasound HCA2205a (220w x 5) amp Post pics when you are done Youth and give us impressions of the amp. Will do Did you get it locally or have it shipped from someone? I bought it from a forum member. Our family went to St Augustine (3 hrs away) for the day. We left at 6:30am, arrived at 9:30am. Spent the day at St. Augustine (oldest city in Florida) and at 5pm, headed 45 minutes further to pick up the amp. So it was a 4 hour ride back home. Pulled in around 10pm. By the way your main wall there looks really nice close up. Thanks. I did a website for a company in exchange for the custom entertainment center/false wall. It turned out very nice and much better than I could have ever done but unfortunately, he didn't do everything he said he was going to do. He was supposed to put hinges on all of the doors (I've added them to the bottom three doors). The top three doors are held up there by screws from the inside. So to open the top doors, I would have to pull out one of my RF-83's, climb into the top part of the cabinet from the side and crawl into the cabinet to unscrew each panel from the inside. Then I would have to climb down and repeat the same process for the left side since the center channel is in the middle and would not be able to climb over it. He was also supposed to put the entire bottom section on rollers so I could roll it out and get behind the equipment. Where did you purchase your rc-64 from? I bought mine from my local Klipsch Dealer when Klipsch was discontinuing the cherry finish on the RC-64's. Quote Link to comment Share on other sites More sharing options...
Moderators Youthman Posted April 17, 2010 Author Moderators Share Posted April 17, 2010 What you aren't going to do my idea?? I just don't know of a roller system that will extend out in front of the cabinet 6 inches and be able to support a 40 pound receiver and a 5 pound shelf. With it being out that far, somethings gonna break for sure. [] I figured it out. If I climb into the bottom right cabinet, I can stand up and lean over into the middle cabinet to get behind the receiver to make connections. Currently, I do not have any shelving in the bottom right cabinet so it's easy to do. Once I add shelving, DVD's etc, just might take a few minutes to remove everything before I can climb into it. Thanks for the kind words Ross and for everyone's advice. As soon as I get it all installed, I'll post a pic. Quote Link to comment Share on other sites More sharing options...
BluBitRates Posted April 17, 2010 Share Posted April 17, 2010 I just went through your HT build thread again. What a fun process it has been. With rf-83s i think the parasound was a no brainer! Quote Link to comment Share on other sites More sharing options...
InVeNtOr Posted April 18, 2010 Share Posted April 18, 2010 youth, i sent you a pm. Quote Link to comment Share on other sites More sharing options...
InVeNtOr Posted April 18, 2010 Share Posted April 18, 2010 here's the pics of 1 set of the heavy duty slides. Quote Link to comment Share on other sites More sharing options...
InVeNtOr Posted April 18, 2010 Share Posted April 18, 2010 full extension Quote Link to comment Share on other sites More sharing options...
InVeNtOr Posted April 18, 2010 Share Posted April 18, 2010 their thickness Quote Link to comment Share on other sites More sharing options...
InVeNtOr Posted April 18, 2010 Share Posted April 18, 2010 if these will work for you let me know. there is some options when it comes to mounting them. since you want it to support your amp, you will have to figure out if the wood you are screwing into will hold it. you can use wood screws and be done. if you don't think that will work i can get you some different hardware. if you can get to both sides of the cabinet wall you are going to mount theses, i can get you hardware that will pass through the wall and bolt on, on the outside. i can also get you some really heavy duty inserts that you can screw into the wood, then provide the screws that will screw into them. me personally, i would use the inserts. that way you can disassemble the rails if needed and not ruin the integrity of the cabinet wall. Quote Link to comment Share on other sites More sharing options...
jamesV Posted April 18, 2010 Share Posted April 18, 2010 I was going to mention some rollers and maybe a lazy-susan type of top. That way you wouldn't have to have the rollers extend out as far but still be able to get to the back of the equipment. Then I seen that you wanted to get it done ASAP so..... James Quote Link to comment Share on other sites More sharing options...
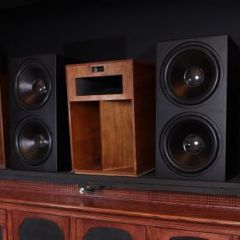
Moderators Youthman Posted April 18, 2010 Author Moderators Share Posted April 18, 2010 I took more time on it than I originally expected but really like the end result. The amp states that it needs 6 inches above it for proper ventilation so I mounted my shelf to allow for the 6". I predrilled the hole with a tiny bit to help get the screws started. Once the first screw was in place, I placed my level on it and then screwed the back screw in place. I know this doesn't impress most of you but it does me. I'm totally not a handyman don't have a lot of tools. For me, this required some thought. I could measure it and drill but I figured that wouldn't work out so well. I decided to place the shelf on both shelves and raise/lower the uninstalled Aluminum Angle at the right height and mark the holes. Removed the shelf and screwed the second rail in place. I was actually very surprised that the shelf was perfectly level. Amp is in place with speaker cables and RCA cables attached. Shelf is in place. Again to my surprise, it was a snug fit. Usually I have to recut something. Even though I was excited to get it hooked up, I spent a lot of time routing and organizing all of my cables using zip ties. I made sure to keep all power cables away from signal cables. Note: After everything was all hooked up, the hum in my sub was gone. I did not think of this when I originally installed everything. PS3 is now in place as well as my rabbit ears and digital to analog converter (don't laugh, we only watch 1 - 2 shows a year). And the final product. I'll post my thoughts on the amp in another thread. [] Quote Link to comment Share on other sites More sharing options...
jrod Posted April 18, 2010 Share Posted April 18, 2010 Looks great Youth, very clean. I'm ready for that amp review!! I'll keep my eyes peeled for the thread. Your ultimate plan is coming together nicely, well done. I bet it feels good![Y] Quote Link to comment Share on other sites More sharing options...
Moderators Youthman Posted April 18, 2010 Author Moderators Share Posted April 18, 2010 Thx jrod. It does feel good seeing how the room has slowly come together. Getting very close. I'll try to post a review of the amp in the next day or so. Quote Link to comment Share on other sites More sharing options...
Rich_Guy Posted April 19, 2010 Share Posted April 19, 2010 Looks great, glad the aluminum angle worked out well for you. Looking forward to the amp review as well. Quote Link to comment Share on other sites More sharing options...
samson Posted April 19, 2010 Share Posted April 19, 2010 Everything is looking awesome, now how about the amp review!!![] Quote Link to comment Share on other sites More sharing options...
Moderators Youthman Posted April 19, 2010 Author Moderators Share Posted April 19, 2010 Thanks for the kind words and thx for the idea Rich. Worked out perfectly. Quote Link to comment Share on other sites More sharing options...

Recommended Posts
Join the conversation
You can post now and register later. If you have an account, sign in now to post with your account.
Note: Your post will require moderator approval before it will be visible.