Rudy81 Posted May 12, 2010 Share Posted May 12, 2010 I finally am in the process of building JC's DBB. I spent quite a bit of time looking at the Jubilee clone, the Jamboree and the DBB. For several reasons I decided to make the DBB my first build. I am no woodworker, so this is a first for me. I am looking forward to combining the DBB bass bin with my P. Audio driver and horn in a two way, active setup. The woofers will be the Kappalite 15" drivers. Plywood is 3/4" Baltic Birch. I got a great deal on it and got more than I need, but that just gives me the ability to work on a center channel at some point. I have spent quite a bit of time bugging JC on his build. I will be using his corner porting design. I had looked at porting the back, but decided to keep the project simple and make the cabinets easy to place anywhere in the room. As I first time woodworking project I got lots of ideas from other forum members and several woodworking sites. My thanks to all who have answered my many questions, especially JC, Greg and Pete. Here is the plywood pile which I hope to turn into a working DBB bass bin. Quote Link to comment Share on other sites More sharing options...
Rudy81 Posted May 12, 2010 Author Share Posted May 12, 2010 I needed to pick up quite a few tools for the project. One of the coolest tools I got was a Kreg Jig. I wanted to make the build as efficient and 'solid' as possible. I didn't want to spend a whole lot of time filling and sanding screw holes. So, the Kreg jig seemed like the answer. That tool rocks. Quote Link to comment Share on other sites More sharing options...
Rudy81 Posted May 12, 2010 Author Share Posted May 12, 2010 One issue I worked on for a while was to minimize the number of angled cuts I needed to make. So, I decided to make a few 45 degree edges vs. many more 22.5 degree cuts. That did require a slight trim to the angle 'overhang' in order to get a flush edge. That angle also required me to play around with the Kreg tool settings in order to prevent the screw from perforating the exterior of the cabinet. This shot is during a test to see how it would all come together. I think it will work rather well once everythin is glued and screwed. Quote Link to comment Share on other sites More sharing options...
Rudy81 Posted May 12, 2010 Author Share Posted May 12, 2010 I hope my cuts will be accurate enough to make for good, tight corners. Quote Link to comment Share on other sites More sharing options...
Rudy81 Posted May 12, 2010 Author Share Posted May 12, 2010 Prep continues with the Kreg Jig. Quote Link to comment Share on other sites More sharing options...
jwc Posted May 12, 2010 Share Posted May 12, 2010 Ah.....YES! This is great. I would love to hear those kappalites with the corner ports....keep it comin' Quote Link to comment Share on other sites More sharing options...
Guest David H Posted May 12, 2010 Share Posted May 12, 2010 Looking good, we were overdue for another DBB build. Dave Quote Link to comment Share on other sites More sharing options...
Rudy81 Posted May 12, 2010 Author Share Posted May 12, 2010 Ah.....YES! This is great. I would love to hear those kappalites with the corner ports....keep it comin' JC, you are welcome to stop by any time! Thank you again for all your help and answering my many questions. You should set up JC's FAQ so you don't have to repeat yourself so much. I hope I can do your design justice. BTW, after much thought, since they will live in my home theater and all my other speakers are black, I will likely finish them like you did. I already have experience with black laquer when I re-finished my center La Scala. Speaking of my center channel, you need to come up with a DBB design that is a little 'shorter' so it will fit under my screen. That is why at one time I had asked you if the DBB bass bin could be turned sideways. Quote Link to comment Share on other sites More sharing options...
Rudy81 Posted May 12, 2010 Author Share Posted May 12, 2010 Looking good, we were overdue for another DBB build. Dave I have nowhere near the experience with these builds that you guys do, but I have tried to absorb as much as possible from all the posts. Quote Link to comment Share on other sites More sharing options...
greg928gts Posted May 12, 2010 Share Posted May 12, 2010 Looking good so far Rudy. The Kreg tool works well. We use ours for cabinet work all the time. Greg Quote Link to comment Share on other sites More sharing options...
Rudy81 Posted May 12, 2010 Author Share Posted May 12, 2010 Looking good so far Rudy. The Kreg tool works well. We use ours for cabinet work all the time. Greg Thanks greg and thanks again for all the tips on cabinet construction. I keep picturing the guy or gal who invented the Kreg Jig sitting around sipping totties on some nice Island. That tool is one huge time saver and hopefully will work well. Quote Link to comment Share on other sites More sharing options...
Pete H Posted May 13, 2010 Share Posted May 13, 2010 Looking good so far Rudy. The Kreg tool works well. We use ours for cabinet work all the time. Greg Thanks greg and thanks again for all the tips on cabinet construction. I keep picturing the guy or gal who invented the Kreg Jig sitting around sipping totties on some nice Island. That tool is one huge time saver and hopefully will work well. Looking good Rudy! You're going to have the Kappalite's up and pumping in no time.[Y] Quote Link to comment Share on other sites More sharing options...
Rudy81 Posted May 13, 2010 Author Share Posted May 13, 2010 Pete: I decided to work the build in a couple of stages. I''m going to fully build the bass bins with gule and seall all seams properly. However, no paint or finish until I decide if they will meet my needs. If things go well, I will then finish the tops and paint. I figure this is the only fair way to test the bins. I thought about just temporarily screwing the cabinets together, but am not sure that would produce the same performance as a properly sealed cabinet. Eash bass bin is taking two an a half sheets of BB. Quote Link to comment Share on other sites More sharing options...
Rudy81 Posted May 13, 2010 Author Share Posted May 13, 2010 Got going early this morning and started by dry fitting the materials to see if I was comfortable gluing things together. Overall the cuts turned out very acceptable. I'm sure not the precision you woodworkers are used to, but good enough that any gaps are very small. Quote Link to comment Share on other sites More sharing options...
Rudy81 Posted May 13, 2010 Author Share Posted May 13, 2010 Having tested the dry fit, I got going with the glue and Kreg screws. BTW, did I mention how cook the Kreg stuff is? As you can see, no screws on the outside at all. I think this will make sanding a minor job prior to painting. Quote Link to comment Share on other sites More sharing options...
Rudy81 Posted May 13, 2010 Author Share Posted May 13, 2010 One down, one to go. Quote Link to comment Share on other sites More sharing options...
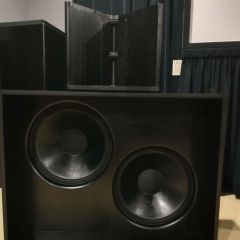
Rudy81 Posted May 13, 2010 Author Share Posted May 13, 2010 The twins debut. Quote Link to comment Share on other sites More sharing options...
Pete H Posted May 13, 2010 Share Posted May 13, 2010 I thought about just temporarily screwing the cabinets together, but am not sure that would produce the same performance as a properly sealed cabinet. The worst thing that could happen is you waste some time and a little plywood if the sound isn't what you are after and it's all glued together, but I can't imagine that you won't like what you hear when you're done. How's the new saw and blade combination working for you? Quote Link to comment Share on other sites More sharing options...
Rudy81 Posted May 13, 2010 Author Share Posted May 13, 2010 Pete, that saw blade cuts through the BB like butter. I just finished making about 40 cleats and it was easy work. I've always known that proper tools make all the difference in the world, but I always took the short cuts before. Not this time and it is paying off. More to follow. Quote Link to comment Share on other sites More sharing options...
jwc Posted May 13, 2010 Share Posted May 13, 2010 Wow....you are flying. Are you gonna make the baffle flush? Can't remember what you told me. Quote Link to comment Share on other sites More sharing options...

Recommended Posts
Join the conversation
You can post now and register later. If you have an account, sign in now to post with your account.
Note: Your post will require moderator approval before it will be visible.