Pete H Posted May 13, 2010 Share Posted May 13, 2010 Got going early this morning and started by dry fitting the materials to see if I was comfortable gluing things together. Overall the cuts turned out very acceptable. I'm sure not the precision you woodworkers are used to, but good enough that any gaps are very small.Rudy, you are a screwing fool[] LOL, You won't ever have to worry about the joints seperating, that's for sure. Looking very good and you may have missed your calling. When are you going to router out the motor boards and how are you mounting the woofer? Quote Link to comment Share on other sites More sharing options...
Rudy81 Posted May 13, 2010 Author Share Posted May 13, 2010 Wow....you are flying. Are you gonna make the baffle flush? Can't remember what you told me. JC, I thought I was going to make the baffle flush, and I looked at that configuration. However, I started to think about the grill and the fact that I am going to mount the woofers on top of the baffle....thus, needing some room for the woofer lip thinkness plus any movement. I finally decided that it would be best to mount the baffle 3/4 inches in from the edge. That leaves me room for the woofer lip and gives me an easy way to mount the grille. I'm all about making it easy on myself. It's Miller time around here, I'm whooped. This is tough working by yourself. Quote Link to comment Share on other sites More sharing options...
Rudy81 Posted May 13, 2010 Author Share Posted May 13, 2010 Rudy, you are a screwing fool LOL, You won't ever have to worry about the joints seperating, that's for sure. Looking very good and you may have missed your calling. When are you going to router out the motor boards and how are you mounting the woofer? Hey, I love to over-engineer the heck out of things. My process thus far has been to glue the edges, then screw every 3 inches or so. I have now added the cleats, which are glued and nailed to the inside. I then went back with a good adhesive caulk and covered every friggin possible air leak. Now, I realize that the baffle will have four HUGE holes, but I think the idea is to get the air coming out of those holes and not the seams. Tomorrow I will fiberglass the seams that don't have cleats...and maybe even the ones that do. I want to be able to use them as personal arks in case of flood. [H] I figure I've gone this far, buying all these tools, bugging you guys and spending the time working on this. Might as well make it the "Mother of All DBB's"! I'm kind of amazed I actually got the pieces to fit. That Jet table saw I picked up off Craigslist was a winner. I will be routing the woofer holes tomorrow. Can't wait to try out the new Bosch router. NO, I didn't have a router before. I am enjoying the hell out of this task. I hope it will be worth the effort. Well, it's Miller time around here. More pics tomorrow. Quote Link to comment Share on other sites More sharing options...
greg928gts Posted May 13, 2010 Share Posted May 13, 2010 Looking good Rudy. Maybe you could expand a little on how you were able to keep the pieces lined up while screwing everything together. Someone recently showed me a trick when glueing pieces together with beveled cuts. You lay the pieces flat on the bench with the long point tips of the bevel cuts against one another, and use a good quality masking tape to make a hinge. Then you flip the pieces over, apply the glue, and fold the pieces together and the tape keeps the long points of the bevels perfectly lined up while screwing or brad nailing. I've done this a couple of times now with smaller items and it worked great! I wonder if it would work on something as large as a DBB or Jamboree? Greg Quote Link to comment Share on other sites More sharing options...
Rudy81 Posted May 13, 2010 Author Share Posted May 13, 2010 Looking good Rudy. Maybe you could expand a little on how you were able to keep the pieces lined up while screwing everything together. Someone recently showed me a trick when glueing pieces together with beveled cuts. You lay the pieces flat on the bench with the long point tips of the bevel cuts against one another, and use a good quality masking tape to make a hinge. Then you flip the pieces over, apply the glue, and fold the pieces together and the tape keeps the long points of the bevels perfectly lined up while screwing or brad nailing. I've done this a couple of times now with smaller items and it worked great! I wonder if it would work on something as large as a DBB or Jamboree? Greg Certainly Greg. Through trial and error I found a solution that worked with these pieces, which are fairly large. The one issue with these pocket screws is that if both pieces are not held pretty steady, they slide around on the glue and get out of alignment. If you look a few pictures up, you will see a 2x4 I cut at a 45 (or whatever angle you need) and locked it into place with a clamp. I could then 'squeeze' the piece with the bevel between that 2x4 and the cabinet. Remember, I had no help, so needed to find a way to steady the pieces while I screwed them together. That technique worked great. Using my body to apply pressure to both pieces, I was able to use one had to ensure alignment on the edge and screw with the other hand. Having prepped the pieces with the Kreg tool was really great. I'm really glad I had that available work table to do all this. My radial arm saw was great to cut the top and bottom 45's. The chop saw helped with sizing small pieces, and of course the table saw did quite a bit of the work. I originally cut the 5x5 sheets as accurately as possible to at least split the 5x5's. I did it to ensure I didn't waste time having to cut a piece again on the table saw. BTW, using the Kreg tool and its pocket holes, I was able to work quickly without having to wait for the glue to dry. The screws held things in place well enough for me to keep working. I'm sure I have a lot to learn, but I have absorbed quite a bit from your Volti site as well as other build threads here on the forum. I am gaining a deeper appreciation for the time and effort you put into your restorations. Thanks again for all your help. Quote Link to comment Share on other sites More sharing options...
Pete H Posted May 13, 2010 Share Posted May 13, 2010 Rudy, you are a screwing fool LOL, You won't ever have to worry about the joints seperating, that's for sure. Looking very good and you may have missed your calling. When are you going to router out the motor boards and how are you mounting the woofer? Hey, I love to over-engineer the heck out of things. My process thus far has been to glue the edges, then screw every 3 inches or so. I have now added the cleats, which are glued and nailed to the inside. I then went back with a good adhesive caulk and covered every friggin possible air leak. Now, I realize that the baffle will have four HUGE holes, but I think the idea is to get the air coming out of those holes and not the seams. Tomorrow I will fiberglass the seams that don't have cleats...and maybe even the ones that do. I want to be able to use them as personal arks in case of flood. I figure I've gone this far, buying all these tools, bugging you guys and spending the time working on this. Might as well make it the "Mother of All DBB's"! I'm kind of amazed I actually got the pieces to fit. That Jet table saw I picked up off Craigslist was a winner. I will be routing the woofer holes tomorrow. Can't wait to try out the new Bosch router. NO, I didn't have a router before. I am enjoying the hell out of this task. I hope it will be worth the effort. Well, it's Miller time around here. More pics tomorrow. You have officially lost it now, OMG, I'm just ROTFLMAO knowing where you are mentally. Let's see, "now I realize that the baffles have big holes, but I want to make sure that the air is coming out the right holes", I'm just lol, remember the e-mail I sent you about getting anal about sealing up a cabinet that has planned big holes in it????????? I really hope you read this in the right frame of mind. Dude, you are fiberglassing a ported cabint..........you could remove all of the screws in the cabinet now and you would still have an airtight cabinet. Did I say that " you are doing a kick as@ job and all of this is just to make you smile??? We all have the tendency to "over engineer" go to the extreme when we're in an area that we're not confident in, but that said, you've taken this opportunity to acquire some great tools and the finished product will sound wonderful and this will be one of the most rewarding projects you've ever done. Rock On and it's Coors light time around here.[][pi][+o(][O] Just in case anyone is wondering about that, It's I know I'm a smart as@ but I'm going to drink some beer, eat some pizze, puke in the morning and well, that just the way it goes some times! Quote Link to comment Share on other sites More sharing options...
Pete H Posted May 13, 2010 Share Posted May 13, 2010 Double post, don't drink and type. Quote Link to comment Share on other sites More sharing options...
Rudy81 Posted May 13, 2010 Author Share Posted May 13, 2010 Pete: I made the 'baffles with big holes' comment for you. I know if I didn't you would question my sanity. Heck, I don't know if it is all necessary. This is my first time building anything like this. I figure if it is worth doing, then do it right. From a common sense standpoint, it stands to reason that if the cabinet leaks air all over the place it can't be good for woofer performance...ported or not. I have some ideas on how to set up the baffle in case I later decide I want to port the enclosure differently, say out the back. I am going to put some rubber gasket material between the baffle edge and the cabinet cleats (they go all the way around the cabinet) and just screw the baffle on. If I ever want to change the layout, I can just make a new baffle and open ports on the back if desired. The tool aquisition has been awesome....let's see, router, table saw, Kreg jig, circle cutting jig, clamps, saw blades, heavy extension cords, orbital sander, etc. etc. I think that finishes most of my shop. I'll be looking for projects at this rate. The nice thing is I tackled that active filtering thing last December. That entailed a whole lot of a learning curve, new pro amps, new crossover etc. I now have a good idea of the P. Audio horn and driver performance for a two way, so I am well on my way to setting this DBB up. I should be up and running in a day or two. [<)] Quote Link to comment Share on other sites More sharing options...
jwc Posted May 14, 2010 Share Posted May 14, 2010 Rudy. This is very cool. So you are going to make a removeable baffle? The one test I always wanted to do was move the position of the woofers more than a concern for the ports. Right now...the design has the woofers somewhere about 17-18" apart. I tried to get them close together........ But I'm curious what the curve would look like with the woofers more seperated. Maybe you could turn this thread into a dbb clinic jc Quote Link to comment Share on other sites More sharing options...
Rudy81 Posted May 14, 2010 Author Share Posted May 14, 2010 Rudy. This is very cool. So you are going to make a removeable baffle? The one test I always wanted to do was move the position of the woofers more than a concern for the ports. Right now...the design has the woofers somewhere about 17-18" apart. I tried to get them close together........ But I'm curious what the curve would look like with the woofers more seperated. Maybe you could turn this thread into a dbb clinic jc That kind of testing could be possible, once I get something working. My brilliant removable baffle idea doesn't sound so good this morning. I am always concerned about providing the woofers as strong and stiff a baffle as possible. With the constant vibration of two big woofers, a non permanent baffle doesn't sound so good. Decisions, decisions. Quote Link to comment Share on other sites More sharing options...
Pete H Posted May 14, 2010 Share Posted May 14, 2010 Rudy. This is very cool. So you are going to make a removeable baffle? The one test I always wanted to do was move the position of the woofers more than a concern for the ports. Right now...the design has the woofers somewhere about 17-18" apart. I tried to get them close together........ But I'm curious what the curve would look like with the woofers more seperated. Maybe you could turn this thread into a dbb clinic jc I don't know if this will tell you exactly what you're looking for but I'm going to be building my second Cornscala BB and then testing it with the first one in a DBB configuration with the 2 15 BB's stacked, but they will be in two completely seperate boxes. Didn't someone post something during your original build about how far the woofers should be seperated? I can't remember exactly but maybe you do. Quote Link to comment Share on other sites More sharing options...
Pete H Posted May 14, 2010 Share Posted May 14, 2010 I picked up something the other day that might be useful to you and anyone else building tanks like these. It's a Magna Cart (small collapsible hand truck) that will hold 150 lbs but folds up in seconds to about 2" by 24" and it works great for moving speakers and cabinets around. Much easier than a large appliance dolly.http://www.google.com/products/catalog?rlz=1T4ACAW_enUS303US303&q=magna+cart&um=1&ie=UTF-8&cid=12669851821600588393&ei=6T3tS7qONMOqlAeP4_20CA&sa=X&oi=product_catalog_result&ct=result&resnum=2&ved=0CDIQ8wIwAQ# Quote Link to comment Share on other sites More sharing options...
Rudy81 Posted May 14, 2010 Author Share Posted May 14, 2010 Pete. The only discussion I recall in JC's original post concering driver distance had to do with JC's concern over comb filtering and frequency cancellation between the drivers. I think someone, more expert than us, indicated that it would not be a problem. However, considering the interaction of the ports and their locations, I can't imagine moving the woofers a few inches is going to make much difference. Then again, I could be way off. After my first cup of coffee some critical decisions have been made. The final version will have the baffle permanently attached. But, I will initially not glue it and lug it upstairs (just one of them) for some testing. I will run a few response tests on the bass bin vs. my Khorn. I'd hate to have it all finished and then find out something is not right. No use getting in a hurry at this point. I must admit, now that they are looking like bass bins it is hard not to want to get done. Quote Link to comment Share on other sites More sharing options...
Pete H Posted May 14, 2010 Share Posted May 14, 2010 OK, so you've been up since bright and early this morning and no updates except that we know you had your morning coffee and your not going to glue a piece. We need pictures with 2 big Kappalites installed. [] Quote Link to comment Share on other sites More sharing options...
Rudy81 Posted May 14, 2010 Author Share Posted May 14, 2010 You want pictures! You want pictures! You can't handle the pictures! I have not been on the laptop since I have been in the shop since my morning coffee. I probably won't get to mounting the woofers, but the bass bins are practically done. I came in to get the dimensions of the corners....so there. BTW, I had no idea working with fiberglass was so friggin messy. Won't be doing that again in the near future....not worth it. Stand by for pictures this evening. [H] Quote Link to comment Share on other sites More sharing options...
Rudy81 Posted May 14, 2010 Author Share Posted May 14, 2010 Finished the basic cabinet walls and cleats. Worked on the baffles and woofer holes. First time making round holes, so it was slow going. Actually loved the plunge router and the circle jig. I decided the prudent man would make a test run before ruining the baffles I made. This my first circle. As it turns out, I made the first one abou a sixteenth of an inch too small. Quote Link to comment Share on other sites More sharing options...
Rudy81 Posted May 14, 2010 Author Share Posted May 14, 2010 This is that test board. Although you can't tell, one side of the woofer is just off the baffle. Glad I made a test run first. Quote Link to comment Share on other sites More sharing options...
Rudy81 Posted May 14, 2010 Author Share Posted May 14, 2010 First hole on one of the baffles. Quote Link to comment Share on other sites More sharing options...
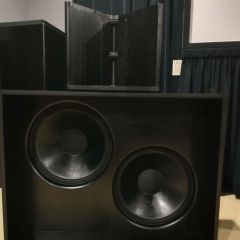
Rudy81 Posted May 14, 2010 Author Share Posted May 14, 2010 BTW JC, as you can see by the picture above, those drivers are HUGE! There would only be an inch and half where I could move the woofer off center. Not worth testing that. Hey, it worked! Quote Link to comment Share on other sites More sharing options...
Rudy81 Posted May 14, 2010 Author Share Posted May 14, 2010 One down, one to go. Quote Link to comment Share on other sites More sharing options...

Recommended Posts
Join the conversation
You can post now and register later. If you have an account, sign in now to post with your account.
Note: Your post will require moderator approval before it will be visible.