alexg5775 Posted July 10, 2014 Share Posted July 10, 2014 (edited) I recently purchased a pair of epic cf4 and in the next few weeks plan on doing many mods. With much help from Moray James and some research i have done on my own on other epic mods I am ready to begin. These are version 2. Once i finish with mods and everything is done i am going to try them with the 6" port (essentially dropping the tuning and turning them back into ver 1) and see what i like better. Just FYI. So i will be doing a complete brace job. I have already removed speakers and horn and started bracing today so this is were my pics starts. More details on bracing to come. I have ordered and received a pair of EV dh1506 compression drivers. These things are MASSIVE compared to the stock compression drivers. I have not heard them for speakers are bare. Pics to come. I have ordered S.A.E. rated f11 felt, which i will be placing donuts of felt on top of the spider/around the woofer, on the inside gasket of the speakers and also a chamber will be formed behind each woofer. Pics and details to come. I also ordered dynamat to place around the Horn to dampen the horn and will also place around the steel frame of the speakers and other areas. Pics and details to come. My crossovers are over at Bob Crites getting recapped. I will post as my project moves along and I am open to all suggestions and opinions and questions. This is my first time ever doing ANY type of mod to any speaker so this is a learning process for me. I am very excited... Special thanks to Moray James. He has literally spent countless hours with me on phone and through emails helping me out. I appreciate it. On to the pics.... Alex Edited August 12, 2014 by alexg5775 1 Quote Link to comment Share on other sites More sharing options...
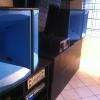
alexg5775 Posted July 10, 2014 Author Share Posted July 10, 2014 Pic of cf4 right next to klipschorn 2 Quote Link to comment Share on other sites More sharing options...
alexg5775 Posted July 10, 2014 Author Share Posted July 10, 2014 (edited) Nothing is glued yet. Hopefully tomorrow i have time to get some more gluing/cutting done. For bracing i am using 3/4" x 2.5" plywood and for stringers i will use 1" x 2" pine. I am using regular carpenters yellow glue. Edited July 10, 2014 by alexg5775 1 Quote Link to comment Share on other sites More sharing options...
alexg5775 Posted July 10, 2014 Author Share Posted July 10, 2014 pic 1 Quote Link to comment Share on other sites More sharing options...
alexg5775 Posted July 10, 2014 Author Share Posted July 10, 2014 (edited) That brace were my thumb is going to be cut and moved down so it is not protruding into the woofers opening at all. There are some small factory bracing (cant be seen) which are in the way so that piece of brace will have to be cut smaller to fit in between factory brace. Edited July 10, 2014 by alexg5775 1 Quote Link to comment Share on other sites More sharing options...
cradeldorf Posted July 11, 2014 Share Posted July 11, 2014 i will be placing donuts of felt on top of the spider/around the woofer, Alex Huh? 1 Quote Link to comment Share on other sites More sharing options...
alexg5775 Posted July 11, 2014 Author Share Posted July 11, 2014 (edited) i will be placing donuts of felt on top of the spider/around the woofer, Alex Huh? I really dont know how to explain it. Next week i will have pics so you can see what i am talking about. Read Morays posts on this page on thread. http://www.audiokarma.org/forums/showthread.php?p=7129834 Alex Edited July 11, 2014 by alexg5775 2 Quote Link to comment Share on other sites More sharing options...
wvu80 Posted July 11, 2014 Share Posted July 11, 2014 (edited) I am also a CF-4 owner. I am very pleased with the sound of my lightly modded speakers, but like most guys if I can improve it, I will. Pictures (of both the old and new) would be helpful, as you are probably making THE go go thread for modding the CF-4's. If you could comment on how they sound to you stock, then how they sound with the mods would be very interesting to any CF owner. It looks like you are doing several mods at one time, so I know it will make it difficult to say which change made which difference in sound. I would also be interested in what the Crites mods are. I am not asking you to give away trade secrets, but if he is changing out caps, etc, it would good to know what changes work best. One thing I am wondering is how the Crites XO's will work with the new EV dh1506 CD's. One last thing, if you could post the costs of the mods, I would be interested. I got such a good deal on the stock units, I'm not sure if pouring big money into upgrades would be the best idea for me. It may be, I'm just not sure. Edited July 11, 2014 by wvu80 1 Quote Link to comment Share on other sites More sharing options...
alexg5775 Posted July 11, 2014 Author Share Posted July 11, 2014 I am also a CF-4 owner. I am very pleased with the sound of my lightly modded speakers, but like most guys if I can improve it, I will. Pictures (of both the old and new) would be helpful, as you are probably making THE go go thread for modding the CF-4's. If you could comment on how they sound to you stock, then how they sound with the mods would be very interesting to any CF owner. It looks like you are doing several mods at one time, so I know it will make it difficult to say which change made which difference in sound. I would also be interested in what the Crites mods are. I am not asking you to give away trade secrets, but if he is changing out caps, etc, it would good to know what changes work best. One thing I am wondering is how the Crites XO's will work with the new EV dh1506 CD's. One last thing, if you could post the costs of the mods, I would be interested. I got such a good deal on the stock units, I'm not sure if pouring big money into upgrades would be the best idea for me. It may be, I'm just not sure. Yes i have read your thread. Pics of the original untouched cf4 bellow. They came with two horizontal braces, one between the top woofer and the tweeter and one behind the lower woofer. You should see these in pics, along with foam. And yes, i am doing all the mods at the same time. I am doing say 5 mods and it would drive me insane taking speakers/horn in and out and listening. I have always been intrigued by these speakers and they came for sale locally and word of mouth is they are suppost to sound better than k horns in smaller cabinet. I initially listened to them against my khorns with 50 watts from a marantz 2252b and i really really liked what i heard. All these mods should make them sound better, and if they are suppost to be sounding better than the khorns this should leave me with a BAD *** pair of speakers I plan on doing a INDEPTH review of these against khorns when all done. And i will also review how they sound compared to stock. As for power i have a 500C getting restored over with Craig, i have a marantz 2330 (130 watts) getting recapped and also biamp the cf4 with probably a pro amp for woofers (thinking a crown k2) and pick the combo i like best and sell of the other. Get me? The only thing crites is doing is recap. He is not changing anything in crossovers. 173$ shipped crites crossover recap 150$ shipped EV dh1506 on ebay 80$ more or less for bracing, glue 63$ shipped dynamat 183$ shipped f11 felt (I should have some left overs) I would say maybe another 50$ on misc supplies, adhesive, tools, etc. I already have a skill saw for cutting wood, FYI. Pic of brace between top woofer and horn. 1 Quote Link to comment Share on other sites More sharing options...
alexg5775 Posted July 11, 2014 Author Share Posted July 11, 2014 Stock Brace behind lower woofer. 1 Quote Link to comment Share on other sites More sharing options...
alexg5775 Posted July 11, 2014 Author Share Posted July 11, 2014 This is were i currently stand with bracing. Everything is glued. There is a horizontal brace under both woofers and under the horn on the baffle and another brace running from this brace to back of box. I ran two brace vertically up the back of the box and one brace running vertically on each side of the box. Moray recommended me i knock out the factory brace but i did not feel comfortable doing this. Next comes the stringers which are 1x2 pine and they pretty much connect the braces together. I will be out of town fri-mon so ill see what i can get done today if not next tuesday i begin again. Fell free to ask any questions and make recommendations. Alex 1 Quote Link to comment Share on other sites More sharing options...
moray james Posted July 11, 2014 Share Posted July 11, 2014 basic brace configuration for optimum brace stiffness is always to have the narrow edge of the brace bonded to the panel. Brace dimension for maximum stiffness is material thickness times 3.5. So if you were using one inch thick sheet goods you would cut your braces 3.5 inches wide and the brace should run up the centre of the panel length wise. In the above photo I see two braces on their sides (one is on a side panel the other is on the back baffle) and they will provide very little stiffening in this position, they need to be mounted on edge. Best regards Moray James. 1 Quote Link to comment Share on other sites More sharing options...
alexg5775 Posted July 15, 2014 Author Share Posted July 15, 2014 So today i worked on speakers for a good 8 straight hours. I have finished the bracing, PIC below. I spoke to Moray after reading his comment above and i installed two braces along side the braces which i had glued with wide part of brace against the back of the box, new braces with narrow side of brace glued to box. If you look closely you can see it in pic. I also dampened the horn with dynamat and made the felt doughnuts as mentioned above. All pics are to come. Lots of patients in doing todays work. This is the FIRST time i do anything like this so i was very careful. I feel like my next set of speakers, if i were to ever mod a pair of speakers like this again, would be so much easier. Alex 1 Quote Link to comment Share on other sites More sharing options...
alexg5775 Posted July 15, 2014 Author Share Posted July 15, 2014 Other brace pic 1 Quote Link to comment Share on other sites More sharing options...
alexg5775 Posted July 16, 2014 Author Share Posted July 16, 2014 This is a pic of felt doughnut for woofer and placing the glue about to glue the seams together. 1 Quote Link to comment Share on other sites More sharing options...
alexg5775 Posted July 16, 2014 Author Share Posted July 16, 2014 Pic of measuring out felt doughnut 1 Quote Link to comment Share on other sites More sharing options...
alexg5775 Posted July 16, 2014 Author Share Posted July 16, 2014 (edited) Here you can see the felt doughnut more clearly. On the inside of the metal strutes of the basket i placed dynamat, on top of the dynamat i will place another piece of 1/8" f-11 felt. I will glue on the felt with adhesive. In this pic i have not glued the felt yet but placed with piece of tape holding it up to visualize the template. Everything i have done i have made templates for with pieces of paper and held it place by tape or something of sort. Edited July 16, 2014 by alexg5775 1 Quote Link to comment Share on other sites More sharing options...
alexg5775 Posted July 16, 2014 Author Share Posted July 16, 2014 And the dynamat on the horn. I will place a little more dynamat around the compression driver do i will update pic when done. 1 Quote Link to comment Share on other sites More sharing options...
alexg5775 Posted July 16, 2014 Author Share Posted July 16, 2014 I am busy with work and family functions for next few days. I will try and get some more work done but might not be able to till next week. All comments and questions are welcomed. Alex 1 Quote Link to comment Share on other sites More sharing options...
moray james Posted July 17, 2014 Share Posted July 17, 2014 The felt doughnut Alex is using is not an optimal execution of this modification but I expect that it will be quite serviceable. It seems the the felt Alex ordered was not to spec being thicker than 1/8 inch. I optimized this modification using three layers of 1/8" S.A.E. rated F-11 acoustical felt. The layers of 1/8" F-11 must be free of one another and the cut seam re attached just as Alex has done in the photo he provided so the seam remains free to flex this is important. The felt disks need to be free to move with each disk being different in OD and ID they follow the profile of the cone. I like to leave at least a 1/8" gap between the felt and the former/cone all the way around. Make sure that the inserted 1/4 inch felt (also F-11) on the basket struts is totally clear of the upper suspension. It may not be easy to see but the basket struts are first lined with dynamat then with a 1/4" layer of F-11. I also place a layer of dynamat on the rear pole plate of the motor assembly. In the case of the CF woofers I coated the whole motor assembly with dynamat. I hope this information is helpful. Best regards Moray James. 2 1 Quote Link to comment Share on other sites More sharing options...

Recommended Posts
Join the conversation
You can post now and register later. If you have an account, sign in now to post with your account.
Note: Your post will require moderator approval before it will be visible.