bliss53 Posted June 9, 2008 Share Posted June 9, 2008 Help me refurbish my new purchase. I have ordered tweeter diaphragms, capacitors, and grill cloth. I am thinking new walnut or cherry veneer. What else would you guys do if they were yours? Quote Link to comment Share on other sites More sharing options...
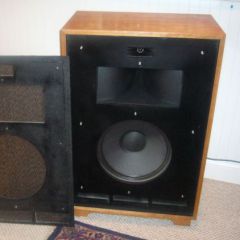
bliss53 Posted June 9, 2008 Author Share Posted June 9, 2008 Here is picture of the other one. The blue tape is holding long splinters out of harm's way. Quote Link to comment Share on other sites More sharing options...
greg928gts Posted June 9, 2008 Share Posted June 9, 2008 Open them up and make sure everything is tight inside. Check and clean wiring connections when you replace the caps. Do you have a shop space to work in for doing the veneer? Greg Quote Link to comment Share on other sites More sharing options...
bliss53 Posted June 10, 2008 Author Share Posted June 10, 2008 Greg, The inside was very clean and tight with no corrosion. I have emptied the cabinets. I have removed the front edge veneer banding because it was coming off anyway. The rest of the veneer is in pretty good shape but oak has always been one of my least favorite woods. Walnut or cherry 4x8 paper backed sheets looks like the way to go. The grills are missing and would need to be constructed. I am wrestling many decisions and choices. 1. Restore them to stock oak 2. Cut the cabinet flush with the motorboard and veneer the motorboard as well. Build a surface mount grill in a custom shape that covers the drivers. 3. Trim 3/8 of an inch from the front edges and adding a solid wood banding with a 1/8 bead detail on the inner edge. 4. Leaving the 3/4 solid edge an adding a 1/8 inch strip to form a beaded inside edge. The banding could have a slight straight bevel. The grill would need to be slightly smaller in that scenario 5. If I end up straying from a straight restoration I would also add recessed custom wood terminal boxes. 6. Add bracing to the interior of the cabinet and to the outside of the back panels. What to do? I have a shop space. I think I have seen your work and work space in some posts. I do not have the shop that you have. I have done small furniture veneer projects but nothing with panels this big. What glue do you prefer and why? Do you butt or miter your veneer cabinet joints? If you miter how do you cut the 45? Does the paper backing show in the joint? Do you cut your own edge banding from the sheets of veneer? Do you use a flush cut router bit to trim your veneer sheets and banding? Thanks for any assistance. Peter Quote Link to comment Share on other sites More sharing options...
Brac Posted June 10, 2008 Share Posted June 10, 2008 2. Cut the cabinet flush with the motorboard and veneer the motorboard as well. Build a surface mount grill in a custom shape that covers the drivers. I can't picture this, but it sounds very intresting...... Quote Link to comment Share on other sites More sharing options...
greg928gts Posted June 10, 2008 Share Posted June 10, 2008 2. Cut the cabinet flush with the motorboard and veneer the motorboard as well. Build a surface mount grill in a custom shape that covers the drivers. I can't picture this, but it sounds very intresting...... Brac, the most famous ones on the forum, Chris King's. Quote Link to comment Share on other sites More sharing options...
greg928gts Posted June 10, 2008 Share Posted June 10, 2008 Peter - So you've got a shop space, and you've obviously got some woodworking background because you're asking good questions and you've veneered some furniture. Now you just need to decide what to do! The bigger panels are no more difficult, just a little more time consuming to "set". I don't now how anyone would miter the joints of veneer at the top and side of a Cornwall. Actually I would call that a bevel, not a miter, but I know what you mean. I couldn't do it. So I just butt them. The nice thing about paper-backed veneer is you don't see the backer because it's so thin. I do plan my layout so the butt joints are less visible. I cut my own edge banding and I do miter those at the corners with a miter guage and knife. If you measure carefully and cut the miters, both sides of the edgebanding will hang over and you can trim both sides. I use a knife and straight edge for trimming, and cut close, but not all the way to the edge, leaving just a bit of the veneer hanging over, then I use a sanding block to finish it off, always sanding down so as not to pull the veneer off the surface. Sometimes I'll clamp my straight edge down so it doesn't slip, and my knife with it. Sometimes I cut up through the veneer to the straight edge held above the veneer. I use Heatlock glue from www.joewoodworker.com and a household iron. I spend a lot of time pressing the veneer down to "set" it in the glue so it won't lift up later. After trimming veneer, I'll take just a little dab of glue on my finger and spread it on the trimmed edge before applying the piece of veneer over it. That way the sheet really sticks right up to the very edge. Greg Quote Link to comment Share on other sites More sharing options...
bliss53 Posted June 11, 2008 Author Share Posted June 11, 2008 Greg, Thanks for the detailed information. I thing the veneer "beveled" joints I have seen are the result of the veneered plywood being beveled and joined. I think I have made some decisions. I am going to go with cherry. I will trim the front edges back 3/4", add some solid cherry molding frames to the front with a interior bread and making a smaller grill with heritage badges. What do think of attaching the frames with some biscuits for alingment? I am still torn between building some feet as you did or building a traditional riser with an arched front. The idea came from the old advent one. The cornwall always reminded me of the advent utility cabinet. I always preferred the solid wood framed advent cabinet. Who in your experience has the best quality/price paper backed cherry veneer? Given the design what would you do, riser or feet? Thanks, Peter Quote Link to comment Share on other sites More sharing options...
Brac Posted June 11, 2008 Share Posted June 11, 2008 Brac, the most famous ones on the forum, Chris King's That is awsome!!!!!! Quote Link to comment Share on other sites More sharing options...
greg928gts Posted June 11, 2008 Share Posted June 11, 2008 I like your idea of the trim on the front. Picture below shows what I did on a pair of JBL's one time. I used beveled oak pieces, I brought the side veneer over the side of the trim and put veneer on the front and then painted the inside edge with the front of the speaker. It made it look like the sides of the speaker were solid wood. I use Rustoleum Satin Black paint for painting the fronts and backs of the speakers. I veneer first, use newspaper and tape to mask off the veneer, paint, then finish sand and finish the veneer. This way the edges of the veneer get painted too. I use 1/4" luan plywood for grill frames for Cornwalls. It's easier to stretch and staple the grill cloth on it than to try and stretch and glue it onto the thinner material. Paint it first. I don't now about best price, but I like the service and quality of the material from www.oakwoodveneer.com Greg Quote Link to comment Share on other sites More sharing options...
greg928gts Posted June 11, 2008 Share Posted June 11, 2008 Here they are with the veneer on and finished. I know someone's going to ask. It's quarter-sawn sapele. Greg Quote Link to comment Share on other sites More sharing options...
greg928gts Posted June 11, 2008 Share Posted June 11, 2008 Here are some Oak La Scalas I did. It would have been more time consuming, but cleaner, to glue and clamp the pieces of trim on and not use nails. I don't think I brought the side veneer over the side of this trim piece. It looks like I put the veneer on first, then the trim, being very careful to hold the trim flush or out just a whisker from the veneer so it could be sanded perfectly flush. You have a random-orbit sander right? Good tips at www.joewoodworker.com and you might find something useful here too www.dcchomes.com/Mkhorn.html Greg Quote Link to comment Share on other sites More sharing options...
bliss53 Posted June 12, 2008 Author Share Posted June 12, 2008 Greg, Random orbit sanders..yes. Thanks again for all the guidance and the great dcchomes pages. You do very nice work. After looking at the shorthorns and the black front cherry project you did I think I have arrived at a plan. I will add mdf pieces to the outside of the motorboard and to the bottom to form a skirt. Then veneer the whole thing. The mitered veneer face joints make me nervous but I am going to give it a shot. I read that heat set glue is tough for this. Any suggestions for this? I am going to try and keep the grill flush. I will put an 1/8" rounded solid cherry trim on the inside edge of the frame. Here is a bad, not to scale sketch. Please give me some feedback on the design (not the art work). I have a thick skin, bring it. Edit: Won't work. No room for ports to breath. Argg. Quote Link to comment Share on other sites More sharing options...
greg928gts Posted June 12, 2008 Share Posted June 12, 2008 I like it. But you may be right about the ports. Is there enough space behind the front frame for air to go in the ports? Port holes through the frame? The craftsman approach. Greg Quote Link to comment Share on other sites More sharing options...
colterphoto1 Posted June 13, 2008 Share Posted June 13, 2008 Greg, I"m gearing up- WHICH Random Orbital Sander? Quote Link to comment Share on other sites More sharing options...
bliss53 Posted June 13, 2008 Author Share Posted June 13, 2008 I know you addressed your question to greg but I can't help myself. I use porter cable electric and pneumatic orbital sanders. Quote Link to comment Share on other sites More sharing options...
bliss53 Posted June 13, 2008 Author Share Posted June 13, 2008 How much would it impact the speaker performance if I were to cover 1-2 inches of the ports on both sides? Or I could possibly leave 5/8 of inch of breathing room in front of the 1-2 inches. Quote Link to comment Share on other sites More sharing options...
greg928gts Posted June 14, 2008 Share Posted June 14, 2008 I've tried Bosch, Makita, Ryobi, and Dewalt, and the Dewalt is the best, but still not smooth enough for me. I'll probably try a Porter Cable at some point, and maybe even look for other brands. The Makitas are nice, very powerful, but they don't have a brake, so when you take them off the work piece they spin out of control. The Bosch was very rough and hard to control, as were the Ryobi's. Always get the hook and loop or get a replacement pad to convert them to hook and loop. I think the Makita sanding discs are the best. Greg Quote Link to comment Share on other sites More sharing options...
bliss53 Posted June 16, 2008 Author Share Posted June 16, 2008 Replaced the tweeter diaphragms and the crossover capcitors (many thanks to Bob Crites). Reassembled them and they sound great. A big improvement over my quartets. I am going to have trouble pulling them out of service for the time it will take to do the veneer work. I covered 1 1/2 inches of the port on either side with mdf using double stick tape. I tried covering the space flush with the motorboard and 5/8 of an inch away from the motor board. I can not hear a difference in either instance from the stock configuration. So it looks like the frame and grill design will work. Quote Link to comment Share on other sites More sharing options...
greg928gts Posted June 16, 2008 Share Posted June 16, 2008 I would opt for the space in front of the ports rather than blocking them partially. I'm not sure either is a good idea. Greg Quote Link to comment Share on other sites More sharing options...

Recommended Posts
Join the conversation
You can post now and register later. If you have an account, sign in now to post with your account.
Note: Your post will require moderator approval before it will be visible.