bliss53 Posted June 18, 2008 Author Share Posted June 18, 2008 New design to make room for the ports. Quote Link to comment Share on other sites More sharing options...
bliss53 Posted July 1, 2008 Author Share Posted July 1, 2008 Got them sounding great with new caps and tweeter diaphragms, now for the refinishing. Sanded down the original finish carefully with a belt sander. Ordered two sheets of 10 mil backed sequential cherry veneer from Oakwood (Thanks Greg). Greg where did you get the veneer trimmer that you use for trimming with the grain? Quote Link to comment Share on other sites More sharing options...
greg928gts Posted July 1, 2008 Share Posted July 1, 2008 Got them sounding great with new caps and tweeter diaphragms, now for the refinishing. Sanded down the original finish carefully with a belt sander. Ordered two sheets of 10 mil backed sequential cherry veneer from Oakwood (Thanks Greg). Greg where did you get the veneer trimmer that you use for trimming with the grain? www.tapeease.com Quote Link to comment Share on other sites More sharing options...
bliss53 Posted July 7, 2008 Author Share Posted July 7, 2008 Got my cherry veneer and the 2 sequenced sheets were slightly damaged. Fdex banged up both ends of the box. I guess I will send them back because I only have 1 1/2 inches of waste for the most of the width of both sheets. Quote Link to comment Share on other sites More sharing options...
bliss53 Posted July 7, 2008 Author Share Posted July 7, 2008 Other end Quote Link to comment Share on other sites More sharing options...
greg928gts Posted July 7, 2008 Share Posted July 7, 2008 Yeah, if you really don't have any to spare, send it back. Too bad. Greg Quote Link to comment Share on other sites More sharing options...
jacksonbart Posted July 7, 2008 Share Posted July 7, 2008 Ouch that sucks Quote Link to comment Share on other sites More sharing options...
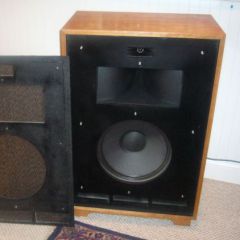
bliss53 Posted July 17, 2008 Author Share Posted July 17, 2008 Another question. My horns and bass driver are mounted to the back of the motor board. Is there any problem with running a 1/4" or 3/8" router round over bit in the motorboard openings to give a slight horn shaped look to the openings? Quote Link to comment Share on other sites More sharing options...
whamo Posted July 17, 2008 Share Posted July 17, 2008 No, there's no problem doing that. It's been done before by HDBR builder. There's pics located somewhere on the server. Good luck. Mark Quote Link to comment Share on other sites More sharing options...
bliss53 Posted July 20, 2008 Author Share Posted July 20, 2008 Greg, Got two new sheets of undamaged cherry last week. I have a question. The sheets have a large number of dark slivers in the grain. As an example you can see a few in the damaged picture above. Should I accept this and not send it back or is this pretty standard for cherry? Peter Quote Link to comment Share on other sites More sharing options...
bliss53 Posted July 20, 2008 Author Share Posted July 20, 2008 Here are some pics of the veneer "slivers" Quote Link to comment Share on other sites More sharing options...
greg928gts Posted July 23, 2008 Share Posted July 23, 2008 The short answer is yes, it's normal. But it all depends on the grade, the price you paid, what was communicated to the supplier, what kind of mood the person picking the material was in that day, etc... I'm sure you could get completely clear cherry if you asked for it. Greg Quote Link to comment Share on other sites More sharing options...
bliss53 Posted July 24, 2008 Author Share Posted July 24, 2008 I paid $190 for two sequential sheets of paper backed cherry. The first shipment that was damaged was almost clear. I guess it is like sending back a meal at a restaurant. Quote Link to comment Share on other sites More sharing options...
bliss53 Posted June 15, 2009 Author Share Posted June 15, 2009 First of all thank you for all the great posts of past projects on the site and especially to Greg for the detailed tips and pictures on his site. http://www.dcchomes.com/Gregsaudio.html Finally started the veneering after the sanded cabinets sat waiting in my shop for almost a year. I picked up some lascalas that put the project on the back burner. I decided to restore them to a stock look rather than do any big modifications. I procededwith a final fill and sand of the cornwall cabinets. Layed out the cherry veneer and found that it would have been better to two 10 foot sheets rather than two 8 foot sheets. That way the layout for the four surfaces of each cabinet could have been consecutive. Painted the cabinets and veneer sheets with heatlock glue. Wrapped one speaker. Sides first, then top and bottom. Found that using a wide putty knife as a spacer while trimming the cross grain left nice uniform edge of veneer that could be sanded flush eaisly. Veneer trimmer worked great in the straight grain cuts if you cut with the feathered direction of the straight grain. The paper backed veneer from oakwood was very easy to work with and left great looking corners. I will work on the mitered edge banding this week in the evenings after work and take some pictures. Quote Link to comment Share on other sites More sharing options...
greg928gts Posted June 15, 2009 Share Posted June 15, 2009 Can you talk a little more about how you used a putty knife as a guide to cut the end grain edged of the veneer? Picture? Greg Quote Link to comment Share on other sites More sharing options...
JJkizak Posted June 15, 2009 Share Posted June 15, 2009 I have a Rigid orbital sander one (6") with the vacuum suction holes in the disc and pad and it does work extremely well. JJK Quote Link to comment Share on other sites More sharing options...
jorjen Posted June 15, 2009 Share Posted June 15, 2009 Greg, I don't know if you remember the set of Cornwalls I did in oiled Flat cut Cherry, but I beveled the ends(only the end joints)of my sheets of paper backed veneer from Oakwood with a picture frame matte cutter. I made 4 to 5 passes with increasing depth/pressure, worked like a charm. Quote Link to comment Share on other sites More sharing options...
bliss53 Posted June 16, 2009 Author Share Posted June 16, 2009 Greg, I wanted to reduce the stress on the glued edges as I cut so I remember hanging wallpaper (which I really dislike) and it occurred to me that this would not stress the edge and leave small uniform overhang and protect the freshly placed side veneer from my unsteady knife. Sorry for the crude drawing. Quote Link to comment Share on other sites More sharing options...
greg928gts Posted June 16, 2009 Share Posted June 16, 2009 Greg, I don't know if you remember the set of Cornwalls I did in oiled Flat cut Cherry, but I beveled the ends(only the end joints)of my sheets of paper backed veneer from Oakwood with a picture frame matte cutter. I made 4 to 5 passes with increasing depth/pressure, worked like a charm. Hi Jordan, nice to see you posting again. I'm sorry, but I'm not sure what you mean by beveling the end joints. Greg Quote Link to comment Share on other sites More sharing options...
greg928gts Posted June 16, 2009 Share Posted June 16, 2009 Greg, I wanted to reduce the stress on the glued edges as I cut so I remember hanging wallpaper (which I really dislike) and it occurred to me that this would not stress the edge and leave small uniform overhang and protect the freshly placed side veneer from my unsteady knife. Sorry for the crude drawing. Ah yes, I see. With the backer board that would work well. I have tried cutting from the back side and I got a lot of chips in the veneer as the knife blade passed through the top veneer, but with a backer board, that probably wouldn't happen. Thanks for the picture and explanation. Greg Quote Link to comment Share on other sites More sharing options...

Recommended Posts
Join the conversation
You can post now and register later. If you have an account, sign in now to post with your account.
Note: Your post will require moderator approval before it will be visible.