John Warren Posted May 17, 2010 Share Posted May 17, 2010 John, that looks like a product you pick up at the audio store. Nice job. Thanks. The idea was to go the JBL old school approach. I think oil walnut is too dark. If I had it to do over again, I would have gone with a lighter species of veneer (Maple maybe). Quote Link to comment Share on other sites More sharing options...
Rudy81 Posted May 17, 2010 Author Share Posted May 17, 2010 John, very nice. I am in the process of deciding how to finish my cabinets. My goal is to keep the cost and the difficulty level down. My initial idea was to finish them like JC did his, in black. Specifically, Black Lacquer to match my La Scala center. I have also been contemplating a veneer, but the issue with the DBB is that when you are looking at them from the front you don't see much of any veneer. You would have to walk around the speaker to see the grain. I'm just not sure it is worth the trouble in my situation since they will live in my HT, which is all black. At least the other speakers and the curtains. Quote Link to comment Share on other sites More sharing options...
Rudy81 Posted May 17, 2010 Author Share Posted May 17, 2010 When I found my measurements didn't show low end it was usually because I didn't change the microphone for input from internal computer mic to external mic. If I hadn't measured for a while this isusually my first oops. You might not have done this but I thought I'd mention it because I have. seti, I spent several hours working on the REW setup for taking measurements. REW uses the "Line In" vs. the mic input on an audio card. So, the mic thing wasn't it. I also looked at every Khorn reading I have taken over the past few years and they all are pretty close in results. I also moved the mic around the room to see if I was getting any room cancellations or other issues. The mic reads well even below 20Hz, when testing my subwoofers. So, I think the mic and setup is fine. When I test the system with Audyssey engaged, I get a rather flat response 20-20000. All I can surmize is that since my Khorns are not in a 'real' corner, frequencies below 50Hz are really suffering. Audyssey can obviously boost those frequencies to compensate for the roll off. Bottome line, now I'm even happier I'm building the DBB, no corner required. Quote Link to comment Share on other sites More sharing options...
seti Posted May 18, 2010 Share Posted May 18, 2010 Cool. I was just letting you know what I did wrong just in case it was helpful : ) I have to measure a sub today. Should be interesting. Quote Link to comment Share on other sites More sharing options...
Rudy81 Posted May 18, 2010 Author Share Posted May 18, 2010 Good luck with the build. Quote Link to comment Share on other sites More sharing options...
aj01 Posted May 18, 2010 Share Posted May 18, 2010 Do you have a frd or zma file for the kappalites? Probably not since you're active, but just wondering... Quote Link to comment Share on other sites More sharing options...
Rudy81 Posted May 18, 2010 Author Share Posted May 18, 2010 Do you have a frd or zma file for the kappalites? Probably not since you're active, but just wondering... I might, but I don't know what those files do....assume I'm ignorant and we're way ahead.[] Quote Link to comment Share on other sites More sharing options...
aj01 Posted May 19, 2010 Share Posted May 19, 2010 You can input them into some of the home-brew crossover calculators. I'm kind of thinking about getting a woofer tester program just to be able to understand some of the loading better. Active may be a better way to go... Quote Link to comment Share on other sites More sharing options...
Rudy81 Posted May 19, 2010 Author Share Posted May 19, 2010 You can input them into some of the home-brew crossover calculators. I'm kind of thinking about getting a woofer tester program just to be able to understand some of the loading better. Active may be a better way to go... That is precisely why I went active at the end of last year. I knew I needed to be able to cross higher than 400Hz to be able to use most drivers in order to achieve a 2 way setup. So, I plunged into the active realm and am glad I did. Now, it is time to find a way to get a bass bin to cross higher than 400Hz and one that has that ability. I chose to go the DBB route for my first DIY bass bin. JC was good enough to send me his plans and he has been helping me all along. I am building the top hat today and should be ready for sanding and priming tonight. Quote Link to comment Share on other sites More sharing options...
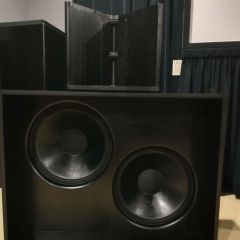
Rudy81 Posted May 19, 2010 Author Share Posted May 19, 2010 I'm getting a real appreciation for speaker builders. Not to mention the fact that JC had already done the research and setup. All I'm doing is the cabinet build. Building the top hat was a little tedious in order to figure out how I wanted to set it up. I was originally going to make it the exact size needed by my P. Audio horns, but decided that my propensity to change gear is not going to end here. So, I made the top hat larger than required in case I even want to change the horn. I don't want to have to totally build another top hat, just the horn motorboard will do. So, I went with JC's 12" high figure. This is how the top hat ended up, before sanding and attaching the parts. Quote Link to comment Share on other sites More sharing options...
Rudy81 Posted May 19, 2010 Author Share Posted May 19, 2010 One design feature I struggled with was how to construct the back side of the top hat. From even a 45 degree angle, it doesn't matter if the top hat is squared off, or mimics the bass bin dimenstions. I went for the simple construction and just made it rectangular. Quote Link to comment Share on other sites More sharing options...
Rudy81 Posted May 19, 2010 Author Share Posted May 19, 2010 Now off to sanding and priming. Quote Link to comment Share on other sites More sharing options...
Pete H Posted May 20, 2010 Share Posted May 20, 2010 Looking good Rudy! Smart choice to go larger than you need with the top section as I'm sure at some point you will play with the combination. What's the different piece of wood on the side of the top? Quote Link to comment Share on other sites More sharing options...
Rudy81 Posted May 20, 2010 Author Share Posted May 20, 2010 Pete, the different lumber is a piece of 2x6 I ripped to fit. that is going to be the sides of the motorboard and I wanted a nice thick piece to provide support to the motorboard. Basically I copied the design of my Khorn in order to make the system easy to change....should that ever be an issue. Quote Link to comment Share on other sites More sharing options...
Rudy81 Posted May 20, 2010 Author Share Posted May 20, 2010 Learned a good lesson today. Yesterday, I decided to go all out and add a good latex primer to the cabinets in order to get a really nice finish. Figured I'd gone this far so might as well do it up right. My plan had been to lacquer the cabinets to match my La Scala center with a finish as close to the Klipsch original as I could. I have done this before in repairing said La Scala and it turned out great. However, in my zeal, I did not research the use of a letex primer before a lacquer coat. It turns out you can't really do that and expect good results. So, the Sherwin Williams guy talked me out of the laquer and into a good oil paint. I hate working with oil, it is messy and takes a long time to dry. But, that's what I ended up doing. I have been waiting all afternoon for the first coat to dry. I need two coats since my spraying technique leaves something to be desired. So, here are a couple of pictures while I watched paint dry. BTW, the primer did make for a really nice surface to paint. Quote Link to comment Share on other sites More sharing options...
Rudy81 Posted May 20, 2010 Author Share Posted May 20, 2010 In orde to make sure the paint flowed well in my HVLP gun with a laquer tip, I did a 1 to 5 dilution with mineral spirits. So far, it looks fairly good and I hope that helped to tone down the semi-gloss finish. I don't want too much of a sheen for my HT. Quote Link to comment Share on other sites More sharing options...
Rudy81 Posted May 20, 2010 Author Share Posted May 20, 2010 I hope to get the second coat on tonight and then put the top hat and finish the motorboard tomorrow. The good news is that I'm almost done with the build. The bad news is that I won't get to play with this stuff for the next two weeks due to an upcoming business trip. At least I will have something new to look forward to when I get back. I hope all this work has been worth it. BTW JC, I don't know how you keep building these things. That is a lot of work! Quote Link to comment Share on other sites More sharing options...
Rudy81 Posted May 21, 2010 Author Share Posted May 21, 2010 Second coat complete and will check on things tomorrow morning. Hopefully I will be able to post a complete cabinet. Tomorrow will see the top hats put together and the motorboard routed to have the P. audio horn flush. I will also be adding the polyfill I got for the bins. I should be able to also add the wiring and terminal strips. I now have a huge mess in the shop, but I'm almost done. I also have twice as many tools as I did before. Nice side benefit for a beginer like me. All in all, I am really looking forward to voicing the speaker and seeing what it can do and how it will perform in my room. Quote Link to comment Share on other sites More sharing options...
Pete H Posted May 21, 2010 Share Posted May 21, 2010 Which HVLP set up are you using? I don't own one and have been reading a little bit here and there but painting anything has always been my least favorite thing to do, so need a simple system. You're probably ready for a business trip to get a break from working[], you've been putting in a lot of hours on this for sure. Quote Link to comment Share on other sites More sharing options...
DrWho Posted May 21, 2010 Share Posted May 21, 2010 Dang you've been busy. FWIW, you can use the waterfall plots in REW to determine how much stuffing you need in the box. You really want to use the minimum amount because the stuffing acts like ESR to the rear volume capacitance, which will lower the efficiency a little bit and widen the Q at Fb...which means a slower, but earlier rolloff. It's a minor thing in the grand scheme of things, but I thought I'd throw it out there since you're going overkill on everything [] Btw, I would really try to hunt down the source of those dips you see. When you measure outside, try putting the mic on the ground and tilt the speaker forward to make sure it's not a boundary reflection related dip. My fear is that it's a reflection off the rear of the cabinet and the angled walls are focusing it at the woofer.... Another thing to do is use the test tone generator and play constant tones through the speaker...as you move the tone around, look (listen) for vibrations and other weird noises. Don't crank it up too loud, but loud enough to get things moving. Quote Link to comment Share on other sites More sharing options...

Recommended Posts
Join the conversation
You can post now and register later. If you have an account, sign in now to post with your account.
Note: Your post will require moderator approval before it will be visible.