Rivernuggets Posted August 19, 2011 Share Posted August 19, 2011 (edited) Got these beautiful sounding Cornwalls from tidmack. Thanks again! Both Dust caps were crunched in and punctured. I bought new dust caps from Parts Express, lots of diameter and material options (Paper, Poly, and Aluminum). Here's the start. Edited February 11, 2015 by Rivernuggets Quote Link to comment Share on other sites More sharing options...
Rivernuggets Posted August 19, 2011 Author Share Posted August 19, 2011 Chunks pulled off easy. Then it's cutting out the old with a break-off blade. Quote Link to comment Share on other sites More sharing options...
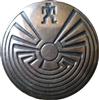
Rivernuggets Posted August 19, 2011 Author Share Posted August 19, 2011 Vacuum everything very well. Leave no chunks down in there. This magnet is a little corroded and has been scratched quite a bit, poor guy. Quote Link to comment Share on other sites More sharing options...
Rivernuggets Posted August 19, 2011 Author Share Posted August 19, 2011 Use a piece of tape folded over on itself to stick onto the dust cap dome. Glue around the perimeter. I used this stuff from Parts Express. Quote Link to comment Share on other sites More sharing options...
Rivernuggets Posted August 19, 2011 Author Share Posted August 19, 2011 Bam! Quote Link to comment Share on other sites More sharing options...
Rivernuggets Posted August 19, 2011 Author Share Posted August 19, 2011 The glue dries clear. Quote Link to comment Share on other sites More sharing options...
Rivernuggets Posted August 19, 2011 Author Share Posted August 19, 2011 Here's the other dust cap removed. This magnet is in much better shape. Quote Link to comment Share on other sites More sharing options...
Rivernuggets Posted August 19, 2011 Author Share Posted August 19, 2011 Here the left one still needs to cure. I placed a folded towel on each new dust cap to give slight pressure while the glue dries. That's it! New dust caps for around $10 plus shipping. Quote Link to comment Share on other sites More sharing options...
davis419b Posted August 19, 2011 Share Posted August 19, 2011 I am curious as to how to get a dust cap off that is not torn or pushed in without destoying it ? Quote Link to comment Share on other sites More sharing options...
Rivernuggets Posted August 20, 2011 Author Share Posted August 20, 2011 I am curious as to how to get a dust cap off that is not torn or pushed in without destoying it ? You can get a dust cap off without damaging it. Tough part would be getting it back on. No matter how careful you are, once you cut it out you'd have to add material to the gap created by the cutting. Glue does gap-fill to an extent, but I wouldn't trust it enough. I understand the desire to keep things original, but what do you want to do? Quote Link to comment Share on other sites More sharing options...
JL Sargent Posted August 20, 2011 Share Posted August 20, 2011 I have used a very thin and sharp scalpel to carefully cut the cap off around the edge. Worked out real nice. Quote Link to comment Share on other sites More sharing options...
formica Posted August 20, 2011 Share Posted August 20, 2011 Nice step by step Rivernuggets... Quote Link to comment Share on other sites More sharing options...
davis419b Posted August 20, 2011 Share Posted August 20, 2011 I am curious as to how to get a dust cap off that is not torn or pushed in without destoying it ? You can get a dust cap off without damaging it. Tough part would be getting it back on. No matter how careful you are, once you cut it out you'd have to add material to the gap created by the cutting. Glue does gap-fill to an extent, but I wouldn't trust it enough. I understand the desire to keep things original, but what do you want to do? I recently bought a set of Fortes from the original owner that were in pretty nice shape. When I went to look at them both dust covers were missing. When I asked what happened to them he said they fell off but he still had one. I looked at parts express but they didnt look the same at the base of the cover as it looked like there was more flat area than the one I have. Maybe you are supposed to trim to fit. I have a 15" woofer from a Cornwall that the rats chewed a hole in the paper cone but the dust cover is exactly what I have. I thought about removing it and using it to repair the passive but I did not want to destroy it getting it off. I have never repaired a speaker and just looking for advice. Quote Link to comment Share on other sites More sharing options...
Boxx Posted August 21, 2011 Share Posted August 21, 2011 Very impressive project.... Your photo's are very helpful in showing what you were doing... Thanks.... Quote Link to comment Share on other sites More sharing options...
Marvel Posted August 21, 2011 Share Posted August 21, 2011 Michael Colter painted some K22s a few years ago. This link takes you to page 5, where there are some pics (not the best pics). Page 1 he tells the paint used. SEM for vinyl restoration. Worked great for those old, faded cones. http://forums.klipsch.com/forums/t/59999.aspx?PageIndex=5 (link opens in new window) Bruce Quote Link to comment Share on other sites More sharing options...
Rivernuggets Posted August 22, 2011 Author Share Posted August 22, 2011 I thought about removing it and using it to repair the passive but I did not want to destroy it getting it off. That should work fine. Don't be in a hurry when cutting along the glue line (pic 2 of this thread). It's better to do more back-and-forth sawing motion with the blade, instead of pressing the blade through. Some pressure is involved but it's mostly for steering/guiding the blade's direction. Use a blade that is short in height, like the above two in this picture. It will be easier to turn while cutting. Or a scalpel, like JL Sargent suggested, would work even better. Talk about precision! Quote Link to comment Share on other sites More sharing options...
Rivernuggets Posted August 22, 2011 Author Share Posted August 22, 2011 Bruce, thanks for the link concerning faded woofer cones. That should bring mine back from the faded dead. "SEM 15243 Color Coat Satin Black Flexible Coating". Thank you Michael, for giving it a shot. Quote Link to comment Share on other sites More sharing options...
djk Posted August 22, 2011 Share Posted August 22, 2011 http://forums.klipsch.com/forums/p/115551/1164978.aspx#1164978 Quote Link to comment Share on other sites More sharing options...

Recommended Posts
Join the conversation
You can post now and register later. If you have an account, sign in now to post with your account.
Note: Your post will require moderator approval before it will be visible.