inMotionGraphics Posted April 21, 2019 Share Posted April 21, 2019 I’m in the process of building a speaker (and lighting) cloud that will enable me to add in-ceiling speakers for Dolby Atmos, and I was hoping I could tap into the vast experience you guys have developed over the years building and tweaking your home theatres with Klipsch speakers. This is going to get a bit complicated and I apologize in advance, but I will do my best to provide you with as much context and information as possible so that you can advise me on the best route forward. Now the reason I need such a complicated solution is because I have a cement slab for a ceiling, so I can’t mount in-ceiling speakers in the ceiling directly. I’ve also used this as an opportunity to build an interesting drop ceiling effect with secluded LED light strips around the perimeter ceiling and my cloud in the middle – just in case you’re wondering why the madness… 😊 Here's what it will look like from ground looking up. The grey parts are the drop ceiling and cloud which drops 20cm from the cement slab (these will have secluded LED strip lights around them), the white part is the slab and the round white dots are LED downlights. The cloud will be built using 15mm thick Baltic Birch Ply (unless you have any better recommendations). I considered MDF but it’s too heavy. Apologies for the metric dimensions, but I’m hopeless at the Imperial system… [all dimensions in diagrams are in centimeters] I’ve purchased the PRO-180RPC In-Ceiling Speakers, and I have been in contact with Klipsch support seeking advice on what would be best for these specific speakers. However I wasn’t really able to get a definitive answer from them for my unique situation. This is the gist of what they say: “Our in-ceiling and in-wall speakers are designed to work with an infinite baffle so a speaker cloud with no backing to close it would work well in this case.” “The box size with not have any affect on the sound of the speaker. So build what ever size works for your building needs.” The reason why I do need some kind of partition for the speakers is because the middle part of the cloud will have slots cut into it and filled with Rockwool to act as acoustic dampening similar to this: https://www.genesisacoustics.co.za/productdetails.php?id=100101 to help deal with reflections from the ceiling. Since rockwool is fibrous and messy, I want to keep it away from my speakers. Having built speakers and subwoofers in the past, my first instinct is to build individual sealed boxes within the cloud for each speaker according to “perfectly calculated” volumes, however this doesn’t seem to apply to these speakers according to Klipsch. The other concern I have and reason for a closed system is to try and reduce sound from the speakers hitting the cement slab and transferring through to the neighbours upstairs (or at least any more than it does already). So here are the three options I’m trying to decide between, from easiest to most complicated to implement, along with any concerns I have with each: Option 1: Simple Partition As seen in the image above, I simply add a divider between the cement slab and cloud base (baffle) that stretches from one side to the other of the cloud. This is the simplest to construct and will save some weight. Concerns and potential issues: An LED downlight on either side of each speaker section will be included in the box. Not sure if this will have an adverse effect on the sound. There is nothing between the back of the open speaker and the cement slab above it, so I’m worried about more sound transferring to the apartment upstairs. I’m also wondering if cement slab essentially forming the back side of the speaker box will have a negative effect on the sound quality. Option 2: Sealed Partition that excludes the downlights This is exactly the same as the one above, except I’ve now added side panels to seal the speakers off from the downlights. Again, the cement slab will form the back side of the “speaker box”. Same concerns and potential issues regarding the cement slab. Option 3: Fully Sealed Speaker boxes This was my original and more ambitious plan. Here I’ve lowered the partition walls to 14cm and added a wooden back panel to seal the box off. There will be a 3cm gap between the 15mm ply board and the cement slab, which I will fill with 3cm thick rockwool in case it helps absorb the sound travelling through to the slab. Advantages (at least in my simple mind): Speaker has it’s own sealed box (Klipsch says this isn’t necessary, but I still can’t wrap my head around it, so maybe you guys can cure my stubbornness if I’m being ridiculous). Sound travelling through to the slab above could be reduced somewhat. Even Klipsch claim that their ME-800-C metal enclosure reduces sound transmission by at least 10db. The 3cm air gap and insulation could also help reduce sound transfer to slab. Disadvantages More time consuming to build More wood required, added expense and added weight. The weight is the greatest concern here. Taking all the above into consideration, which option would you guys recommend. If I can avoid option 3 with little to no adverse effects, then that would be preferable, but I’ve spent a lot on these speakers and the construction so far, so I want to do what is going to sound the best at the end of the day. I’m sure you guys know what I mean… 😉 Thank you for your patience and taking the time to read this, and I appreciate any input and advice you guys have to offer. Thank you Brendon Quote Link to comment Share on other sites More sharing options...
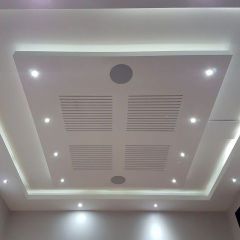
inMotionGraphics Posted May 16, 2019 Author Share Posted May 16, 2019 I completed my ceiling cloud and drop ceilings about 2 weeks ago, and thought I'd share some photos of how it turned out in case anyone is interested. I'm really happy with everything, and those PRO-180RPC's sound great! This expands my theater to 7.2.2. Totally worth the effort and expense... At over 100kg, getting this monstrosity (the center speaker cloud) mounted to my abnormally high ceiling slab (3.3m) was a huge challenge, but glad it all worked out well in the end. It took a total of 5 days and 3 hours from the first bit of glue and screw until it was mounted with one coat of primer and one top coat of paint, and the down lights installed. Then I spent an additional day wiring the LED strip lights. It still needs another coat of paint, but I ran out of time before my family arrived for a week long visit... 🙂 The perimeter drop ceiling was built and painted the week before... so I only needed to do the wiring and install the lights still. And in case you’re wondering, those slats aren’t for design purposes, but are actually for acoustic absorption to try and help with ceiling reflections. I’ve got a 100mm thick layer of Rockwool above those slats. It might sound like a crazy amount of effort to go to for Dolby Atmos, but it's TOTALLY worth it! Cheers Brendon 4 Quote Link to comment Share on other sites More sharing options...
Khornukopia Posted May 16, 2019 Share Posted May 16, 2019 Your speaker cloud and the indirect lighting looks good. The Rockwool will also help with the sound quality inside your room. 1 Quote Link to comment Share on other sites More sharing options...
Moderators dtel Posted May 16, 2019 Moderators Share Posted May 16, 2019 Cool looking cloud, great idea to add what you need and at the same add a great looking feature, love the lights. 1 Quote Link to comment Share on other sites More sharing options...
MenloBob Posted May 16, 2019 Share Posted May 16, 2019 Very nice job. 1 Quote Link to comment Share on other sites More sharing options...
TasDom Posted May 16, 2019 Share Posted May 16, 2019 Way cool, great job! 1 Quote Link to comment Share on other sites More sharing options...
inMotionGraphics Posted May 20, 2019 Author Share Posted May 20, 2019 Thanks guys, I really appreciate you taking the time to look at my photos and your positive feedback. On 5/16/2019 at 8:18 PM, Khornukopia said: Your speaker cloud and the indirect lighting looks good. The Rockwool will also help with the sound quality inside your room. Yeah, I was a bit concerned that the slots would make the entire ceiling cloud look ugly, but I was pleasantly surprised (and relieved) that it actually enhances the overall design and makes the ceiling look more interesting... all the while of course helping to reduce ceiling reflections. I also made my own acoustic panels that include Rockwool and a Flexible Noise Barrier product for the backing to cover the windows and door etc. The 2-fold idea behind these is to reduce acoustic reflections and to reduce the amount of sound getting through the windows and door etc. I might share the construction process of these in a separate post once I've done some before and after measurements in case anyone wants to copy them. On 5/16/2019 at 9:24 PM, dtel said: Cool looking cloud, great idea to add what you need and at the same add a great looking feature, love the lights. Thank you dtel. And yeah, the lights are even better than I imagined they'd be. The recessed LED strip lights are connected to controllers that have a sound to light feature and various other programs so I can have a real night club vibe for parties, and both the downlights and strip lights connect to my Wi-Fi network, so I can control them with my Google Home (voice activated) or via apps. 1 Quote Link to comment Share on other sites More sharing options...
Bronzeman62 Posted May 25, 2019 Share Posted May 25, 2019 Awesome job! Great form and function is always a win in my book. 1 Quote Link to comment Share on other sites More sharing options...
Bronzeman62 Posted May 25, 2019 Share Posted May 25, 2019 (edited) I've found this guy on YouTube who is a wealth of information His DIY videos on acoustics are an college course. His channel is Tech Ingredients and I've included a video on DIY sound absorption panels "ABS" - Absolutely Brilliant Stuff . Edited May 25, 2019 by Bronzeman62 Quote Link to comment Share on other sites More sharing options...
inMotionGraphics Posted May 26, 2019 Author Share Posted May 26, 2019 (edited) 23 hours ago, Bronzeman62 said: Awesome job! Great form and function is always a win in my book. Thank you Bronzeman, and I couldn't have said it better myself regarding form and function... 🙂 "I've found this guy on YouTube who is a wealth of information His DIY videos on acoustics are an college course." No way! I just found this guy a week or so ago too... I'm not sure how I found him, but his video on the "The World's Second best Speaker" most likely followed another home theater related video I was watching... or maybe you even posted it on the forum somewhere, but I immediately went down the rabbit hole watching a number of his "not so short" but very interesting videos, and subscribed to his channel. This is the video that got me to the channel: Cheers Brendon Edited May 26, 2019 by inMotionGraphics Quote Link to comment Share on other sites More sharing options...
Bronzeman62 Posted May 26, 2019 Share Posted May 26, 2019 Me too. Quote Link to comment Share on other sites More sharing options...
LawCPA Posted July 7, 2019 Share Posted July 7, 2019 Great job. It all looks super clean. Did you post on AVS in the Klipsch Owner thread as well?Sent from my iPad using Tapatalk 1 Quote Link to comment Share on other sites More sharing options...
inMotionGraphics Posted July 7, 2019 Author Share Posted July 7, 2019 Thank you @LawCPA, I appreciate your feedback. And no, I haven't shared it on AVS or anywhere else yet. I was planning on posting in the "Lets see your Home Theater" thread on this forum at some point. When I do that, I'll be sure to share it on AVS as well. Thanks for the suggestion. 1 Quote Link to comment Share on other sites More sharing options...
Khornukopia Posted August 16, 2019 Share Posted August 16, 2019 How did you attach the cloud to the ceiling? I don't see any hangers in you pictures. Clean installation. Quote Link to comment Share on other sites More sharing options...
inMotionGraphics Posted August 17, 2019 Author Share Posted August 17, 2019 (edited) 8 hours ago, Khornukopia said: How did you attach the cloud to the ceiling? I don't see any hangers in you pictures. Clean installation. Ah, good question... I built a frame on the cement ceiling slab using galvanized angles (50mm x 25mm x 3.6m) which are just 0.8mm thick and so very light. This is what they look like: https://dbnonline.ubssa.co.za/marley-galv-angle-50x25-3-6m-680894.html. The 25mm side gets fastened to the ceiling and the 50mm side hangs down at a right angle. The sides of the ceiling cloud will be screwed to these 50mm sides. I used 6mm x 50mm Express Nail Anchors (lots of them) to attach the Angles to the cement slab. These work well because all you have to do is drill through the angle and into the cement slab, and then hit them in with a hammer. This is a huge time saver when you need to do one every 30cm or so... I went overkill on this as the last thing I want is for the entire thing to come down on someone. But this thing is strong enough for me to hang on, so no risk of that... 🙂 Here's an image of the Express nails: Now that I have the galvanized frame on my ceiling, the ceiling cloud just slides over this frame, and then I used brass screws to screw through the sides of the cloud and into the angled frame. The galvanized angles are soft enough that you can just screw straight into them without having to drill holes first. I added a screw every 15mm or so, just to make sure that it will never come down on someone's head. Then I used wood filler to cover the counter sunk screw heads and painted over everything. Done! I hope this answers your question, but if anything is unclear, let me know and I'll gladly assist further. Brendon Edited August 17, 2019 by inMotionGraphics 1 Quote Link to comment Share on other sites More sharing options...

Recommended Posts
Join the conversation
You can post now and register later. If you have an account, sign in now to post with your account.
Note: Your post will require moderator approval before it will be visible.