GWSmith Posted August 31, 2007 Author Share Posted August 31, 2007 Hello friends of the Klipschorn! Just wanted you to know, that I was busy last night CLEANING the interior of the horn/tweeter cabinet (with warm water - rags and a drying cloth) taking before and after photos. I didn't realize that the lower wood surface which the xover sits on is a fine veneer! I also cleaned the OEM wiring up which pretty loaded with dust and other debris .. The grills have all been cleaned and dried and look much better. Soon the re-assembly and sprucing up of all the finished wood exterior, followed by a final photo shoot, setup - hookup - and FIRST LISTEN!! Can't wait. Again, check back often to see how its going. ..........Gary Quote Link to comment Share on other sites More sharing options...
GWSmith Posted August 31, 2007 Author Share Posted August 31, 2007 NEW PHOTOS ARE UP.............Please have a look at the latest from this weeks work through this evenings adventures [] Send your thoughts, comments if you approve, have done it differently etc. Right now, I am in the finishing stages, which means that I will now begin work on touching up the cabinets with stain and then oiling them. I was going to use the 50/50 mix of turpentine and raw linseed oil rubbed on with `0000' gauge steel wool, but that may not be necessary here, as there are no deep scratches, and the stains on the top of the horn module are from watering of plants over many years. [*-)] OK, I am about to start uploading. .....Gary Quote Link to comment Share on other sites More sharing options...
GWSmith Posted August 31, 2007 Author Share Posted August 31, 2007 Here is a photo of my method of cleaning... Full garden hose to rinse, then drying cloth on the wood brackets.. Quote Link to comment Share on other sites More sharing options...
GWSmith Posted August 31, 2007 Author Share Posted August 31, 2007 To brighten a bit, I then went to this product. I think it worked just a little. It seems the original color of these grills was a bit of an `off' white.. Well, I did the best with what I had to work with... Let me know if you did like I did here and went WAY beyond the vacuum cleaner! [] Quote Link to comment Share on other sites More sharing options...
GWSmith Posted August 31, 2007 Author Share Posted August 31, 2007 This one shows the start of cleaning the Horn... I used warm water and an old sock. Quote Link to comment Share on other sites More sharing options...
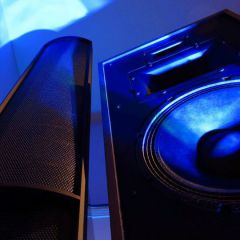
GWSmith Posted August 31, 2007 Author Share Posted August 31, 2007 This one shows the cleaned horn assembly vs. the next one to be started on... Quite a difference don't you think ? Quote Link to comment Share on other sites More sharing options...
GWSmith Posted August 31, 2007 Author Share Posted August 31, 2007 K-55-V drivers are cleaned and ready to re-mount.... Quote Link to comment Share on other sites More sharing options...
GWSmith Posted August 31, 2007 Author Share Posted August 31, 2007 I could NOT believe how LOOSE all this hardware was, and I'm glad I went through each and every screw, nut and bolt ! Quote Link to comment Share on other sites More sharing options...
GWSmith Posted August 31, 2007 Author Share Posted August 31, 2007 Yeah, I even washed all the original white `zip' cord.... Many would have probably changed this out ?? Quote Link to comment Share on other sites More sharing options...
GWSmith Posted August 31, 2007 Author Share Posted August 31, 2007 Washing the beautiful bass module veneer! This pair has such a nice pattern - a first rate job on behalf of the crew who built them! [] Quote Link to comment Share on other sites More sharing options...
GWSmith Posted August 31, 2007 Author Share Posted August 31, 2007 You gotta love the quality of wood materials used. I'm not sure if the 60th anniversary models are made like this. Maybe MDF ? or are they using this kind of ply core still ? Quote Link to comment Share on other sites More sharing options...
GWSmith Posted August 31, 2007 Author Share Posted August 31, 2007 Side `filler' grills are cleaned-dried and ready to be installed... Quote Link to comment Share on other sites More sharing options...
GWSmith Posted August 31, 2007 Author Share Posted August 31, 2007 Here are all the components, cleaned and ready for the next step of veneer touch up and final finishing... Quote Link to comment Share on other sites More sharing options...
GWSmith Posted August 31, 2007 Author Share Posted August 31, 2007 Ok, this is where I am at as of this date and time. Bass modules are on their backs, cleaned and ready for touch up of some small nicks etc, then hand rubbed oiling should do it. The next photos over the Labor Day weekend should show the final assembly and placement. For the camera buffs, I am using a new Canon XTI (or 400D if in the UK) with the kit lens, running manual mode with auto focus with and without flash. Reducing the image from around 3 meg per. to about 180K as you may have found out by now [] Stay posted, more to come! Regards, Gary PS. Enjoy your holiday Quote Link to comment Share on other sites More sharing options...
GWSmith Posted September 2, 2007 Author Share Posted September 2, 2007 Hi there gang. Ok, the latest is, the K'Horns are back together, the wood is well oiled and looks wonderful!! I will post the photos of the project and where it sits right now. Its only a matter of hours before I hook up an amp and hear them for the FIRST time! Stay tuned! ..........Gary Quote Link to comment Share on other sites More sharing options...
fini Posted September 2, 2007 Share Posted September 2, 2007 Looks real nice, Gary! Boy, I sure hope you like how they sound...[] If you don't mind me asking, how much did the new caps cost? Quote Link to comment Share on other sites More sharing options...
GWSmith Posted September 2, 2007 Author Share Posted September 2, 2007 Hi Fini.. Thanks for the comment, I am still in a bit of a fog as to how to clean the horn grill were the actual cutout is.. There is a little bit of a stain there. I put oxy clean on a rag and rubbed gently and it really didn't seem to do much, this after vacuuming as well.. Maybe just leave them as they are I guess. Ok, the caps were around $60 I believe with shipping. Yeah, I hope to try them today or tomorrow, its only a matter of a few hours away now [] I hope I like them, they will be part of a `vintage' system with some old quad gear I bought new around 1974... All set up in a large music room with instruments etc. The dedicated theater is another room and major project about to begin. This however involves my plans with my contractor to remove slide door closet to `square up' the room. The plans are made and it is to look like an old Victorian theater. Sorry, no room for an entry foyer or popcorn machine with this one[] More here soon! .Gary Quote Link to comment Share on other sites More sharing options...
GWSmith Posted September 2, 2007 Author Share Posted September 2, 2007 FINALLY!!!!!!!!!!!!!!! I have hooked them up!! WOW! Talk about sensitivity! I am running a Marantz 4140 quad integrated amp in the 25w per.ch mode and I can't believe how much these things put out. Volume at 9 'O' clock is plenty ! I have photos and plenty of them leading up to the setup as it is now. The right speaker is in the corner as far as I can get it, prohibited by a baseboard heater. The LEFT channel has NO wall as of right now, but my contractor is ready to build a half wall for it, so I am not worried. There is a BIG difference in the bass response and for sure - between the two, and the corner placement is key as heard. I did however imagine that these speakers would be a bit midrange heavy, and I was right, the tweeter plays lower then what I am used to with my dynamic speakers. The image and soundstage is a bit on the narrow side, BUT, its all very interesting to hear, and to be listening to something that was designed so many years ago, with that in mind, they make a HUGE wall of sound [] I tried only one CD so far, one for Organ and Orchestra (Telarc) at Davis Hall San Fransisco CA. Out of time right now, got a concert to play tonight and I need to get my gear loaded and ready to hit the road. More tomorrow WITH new photos! ........Gary Very Pleased !!! Quote Link to comment Share on other sites More sharing options...
GWSmith Posted September 4, 2007 Author Share Posted September 4, 2007 Ok everyone.. Here are the latest photos from the Klipschorn project for you! These depict the final assembly of components and the cabinet rubbing etc.,concluding with the test setup - location. More to follow... ....Gary Quote Link to comment Share on other sites More sharing options...
GWSmith Posted September 4, 2007 Author Share Posted September 4, 2007 Quote Link to comment Share on other sites More sharing options...

Recommended Posts
Join the conversation
You can post now and register later. If you have an account, sign in now to post with your account.
Note: Your post will require moderator approval before it will be visible.