cueman Posted April 8, 2005 Share Posted April 8, 2005 The following posts show my homemade La Scala cabinet project. I decided to post the pictures the way I did so you can enlarge only the ones that interest you. I also found that there is a limit to each post, so I had to keep the text descriptions brief. Hopefully, the way I posted photos won't look wierd to those with different screen resolutions. The image hosting service used is not totally reliable, so if you are not getting the pics, try again at a later time. This project turned into a much bigger job than I had initially expected, but that's usually the way it goes with woodworking projects. I think the speakers turned out great. The finish isn't exactly what I wanted, but I can live with it. I used Watco Danish oil on the raw birch. The speakers also sound ten times better than the old industrial cabinets. (I suppose the satisfaction of building them myself has something to do with that) All total I'm into these speakers for about $1100, I'm happy with that. I want to thank Bob Crites for the work he did on my tweeters and checking out just about everything else except the woofers. Thanks Bob !! Enjoy the Pics !!! Quote Link to comment Share on other sites More sharing options...
cueman Posted April 8, 2005 Author Share Posted April 8, 2005 1.) Here is the unassembled pile of wood that is carefully cut to spec per the plans 2.) This is a sled I made for my table saw just for this project. It proved to be invaluable for getting accurate square cuts, especially on the larger pieces. 3.) I used my router table to clean up the baffle holes, which I first rough cut with a jigsaw. 4.) Here I am gluing the back to the first cabinet. Having a limited supply of clamps, I assembled one at a time. I spent about 3 nights assembling both cabinets. Quote Link to comment Share on other sites More sharing options...
cueman Posted April 8, 2005 Author Share Posted April 8, 2005 1.) Here I am test fitting things before gluing up. 2.) This is another jig I made to get the 60 degree cuts for the roof of the dog house. After several unsuccessful attempts at pushing the wood through by hand, it was necessary to come up with something. 3.) Gluing up the dog houses 4.) Yes, it DOES look like a dog house... Quote Link to comment Share on other sites More sharing options...
cueman Posted April 8, 2005 Author Share Posted April 8, 2005 1.) I am gluing the dog house into the cabinet. I call those brick clamps. 2.) Another shot from the back, using clamps to be sure the bottom of the dog house is glued up tight against the back side. 3.) A shot of the dog house all glued in. I also made my splitters 3" wide. 4.) On one speaker, the point came right to the edge, on the other it was back about 1/8" or so. Damn!!! Quote Link to comment Share on other sites More sharing options...
cueman Posted April 8, 2005 Author Share Posted April 8, 2005 1.) I used this soft weatherstrip to put a seal around the chamber hole before screwing down the bottom cover. 2.) Here you can see that I slightly rounded the edges of the bottom cover. They slide around real easy on the carpet. 3.) The K43 in it's new home. 4.) You can see the wood filler covering the nail holes, but only if you are looking for it. Quote Link to comment Share on other sites More sharing options...
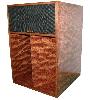
cueman Posted April 8, 2005 Author Share Posted April 8, 2005 1.) Just a close look at a finished cab. 2.) You can see the difference here after I put the Watco on one cabinet. 3.) The dog is really confused now. 4.) They are now in the house, and sounding fantastic. The pic looks like they are 2 different colors, but they're not Quote Link to comment Share on other sites More sharing options...
johnyholiday Posted April 8, 2005 Share Posted April 8, 2005 3.) The dog is really confused now. lmao, hey thats one heck of a job ,tasty indeed Quote Link to comment Share on other sites More sharing options...
jorjen Posted April 8, 2005 Share Posted April 8, 2005 Outstanding work Cueman, VERY impressive! Congrats on a job well done. One question. What was your reasoning on using the K43? Were you just looking for higher power handling? Once again, nice, nice job. Quote Link to comment Share on other sites More sharing options...
cueman Posted April 8, 2005 Author Share Posted April 8, 2005 Thanks Jordan. The reason for the K43 is that I bought these as Industrial's. I didn't care for the black utility cabinets, so the project was born. Todd Quote Link to comment Share on other sites More sharing options...
jorjen Posted April 8, 2005 Share Posted April 8, 2005 Oops! Sorry, I already knew that Cueman, slipped my mind. Quote Link to comment Share on other sites More sharing options...
cueman Posted April 9, 2005 Author Share Posted April 9, 2005 Edit. Todd Quote Link to comment Share on other sites More sharing options...
jwc Posted April 9, 2005 Share Posted April 9, 2005 Great job. When you say $1100 into them, is this the cost of the built only or did you calculate in drivers a networks. jc Quote Link to comment Share on other sites More sharing options...
lwhaples Posted April 9, 2005 Share Posted April 9, 2005 Todd,WOW! They sure look good,and if you like the sound that's all that matters. Were you able to sell your old cabinets? Or is that already part of the end cost? Enjoy! Larry Quote Link to comment Share on other sites More sharing options...
PrestonTom Posted April 9, 2005 Share Posted April 9, 2005 FANTASTIC! Congratulations. This is an inspiration. The photos and chronology make a very nice story - thanks for sharing. My two comments: 1) I also have been a big fan of the WATCO products for finishing wood. That is what I used on my raw birch K-Horns. 2) I was in Camden NJ a few years ago and next to the old RCA building. Near the top of the roof they had a window with the old advertising logo "His Master's Voice" with a depiction of the dog with his ear cocked next to the old phonograph. The photo of your dog next next to the La Scala captures that feeling in much the same way. regarding the sound improving: I remember after I purchased then refinished my K-Horns (which had been out in a barn for a few years - but not in too bad of a condition) I also noticed an improvement in the sound. The placebo effect for me was very strong. In spite of me knowing better, I swear the sound was now more "revealing and detailed" the bass was "tighter and more solid". Wait these are the phrases that folks use when they buy the esoteric (and very expensive) speaker wire.... Enjoy your fruits of your labor. -Tom Quote Link to comment Share on other sites More sharing options...
hwatkins Posted April 9, 2005 Share Posted April 9, 2005 Excellent and beautiful. Thanks for the detail and pics. Years of enjoyment are sure to follow. Quote Link to comment Share on other sites More sharing options...
Myhamish Posted April 9, 2005 Share Posted April 9, 2005 Thanks for the great post and congratulations on the beautiful job. Handcrafted articles are 'affairs of the heart' and mean so much more. Have you thought about dating and signing them, so future generations will appreciate the full story? And I love your dog being included in the pix. Well done. Hamish Quote Link to comment Share on other sites More sharing options...
cueman Posted April 9, 2005 Author Share Posted April 9, 2005 ---------------------------- On 4/9/2005 7:07:46 AM jwcullison wrote: When you say $1100 into them, is this the cost of the built only or did you calculate in drivers a networks. jc --------------------------- I mean $1100 total. I paid $800 for the Industrials, close to $200 in wood and a little over $100 in repairs. Actually I forgot about shipping on the Industrials. That was $95, so make my total $1200. I still like it!! I still have the industrial cabs. I have one member that expressed interest, I am waiting to her from him. If he passes, they will be available. I am in Arizona if anyone is close. The way the original seller shipped to me was to box them and put them on a pallet. Then he had them trucked to a terminal in Phoenix, where I went to pick them up. I only paid $95, but it cost him $148. That is for a cross country trip. It's the cheapest way to go for sure Todd Quote Link to comment Share on other sites More sharing options...
greg928gts Posted April 9, 2005 Share Posted April 9, 2005 Very nice work. They look just like real La Scalas! How did you clean up the glue where it got on the wood around the joints? I like the way the pictures came out in your posts. Greg Quote Link to comment Share on other sites More sharing options...
cueman Posted April 9, 2005 Author Share Posted April 9, 2005 ---------------- On 4/9/2005 12:15:34 PM greg928s4 wrote: How did you clean up the glue where it got on the wood around the joints? I like the way the pictures came out in your posts. Greg ---------------- Thanks Greg. I tried to clean all the glue with a wet rag before it dried. If it was an internal joint, I didn't worry about it. I think most of the pictures that look like glue is actually just wet from me wiping it down. Todd Quote Link to comment Share on other sites More sharing options...
Tom Mobley Posted April 9, 2005 Share Posted April 9, 2005 cueman, what part of Az do you live in? I'm in Glendale just north of 101 and 59th. Quote Link to comment Share on other sites More sharing options...

Recommended Posts
Join the conversation
You can post now and register later. If you have an account, sign in now to post with your account.
Note: Your post will require moderator approval before it will be visible.