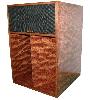
cueman Posted May 3, 2005 Share Posted May 3, 2005 So everything is going well, and the LS's are looking good. The seams in the veneer are near perfect. I take them outside to do some sanding. I fart around for a while, and 20 minutes later, I look at the veneer and there is 1/8" or more gap in the seams !!! Seems the sunlight and 90 degree weather has shrunk the veneer. Well, I put all the rest of the sheets outside so as to preshrink it. I think I may have enough to redo this one cab. It is only the 3 outside walls that have seams And the dreaded shrinkage: Quote Link to comment Share on other sites More sharing options...
Olorin Posted May 3, 2005 Share Posted May 3, 2005 Yikes! Still, that veneer pattern is stunning. What is it? Quote Link to comment Share on other sites More sharing options...
cueman Posted May 3, 2005 Author Share Posted May 3, 2005 ---------------- On 5/3/2005 5:51:34 PM Olorin wrote: Yikes! Still, that veneer pattern is stunning. What is it? ---------------- It is Bubinga. Yes I think they will be awesome when finished. I am going to trim the front edges with some Bubinga moulding which I will make from a board I picked up today. I was inspired to do this from the oak pair that was on ebay recently. I will make some bass bin grills for the sides of the doghouse as well. They have been out of the sun for about an hour, and the gap seem to be closing a little, but I doubt it will close up all the way. A tough lesson. I have quite a few hours into this one cab already. I'm just glad I haven't started the second yet. Quote Link to comment Share on other sites More sharing options...
Olorin Posted May 3, 2005 Share Posted May 3, 2005 I've never seen anything like it -- those are going to be beautiful. I hope it comes together for you. Quote Link to comment Share on other sites More sharing options...
D-MAN Posted May 3, 2005 Share Posted May 3, 2005 Holy COw! Now I know what my next set is going to have on it! Awesome! DM Quote Link to comment Share on other sites More sharing options...
r.cherry Posted May 3, 2005 Share Posted May 3, 2005 could you inlay something in the gap to look nice? some ebony strips might be tasty? with a router and a straight edge it would be easy to make that gap say 1/4 inch to 1/2 inch and lay in something that might look cool? just hate to see all that labor and nice hard work go down the potty. Quote Link to comment Share on other sites More sharing options...
D-MAN Posted May 3, 2005 Share Posted May 3, 2005 OOOOhhh! inlays or strips of ebony, thats a great idea! Now, THAT's truly AWESOME. Like a fine musical instrument, or a really fine piece of furniture. This is making me drool... STOP IT! DM Quote Link to comment Share on other sites More sharing options...
BS Button Posted May 3, 2005 Share Posted May 3, 2005 What caused this gap to occur? Quote Link to comment Share on other sites More sharing options...
cueman Posted May 3, 2005 Author Share Posted May 3, 2005 ---------------- On 5/3/2005 6:37:38 PM r.cherry wrote: could you inlay something in the gap to look nice? some ebony strips might be tasty? with a router and a straight edge it would be easy to make that gap say 1/4 inch to 1/2 inch and lay in something that might look cool? just hate to see all that labor and nice hard work go down the potty. ---------------- I could. But I don't know. It doesn't seem right when I picture it in my mind. I think it would look like I was trying to cover up a mistake. Quote Link to comment Share on other sites More sharing options...
dbflash Posted May 3, 2005 Share Posted May 3, 2005 The speakers look great. I have never done this and leave it to you pros. I have a question? Is this normal? I know wood shrinks and expands due to weather and humidity. I thoght veneer would be more stable. What kind of veneer did you use? The kind that already has glue on it and you iron it on or did you have to use glue. I have heard there is certain glue that is better for this than other types. You guys who have redone your speakers are making me want to try a tackle this, but I have so many questions. I also like your attitude. It's like stuff happens. Time for plan B. Have a problem no big deal. Please keep posting. I cannot wait to see the finished product. Danny Quote Link to comment Share on other sites More sharing options...
cueman Posted May 3, 2005 Author Share Posted May 3, 2005 I thought veneer would be more stable myself. This is raw veneer, with no backing on it. I used contact cement and was very surprised that this happened. Luckily, I have just enough veneer to redo this one. I think I will fill the gaps and just re-veneer right over the top. Scraping this stuff off is not something I want to do. I will definitely post pics of the finished product. Should be another week or so. Quote Link to comment Share on other sites More sharing options...
1BigBore Posted May 4, 2005 Share Posted May 4, 2005 However you "fix" it, I am sure that they will be beautiful. Will you use the same veneer on the endgrain, or will you do something else? This kind of art just amazes me. Please keep on posting the photos. 1BB Quote Link to comment Share on other sites More sharing options...
cueman Posted May 4, 2005 Author Share Posted May 4, 2005 I'll post a new thread with pics when I'm done. For the front grain, I bought a board of Bubinga that I will cut into 3/4' strips, and rout a rounded edge on them. I have grills for these, and will also make the side bin grills. They are coming along nicely. Quote Link to comment Share on other sites More sharing options...
ricktate Posted May 5, 2005 Share Posted May 5, 2005 Before you pull it off try heating one half up with a iron and pushing it back together ,,,might need two people to push while you heat the veneer up.Other option is pull back halves off and re-do.I also like the router and inlay idea could make it look cool with contrasting wood strip or metal.Did it pull apart on the tops to?Rick Quote Link to comment Share on other sites More sharing options...
cueman Posted May 5, 2005 Author Share Posted May 5, 2005 That's not a bad idea, but too late. I already filled in the gaps with wood filler and am going to re-veneer right over the top of this old stuff. No way I'm going to try to peel it off. That would be a nightmare. Quote Link to comment Share on other sites More sharing options...
Jim E Posted May 5, 2005 Share Posted May 5, 2005 ---------------- On 5/3/2005 11:33:37 PM cueman wrote: I thought veneer would be more stable myself. This is raw veneer, with no backing on it. I used contact cement and was very surprised that this happened. Luckily, I have just enough veneer to redo this one. I think I will fill the gaps and just re-veneer right over the top. Scraping this stuff off is not something I want to do. I will definitely post pics of the finished product. Should be another week or so. ---------------- Cueman, That bubinga is hard to beat in the looks department. With the right clear finish it will look three dimensional. Please don't use any stain on this beautuful wood. It's not the raw veneer. Contact cement is not the right stuff for veneer. Especially the water based types. Even the original contact cement "creeps". It is too bad because it looks like you did everything else right. If you want the new veneer to work you will unfortunately have to strip off all the old veneer and remove all traces of the contact cement. One word of warning. Some African and South American wood species should not be sanded without a respirator so be safe and wear a mask. Quote Link to comment Share on other sites More sharing options...
cueman Posted May 5, 2005 Author Share Posted May 5, 2005 ---------------- On 5/5/2005 10:37:08 PM Jim E wrote: It's not the raw veneer. Contact cement is not the right stuff for veneer. Especially the water based types. Even the original contact cement "creeps". It is too bad because it looks like you did everything else right. If you want the new veneer to work you will unfortunately have to strip off all the old veneer and remove all traces of the contact cement. One word of warning. Some African and South American wood species should not be sanded without a respirator so be safe and wear a mask. ---------------- Contact cement is not for veneer? Well dang that's a new one one to me. And no, I will not have to remove all of the contact cement, I have already veneered over the top of it, using - you guessed it - contact cement After further reading the directions on the can, it says not to expose to sunlight or high temperatures until after 72 hours of applying. That's where my mistake was. It may be true that contact cement is not the best for raw veneer, but it has worked for me in the past, so I stick with what works for me. Quote Link to comment Share on other sites More sharing options...
Jim E Posted May 6, 2005 Share Posted May 6, 2005 What I said was contact cement is not the right stuff for veneer. Use what you want but PVA glue is best for veneers. Before modern adhesives became available, hyde glue was the standard for centuries. Contact cement is better suited for applying laminates such as formica. I apologize for putting my 2C in. There was no intent to critique your project in a negative way. I admire your effort and was only offering a little advise from thirty five years of experiance. I hope it works out for you. Quote Link to comment Share on other sites More sharing options...
klipschaholik Posted May 6, 2005 Share Posted May 6, 2005 Jim, Why the hazard with those woods and needing a respirator to sand? Does that apply to rosewood as well? Cough, Cough, hack, hack I'm considering using the contact cement technique to finish my other lascala because of the splitting and bubbling I experienced with the heat set glue. Hmm,now what to do? Quote Link to comment Share on other sites More sharing options...
cueman Posted May 6, 2005 Author Share Posted May 6, 2005 It's true, I would at the very least wear a dust mask when working with hardwoods. When building cues, I found Cocobolo and Tulipwood to be the nastiest woods. The dust can burn the heck out of your nose. Ebony is another bad one. Jim, what would you recommend as a finish for this Bubinga, to retain the good looks of the wood? Thanks Quote Link to comment Share on other sites More sharing options...

Recommended Posts
Join the conversation
You can post now and register later. If you have an account, sign in now to post with your account.
Note: Your post will require moderator approval before it will be visible.