Rudy81 Posted March 21, 2007 Share Posted March 21, 2007 I have decided to tackle this much discussed topic yet again since I seem to be slower than most and just didn't get it. I hope this topic will help another Khorn owner who may have taken the recommendations with a grain of salt. I purchased my Khorns, used, almost three years ago. Until then I had Belles and La Scalas. I was very familiar with the bass they could produce, but was new to the Khorn. I appealed for help on the forum after first setting up the Khorns since they seemed to have considerably less bass than did my Belles or LaS. Everyone chimed in and said, "make sure the bass bin is sealed well" against the wall. I eventually built a nice set of very heavy and very sturdy false corners since my room has some limitations at the corners, and I wanted the ability to turn the Khorns and move the sweet spot further back. These corners worked very well and I did what I thought was a good job of "sealing" the tailboards. The bass did improve considerably, but I did, on occassion need my sub to supplement the Khorns when listening to bass intensive music. I use my system for both 2-channel listening and 7.1 channel movies. Overall, I was satisified, but always wondered why the bass on the Khorns was not quite as punchy as my Belles or LaS. I recently stumbled upon this thread http://forums.klipsch.com/forums/thread/831251.aspx concerning sealing the backs to mirror the look of the anniversary Khorns that come with sealed backs. I originally thought I would try to do this surgical procedure. However, after researching some old Dope from Hope articles, and many threads on this forum, I came to the conclusion that a properly sealed Khorns would sound as good or better than the surgically altered "sealed" model....which, would be a time consuming undertaking not to mention putting holes in my bass bins. So, I opted instead to make sure that my Khorns were properly sealed. While working with my false corners and a flashlight, I noticed that light was leaking along parts of the tail boards. I had stuck the flashlight near the very corner and could see some light escaping from the front side of the tail board. ???? My thought was that I had not done a good job of sealing the Khorns, and certailnly if light can escape, so could air pressure waves. I decided to use the pipe insulation others have mentioned on this forum in order to ensure and tight seal and to allow for the imperfections on my corners to be filled. After re-sealing the Khorns and ensuring light did not get through the seal, I set my system back up. This is the part that kills me. I should have done this from the start, two plus years ago!!!!! I had no idea the Khorns could go this low! Just for fun I turned on my sub as I used to before, and I could not tell if it was on or not. The bass is out of this world and has made everything I listen to that much better, more fuller and complete. Bottom line, I was stupid for not taking this sealing thing more seriously and ensuring I had a darn near perfect seal. The difference is simply dramatic. I thought I would re-visit the topic in case there is another poor soul with these magnificent speakers that is missing out on what they can do. My thanks to those who contributed to this issue in so many other threads. Quote Link to comment Share on other sites More sharing options...
DrWho Posted March 21, 2007 Share Posted March 21, 2007 glad to hear things are working out for ya [Y] Amazing what a lil bit of pipe insulation will do... Quote Link to comment Share on other sites More sharing options...
Rudy81 Posted March 21, 2007 Author Share Posted March 21, 2007 The differance from my other attempt at a seal has been so amazing, I had to write this thread in case it may benefit someone else. Truly, it is like I have a new pair of Khorns! Quote Link to comment Share on other sites More sharing options...
JJkizak Posted March 21, 2007 Share Posted March 21, 2007 It's a wonderment that the K-horns didn't come with the rubber or foam seals already installed, but I do remember recommendations from people to pull them away from the wall to suit your tastes. JJK Quote Link to comment Share on other sites More sharing options...
Guest " " Posted March 21, 2007 Share Posted March 21, 2007 My 1985 models came with them. Quote Link to comment Share on other sites More sharing options...
Rudy81 Posted March 21, 2007 Author Share Posted March 21, 2007 Mine also had rubber seals from Klipsch, but one set was damaged and I had to resort to a DIY situation. My first attempt failed misearably. The pipe insulation is not great on looks, but the performance is outstanding. Quote Link to comment Share on other sites More sharing options...
Cut-Throat Posted March 21, 2007 Share Posted March 21, 2007 The differance from my other attempt at a seal has been so amazing, I had to write this thread in case it may benefit someone else. Truly, it is like I have a new pair of Khorns! Did you seal the Top Hat as well? - I used some weatherstripping along the edge where it meets the wall. Quote Link to comment Share on other sites More sharing options...
Rudy81 Posted March 21, 2007 Author Share Posted March 21, 2007 I designed my false corners to go only as high as the bass bin. So, I sealed the bottom part of the top hat against the false corner. So, the folded horn is totally sealed until it leaves the confines of the bass bin on the sides. Quote Link to comment Share on other sites More sharing options...
Mallette Posted March 21, 2007 Share Posted March 21, 2007 Ok, perhaps we could lay this to rest with a post with DETAILS. I've felt my 'horns deliver bass as per the source material...but when I read these things I wonder. At least this is something one can do with little skill or financial risk. How about a drawing? Define "Tailboard" and "Top Hat." I THINK I know what these are, but using terms without definition is a violation of technical writing (which is what we are doing in some of these discussions) and prone to miscommunication. Dave Quote Link to comment Share on other sites More sharing options...
edwinr Posted March 21, 2007 Share Posted March 21, 2007 Klipsch now offer a better sealing solution for the AK5 Klipschorn. I guess with my previous Klipschorns I didn't take the corner sealing as seriously as I should have... Quote Link to comment Share on other sites More sharing options...
Rudy81 Posted March 21, 2007 Author Share Posted March 21, 2007 Ok, perhaps we could lay this to rest with a post with DETAILS. I've felt my 'horns deliver bass as per the source material...but when I read these things I wonder. At least this is something one can do with little skill or financial risk. How about a drawing? Define "Tailboard" and "Top Hat." I THINK I know what these are, but using terms without definition is a violation of technical writing (which is what we are doing in some of these discussions) and prone to miscommunication. Dave Fair enough Dave. My definition of the top hat is the Khorn section that you can remove and contains the tweeter and mid range horns, leaving the bass bin by itself. The tailboard is the lone board that is attached to the very rear end of the bass bin and snugs up against the wall when placed in a corner. In my case, I placed pipe insulation vertically along the edges of the tail board, and horizontally along the lower edge of the top hat. My test for a good seal, which you can do is to take the top hat off if you are using a room corner, place the bass bin where it normally sits and put a flashlight or some light source in the triangle created by the back side of the tail board and the wall corner. Now, go around the front and see if you can see light eminating from the vertical sides of the tail board. That is what I saw when I first did this and realized I had air leaking and figured I had to be loosing some low frequency capability. As an example of what can be heard in source material, I often listen to the Billy Cobham album "Warning". For a long time I had listened to it and felt it was all there was to hear. One day, I turned on my subwoofer to see how much punch it added to the drums, and realized that in some tracks, there was a much lower frequency drum playing in the background.....but my Khorns could not reploduce it. I spent well over a year wishing I could just use my Khorns and get that very low frequency sound. After my careful addition of the pipe insulation and after making sure there was not light leaking from the corner, I used that very album to see if there was a differance. I could not beleive what I was hearing. I actually got up to make sure my sub was off since it should not run when only listening to two channel in my setup. Sub was off and I was now hearing the very low drums as I once did with my sub. The differance was dramatic in my case. Now, you may already have a good seal and have not missed anything. I did only because I was not as careful as I shoud have been. I did not know what I was missing because no other systems I have access to can reproduce those low frequencies without sounding boomy or odd. It is very difficult to know if you are missing something or not without having another system to compare. I just lucked out with this minor discovery. Same thing happened to me when I changed my K77's to Bob's CT-125....love those high notes. See page 3 of this thread http://forums.klipsch.com/forums/3/334461/ShowThread.aspx and you will see what I am talking about. This is from some other such discussion, but a picture is worth a thousand words. Quote Link to comment Share on other sites More sharing options...
Mallette Posted March 21, 2007 Share Posted March 21, 2007 Thank you, kind sir. I have my Top Hat sealed, but not the tail board. Perhaps a fun little project for my next days off... Dave Quote Link to comment Share on other sites More sharing options...
Rudy81 Posted March 21, 2007 Author Share Posted March 21, 2007 Definately do it!!!!! $5 of pipe insulation and half an hour and you may find it to be the best and cheapest upgrade...BTW, in my previous post I added a link to a thread that has a picture of what this will look like. Also, my Khorns have a tailboard that is tapered at the bottom to accomodate wall moulding, but I don't need that since I use a false corner. So, I added a small piece of 1/8" thick oak to the outside of the tailboard so that the vertical edges would be straight and not tapered at the bottom. I now have as perfect a seal as I can make. Good luck, let us know if it makes a differance. Quote Link to comment Share on other sites More sharing options...
Dave in ABQ Posted March 21, 2007 Share Posted March 21, 2007 Great Thread Rudy! I'm overdue for some better coner sealing. One of my KHorns has only 12" of "corner" on one edge! I'm looking a building a hybrid false wall/sealed back when I finnally get some free time. Quote Link to comment Share on other sites More sharing options...
arfz28 Posted March 21, 2007 Share Posted March 21, 2007 Yep, if I said it once on this forum I have said it dozens of times. Putting pipe insulation on your k-horns and properly sealing them to the walls is the best 4 dollar tweek you can make on your k-horns. Quote Link to comment Share on other sites More sharing options...
Rudy81 Posted March 21, 2007 Author Share Posted March 21, 2007 Yep, if I said it once on this forum I have said it dozens of times. Putting pipe insulation on your k-horns and properly sealing them to the walls is the best 4 dollar tweek you can make on your k-horns. I now realize what an understatement that is. Sad part is I had read all the threads on sealing the Khorns etc, but I guess I didn't quite get how crucial it was to do properly. Quote Link to comment Share on other sites More sharing options...
shinerman Posted March 22, 2007 Share Posted March 22, 2007 Rudy, If you don't mind me asking.............What do you construct your false wall of? Quote Link to comment Share on other sites More sharing options...
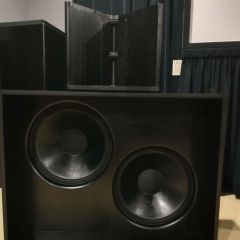
Rudy81 Posted March 22, 2007 Author Share Posted March 22, 2007 My corners are made of a 3/4" sheet of MDF sanwiched by 3/4" sheets of plywood, glued and screwed. Each side is made this way and bolted together at the corner and bolted to the floor piece which is a single 3/4" piece of plywood. Each side weighs a heck of a lot, and they are very solid. Thickness ends up being about 2 1/4". I then painted the inside of the corner black and covered it with some speaker cloth to make it all match. You can see a close up here. This picture was taken BEFORE I added the pipe insulation seals. Quote Link to comment Share on other sites More sharing options...
IndyKlipschFan Posted March 22, 2007 Share Posted March 22, 2007 I am glad my thread got people to think too. That was the purpose... It is/ was a simple mod.. I am very happy with it too. Still. Quote Link to comment Share on other sites More sharing options...
IndyKlipschFan Posted March 22, 2007 Share Posted March 22, 2007 And you will get the results of this too. Well the seald results... to be fair.. I have the AK-4 networks, not AK-5's. Quote Link to comment Share on other sites More sharing options...

Recommended Posts
Join the conversation
You can post now and register later. If you have an account, sign in now to post with your account.
Note: Your post will require moderator approval before it will be visible.