CIGARBUM Posted February 13, 2009 Author Share Posted February 13, 2009 come on Quote Link to comment Share on other sites More sharing options...
colterphoto1 Posted February 13, 2009 Share Posted February 13, 2009 1. Perfectly good shop and very nice tools 2. I like the dimensions you have selected for your Cornscalas. The 'squatty' look reminds me of a Belle somewhat. 3.You look like you know what you're doing. I like the square stiffening panels on the sides. Good idea. 4. I bumped Bob's original Cornscala 'let's build a driver test box' so you could get your history lesson on this design. Michael Quote Link to comment Share on other sites More sharing options...
Guest David H Posted February 15, 2009 Share Posted February 15, 2009 Looking good, keep it up. Quote Link to comment Share on other sites More sharing options...
jwc Posted February 15, 2009 Share Posted February 15, 2009 Well if you are into bumping old Cornscala info from 2005...... http://forums.klipsch.com/forums/storage/4/1071530/cs4.pdf http://forums.klipsch.com/forums/storage/4/1117459/woodorderallgrill.pdf jc Quote Link to comment Share on other sites More sharing options...
CIGARBUM Posted February 15, 2009 Author Share Posted February 15, 2009 Well, time for an update, didn't do much yesterday, had to take sweetie pie (GF) out. I did manage to squirt a little paint on the edges and put in the damping material. Today may be a little slow, want to watch a race on TV, and clean up the shop, I do make a mess. Quote Link to comment Share on other sites More sharing options...
CIGARBUM Posted February 15, 2009 Author Share Posted February 15, 2009 I've got what I call the riser (will go on the bottom) and the spacer that will go between the bass bin and the HF cabinet. This was done for a couple reasons,(1) it will stiffen the top and bottom of the bass bin, I have already stiffened the sides and back and (2) and it will get the centerline of dHF cabinet at ear level with my chair. Quote Link to comment Share on other sites More sharing options...
CIGARBUM Posted February 15, 2009 Author Share Posted February 15, 2009 Just another pictures of the motor boards and the backs, you see how I have stiffened the backs. I used this for the sides and backs,I really didn't want to clutter the inside of the bass bin. Quote Link to comment Share on other sites More sharing options...
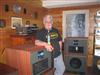
CIGARBUM Posted February 15, 2009 Author Share Posted February 15, 2009 This is the little white book that is my brains, pictures, drawing and calulations Quote Link to comment Share on other sites More sharing options...
CIGARBUM Posted February 15, 2009 Author Share Posted February 15, 2009 I did clean up a little. Quote Link to comment Share on other sites More sharing options...
bhendrix Posted February 15, 2009 Share Posted February 15, 2009 Nice work, CB!! I really like the sidewall doubler idea. Haven't seen that before. Is that your idea or did you see it somewhere else? Quote Link to comment Share on other sites More sharing options...
CIGARBUM Posted February 15, 2009 Author Share Posted February 15, 2009 It may not be my idea, but I have never seen it before. I did some calulations, bearing surface area and and stuff like that. I just didn't like the other way of putting braces on the inside, it looked like and after though. I like things neet. CB Quote Link to comment Share on other sites More sharing options...
CIGARBUM Posted February 16, 2009 Author Share Posted February 16, 2009 Been working away this morning and just wanted to pass on a couple observations in the construction. (1) Make sure you have plenty of clamps, long enought to span size of box. (2) Make sure you have a large smooth perfectly flat working surface (3) Keep the work surface clean and free of dust, wood chips or other foreign material. I have been very lucky and all the boxes have turned out to be perfectly square, make sure you measure the diagonal, they need to be the same. This thing is getting big, this is due to the fact that the components I am using are large. The CP125 tweeter is about 6.5" tall and Al's trachorns is 8.5" and leaving 1" at top middle and bottom the HF cabinet is about 19" tall. Overall height will be about 43". And it will be heavy. I will post some more pictures later today. Quote Link to comment Share on other sites More sharing options...
Guest David H Posted February 16, 2009 Share Posted February 16, 2009 This thing is getting big, this is due to the fact that the components I am using are large. The CP125 tweeter is about 6.5" tall and Al's trachorns is 8.5" and leaving 1" at top middle and bottom the HF cabinet is about 19" tall. Overall height will be about 43". And it will be heavy. Because of the size of the top cab, I had to use gussets front back and center to keep the ply straight. Quote Link to comment Share on other sites More sharing options...
CIGARBUM Posted February 16, 2009 Author Share Posted February 16, 2009 I guess I don't understand, was your plywood warped to start with? What kind of plywood did you use? The 13 ply seems pretty good, and I am using pocket hole joints, clamp it them glue it and screw it, even, flush and square. Quote Link to comment Share on other sites More sharing options...
greg928gts Posted February 16, 2009 Share Posted February 16, 2009 This thing is getting big, this is due to the fact that the components I am using are large. The CP125 tweeter is about 6.5" tall and Al's trachorns is 8.5" and leaving 1" at top middle and bottom the HF cabinet is about 19" tall. Overall height will be about 43". And it will be heavy. Because of the size of the top cab, I had to use gussets front back and center to keep the ply straight. I've had this same problem with the LS tops I've made. That's why Klipsch installed a 3" wide piece across the back, just under the top, to help stiffen and square up the back. I'll have to start doing that as well. Greg Quote Link to comment Share on other sites More sharing options...
USNRET Posted February 16, 2009 Share Posted February 16, 2009 I guess I don't understand, was your plywood warped to start with? What kind of plywood did you use? The 13 ply seems pretty good, and I am using pocket hole joints, clamp it them glue it and screw it, even, flush and square. A bonifide, degreed CE said this? Quote Link to comment Share on other sites More sharing options...
CIGARBUM Posted February 16, 2009 Author Share Posted February 16, 2009 I may put a back on mine, just to keep the dust and crap out, bugs, mice, cats,stray dogs, you know the usual stuff. USNRET - Mikey, you making fun of me again, I can't help it. Quote Link to comment Share on other sites More sharing options...
Guest David H Posted February 17, 2009 Share Posted February 17, 2009 Ok I admit it......I used cheap ply. I was not warped when it was installed, but after a few days unsupported, the center started to sagg. Quote Link to comment Share on other sites More sharing options...
Guest David H Posted February 17, 2009 Share Posted February 17, 2009 I may put a back on mine, just to keep the dust and crap out, bugs, mice, cats,stray dogs, you know the usual stuff. A stray kitten in a used set of RF-3s is a real world experiance that won me a set of Heresy II's, in the klipsch storyteller contest. The cat is fat cranky and old now. Quote Link to comment Share on other sites More sharing options...
CIGARBUM Posted February 17, 2009 Author Share Posted February 17, 2009 Can you put a back on the HF cabinet? Will it have any adverse effect on any thing? CB PS: When out to the shop, glue is frozen, guess it's too cold to do anything today. Come on warmer weather. Quote Link to comment Share on other sites More sharing options...

Recommended Posts
Join the conversation
You can post now and register later. If you have an account, sign in now to post with your account.
Note: Your post will require moderator approval before it will be visible.