WakeJunkie Posted April 29, 2013 Author Share Posted April 29, 2013 (edited) Between a sinus infection and my Daughter's birthday party I didn't work much this weekend. I did manage to have a productive Sunday Afternoon. My Daughter was my helper when I was cutting the concrete for the speaker behind the screen. I cut in a steel brick ledge on the front and back of the 12" block then cut the rest of the hole and took it out with a sledge hammer. I welded 1.5"x 1/8" flat bar between the front and back brick ledge to hold them in place. I Built a simple 3/4 plywood box for the center to sit in. It is 14.5" tall, 36" wide, and 19" deep (inside). Big enough for any forseable upgrade. Edited November 24, 2014 by WakeJunkie Quote Link to comment Share on other sites More sharing options...
WakeJunkie Posted April 29, 2013 Author Share Posted April 29, 2013 (edited) Scratch coat of morter before applying the stone. Progress on the stone is very slow... I put the bottom of the Center channel about 18" above the bottom of the screen. I just wanted to be certain that no masking would get in front of it. Edited November 24, 2014 by WakeJunkie Quote Link to comment Share on other sites More sharing options...
Moderators Youthman Posted April 29, 2013 Moderators Share Posted April 29, 2013 30 days till our visit....cmon bro...you can do it! [] Can't wait to see it in person. Quote Link to comment Share on other sites More sharing options...
WakeJunkie Posted April 30, 2013 Author Share Posted April 30, 2013 30 days till our visit....cmon bro...you can do it! Can't wait to see it in person. Looking forward to it!If the weatehr is nice we will spend the weekend wakeboarding. Otherwise we will spend it in the HT. Not a bad weekend either way. Ordered these for the fireplace and the top of the colums on each side of the screen. This one is for the fireplace mantel: Quote Link to comment Share on other sites More sharing options...
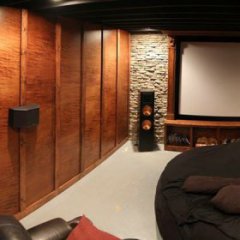
WakeJunkie Posted May 2, 2013 Author Share Posted May 2, 2013 (edited) Finally finished the stone on the screen wall. Going to the mill tomorrow to pick up some Walnut for the equipment rack faceplates. Edited November 24, 2014 by WakeJunkie Quote Link to comment Share on other sites More sharing options...
Heritage_Head Posted May 2, 2013 Share Posted May 2, 2013 Looking good man. Are the front speakers going in front of the brick? Quote Link to comment Share on other sites More sharing options...
WakeJunkie Posted May 2, 2013 Author Share Posted May 2, 2013 Looking good man. Are the front speakers going in front of the brick? Yes, only the Center will be hidden. With all the woodwork going into this room I hope to one day upgrade to a nice pair of Cherry RF-7s.Something that would be more of a showpiece in the room. I found a pair, they just cost as much as this entire project. Quote Link to comment Share on other sites More sharing options...
Moderators Youthman Posted May 2, 2013 Moderators Share Posted May 2, 2013 With all the woodwork going into this room I hope to one day upgrade to a nice pair of Cherry RF-7s. Dude, you just made my heart stop. RF-7's in your room with an RC-7....I believe you would absolutely love that setup. Something that would be more of a showpiece in the room. Showpiece of sight and sound! You know what I paid for my son's pair.....I found them once, just might be able to find them again. Might not be cherry though. If you got them at a sweet price, you could always swap them out later down the road for a cherry set. Honestly, I'm tempted to pack my RC-7 when we come up to visit so you can try it out in your system. I'm just scared it won't come home with me. [] Quote Link to comment Share on other sites More sharing options...
TasDom Posted May 2, 2013 Share Posted May 2, 2013 PM sent YM Quote Link to comment Share on other sites More sharing options...
Moderators Youthman Posted May 2, 2013 Moderators Share Posted May 2, 2013 PM replied....[] Wish I could have snagged his Parasound A23 for $350. Fantastic price. Would have been perfect for my 2ch setup. Quote Link to comment Share on other sites More sharing options...
WakeJunkie Posted May 6, 2013 Author Share Posted May 6, 2013 (edited) I had a busy Saturday in the HT. It was my only day to work down there so I hit it hard. I framed up the equipment rack, and moved the stud that would be in front of the opening where the sub will sit behind the wall. I also framed up the side walls for the small equipment closet to separate it from the workshop. Due to the AC ductwork it will be one of those duck to get in kind of closets. You can see I will have front and rear rack rails to support deep rackmount fixtures such as drawers and maybe a future Rackmount UPS. I ended up with a 47" rack. Edited November 24, 2014 by WakeJunkie Quote Link to comment Share on other sites More sharing options...
WakeJunkie Posted May 6, 2013 Author Share Posted May 6, 2013 (edited) I also built the screen Saturday. I used pocket hole joints (glued and screwed) instead of "L" brackets mainly because I already have a pocket hole jig...why buy brackets? I built it about 1" bigger in each direction than needed for 130" diagonal screen so my masking can overlap. Screen tight installed. Reinforced the corners with 1/4 plywood. Didn't get a pic, but I mitered and attached shoemolding to the front edge so the fabric would stand proud of the center supports, and I would have no edge bleed through. Edited November 24, 2014 by WakeJunkie Quote Link to comment Share on other sites More sharing options...
WakeJunkie Posted May 6, 2013 Author Share Posted May 6, 2013 (edited) This is the walnut for the faceplates of the rack. I will use the plunge router to cut out the openings exactly the size of the Xbox360, PS3, etc. This is just one pass through the plainer and wiped with a wet towel. No stain required, just some poly or maybe tung oil. Edited November 24, 2014 by WakeJunkie Quote Link to comment Share on other sites More sharing options...
WakeJunkie Posted May 6, 2013 Author Share Posted May 6, 2013 (edited) Started cutting pieces for the lower cabinet that will be below the screen. Used up the wood I had already planed, so back to the planer I went. I have a pretty large stack of oak that needs maybe 2 more passes and it will be ready to build with. Edited November 24, 2014 by WakeJunkie Quote Link to comment Share on other sites More sharing options...
WakeJunkie Posted May 6, 2013 Author Share Posted May 6, 2013 (edited) If you ever wondered how an electric screen knows where to stop here it is. On the top right you see a long slender gear. It spins as the screen goes up and down. The smaller gear on the brass threaded rod moves up and down (left to right) that rod as the long gear spins it. When it reaches the end it presses the plastic plunger with the spring into the blue NC momentary switch to break the circuit. This is repeated on flip side with another nut setting the 'up' stop point. After a bit of frustration I finally figured out that this switch had failed. luckily I was able to find one at Radio Shack last night on our way to see Iron Man 3. Edited November 24, 2014 by WakeJunkie Quote Link to comment Share on other sites More sharing options...
Sancho Panza Posted May 6, 2013 Share Posted May 6, 2013 Where's th' Cowbell? Gotta have a little more Cowbell! Quote Link to comment Share on other sites More sharing options...
WakeJunkie Posted May 6, 2013 Author Share Posted May 6, 2013 Where's th' Cowbell? Gotta have a little more Cowbell! All 5 cowbells are safely out of the massive dust zone I have created during this build.We live in the country. We even have a MSU cowbell by the back door we use to call the kids in for supper. Quote Link to comment Share on other sites More sharing options...
Moderators Youthman Posted May 6, 2013 Moderators Share Posted May 6, 2013 Nice productive weekend. It's cool how everything you do is precise and calculated. Very nice work Quote Link to comment Share on other sites More sharing options...
akdave Posted May 6, 2013 Share Posted May 6, 2013 This this thing is going to be so awesome! Thanks for the pics of your hard work! Quote Link to comment Share on other sites More sharing options...
WakeJunkie Posted May 6, 2013 Author Share Posted May 6, 2013 Nice productive weekend. It's cool how everything you do is precise and calculated. Very nice work Thanks Youth. I only have 2 Saturdays before your group gets here. Tell your kids to bring work clothes ;-)I like the way you call it "Precise and calculated" most people just call it anal. This this thing is going to be so awesome! Thanks for the pics of your hard work! Thanks Dave, It has been fun so far. I wish I could just take off work for a week and finish it. It would go faster, but all the wood is from a local kiln and I get it rough cut (except 2x4's). Wonderful wood, it just takes time to straight line and plane every board. Quote Link to comment Share on other sites More sharing options...

Recommended Posts
Join the conversation
You can post now and register later. If you have an account, sign in now to post with your account.
Note: Your post will require moderator approval before it will be visible.