jwc Posted March 11, 2009 Share Posted March 11, 2009 http://forums.klipsch.com/forums/t/58314.aspx?PageIndex=19 Quote Link to comment Share on other sites More sharing options...
rll Posted March 13, 2009 Share Posted March 13, 2009 Looking very good! This is where it really gets to be fun. I'm very happy with the way mine turned out, but I have begun thinking about a second pair of cabinets (cleaning up the one or two minor flaws) with a veneer this time. I do like the black finish, so I may go with Ash with a black stain. But I've always had a thing for Walnut, so I may go with that. Plenty of time to think it over as that will be a project for next winter. In the meantime, sometime soon I'll pick up some samples, practice techniques, and try different stains. Quote Link to comment Share on other sites More sharing options...
Deang Posted March 14, 2009 Share Posted March 14, 2009 Here you go Robert, all done. They'll ship out on Monday. Quote Link to comment Share on other sites More sharing options...
Deang Posted March 14, 2009 Share Posted March 14, 2009 ! Quote Link to comment Share on other sites More sharing options...
Deang Posted March 14, 2009 Share Posted March 14, 2009 1 Quote Link to comment Share on other sites More sharing options...
Deang Posted March 14, 2009 Share Posted March 14, 2009 2 Quote Link to comment Share on other sites More sharing options...
colterphoto1 Posted March 14, 2009 Share Posted March 14, 2009 Works of Art there Dean. Very pretty layout and I like the way you route your wiring. It's very easy to read what's going on with your networks. Looks like you took a lot of time and care in the preparation and assembly. Really nice photography too! [8-|] WOW that veneer is beautiful and equally nice job of laying out the pieces so the grain stripes are contiguous. These are going to be something to be really proud of. BTW, the stuffing is only to reduce cabinet resonances. The 'increased apparent volume' is gotten by stuffing the entire enclosure, generally only used for smaller sealed cabinets. You would normally not completely stuff a bass reflex bin. What you've done is perfect. Michael Quote Link to comment Share on other sites More sharing options...
Arky Posted March 14, 2009 Share Posted March 14, 2009 Nice Dean. Quote Link to comment Share on other sites More sharing options...
Deang Posted March 15, 2009 Share Posted March 15, 2009 Thanks guys. The pics don't really do these justice, they turned out real nice. Quote Link to comment Share on other sites More sharing options...
CIGARBUM Posted March 15, 2009 Author Share Posted March 15, 2009 Gee, Golly Wizz Dean, them sure is purdy. Can't wait. Will finish up everything else today and be ready when they get here. CB Quote Link to comment Share on other sites More sharing options...
Bacek Posted March 15, 2009 Share Posted March 15, 2009 DeanG I don't know what did you use to screw this air inductors. If screws are made of brass then ok, but if it is steel then you have changed inductance of the inductors. Quote Link to comment Share on other sites More sharing options...
JL Sargent Posted March 15, 2009 Share Posted March 15, 2009 They look like brass to me. Quote Link to comment Share on other sites More sharing options...
Deang Posted March 15, 2009 Share Posted March 15, 2009 DeanG I don't know what did you use to screw this air inductors. If screws are made of brass then ok, but if it is steel then you have changed inductance of the inductors. LOL, no worries -- I've been doing this a while. BTW, it doesn't have to be brass, you can also use stainless steel. Quote Link to comment Share on other sites More sharing options...
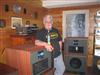
CIGARBUM Posted March 15, 2009 Author Share Posted March 15, 2009 Well we're getting down to the short strokes. Just finishing up a few last details. The grill frames are complete and Dean's crossovers will be here very soon. I would like to take this opportunity to again thank those who have contributed to my project; Dean - crossovers, Bob - woofers and grill cloth, Al - for the trachorn and the many others that have given me the necessary guidance and support. I guess the last would be to Klipsch for the inspiration to build thes speakers. There goes the pictures; Quote Link to comment Share on other sites More sharing options...
colterphoto1 Posted March 15, 2009 Share Posted March 15, 2009 GREAT photo! That should be your avatar. 'A man and his Cornscalas' Quote Link to comment Share on other sites More sharing options...
CIGARBUM Posted March 15, 2009 Author Share Posted March 15, 2009 As you can see from the last picture that I decided to run the woofer wire up the middle, hidden and I guess if you ever want to seperate the cabinets, just cut it. And yes Micheal all the screws are 305 stainless. Quote Link to comment Share on other sites More sharing options...
CIGARBUM Posted March 15, 2009 Author Share Posted March 15, 2009 So far this is the only mistake, I did not allow for the thickness of the weather stripping and the back protrudes out about 1/8" so it isn't flush Quote Link to comment Share on other sites More sharing options...
CIGARBUM Posted March 15, 2009 Author Share Posted March 15, 2009 You can see the relative size of the Cornscalas and the Belles. They are BIG AND HEAVY, that's OK Quote Link to comment Share on other sites More sharing options...
CIGARBUM Posted March 15, 2009 Author Share Posted March 15, 2009 I will have to admit, the veneering came out pretty darn nice, and I like the color, no stain, just Teak Oil. Quote Link to comment Share on other sites More sharing options...
Deang Posted March 15, 2009 Share Posted March 15, 2009 Get some of this -- it compresses. http://www.parts-express.com/pe/showdetl.cfm?Partnumber=260-540 Quote Link to comment Share on other sites More sharing options...

Recommended Posts
Join the conversation
You can post now and register later. If you have an account, sign in now to post with your account.
Note: Your post will require moderator approval before it will be visible.